Dot Mani

Too Yacht to Handle and Endless Blue Dotticure

9:00:00 AM

Good Morning and Happy Friday!  This week has been so weird because of Memorial Day!  Monday felt like Sunday, which meant Tuesday felt like Monday.  This happens to me every single time that there is a holiday that falls on a Monday and I don't have to work.

Since I thought today was Thursday, I almost forgot to schedule a post.  I also noticed tonight that I have a huge back log of posts and photos to edit.  I don't understand how I keep falling so far behind with sharing manicures.  I need to get my booty in motion.

Today I am sharing a manicure I did last week after seeing this manicure by Oh My Gosh Polish.  I loved the combination of China Glaze Too Yacht to Handle and Sinful Colors Endless Blue.  Plus the design is nothing short of amazing.  I grabbed my polishes and got to work.  Since it was late the night I did the look, I decided to skip the tape and triangle nails and just do a full dotticure.

Let's take a look!


Colors Used:
  • Sinful Colors - Snow Me White
  • China Glaze - Too Yacht to Handle
  • Sinful Colors - Endless Blue
Aren't these colors just perfect together?  I love the blue against the aqua, it's just an awesome combination in my opinion.  Too Yacht To Handle is one of my new favorite polishes.  I purchased it last winter because I missed it in all the stores last summer along with That's Shore Bright.  Sure I paid a little more than what I would have if I would have grabbed them from the local beauty store, but they were both totally worth it.  As a base an a nail art polish, it's so bright and cheerful.

Endless Blue by Sinful Colors is an amazing dupe of Essie's Butler Please.  I always kicked myself for never purchasing Butler Please because the color was to die for.  After months of being depressed due to missing out, I stumbled upon Endless Blue and couldn't be happier.  How could you go wrong with a $1.99 duplicate of a $8.00 polish?!  Plus, according to some reviews I've read, the Sinful has a better formula.  I can't confirm obviously since I don't own the Essie.


Oh how I love my dotting tools.  I honestly believe that they should be in every nail artist's tool kit.  Even though bobbing pins and toothpicks do the trick, I find a dotting tool to be so much easier to use.  If you don't have any, you can purchase the set that I have from the BornPretty Store.  For  10%, you can use the code AMBK31!

What do you think of the manicure?  Love it, hate it?  Are you a fan of the color combo?

I hope you all enjoy your weekend!  Until next time, <3.

Gradient Mani

Twinsie Tuesday: Follower Requested Manicure - Tribal Nails!

9:00:00 AM

Good morning polished world!  Hope you all had a great weekend and fabulous Memorial Day!  I spent my day outside at a barbecue enjoying the weather.  Sure, my allergies are off the wall now thanks to the pollen and the wind, but regardless, it was a nice day.

Today is Tuesday, meaning it is time for another Twinsie Tuesday.  This week we are sharing Follower Requested manicures.  Last week, I asked my lovely followers on my Facebook and Instagram what they would like to see.  I received so many great ideas which I will be writing down and using throughout the rest of the summer.

For today's manicure though, I selected @brubru_zanini on Instagram's suggestion of Tribal Nails!  I think in the time that I have done this blog, I have done one or two tribal designs, which is not nearly enough.  When I saw it, it dawned on me how many great tribal manis I've seen in the past few years that I've wanted to attempt.

Today's design was inspired by this manicure by Totally Nailed.  I loved the yellow to red gradient with the black details.  I grabbed some polishes and got to work!  Let's take a look!  Back to the outdoor photos....are we a fan?


Colors Used:
  • Gradient
    • Zoya - Darcy, Thandie, Livingston
    • INM - Northern Lights - Gold
  • Details
    • Orly - Instant Artist - Jet Black
Isn't it awesome looking?  It kind of has a Lion King feel to me.  I started off with a base coat of Zoya Darcy, from last year's summer collection.  Such a great yellow polish which isn't too bright and isn't too dark.  When my base was dry, on a make up sponge, I created the gradient of Darcy, Thandie, and Livingston.  I used a small amount of Darcy since my base was already yellow.  I then sponged the nail a few times until I got the color to look how I wanted it to.  Since the Zoya's are so heavily color concentrated, it didn't take much.

I then took my bottle of Northern Lights in gold and added a quick top coat of that to even out the gradient and add the little bit of sparkle.  I picked the gold Northern Lights because I thought it would look better on top of the yellow/orange/reds.

As soon as my polish was dry, I started painting the design on using my striper.  This was the first time that I didn't use a nail art brush to create designs.  I literally used the striper the whole time.  Big step for me!  Can I tell you how simple it was?!  I think that practice has slowly made perfect!


This was my first time doing a gradient on top of a non-white base color.  It was so much simpler than starting with a white base!  And it also had a lot less clean up!  I'm going to try this again in the future with other colors!  I hope it works!

What do you think of today's tribal design?  Love it, hate it?  Think I should do more?

Don't forget to check out the other Twinsie's posts!  Can't wait to see what their followers suggested!


Amanda at Amandalandish
Amber at Nails Like Lace
Chelsea at Nailed Blog
Elizabeth at Did My Nails
Kelly at Tuxarina
Lakeisha at Refined and Polished
Marisa at Polish Obsession
Róisín at Cuti-CLUE-les
Stephanie at A Little Polish
Traci at DrinkCitra

Again, thank you everyone who requested manicures! I can't wait to use all the ideas <3.

**Polishes in this post were provided for PR purposes.  Please see my disclosure policy**


Flowers

Poppy Nail Art For Memorial Day

9:00:00 AM

Good morning polished world and Happy Memorial Day Weekend!  Do you have any plans?  I have a busy weekend planned followed by a giant barbecue on Monday.  I can't wait, I have been craving a hot dog with some potato salad and watermelon since last summer.  It's going to be 80 degrees here on Monday so it's perfect weather for barbecue!

The barbecues and celebrations wouldn't be possible if it weren't for those we are honoring on Memorial Day.  We must not forget the brave men and women who passed away while protecting our freedoms and serving our country.  In remembrance each year, you can find veterans selling  remembrance poppies in the mall or outside of the post office.

After seeing a local veteran sitting at a table filled with remembrance poppies, I decided to attempt to paint them on my nails.  I wasn't sure where to start, so I searched "Poppy nail art" on Google and found this amazing manicure by Paulina's Passions.  I loved the look of her manicure, and since she had an easy to follow tutorial, I decided to attempt them myself!

Let's take a look!


Colors Used:
  • OPI - My Vampire is Buff
  • Mint - Sweet Liberty
  • Zoya - Tilda
  • Orly - Liquid Vinyl
I love how the poppies pop off the nude background.  My Vampire is Buff is such a gorgeous cream that I'm super happy I picked up last year.  Now that it's part of the core OPI collection at Sally Beauty, I'll be using this polish a lot more since I know I can easily access back ups.  After I applied two coats of My Vampire is Buff, I let them dry and did not add a matte top coat like Paulina did in her tutorial.

After my base was dry, I used a nail art brush and Sweet Liberty by Mint to create the poppies.  This polish is a perfect poppy orange red.  I received it last year in a Nail Art Society Kit and am kicking myself that it took this long to use it.  

As the red poppies were drying, I used Zoya Tilda to create the stems of the poppies using a nail art brush.  Then, with my base color, I created the centers of the poppies.  Then I used my Liquid Vinyl to create the poppy seeds in the center, then followed by very small dots of My Vampire is Buff on top.  I added my Out the Door top coat and enjoyed!


I love the end result of my poppies!  I wasn't 100%  sure after I applied the red base of them, but after I added the details of the centers the look really came to life!  I think they would have looked gorgeous with a matte top coat, or even if I followed what Paulina did and used the matte base then added the art on top.  I loved the contrast between matte and shiny on hers!

What do you think?  Enjoying the remembrance poppies?

I hope that everyone has a safe and Happy Memorial Day!  If you are going to drink, remember to do so responsibly.

Until next time, <3.

Dot Mani

The Beauty Buffs: Coral Trend

8:00:00 AM

Press Sample
Good morning!  Hope you are all doing fantastic today!  I'm happy to be back posting with The Beauty Buffs today!  If you haven't heard, our little group is not only on Facebook, but we're also on Instagram and Twitter!  Make sure to follow all the accounts to see all the amazing posts!

This week, our theme is coral!  Coral is one of my go-to summer pedicure colors mainly because it makes me look tanner than what I really am.  After visiting today's coral trend, I realize how lacking my collection is and how I really need to purchase more pretty corals!

A few weeks ago I received a surprise package from INM nails which contained six colored polishes which are part of their summer collection.  One of these six polishes is Pulcinella, a gorgeous coral cream.  It was perfect for today's prompt!  I grabbed a few other polishes and got to work!

Let's take a look!


Colors Used:
  • INM Nails - Pulcinella
  • OPI - My Boyfriend Scales Walls
  • Zoya - Tilda
  • Orly Instant Artist - Black
  • INM Nails - Northern Lights Gold
Isn't it gorgeous?  As I said above, Pulcinella is a gorgeous coral cream polish.  I had full coverage in two coats, but used three for this manicure.  Once dried, I added a top coat of INM Northern Lights in Gold.  Yes, that's right, gold!  I received this in my surprise package as well and was beyond excited.  I had looked everywhere for the gold version of my favorite holo top coat but could never find it.  I decided to use the gold on top of the coral because I think gold and coral create a gorgeous combination.

In comparison to the silver INM Northern Lights, I could tell that this was in fact a gold glitter on top of the coral.  I at first thought it wasn't going to show up and it was going to be a flop, but I was pleasantly surprised.  Just like it's silver sister, the gold Northern Lights gives the base polish a whole new look.  While the cream was gorgeous on it's own, it became something even more beautiful.


For the design, I decided to create roses, my favorite go-to design.  For an accent, I added a polka dot nail since we all know I love polka dots.  I really loved this manicure and how it turned out.  I think the Zoya Tilda leaves are gorgeous against the bright coral rose.

What do you think?  Fan of this coral?  Did you know that INM made cream polishes?

I can't wait to play around with the rest of the INM polishes!  So many nail art ideas floating around in my mind!

Don't forget to check out the rest of the lovely ladies Coral posts!


An InLinkz Link-up

Until next time, <3

**Polishes used in this post were provided for PR purposes. Please see my disclosure policy**

Incoco

Twinsie Tuesday: Re-visit a Prompt!

9:00:00 AM

Press Sample
Hello there everyone!  How are you all today?  It's Tuesday so that means it's time for another Twinsie Tuesday!  This week our prompt is to re-visit a past post we loved, hated, or had to miss.  Since I missed applique week a few weeks ago, I figured I should re-visit that prompt!  Perfect timing as well since I just received some appliques from the Incoco Metropolis collection for Summer 2014!

It was difficult for me to pick one applique from the five that I was sent because they all were so pretty!  For today's post, I decided to go with the City Girl appliques which are a light silver base with different black and grey designs and writing on them.  Totally a design I could never accomplish on my own with nail art brushes, so it really stuck out to me as a unique design!
Let's take a look!


Compared to my last experience with Incoco appliques, I found these to be much easier to use.  Maybe it's just me and practice is starting to make perfect.  Regardless, they were easy to use.  I really loved that not all the nails were the same in this pack.  There is one design which was too big for my nails which was a silver nail that said "Fashion" in a chevron pattern which was to be worn at the cuticle.  It looked really cool and I wish it would have fit my nails!

My only complaint regarding these appliques are that they are kind of sheer.  You can sort of see my nail line in a few of the photos.  If I were using a silver base, I typically use 2 to 3 coats because I dislike that "smile" line.  The designs are so busy though that you can't really tell, it was just something I noticed.


As you can see from looking at my pointer and middle finger, I still need a little more practice getting my appliques to lay flat.  Any tips on how to do so?  For some reason these are always the two nails I have the most trouble with.

Do you like the appliques?  Think they're a fun design you would  wear?

If you want your own pack of Incoco City Girl appliques, you can purchase them here for $8.99!  Make sure to check out the rest of the Metropolis collection while you're there!  I hope to have the rest of the appliques posted on the blog in the next week or so!

Don't forget to check out the other Twinsie's posts!  Can't wait to see what everyone revisited!


Amanda at Amandalandish
Amber at Nails Like Lace
Chelsea at Nailed Blog
Elizabeth at Did My Nails
Kelly at Tuxarina
Lakeisha at Refined and Polished
Marisa at Polish Obsession
Róisín at Cuti-CLUE-les
Stephanie at A Little Polish
Traci at DrinkCitra

OH! Before I go!  Next week our prompt is Follower Requested Manicure!  If you have any ideas, please leave them in the comments or connect with me on one of my Social Networks!  I'll be posting something on IG in the next few days as well!

Until next time, <3.

**Appliques were provided by Incoco for review. Please see my disclosure policy**

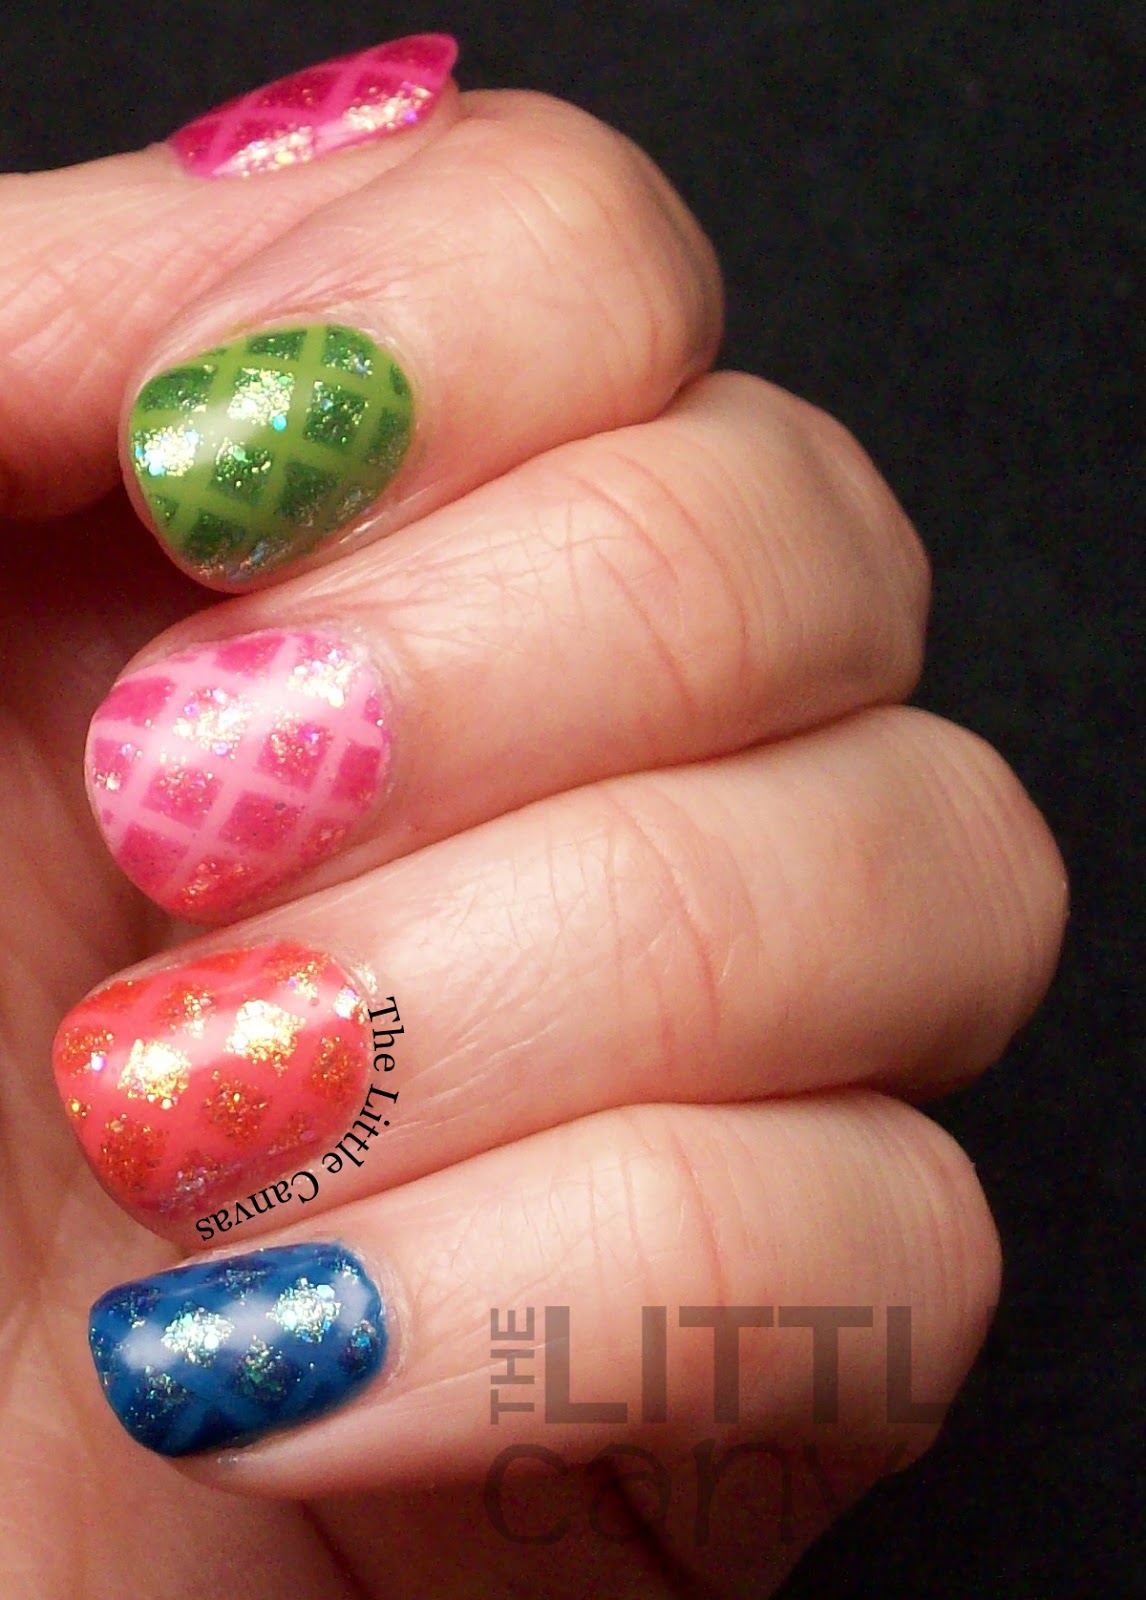
Tape Mani

Zoya Tickled and Bubbly Tape Manicure

9:00:00 AM

Press Sample
Happy Sunday Polished World!  Hope you all are having a fantastic weekend!  Today I'm bringing you a manicure that I wasn't too fond of when I had it on, but now after editing the photos and revisiting it for today's post, I'm really enjoying it!  It is a manicure I did using the new Summer 2014 Zoya Tickled and Bubbly collections.  The Tickled collection contains six gorgeous full coverage creams, and the Bubbly collection contains six amazing glitter polishes which build to be full coverage in two coats.

When I received the polishes, I was so overwhelmed by the gorgeousness of the collections that I didn't know which ones to use first.  Since I couldn't decide, I thought it was only appropriate to do a skittle manicure using ten of the twelve polishes from both collections!

I decided to do a criss cross quilted tape manicure.  The idea in my head was better than on the nail, but still was a decent manicure.  Let's take a look!


Colors Used:
  • Pointer
    • Zoya - Tilda and Stassi
  • Middle
    • Zoya - Kitridge and Binx
  • Ring
    • Zoya - Wendy and Jesy
  • Pinkie
    • Zoya - Ling and Muse
  • Thumb
    • Zoya - Rooney and Harper
Aren't the colors gorgeous!?  I think that my pinkie finger is my favorite since I am sucker for a blue polish.  Ling is such a perfect blueberry blue that my collection was lacking and I'm so happy to have.  Muse was just a gorgeous topper as well.  I don't know how I've survived so long without blues like these.  Not too fond of the name "Muse" though....who's name is Muse? lol

All the cream polishes from the Tickled collection applied perfectly with two coats.  I could have gotten away with one coat of Rooney and Ling, but went for two to make sure that the colors really popped.  It might have been me, but I swear that the brushes seem to have gotten a tad larger than previous collections.  Again, probably just me, but they are so easy to work with.

The Bubbly polishes are great toppers.  I used two thin coats over the tape and as you can see had great coverage.  I'm 100% positive that they would have full coverage on the naked nail in two coats as well.  They are beyond sparkly as well.


The best part of the Tickled polishes is that they did not stain.  That's right, no stains!  I was certain that Tilda and Ling were going to destroy my nails because of the saturated green and blue, but when I say no stain, I mean it.  I couldn't be happier and will be using these over and over again!

What do you think?  Fan of the Tickled and Bubbly collection?  Fan of this tape design?

Hope you all have a great day! Until next time, <3.

**Polishes in this post were provided for review.  Please see my disclosure policy**

Flowers

Cherry Blossom Nail Art with Zoya Dillon

9:00:00 AM

Press Sample
Good morning polished peeps!  Almost didn't get this post up because I forgot I didn't finish editing the photos.  So I finished the editing process while I was painting my nails at midnight.  As I type this, I have one more nail to do.  It's been so hot and humid here that my nail polish is all funky and I'm having the worst time getting everything to lay evenly.  There are so many bubbles.  Ugh.

Anyways, today's manicure was done before the humidity set in.  Last week I decided to do some cherry blossom nails since all the cherry trees were blooming.  This week the petals are beginning to fall off as the crab apple trees are beginning to bloom.  Last year I really wanted to create this manicure during this time of the year, but sadly ran out of time.

So here I am this year painting a pretty cherry blossom manicure using the gorgeous Zoya Dillon as a base.  I've never seen this design with a shimmer base, and now after doing it, I love it so much more than those with the cream base!

Let's take a look!  Yes, indoor photos, this is the time of year where I'm going to be switching back and forth a lot!


Colors Used:
  • Zoya - Dillon
  • Zoya - Louise
  • Sally Hansen - Pink Blink
  • OPI - Hey Baby!
Zoya Dillon is from the Spring Awaken collection.  It is a gorgeous shimmery mint polish which applied perfectly in two coats!  I'm not sure why it has taken me so long to use since mint is one of my favorite colors.  If you love anything mint, then this polish is a must have for your collection.  It is so different compared to anything else I own.  I can't wait to use more of it!

After applying two coats, I took my nail art brush and created the branches using Zoya Louise, a dark brown polish from the Cashmere collection.  When I received this polish last year, I honestly thought I was never going to use it.  After using it as a base for different designs and as a nail art polish, I'm in love.

After my branches were done, I used my small dotting tool and created the blossoms on the branches.  When they were dried, I took a smaller dotting tool and added the darker pink middle.


As I said before, I love the look of this design on top of the shimmer base.  I think it really adds a dimension that the cream designs don't have.

What do you think? Loving Zoya Dillon?  Have you ever done cherry blossoms on your nails?

Well lovelies, I am off!  I'm sorry the posts seem rushed and sloppily together lately.  I apologized last post that I have slacked on responding to comments, and I'm here again to say I'm sorry.  I will be responding soon, I promise.  I'm setting time aside this weekend to focus on the blog, revamp it a tad, and create a posting schedule!

Don't forget I'm hosting a giveaway for Piggy Paint polish which closes Monday!  Click the image in the upper right hand corner to be directed to the Rafflecopter post!  Good luck!

Until next time, <3.

**Some polishes used in this post were provided for PR purposes.  Please see my disclosure policy**

Gradient Mani

Twinsie Tuesday: Bubbles

9:00:00 AM

Hello there!  How are you all today?  I'm doing well since the weather has been great outside!  Funny how much the weather can change a person's mood!  I'm also doing well since it is Tuesday and I'm here posting again as part of Twinsie Tuesday.  Sorry to sit out last week ladies, but I was just swamped.

Today's prompt is "bubbles".  Honestly, hated this week.  I had a really great idea for a manicure, tried to get it to work for almost two hours and finally gave up.  Then I went on to my next manicure and banged it out in twenty minutes at midnight.  It was such a mess. I was going to use it for today but when I got around to photographing it this weekend, it was a shrunken bubbled mess.  Actually the top coat bubbles probably would have made it perfect for today's theme.

So I took them off and decided to sit down and do a third manicure.  At this point I was totally defeated and had no idea what to do.  After sitting out last week, I couldn't sit out again, so I pushed through.  I found this tutorial on YouTube and thought it looked simple enough.  After all I finished, I sat back and really wasn't too happy.  I think it was due to the whole frustration of getting to this final mani.

Time to take a look.  Ignore the awfulness of the manicure and let's look at the positive: I was able to take photos outside again!


Colors Used:
  • Gradient - A Zoya Rainbow!
    • Zoya - Livingston, Thandie, Darcy, Tilda, & Ling
  • INM - Northern Lights
  • Orly Instant Artist - White
Just like the YouTube tutorial, I started by creating a rainbow gradient.  I decided to use my Zoya creams since they are so bright and saturated.  I'm in love with Tilda and Ling from the new Summer Tickled collection.  I'll have a review of those later this week when I'm not in such a mopey mood regarding a manicure.  Just know I love my Zoya's and have absolutely zero hate for them.  Seriously, look at how bright and perfect the gradient is!

I then topped the gradient off with a top coat of INM Northern Lights because a rainbow gradient isn't complete unless it sparkles.  Plus it quickly dried my gradient so I was able to move on to my next step which was freehanding all the damn bubbles on my nails.  I did this using a nail art brush and my white Orly Instant Artist polish.  After they were dried, I added a quick top coat and called it a night.


Not the neatest manicure I've done.  Maybe it is and I'm just being tough on myself due to the stress of it all.  Regardless, I completed bubble day!  I should have just put a Zoya Bubbly on my nails and drew a bubble in the lower corner or something.  Oh well.  It's done, and I can move on! lol

Don't forget to take a look at the other Twinsie's this week!


Amanda at Amandalandish
Amber at Nails Like Lace
Chelsea at Nailed Blog
Elizabeth at Did My Nails
Kelly at Tuxarina
Lakeisha at Refined and Polished
Marisa at Polish Obsession
Róisín at Cuti-CLUE-les
Stephanie at A Little Polish
Traci at DrinkCitra

I apologize for not replying to comments lately.  I've been kind of busy with a few things but I do read each and every single one as they come in and I appreciate all your kind words!  I will get to replying and commenting on other blogs this week!  I swear it!

Until next time, <3.

Fun and Random

Converse Nail Art Take 2 + Tutorial!

9:00:00 AM

Hello polished world!  Happy Saturday!  As I write this post, I'm not a happy camper about my current manicure which is going up on the blog later this week.  If I have time this weekend I most likely will re-do it.  It got super hot here all of a sudden, and with that all the formulas on my polish I swear changed and it's frustrating me.  Maybe it's mind over matter, but I swear it's the humidity.

So, to make myself happy, I am sharing one of my all time favorite manicures that I have re-created.  This manicure being the converse nails!  I originally did converse nails when I first started blogging.  To this day, it's one of my most popular posts, and the pictures are unfortunately the most stolen.  Due to it's popularity, I really wanted to re-create the design and see how my skills have improved.  Then maybe people could start sharing a better version of the ones that are kind of a huge mess.

Earlier this year (literally I think I did these in February or March), I finally got around to doing the design.  Due to other things going on with the blog, they were put in the drafts folder and kind of forgotten about, until now!  Plus it's perfect since now that it's warmer I'm living in my Converse.

Let's take a look!


 Colors Used:
  • China Glaze - Splish Splash
  • China Glaze - That's Shore Bright
  • Orly - Oh Cabana Boy
  • China Glaze - Flip Flop Fantasy
  • China Glaze - Too Yacht To Handle
  • Orly Instant Artist - White
  • Orly Instant Artist - Black
Tutorial Time!  At the time I did this post, this was my first tutorial using the nail art wheel.   I think I've gotten a little better creating them since this! 


  1. Start off with a base coat of your favorite neon polish.  For this tutorial, I used Orly Oh Cabana Boy.  You could also use a black polish for a traditional Converse look.
  2. With a white striper, create a white line across the nail.
  3. Fill in the tip of your nail with a white polish.
  4. With a dotting tool, create six dots on the nail for the shoe's eyelets.
  5. With the white striper, create the laces.
  6. After the laces are drawn in, with a dotting tool, create the black dots in the eyelets.
  7. With a black striper, create the black U on the shoe's toe.
  8. Finish off with a top coat and enjoy!

These make me so happy.  I love my Converse and  I really wish I had a pair in all these colors.  Especially that mint on my pinkie finger.  It would make me so happy, especially since I'm mint obsessed lately.  I noticed on Converse's website that you can create your own Chuck's now and I might have to do that for my birthday.  If I do, you can bet your booty that I'll create a manicure to match them.

What do you think?  Better than the first attempt?  Will you re-create the look?

As a reminder, if you are going to share my image, please do NOT remove my cuticle watermark.  I work hard on my nails and this blog, and it is upsetting when I see my nails appearing on other people's Instagram accounts with no credit, or my favorite 'Look at my nails" caption.  Myself, along with other bloggers, put a lot of time into our sites...it truly is a labor of love.  So please, give credit where credit is due.

Until next time, <3.

Flowers

The Beauty Buffs: Radiant Orchid

8:00:00 AM

Good morning polished world!  How are you all today??  I'm doing fabulous since the weather is finally turning into Spring like weather.  I planted some seeds for the garden, my strawberry plant has come back in full force and has some flowers on it, and the leaves are coming back on the trees.  That means I'll be back to taking photos outside in no time!

I'm also fabulous since I'm back posting with The Beauty Buffs.  I had to skip the yellow theme two weeks ago since life got kind of hectic with Easter.  I was upset because I was excited to explore my yellow collection since it really isn't a color I use typically as a base.  For nail art though, it definitely is a go to color, and is even used in today's nail art!

Today's theme is Radiant Orchid which is Pantone's color of the year!  Purple is one of my favorite colors, so when this color was announced at the beginning of the year, I was thrilled.  To me, it makes up for last years color being Emerald.  Earlier this year I did a radiant orchid gradient for Twinsie Tuesday's seasonal gradient prompt, and sadly have yet to revisit the color until today!

For today's look, I decided to attempt orchids, which kind of turned out looking more like those morning glory vine flowers.  Despite that, it is a cute manicure using one of my favorite bright radiant orchid shades, China Glaze That's Shore Bright.

Let's take a look!


Colors Used
  • China Glaze - That's Shore Bright
  • Sinful Colors - Snow Me White
  • Zoya - Tilda
  • INM - El Sol
  • INM - Northern Lights
Isn't That's Shore Bright a gorgeous shade?  This polish was released last summer as part of China Glaze's neon collection.  I could not find this polish anywhere last year and was so upset, it was a color I needed in my life badly.  I tracked it down on HB Beauty Bar and snagged it along with a bottle of Too Yacht to Handle.  Many girls in the blogging world complained about the formula of this polish, and I honestly do not have a single problem.  Yes, it's a little streaky, but what neon isn't on first coat?  It evened out perfectly in two coats, and I used three to really make the color pop.  It dries kind of chalky, which was another complaint last year, but it's a neon, so to me that's kind of expected.  While this color is gorgeous on it's own, I added a top coat of INM Northern Lights because you can never go wrong with a holo glitter top coat.  Goodness I love it.


For my orchids, I went rather simple.  After doing the base coat of white polish, I used my medium dotting tool and created three dots along my nail.  I did them kind of in a curved form because orchids grow curved on their little vine.  Once my purple orchids were on the nail, I took Zoya Tilda from the new Tickled collection and created the vines.  Tilda is such a perfect green....but I will save that review for another post.  Before adding a top coat, I dotted in the centers of the orchids.

Do you like the manicure?  Think it's cute?  Do you think they look like normal vine flowers instead of orchids like I do?

What I really love about radiant orchid is that there isn't just one purple that fits the radiant orchid description.  Both Sephora and Zoya have pages on their sites which categorize all the radiant orchid polishes that are for sale.  Sephora's page can be seen here, and Zoya's here.  Nail It! magazine also had an article which helped readers figure out which polishes were radiant orchid as well.  That article can be seen here.  See how there is not one set radiant orchid color?

If are overwhelmed by the all those different radiant orchid shades that those sites listed, then I suggest taking a look at All Lacquered Up's Radiant Orchid Madness!  This was such an awesome feature Michelle had on her blog where radiant orchid polishes went head to head until one was crowned a winner.  Set up similarly to the NCAA March Madness, she used a bracket system and followers voted for winners.  In the end, Zoya Perrie was crowned the Radiant Orchid winner!  Such a neat idea to see all different radiant orchid polishes and see the overall results.  I hope she does this every year!

I have done a lot of babbling today!  I'm off to look at the other posts for the day!  Hope you join me!! :)


An InLinkz Link-up

Until next time, <3.

Twinsie Tuesday

9:00:00 AM

Hi everyone!  I'm sorry to say this week I am sitting out of Twinsie Tuesday.  My hours at work have increased a tad so some aspects of the blog have been put on the back burner.  While I do have quite the back log of nails to share with lovelies, I don't have anything to match this weeks theme which is nail appliques.  A few months ago, I shared a few different Incoco nail appliques on the blog.  If you would like to see those posts, click here!

Make sure to check out the other lovely ladies posts!  Can't wait to see everyone's manicures!


Amanda at Amandalandish
Amber at Nails Like Lace
Chelsea at Nailed Blog
Elizabeth at Did My Nails
Kelly at Tuxarina
Lakeisha at Refined and Polished
Marisa at Polish Obsession
Rachel at Top Coat It
Róisín at Cuti-CLUE-les
Stephanie at A Little Polish
Traci at DrinkCitra

I will be back tomorrow posting with The Beauty Buffs!  Until then, <3.

Giveaway

Piggy Paint Tape Manicure! and Giveaway!

9:00:00 AM

Press Sample/Sponsored Giveaway
Happy Monday polished world!  Hope you all had a fantastic weekend!  I'm starting off this week with a review of a new polish for me, Piggy Paint!  Piggy Paint Natural as Mud polish is non-toxic, odor less, and kid friendly.  This all natural polish was created by a mother of two young girls.  One day while the girls were painting their nails on a foam plate, the solvent based polish that they were using began to bubble and eat away at the plate.  After seeing how harmful these polishes can be, Piggy Paint was born!

I am a girl who has many allergies, one to Formaldehyde Resin which can be found as an ingredient still in some solvent based polishes, including SOME OPI (mainly old core colors).  My most recent OPI with this ingredient on the label was Miss You-niverse from the Miss Universe 2013 collection.  While people say "Oh this isn't the same formaldehyde that was the dangerous one" it still causes me to have horrible rashes.  All polishes I purchase and use are 3 or 5 free.  I love companies such as Zoya, Sally Hansen, Orly, and Sinful Colors because I always know that the chemicals I have a problem with won't be in there.

When I was contacted by Piggy Paint, read a little bit about their company/polish, I became ecstatic to try the brand.  A polish that promises to be odorless and all natural....come on, that is amazing!  Don't get me wrong, I love my polishes, but sometimes the smells can give me a migraine.

The company sent me the Make it Last set which had a Basecoat and Topcoat along with the Birthday Bash set which contained three polishes.  The packaging was so adorable, you must click here to see!  I wanted to use all three polishes for today's design to really test them out with nail art while reviewing the application on the nail itself.  I have seen a tape manicure floating around Instagram by lots of girls which I thought would be perfect for an accent.

Let's take a look!


Colors Used:
  • Piggy Paint - PINKie Promise, Groovy Grape, Sea-quin
  • Sinful Colors - Snow Me White
Now, if I had a white polish from the brand I promise I would have used that for the base of my funky accent.  For my accent nail, I obviously started off with a base coat of white polish and let that dry.  For that nail, I used my normal Nicole by OPI Base Coat Plus.  I did this so I could compare the wear between my regular polish and the Piggy Paint.

While my white was drying, I applied the Piggy Paint base coat to my other nails.  This kind of had a light odor to it.  It kind of smelled like when you clip geraniums in the garden.....weird smell to recognize,but that's really what it reminded me off.  After about 60 seconds, my nail wasn't shiny like it is with my usual base coat, but more buff looking.  I then applied a thin coat of each of the Piggy Paints.  I started with Sea-quin on my pinkie because look at that color.  A gorgeous teal blue polish which really had full application in one coat.  I did apply another though after waiting 60 seconds, which made it really pop.

The second nail I did was Groovy Grape on my middle finger.  This is such a fun shimmery purple shade.  It applied better than most of my shimmer polishes and left no brush marks on the nail.  I used three coats above.  The last nail I applied was PINKie Promise, a really fun bright pink.  This one gave me a tad bit of trouble.  I had to use four coats because it applied a little streaky.  My swatch is a tad bumpy because I got impatient and kind of started layering it on thick to get it to even out.  The color was worth it though because it was so bright and cheery.  I added the Piggy Paint top coat on top of all the nails and let them dry while I played around with my accent nail.


Goodness gracious was this accent nail a pain in the behind to do.  So many pieces of tape!   I had to do the middle section first, remove the tape, then do the outer edges.  In total, about little 21 pieces of tape were used.  Piggy Paint though was AMAZING when it came to nail art!  The polishes are so color saturated that I didn't have to fill in the little squares numerous time.  One dot with my dotting tool and each "well" was filled.

I had a hunch that they would be similar to my Orly Instant Artists which are also water based.  When I messed up the first time with the tape, I already applied some color.  I took a damp napkin, and sure enough, the design wiped right off and I was able to start over without damaging my white base.

Wear time: same as my regular polish which really impressed me.  On my right hand, two of my nails popped off but it happened to my chemical accent and one of my Piggy Paint nails, so it's not like it was one or the other.  Just a weird thing that's been happening lately.

What do you think?  Liking the tape manicure?  Loving the colors?

I LOVED this manicure.  I love everything about Piggy Paint.  Minus that base coat, the polish truly was odorless.  I could have painted all night!  They have a variety of colors and gift sets which would be perfect for any polish enthusiast, no matter the age.  The bottles retail for $8.99 each, but if you use the promo code piggypaint5, you will receive 15% off your entire order until June 30th.

That's not all!  The awesome people at Piggy Paint are offering my readers a giveaway of their Little Miss Firecracker Gift Set!  This set retails for $24.99 and contains Sometimes Sweet, Glitter Bug, and Tea Party for Two...perfect colors for Fourth of July, which will be here before we know it!  A winner will be selected on May 19th, so you ladies have two weeks to enter!


a Rafflecopter giveaway

I hope you enter and try out this amazing brand!  I think it is great for any of those polish mommies who want to paint their itty bitty's nails, as well as their own!  Their site has some amazing little tips to make nail polish time a learning time as well.  It's really awesome!

Well, I have babbled enough today, until next time, <3.

**Products in this post were provided for review, please see my disclosure policy**