Dot Mani

The One With the New Years Eve Manicure and ILNP Versailles

9:00:00 AM


Good morning polished world!  It's New Years Eve!!!  And it's rained consistently for the past 48 hours.  Great way to end the year by raining the whole way right up until the end.  Mark my words, we will probably start the New Year off with flooding, maybe an ice storm, and then a lovely winter storm.

Minus the weather, I'm kicking off the New Years right by having a wonderfully, golden, holographic manicure.  Before Christmas, I purchased four new bottles of ILNP, one being the beyond gorgeous Versailles.  My whole plan was to use this polish for Christmas manicures, until I realized it was the perfect polish for NYE.

Let's take a look!


Colors Used:
  • ILNP - Versailles
  • ORLY - Liquid Vinyl
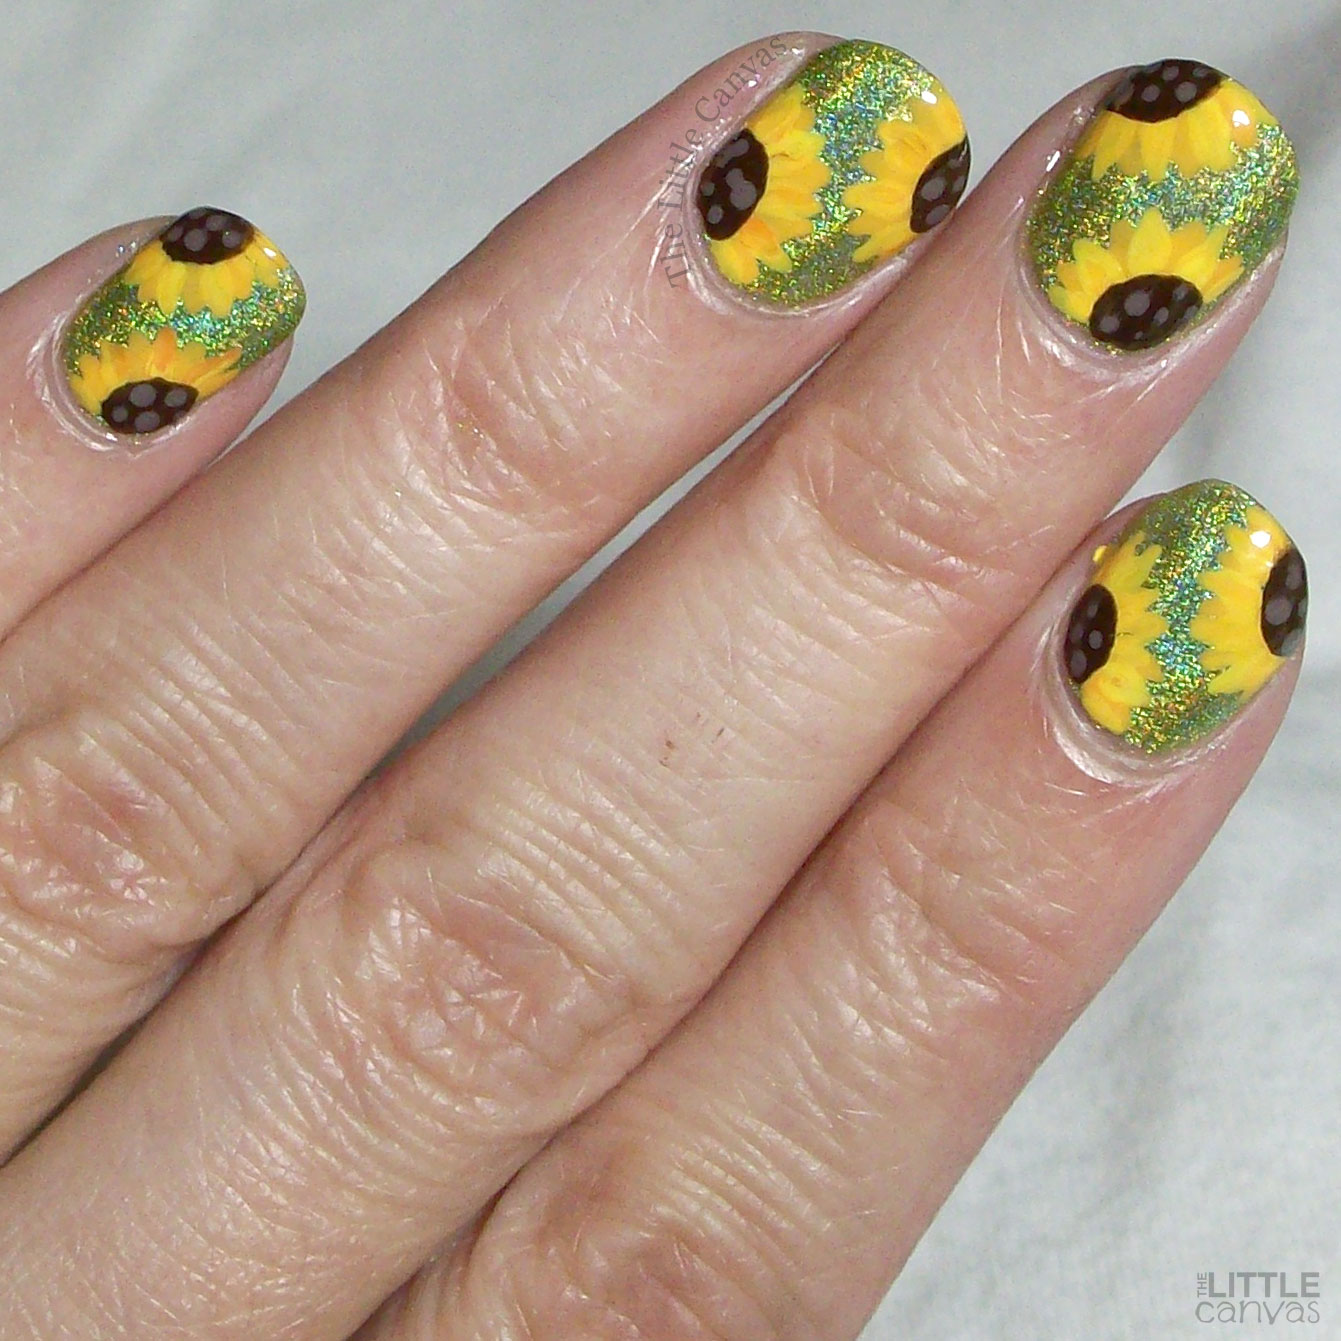
Isn't this the most gorgeous, beautiful, gold holographic polish!?  This polish reminds me of the gold version of Mega X, my favorite silver holographic by ILNP.  Two coats and gorgeous color.  I have received so many compliments on this polish because it catches the eye with the holo.


My favorite thing about this polish; the way it did a glitter gradient!  I've never used any of my ILNP polishes for a gradient until now.  I'm truly kicking myself that it's taken so long because it's such a stunning effect!  I cannot wait to do this with my others.

What do you think?  Fan of this New Years look?  Loving Versailles?

Happy New Year, everyone!  See you in 2020!

Christmas

The One With the ILNP Christmas Manicure

9:00:00 AM


Good morning Polished World, and Merry Christmas!!!!  Hope you all are having a wonderful day with your loved ones!  Let us not forget all of those who are working today at hospitals, nursing homes, fire departments, and police departments!  Thank you all for your continued service to our communities.

Today's manicure was one I really was lazy about and was about two seconds from not even posting because I was just that tired from Christmas Eve to edit the photos.  The reason I forced myself to post was not only because I love the manicure, but I had to share the gorgeous ILNP Christmas polishes I bought this year.  I'm kicking myself that I didn't use them sooner.

Let's take a look!


Colors Used:
  • ILNP - Say Love
  • ILNP - Christmas Cookie
  • ILNP - Versailles 
  • ILNP - Lucky One
  • Serendipity Polish - Sunshine Rainbow
Yes, I know, I'm an idiot for covering up the beauty that is Versailles, but I wanted a little more of a glittery gem look on that nail for Christmas.  Any other time, I would have left it alone.  Two coats of that gold beauty and I had the BEST holographic gold accent.  Adding a thin coat of Sunshine Rainbow by Serendipity Polish really added a whole new dimension to the polish.  Part of me kind of wished I did an accent of Lucky One, the gorgeous green I used for the dots, but I like the gold accent.  I think it added a little something.

The main reason that I kind of kick myself that I didn't accent with Lucky One is because it probably would have blended in Christmas Cookie a tad better.  This polish though is amazing.  A white crelly with the most delicate mixture of red and green glitters.  I was so obsessed with the Say Love and Lucky One dots that I was half tempted to just do a full dotticure.  Maybe next year.


Say Love.....that gorgeous, GORGEOUS, deep red holographic polish that I have been searching years for.  This is the ABSOLUTE best Christmas red.  It reminds me of Dorothy's red ruby slippers.  It's just so flawless.  Two coats, full coverage, and just like all of Barbara's polish, the strongest holographic effect.  If the snowflake design looks familiar, it's because it is a re-creation of one of my designs from last year, just switched up all the other nails.

Looking at it again, I kind of do wish I accented with Lucky One.  Hmm.  Next year, right?

What do you think?  Loving the Versailles accent nail or do you think I should have done Lucky One?

Again, I hope you and yours have a very blessed Christmas!!

Now, onto New Years manicures.....where did my bottle of Versailles and Mega X go?

Until next time, <3.


Christmas

The One With the Annual Christmas Lights Manicure

9:00:00 AM


Good morning polished world!  How are you all doing on this last Sunday before Christmas?  I am behind in my Christmas manicures because I felt like I was coming down with a cold, so I decided to spend the last few evenings laying low and resting.  Good news is, I think I warded it off!  Still taking zinc around the clock, but I'm pretty sure if I didn't rest, I would have had a full blown cold by now.

Regardless, I probably am going to end up sick because it went from 8 degrees to a forecasted 40 degrees today.  Of course, right before Christmas, my dreams of a white Christmas are melting away.  Hopefully the temperature plummets and we get some snow before Wednesday.

Today's manicure is my annual Christmas light design.  This is one that I have done since I started this blog oh so many years ago.  I've created the design on a white base, glitter base, holographic base, and a negative space base.  My favorite though has to be the gradient with a shimmer base because it really gives that illusion of Christmas lights on top of snow.  Nothing is prettier than when the snow falls on the lights and they melt through causing a gorgeous colorful glow.

Let's take a look!


Colors Used:
  • Morgan Taylor - I'm Drawing a Blanco
  • ORLY - White Tips
  • INM - Northern Lights
  • Acrylics
Last year, I created this design on top of a negative space where I added I'm Drawing a Blanco to the gradient.  I had a love hate relationship with the negative space because I felt like where the gradient met the naked nail, it looked a tad yellow.  Therefore, this year I decided to do a sheer base of I'm Drawing a Blanco to really give a shimmery snow look before adding the stark white gradient.  Overall, I was very pleased with the outcome.


This is also the first year since I started blogging where I fit all four colors on each of the nails.  It was a bit tricky on that pinkie nail, but look at me go!

The hardest part of this design has to be painting the lines.  My OCD really got to me and I erased them a dozen times before I settled with something I like.  When the nails were lined up, the wire really looked like it flawlessly connected from nail to nail. 

What do you think?  Perfect for Christmas?

Now to paint my final Christmas design!

Until next time, <3.

Christmas

The One With the Buffalo Plaid and Holly

9:00:00 AM


Good morning polished world!  How are you all doing on this fine Sunday morning?  Yesterday it poured all day then turned to a very, heavy, wet snow.  While I hate the heavy, wet snow, I am hoping this means we are on our way to a white Christmas.  Nothing is prettier than Christmas lights underneath some white, fluffy snow.

Today's manicure is a new one for me.  Usually each Christmas I re-create past designs, but I can safely say that I have never once attempted this design.  Okay, the holly I've done, but this combination....all new.  I was scrolling through Pinterest for some inspiration and found this design and fell in love.  I then decided to start researching how to do a free hand buffalo plaid, practiced a bit, and then attempted the design.

Let's take a look!


Colors Used:
  • OPI - The Spy Who Loved Me
  • China Glaze - Big Hair and Bubbly
  • China Glaze - Merry Whatever
  • ORLY - Liquid Vinyl
Look at that buffalo plaid print!!!  All free hand using acrylics!  I am super impressed with how straight my lines are and how perfect the boxes are.  I couldn't stop staring at them!  I also had the print on my thumb, which looked even better than my ring finger.  Most certainly going to re-create this design next year.


I also have to say that my holly is probably one of the best that I've ever done as well.  Every year I do a holly design but the leaves never turn out looking right.  These were perfect.  Had nice little definition and fit along the nail bed.

What do you think?  Fan of this manicure?  Love it as much as I do?

Until next time, <3.

ILNP

The One With the Christmas Snowflakes Inspired by SRG.Nails

9:00:00 AM


Good morning polished world! How are you all doing on this fine Monday?  We are in a little big of a heat wave here and the snow is all melting.   Makes sense I finally paint some snowflakes on my nails and the snow melts.  I hope that it comes back for Christmas.  Nothing is better than a white Christmas.

Today's manicure is inspired by this manicure by srg.nails on Instagram.  I'm not one for red nails, but this design I couldn't get out of my head. I just had to try it.  I busted out my red polishes and started swatching to see which was the right one for the design and settled by an oldie from Morgan Taylor.  The end result, something I completely loved!!

Let's take a look!


Colors Used:
  • Morgan Taylor - All Tango'd Up
  • ILNP - Mega X
  • Acrylic
Isn't this design perfect?! I really did not want to take off this manicure, but alas, I have to keep up on the Christmas designs for the blog.  I switched up the design a little bit and put my own spin on the snowflakes. Mainly because I attempted to paint the snowflakes just like hers but couldn't get them to look right on my nails.


All Tango'd Up is a gorgeous red polish by Morgan Taylor.  This is a brand I love but severly neglect when it comes to my blog.  Sally Beauty started carrying the line, so that means I just need to splurge and start utilizing the brand more.  Paired with ILNP Mega X, this manicure truly came together perfectly.

What do you think?  Fan of this nail art?  Love the combo?

Until next time, <3.

Christmas

The One With the Christmas Dotticure

9:00:00 AM


Good morning polished world!  How are you all today?  Snowy and cold here. Since the weather has been so weird, literally everyone I know has either a cold or upper respiratory infection.  I'm doing my best to keep hydrated, while I overdose myself with zinc and vitamin C.  If I get sick, I get sick, but I can't say that I didn't try to stay healthy!

As promised, here I am starting with Christmas nail art!!  The other evening I had zero inspiration and it was late, but I still wanted to start my Christmas nails.  I went onto Pinterest and searched "Simple Christmas Nails" and came across a Christmas Dotticure by my friend Sarah at 25 Sweet Peas.  It was the perfect, simple design and I had the perfect Zoya polishes to complete the manicure.

Let's take a look!


Colors Used:
  • Zoya - Tomoko
  • Zoya - Blaze
  • Zoya - Merida
Isn't it perfect?! I don't know what polish I love the most.  We all know that Tomoko is one of my favorites of the original Pixie Dust polishes.  I have two bottles, one which has seen a better day, and this new one.  I really think I need to get a third now that I've started using my back up.  It's truly my favorite for accent nails because of it's textured appearance and gold color.  Two coats and full coverage.  I tend to put a top coat over it to make it extra shiny, but even without a top coat it's amazing.


Blaze and Merida are beyond perfect for Christmas.  I love the Zoya scattered holographic polishes. I should probably check out their website to see if they've made anymore in the last year or so that I haven't seen.When I disappeared from blogging, I stopped paying attention to new polish collections.  Since I have the ORLY Color Pass, that's the only company I kept up on when it came to new releases.  And of course, I paid attention to ILNP because, well, they're gorgeous.

What do you think?  Fan of this dotticure?

Until next time, <3.


China Glaze

The One With the Pretty Blue Color Block

9:00:00 AM

Nothing to Disclose

Good Morning polished world!  How are you all doing on this cold, chilly Monday?  We are in the middle of a lovely snowstorm. Yesterday we had a good inch or so of icy sleet, and then now we are supposed to get snow on top of it.  I'm thanking the Lord for all wheel drive and heated seats! Makes for the longer commute to be manageable.

Since it's cold and chilly, I figured I would share my blue color block manicure I did when we had our first snowstorm in early November.  I wanted to wait to share it because I felt that it had a winter/Christmas feel because of the color pallette.  Honestly, I probably should have accented it with some snowflakes.

Let's take a look!


Colors Used:
  • OPI - Set Apart by Tile Art
  • China Glaze - Combat Blue-Ts
  • Zoya - Dream
  • Serendipity Polish - Holoday Lights

Set Apart by Tile Art is such a wonderfully gorgeous polish by OPI.  I bought this one because I thought it was a dupe of My Boyfriend Scales Walls, but it wasn't 100% identical. What I found was something even more wonderful than my beloved My Boyfriend Scales Walls.  This polish leans towards a light blue tint versus the grey tint of MBSW.  Two coats, full coverage, and just wonderful off white that adds something unique to the manicure.


I think that if I used a regular white instead of Set Apart by Tile Art, I wouldn't have liked this manicure as much.  It blended so well with the gorgeous blue of Combat Blue-Ts and Dream.  Anyone else find that Combat Blue-Ts can be a tad difficult to work with because it dries so fast?  It's well worth the pain that it is to apply.  It looks GORGEOUS without a top coat because it has the most perfect matte finish.

What do you think of this color block manicure?  Perfect for this time of year??

Might have a Christmas manicure to post next!  Stay tuned.

Until next time, <3.

Glitter Gradient

The One With My Fall-ish Thanksgiving Glitter Gradient

9:00:00 AM


Good morning polished world! How are you all doing on this Wednesday before Thanksgiving?  We are in a bit of a heat wave here, but we are expecting another wind storm which is going to bring us some frigid cold temperatures for Thanksgiving.  Saying a prayer and crossing my fingers that I do not end up with some weird illness due to this weather.  I really don't want to have a sinus infection anytime soon.

Today's manicure is my Thanksgiving manicure.  Rather simple for me, but I wasn't feeling like turkey's or any other random crazy nail art that I've done in the past. I was scrolling pinterest and was coming across dozens of glitter gradients.  It's been a hot minute since I've done a glitter gradient, so I gave it another go.  Happy that I did because I'm really loving it!

Let's take a look!


Colors Used:
  • Pure Ice - Studette
  • Zoya - Louise
  • Zoya - Taylor
  • Sinful Colors - Pandora
  • Some other gold and red glitter Sinful Colors.....the label fell off
As you know from my other posts over the years, this is not a color pallette I typically would wear, so this is EXTREMELY out of my comfort zone.  Can't say that I hate it.  It's actually kind of refreshing.  I like how all these colors go with my skin tone.  Maybe they're wrong, but I didn't think so in person.


I'm rather proud of my glitter gradient.  I'm hit or miss when I attempt this, and it's safe to say this is a home run.  They always look so ugly before you put the top coat on, and I think that's why I always think I fail at doing them.  The sponge leaves rough spots because you're transferring some of the glitter base when dabbing on the glitter.  I used to take this as a failed glitter gradient and would remove it.  Luckily I learned last year when I did one that this is what was occuring.

What do you think of this manicure?  Should I attempt more glitter gradients?  Am I going to remember what a pain glitter is to remove and totally give up on the idea come Christmas time?

Speaking of Christmas....time to get started on the red and green manicures!!!  In the meantime, I hope everyone has a Happy and Blessed Thanksgiving!!

Until next time, <3.

Abstract

The One With the Random Lines and Dots

9:00:00 AM


Good morning polished world!  How are you on this fine Thanksgiving week?  I'm feeling a tad dreary since the weather hasn't been the greatest.  It's cold, then wet, then grey, then sunny for five seconds, then right back to the cold.  Honestly though, I do love this time of year becauses I am a huge homebody and I love to be inside and cozy.  I cook and bake all of the things, while binging Hulu and Netflix.  What more could anyone want?

Well, I guess you could want sunshine.  One way I bring brightness into my life on these dreary days is by painting some bright neons on my nails.  Today's manicure uses some of my favorite China Glaze neon polishes and mixes it with a weird abstract looking accent nail.  Wasn't really sure where I was going with this design, but I'm happy with the end result.

Let's take a look!


Colors Used:
  • China Glaze - What I Like About Blue
  • China Glaze - Lip Smackin' Good
  • ORLY - White Tips
Since I missed out on the blogging world this summer, I missed out on any China Glaze neon's that might have been released.  Were there any?? I guess I could google and find out.  I do know, however, there were some OPI neons that were released this summer and I did snag those.  Only found that out because I ran into Sally Beauty for some top coat and stumbled across that display.


I'm getting off topic.  What I Like About Blue is one of my favorite polishes hands down.  Formula is a little wonky, but totally workable.  You just have to be careful on the second coat because it can drag if you're heavy handed.  Lip Smackin' Good is similar, but again, totally workable.

What do you think?  Like this bright manicure? Help cure those early winter blues??

Getting close to doing some Christmas Manicures!!!!  Ahhh I can't wait!

Until next time, <3.

Animal Print

The One With the Random Leopard Print

9:00:00 AM


Hey happy Polished world!  How are you all doing on this wonderful Friday?  Sorry I haven't posted all week, but it's been quite busy.  As some of you may know, I started a new job a month ago and I really hit the ground running.  This week I had a few projects due and I'm happy to say I've successfully accomplished them all.  I've been painting my nails, but after working those 8 hour days, I really didn't feel like turning on the computer to blog.  Last night though, I took an opportunity to just edit a bunch of photos and blog again.

Welcome to my next five posts probably being all ORLY.  I didn't realize how much I use this brand until I was editing.  Hey, if you love a brand, why not constantly use it?  I really have to get to my pile of about 75 untried polishes which include more ORLY, ILNP, and OPI.  Alas, here I am using my oldies, but goodies.

One of my favorite oldies is ORLY Mirrorball.  I used it alongside my favorite black and white polish, also by ORLY, to create a simple leopard manicure.

Let's take a look!


Colors Used:
  • ORLY - Mirrorball
  • ORLY - Liquid Vinyl
  • ORLY - White Tips
I can't tell if my contacts are blurring my vision, or if that photo is blurry.  I swear my camera has been acting up hardcore lately.  I really need to invest in a new one.  Kind of ruins the whole blogging vibe when I edit the photos and they all look cruddy.  I probably should edit the photos right after I take the photos because that way I could just re-shoot if there are problems.


I really love the black, white, and holo silver together. It's always a classic look.  I actually just removed a tape manicure using the same color scheme.  I'm really loving the use of black polish.  This is probably why 90% of my posts are going to contain ORLY because Liquid Vinyl is my favorite black.

What do you think?  Fan of this manicure?  Think my photos are blurry?  Meh

Until next time, <3.

Flowers

The One With the Little Daisies

9:00:00 AM


Good morning polished world!  It's Thursday and we have had our first snowfall, and it feels like mid January outside.  I'm telling you, this cold weather makes me lazy.  I need to start updating my Instagram again.  I'm over here blogging, but not sharing.  The sharing part is the easiest too, so that's why this is all a shock to me.  I need a personal assistant to share my posts for me!

Today's design is a cute little floral manicure I did using my favorite ORLY polish - Blue Suede.  I truly have zero idea where my inspiration came from for this manicure, but I'm not 100% fan of the manicure.  I love the blue, love the holographic accent, but the floral design....meh.  I think I could have done better.

Let's take a look!


Colors Used:
  • ORLY - Blue Suede
  • INM - Granite
  • ORLY - Mirrorball
  • Acrylics
I think it's the green leaves I don't like.  They're a tad messy for my liking.  I go from these highs when it comes to my details, to these lows where I just feel like I can't nail art anymore.  I realize I'm being hard on myself because yes, the manicure is cute, and really no one sees what I see when it comes to the "messiness".


I love ORLY Mirrorball, but I think it might have added too much to the manicure.  I think I should have gone with a plain grey nail, or maybe another Blue Suede nail.

What do you think?  Like this look?  Think I should have done it differently?

Until next time, <3.

Color Club

The One With the Color Club Dry Brush Manicure

9:00:00 AM


Good morning polished world!  How are you on this wonderful Sunday? I apologize for not blogging this week, but I'm not going to lie, Daylight Savings really messed me up last week and I haven't been able to get used to this whole time change.  Earlier nights equals less blogging time.  Although I've still been creating nail art, therefore I'm going to have a lot of content coming up!

On top of Daylight Savings, tomorrow we are supposed to get our first real accumulation of snow.  While we had our first snowfall last week, this one will probably last a tad longer seeing as they're predicting about 4-8 inches.  Since the snow is coming, I thought it was appropriate to post this light blue dry brush manicure.  The blue polish reminds me of cold and snow....kind of.

Let's take a look!


Colors Used:
  • Color Club - Meet Me at the Rink
  • Color Club - Pucci-Licious 
  • Cannot remember the name of the silver because it was awhile ago.....
Meet me at the Rink was part of the Poptastic Pastel neon collection that came out years ago.  I purchased it yeaaaars ago and the beauties just sit in my collection rarely touched.  I forget how much I love them.  Sure, the formula isn't 100% wonderful, but if you have some patience you can get complete coverage in two coats.


The dry brush nail is one of my favorites.  The purple, the blue, the silver, then the little abstract design....all perfect.  I wish I did all 10 of my nails with this design.  Maybe next time.

What do you think of this manicure?

Until next time, <3.

Dot Mani

The One With ILNP Paige and Some Dots

9:00:00 AM

Nothing to Disclose Press Sample Affiliate Link

Good morning polished world, and welcome to Monday!  Another weekend has come and gone, Daylight Savings is upon us, and now I'm going to be all off for the next two weeks.  Don't get me wrong, I love this whole extra hour of sleeping and falling back, I just hate how I have to learn a new sleep schedule.  It's safe to say last night I failed at that sleep schedule.

Instead of sharing the Monthly Mani Favs like I used to for the first post of the month, I've decided to hold off on that until next year, since this year it's going to be completely impossible to do a Monthly Mani Fav round up for my Yearly Fav post.   See what happens when you take over two months off?  Blogger madness.  I'll bring back the Monthly Mani Fav in 2020 if I stay active with the blog.  I really hope I do.

Anyways, today I am posting the second manicure I did during my blogger hiatus.  It is a super simple dot manicure using the gorgeous ILNP Paige. I went through about a 3 week period where all I wore was Paige, so I had to switch it up a bit with some dots.  And to see if I still could do a dotticure.

Let's take a look!


Colors Used:
  • ILNP - Paige
  • ORLY - Liquid Vinyl
  • ORLY - White Tips
Isn't Paige gorgeous?  One of my all time favorite holographic polishes by ILNP.  Two coats and I had total coverage.  This holo is so strong outdoors and indoors.  I always forget about this beauty in my collection, then it makes a re-appearance and I cannot get enough.


Paige pairs so well with these black and white polka dots.  I debated on doing an abstract looking manicure, but I didn't want to take away from that holo, and really, can you blame me?

What do you think?  Like this manicure?  Fan of Paige?

Until next time, <3.

Halloween

The One With the Spider Web Nail Art

9:00:00 AM

Good morning polished world and Happy Halloween to you all!  I almost forgot to do this post, but as I laid down in bed at 12:30am, I realized that I never edited the photos for this post, or wrote it.  I would have talked myself into doing it another day, but then I realized that the Halloween manicure kind of needs to be posted on Halloween, therefore I got up and got to work.  Of course Blogger didn't want to participate with me, so we will see if the photos actually end up getting uploaded. Technology hasn't been my friend today.

So, today is Halloween, and we are supposed to get a horrible storm.  I'm not sure if that means we will have any trick or treaters.  The southern part of the state is actually re-scheduling Halloween for Saturday because of this storm.  My guess is, because they're predicting it's going to be an awful storm, it really won't be and it will be a semi decent night.

Regardless, my nails are ready, this post is ready, so let's take a look!


Colors Used:
  • Serendipity Polish - CE0,000,000
  • ORLY - White Tips
  • Acrylic
I actually created this spider web design last year and loved it so much that I had to re-create it this year.  To get the look I started off with two coats of Serendipity Polish CE0,000,000.  I will always tell everyone how much I miss this brand.  Long wearing, fast drying, one coater polishes.  Ahhh, how I loved them.


Once my base was dry, which literally was two minutes, I sponged the white polish onto the nails.  This gives it a really spooky feel.  I then went through with my nail art brush and added the spider webs.  I feel like these are the best webs that I've ever created.

What do you think?  Fan of this manicure?  Something you'd try?

Hope everyone has a safe Halloween! 

Until next time, <3.


Halloween

The One With the Pumpkin Nail Art that I Really Don't Like

9:00:00 AM

Nothing to Disclose

Good morning polished world! How are you all doing on this wonderful Monday?  I apologize for not posting but I got distracted and thought I had posted.  Actually I'm even behind on Instagram too.  Not quite sure how that happened since I feel I have been diligent, but who knows.

Today's nail art is something that looked MUCH better in my head than it did on my nails.  Remember the other day when I posted the graveyard coming from the cuticle and I said pumpkins by my cuticle would be a cute idea.  Yeah, they would probably be cute if they weren't jack o'lanterns.  I ran out of room, so I just did the eyes, and well I really did not like them.  But since I'm all about the blog again, I figured I would post them.

Let's take a look!


Colors Used:
  • OPI - I Can Never Hut Up
  • OPI - No Tan Lines
  • ORLY - Liquid Vinyl
  • Acrylics
The thing I really liked about this manicure was the base.  I used two coats of I Can Never Hut Up, which is one of my all time favorite grey polishes by OPI.  When that was dry, I went through with a black polish and created the dry brush look.  I then added the pumpkins first by outlining them with a black acrylic.  I then filled in the orange and green and added some darker orange shading.


Then came time for the jack o'lantern faces.  This is where the manicure took a turn for the disaster-cure.  I didn't plan the spacing out enough and had no room for the little mouths, therefore I had tiny triangle eyes, at first.  I tried to fix my mess, and made the triangles larger, which I wasn't happy with.

Even though I wasn't happy with the design, other people thought they were cute.  They said they were peek-a-boo jack o'lanterns.

What do you think?  Hate them, love them?

Until next time, <3.

Halloween

The One With the Mani Swap With Coffee and Nail Polish - Graveyard Nails!

9:00:00 AM


Good morning, polished world!  How are you doing on this fine, fine Tuesday?  We are finally getting some Fall weather right in time for Halloween.  Life has slowed down for me during my favorite season and I actually am getting to enjoy the changing colors and crisp air.  I'm hoping the weather holds this weekend so I can carve my pumpkins.  I need ideas, so if you have any, let me know!

Today's post is a Mani Swap with Coffee and Nail Polish, you know, since two of my last three Halloween manicures have been inspired by her.  How could I not recreate her ghosts and candy corn dots??  When I saw her graveyard nails, I knew I had to re-create them as well.  After chatting about Halloween nail art, we decided to do today's swap!!

Let's take a look at my re-creation of her graveyard nails!


Colors Used:
  • OPI - I Can Never Hut Up
  • ORLY - Liquid Vinyl
  • ORLY - White Tips
  • Zoya - Troy
Aren't these graveyard nails neat?!  Just like her other designs, I never would have thought of this manicure.  Especially doing the little graves at the cuticle.  Why don't I think of doing more cuticle nail art?  It's so versatile and there are so many designs you can do from there.  I think I might do some Thanksgiving cuticle pumpkins.  That sounds weird, but trust me, I think it's going to be cute.


I really loved the base for this manicure.  To get the look, I started with a base coat of Zoya Troy.  It's a dark grey pewter polish from I believe the Urban Grunge collection.  During my blogging hiatus, it was a polish I discovered in my collection and wore a lot with a variety of holographic top coats.  You can get away with one coat of this beauty, but I typically use two.

When that was dried, I went through with ORLY White Tips and did a vertical dry brush unlike the normal random abstract dry brush that I typically do.  I then did a dry brush with I Can Not Hut Up by OPI.  One of my favorite light grey polishes with a subtle blue shimmer.  Then to make it a little more spooky, I added a bit of a dry brush using ORLY Liquid Vinyl.


Once my dry brush was completed, I added the cuticle nail art using acrylics.  Honestly, it was so much easier to create the nail art at the cuticle instead of at the tip of the nail.  Maybe because of the angle when painting.  Who knows.  Regardless, I really need to create more cuticle nail art.

I didn't plan the photo at the actual graveyard, it just was an interesting coincidence.  On a beautiful day this weekend, I went to visit some family plots before the winter to make sure they were in good condition when I realized I had the graveyards painted on my nails.  I had to take the opportunity for the photo.  I'm not going to lie, I find graveyards to be extremely peaceful and not so much haunting.  Just walking around and reading different graves you can learn so much.  At this particular graveyard, some of the graves are from the 1800s.  I just find it interesting.

What do you think?  Fan of this manicure? Do you get creeped out by graveyards?

Don't forget to check out Shannon's swap!!!

Until next time, <3.


Dot Mani

The One With the Candy Corn Dotticure

9:00:00 AM

Good morning polished world!  How are you doing on this fine Sunday?  I meant to have this post up yesterday, but I decided to go to bed instead of editing photos and writing.  Actually, I took a look at the photos and they were in bad shape that I just kind of gave up and went to sleep.  I need to invest in a new camera.  I've been using the same one for the past five years and I think it's time.

Until then, the old camera is getting the job done and captured this fun candy corn dotticure inspired by Coffee and Nail Polish.  Pretty sure I should change my blog name for this month to "Inspired by Coffee and Nail Polish" because the mani I'm posting after this one will be the third one inspired by her.  She's just hitting home runs this Halloween season, so how can I not re-create her designs??

Let's take a look! 


Colors Used:
  • Zoya - Taylor
  • Serendipity Polish - Orange County Girl
  • Serendipity Polish - Bottomless Mimosas
  • Serendipity Polish - #GoalDigger
Despite the fact that the coloring is horrid on these photos, the manicure was beyond amazing.  I absolutely loved the use of a nude base for the nail art.  I probably would have created this look with a negative space manicure, and then hated it.  I always forget to use my nude polishes, like Taylor from Zoya.  I got this polish years ago and it's such a great shade which really does match my skin.  We will ignore the fact that my skin looks beyond lobster'ed in these photos, truly it does match.


I miss Serendipity Polish.  That's one Indie that I wish was still around.  One coat creams which worked wonderfully for nail art.  

I'm sad that my top coat is getting old because it bubbled around the dots.  Oh well.  New camera, new top coat.....I need to get to the store.

What do you think?  Fan of this manicure? Recommendations for new cameras?

Until next time, <3.

Halloween

The One With the Ghoulish Ghosts

9:00:00 AM


Good morning polished world!  How are you all doing on this Wednesday?  The weather is finally like Fall here with temperatures in the 50s and 60s.  We are due for a frost and the leaves are finally changing.  Ahhh, it's truly my favorite time of year.  Now, I just need to get some apples and start making some pies!

Before the pie making, there's some blogging to do.  Today's Halloween design was inspired by Coffee & Nail Polish.  She created the most unique ghost design for #GlamNailsChallengeOct.  In all my years of blogging I had never seen anything like it, and I for sure never thought of doing it!

Let's take a look!


Colors Used:
  • Sally Hansen - Stilletos & Studs
  • INM - Northern Lights
  • Acrylics
Isn't this so amazing?!  Shannon came up with the idea of see through little ghosts.  I always hate doing ghost designs because the opaque white always didn't look right to me.  While this looks like an unbelievably complicated design, it was so easy to do!  I took white acrylic paint and watered it down.  I painted the design on the nail, then let it sit for about 30 seconds.  I then wiped off the access and was left with the outline of the ghost.  I brushed around some excess acrylics to fill in some really naked areas and was left with little ghosts!


Stilettos & Studs was a great base color for this manicure.  I debated on going with a straight black base with a scattered holo topper, but when I saw this polish in my drawer I had to use it.  It gives it that cloudy, spooky, night sky feel.  Two coats and I had full coverage of this Miracle Gel.  It wore like a beast, it took a little scrubbing to remove it.

What do you think?  Like these little ghosts?  Think they're spooky or cute?

Until next time, <3.

Halloween

The One With the Candy Corn Drip Nail Art

9:00:00 AM


Good morning, Polished World! How are you all doing on this fine, fine Sunday?  I meant to have this post up yesterday, but my days kind of blurred into one another and I thought yesterday was the 11th and not the 12th.  I literally am the worst person when it comes to remembering dates, or knowing what day of the week it is in general.  I can't tell you how many times I have to ask people what day it is.

Oh well, what I do know is that it's still October, and Halloween is right around the corner!  That means it's time for me to start creating some Halloween designs.  While on Pinterest, I came across a candy corn paint drip manicure originally created by Adventures in Acetone.  Her blog was one of the first that I followed, and I was so surprised that I had never seen this design until now.  Since I love the paint drip look, I decided to re-create it.  At 11pm the other night.  Not my wisest decision, but so worth it!

Let's take a look!


Colors Used:
  • Zoya - Storm
  • OPI - Alpine Snow
  • OPI - Exotic Birds Do Not Tweet
  • OPI - No Tan Lines
Isn't this awesome?  And yes, I used all nail polish to create the look.  I started off with two coats of my favorite Zoya polish - Storm.  I need to get another bottle of this black scattered holo beauty.  It's the perfect base coat for nail art like this.


Once dried, I added some very messy paint drips using Alpine Snow.  It was my first time making an all polish paint drip, but it was actually a tad easier than using the acrylics.  When that dried, I added the orange and yellow for the candy corn colors.  I then cleaned up any messy edges using Storm to make the paint drip more even.

What do you think? Fan of this look?

Until next time, <3.

ILNP

The One With the Fall Pumpkin Manicure

9:00:00 AM


Good morning polished world!  How are you all doing today?  Look at me, back at blogging like I never left.  I'm not going to lie, it doesn't feel like a chore anymore.  I now look forward to sitting down on my computer, coming up with nail designs, completing them, and then sharing them all with you. I think the break was good for me.  Hopefully I continue down this path.

Truly, I came back at the perfect time of year.  Fall has so many opportunities for nail art, then followed by Christmas!  Ahhhh so many nail art ideas, so little time.  It already is October 9th and I just painted my first Halloween design last evening.  I feel I'm behind, but really looking at other Instagrams, I feel like I'm right where I should be.  I actually wonder how many other "blogs" are still out there.  Part of me always wondered if I should delete this blog, and just convert to Instagram, but my first three posts back already have over 100 views, so people are reading.  *waves*

Anyways, today's manicure is a Fall pumpkin design.  Typically I would do this design around Thanksgiving, but after seeing a few other nail artists use this color of green, I just had to do this design.

Let's take a look!


Colors Used:
  • INM - Sage
  • ILNP - Clockwork
  • ORLY - White Tips
  • Assorted Acrylics
Isn't that little pumpkin cute??  And look at me shading and makine some sort of dimension to that pumpkin.  It looked better in person than it does in the photos.  I have to reconfigure my lighting setup.  It's all out of whack since I took it all down with the whole hiatus thing.  I also probably should invest in a new camera......


Sage by INM is a gorgeous green polish.  I used two coats but you really can get away with just one.  It applied perfectly, dried super fast, and had such a shine that if you didn't have a top coat, you could go without it.  I ended up wearing the manicure for five days with no chips, which is a huge record for me.

What do you think? Like the green? Think this is a good Fall design?

Until next time, <3.

FingerPaints

The One With the FingerPaints Gold Negative Space Manicure

9:00:00 AM


Good morning polished world!  How are you all doing today?  I've been better.  Friday I ended up getting sick with some sort of allergic reaction where my breathing got all messed up and I've had the WORST stomach cramps for the past 24 close to 48 hours.  I'm hoping today it gets better and I can leave my house for more than 5 minutes.  Especially because it's supposed to be a perfect Fall day today.  Sunny, in the 70s...really hope I get outside.

Since I've been since, I haven't wanted to edit my latest Fall themed manicure.  Lucky for me, I had edited all my old photos over this past week and have 8 posts to share.  After looking through all the photos, I felt this negative space, gold, daisy manicure was fitting for a nice, sunny, Fall day.  Maybe.  

Let's take a look!


Colors Used:
  • FingerPaints - Beverly's Touch
  • ORLY - White Tips
Pretty sure this is a re-creation of a manicure I did a few years ago.  I painted it back in April when I was feeling very uninspired but wanted some sort of floral design.  I remember looking on Instagram and finding a negative space manicure, and this one flew back into my mind.  Now you know me, I'm not a huge fan of gold, so this was a manicure that was way out of my comfort zone then, and was again when I recreated it.  Both times though, I absolutely loved the white and gold color combination.


Beverly's Touch is an oldie but goodie from my polish stash.  You can totally get away with one coat of this gorgeous yellow gold, but I used two.  I love how saturated it is because it makes it easier to use for nail art.

Fan of this manicure? Ever enjoyed the negative space look?

Until next time, <3.

Flowers

The One With the Sunflowers and ILNP Sundance

9:00:00 AM


Hey there polished world!!  I told you I was back!  Twice this week I have painted nail art, and I have a surplus of drafts.  I didn't realize until I took my picture card out of the camera how many manicures I never edited from before I stopped painting.  I think I have about 8 manicures to post, which is just beyond crazy to me.  Now, I just have to find the appropriate time to post them since it's Fall and most of the designs are Spring/Summer.  Guess I'll be creative....

Today's manicure is one I painted the other night, aka the first nail art after my hiatus!  For the past two months I have been wanting do sunflower nail art.  Summer, then September came and left, and I never painted any sunflowers.  Since it was super warm out the other day, and sunflowers are a Summer to Fall transition flower, I figured it would be appropriate to still paint them.

If you've been following me for a while, then you would know that annually I paint sunflowers on top of a glittery cobalt blue base.  Since I've done it so many times,  I really wasn't feeling it.  I then found my bottle of ORLY Olive You Kelly and was going to use that as my base, until I remembered that last year that's the base I used for my sunflowers.  Then, sitting next to the ORLY bottle was Sundance by ILNP; the perfect base for this design.

Let's take a look!


Colors Used:
  • ILNP - Sundance
  • Acrylics
Look at how gorgeous Sundance is!!!!  Two coats of this beautiful, green, holographic beauty.  All of my ILNP polishes are the same, saturated with color with a gorgeous holographic effect no matter what type of lighting you are in.  I can't tell you how many times this summer when I was wearing plain swatches I would get distracted and get lost in the holo.


I love how nail art on top of a holographic base gives the manicure a 3D illusion.  I debated on adding little flat green leaves but felt like the green background really gave it a leafy-field feel!

Not going to lie, I was a tad rusty when it came to nail art and working with the acrylics.  After a few nails it all started to come back to me.  I think it's going to be a slow and steady type thing as I start to get back into the swing of nail art!

What do you think?  Fan of this manicure?  Loving that beautiful base.

Until next time, <3.

China Glaze

Hey Guys, Remember Me? Oh, and.....The One With the Watermelon Nail Art

9:00:00 AM


Good morning polished world!!!  Do you remember me??  It's been a LOOONNNGGG time since I posted here on this blog.  Not a day went by where I didn't think about the nail art community and my little hobby. 

So, the big question, where have I been?  Well long story short, my life became really hectic.  Work, eat, sleep, repeat.  My nails went from intricately painted with nail art, to just random swatches of holographic polishes.  I kept polish on so long that they were chipping, which lead to peeling nails, which led to many a break.  Whenever I got the urge to paint my nails, they were in such horrid condition that I just kind of lost all motivation to do any form of art.

I continued to purchase polishes, but they were thrown to the side as I didn't feel the urge to use them.  I kept using my oldies but goodies saying to myself I would use the new polishes when my nails were in better condition.  Each day, my life continued to be more hectic than the next, and I continued to put my hobby on the back burner.  This community became a memory to me as I just didn't have the time to blog or interact.  It was sad, but I had priorities and needed to continue down the path I was on.  I did so knowing that one day I would be back and life would slow down.

Sure enough it did, and here I am!  Back and ready to get back at it!!  My life has had some major changes, and I'm excited for the future and I'm beyond excited to be back here in the blogging world.  The question is, are my followers still out there?

Today's manicure is one I did in August.  I figured since it's September 30th, it's 80 degrees, and probably the last summer like day, it was appropriate to share.  Right?  Let's face it, I don't have any fall-themed manicures started since I literally just began the nail art again last night, sooooo we have to go with this.

Let's take a look!


Colors Used:
  • China Glaze - Treble Maker
  • China Glaze - Lip Smackin' Good
  • ILNP - Mega X
Did I mention I was using my oldies but goodies?  These colors are for sure some of my favorites, ILNP Mega X being my all time favorite.  Before I get into talking about how much I love the colors, this manicure was literally one of the two nail art designs I did in the past four months.  It was of course for a picnic where I wore my beloved watermelon shirt with green pants that were the exact shade as Treble Maker.  One of my favorite outfits that I didn't wear nearly enough this summer.


Clearly you can tell I have missed blogging since I'm babbling.  These China Glaze polishes are some of my favorites.  Treble Maker is a fun green polish which covers completely in two coats.  Trick with this one is to make sure your first coat is completely dried, otherwise you're going to be dragging the first coat when applying the second.  Lip Smackin' Good is a gorgeous two coat pink polish with a pretty subtle shimmer.  It can be a dragger too, but it's super buildable and easy to work with.

Then there's Mega X, the world's best silver holographic polish.  One of my all time favorites by ILNP.  I think I wore this alone at least three times during my nail art hiatus.  I actually lived on all of my holographic beauties by ILNP.  Not any of the new ones I bought though, of course saving those for when I was back go blogging.  Guess I can bust them out now!

What do you think of this nail art?  Have you missed me? 

I cannot wait to share Fall and Halloween nail art!  I feel I came back at the right time. 

Until next time, which won't be four months from now....

<3