Animal Print

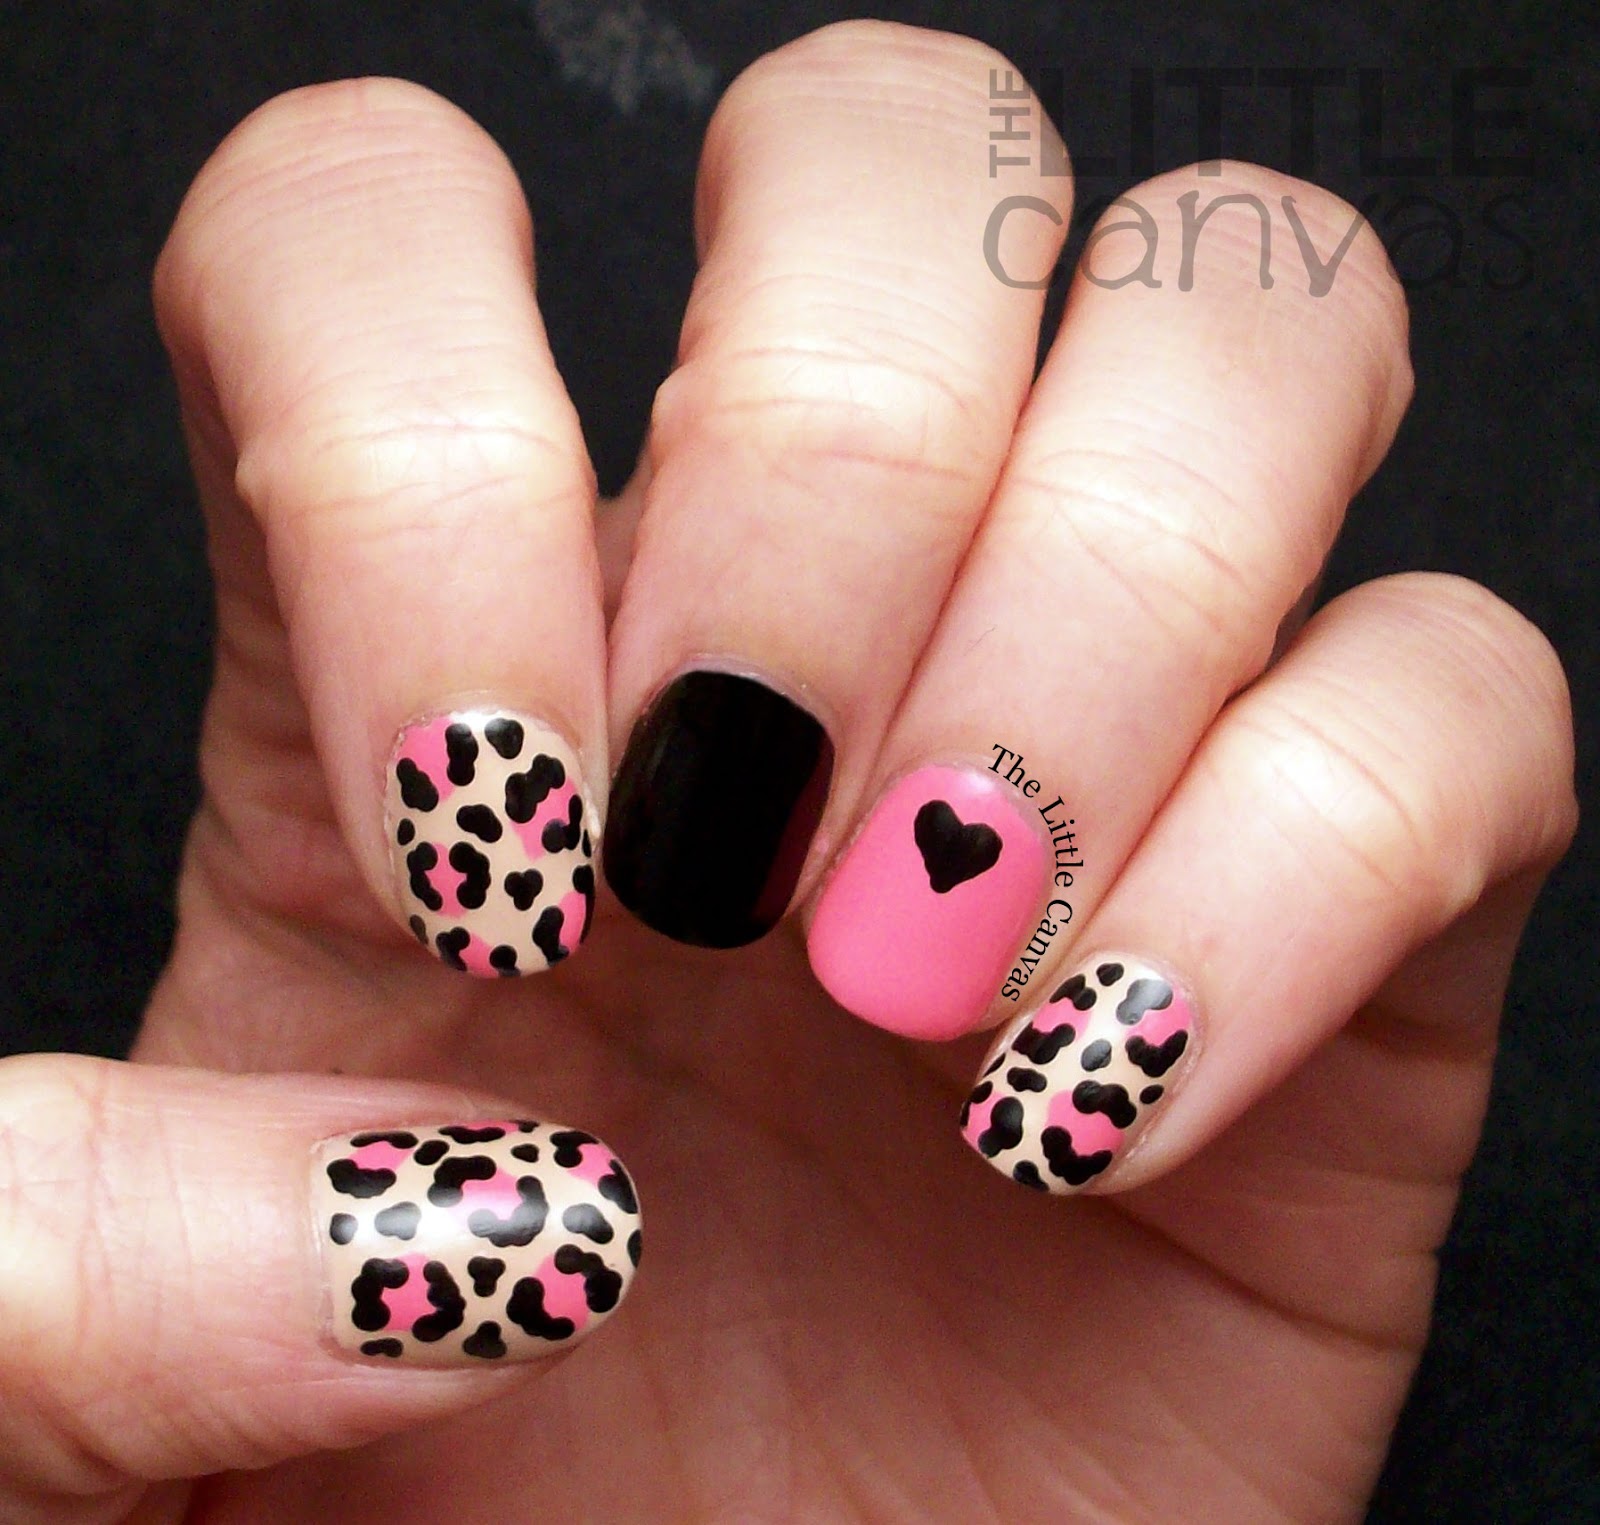
Pink Gradient Leopard Manicure with FingerPaints Sweet Spring

9:00:00 AM


Good morning polished world!  How are you all doing on this awesome Friday?  It's been quite a long week for me, so I am super excited that tomorrow is Saturday and I can sleep in!  Oh how I love sleep-in-Saturday!

Today I'm sharing a very pink and girlie manicure!  I recently received the Spring Picnic in the Park Collection from FingerPaints.  One of the polishes in this collection is Sweet Spring, a gorgeous baby pink cream.  Now, if you know me, I'm not one to wear pink polishes.  Lately though, I have been finding myself gravitating towards them, and Sweet Spring was no exception.

So I grabbed a darker pink and I just started playing around.  The end result was quite fabulous.


Colors Used:
  • FingerPaints - Sweet Spring
  • Essence - Ultimate Pink
  • INM - Northern Lights
  • Black Acrylific

To get the look, I started off with a base coat of Sweet Spring.  It took two coats to get full coverage of the beautiful pastel pink.  Can we take a minute to talk about how awesome FingerPaint's brush is?  It reminds me to the OPI brush, which is one of my favorites.  I hate the thin little brushes that require me to paint and paint and paint to get one coat.  With a wide brush like this one, I just have to do 3 swipes to get a perfect coat.

When my pretty pink base was dry, I took a make up sponge and created the pink gradient with Sweet Spring and Essence Ultimate Pink.  It is one of the best gradients I have ever created in my whole 3 years of blogging!  I couldn't stop staring at it!  So, what did I decide to do.....add glitter!  And guess what, it made it even more amazing!!!


I couldn't just have a plain gradient on my nails though.  I had to add some crazy nail art, which clearly means leopard print!  I kind of created a reverse gradient with the design which I think turned out to look really cool.  Sweet Spring was awesome for nail art.  Light colors like that sometimes don't dot well, but I had no problems with this.

What do you think?  Fun manicure?  Something you would try?

Until next time, <3.

Dot Mani

Twinsie Tuesday: Polish Received in a Swap

9:00:00 AM


Good morning polished peeps!  How are you all today?  It is Tuesday, so that means it is time for yet another Twinsie Tuesday!  I apologize for skipping last week.  I'm really not sure how it happened, but on Monday night I thought it was Sunday night.  Therefore, I never got around to doing, well, any of the post.

This week though I did, and if anything this would have been the week to skip for me.  This week we are sharing polishes which we received in a swap.  Well, I've never really participated in any swaps, so I honestly do not own any swap polishes!

So my creative juices started flowing.  How could I possibly get this post to work without owning any polishes I received in a swap?!  I finally figured it out!  I decided to use polishes which I would think any girl would love to receive in a swap, because they are some of my favorites!

Let's take a look!


Colors Used:
  • FingerPaints - Patent Leather
  • FingerPaints - Paper Mache
  • FingerPaints - One in a Melon
  • FingerPaints - Grassy Knoll
I may or may not have mentioned it, but I'm beginning to fall in love with FingerPaints brand.  FingerPaints polishes are sold exclusively at Sally Beauty Supply stores.  When I began blogging, I never paid much attention to the brand, mostly because they were horribly separated every time I went in the store.  Well, after the company reformulated their polishes, and redesigned their bottles, I noticed such a change in the displays and I started to gravitate towards the brand.  They have a wide brush, which I love, awesome application of polish, and the wear is perfect!  Therefore, I think anyone would be lucky to receive some of these in swaps, especially the ones that are hard to find or part of limited edition collections!

The first polish I would send, which was released as part of their Patent Leather Winter Kit.  That polish is Patent Leather, an awesome, shiny, black polish which applies evenly in one coat.  The shine without top coat is brilliant, then with top coat is even more brilliant!  The next polish is Paper Mache which is a white polish that is part of their core collection.  Perfect two coater, and one of my all time favorite white polishes!  All nail girls need a good black and white, therefore these would be awesome swap polishes!


The next polishes are One in a Melon and Grassy Knoll which are from their new limited edition Picnic in the Park collection!  This collection as a whole is a must have because of the bright, fun, spring colors.  These two though are perfect nail art polishes for flowers!  I'm always looking for the perfect green for floral leaves, and Grassy Knoll is just that!  Cannot wait to use it for some Spring nail art!  Same goes for One In a Melon!  Can we say perfect Spring/Summer color?  I have a feeling that this melon colored polish is going to be my go-to Summer pedicure color!  Another two needs for any nail artist!

What do you think?  Would you be happy to receive these polishes in swaps?

Don't forget to check out the other Twinsie's posts!


Tiffany at Polished To Precision
Savannah at Addicted to Polish
Róisín at Cuti-CLUE-les
Marisa at Polish Obsession
​Lisa at The Polish Playground
Lakeisha at Refined and Polished
Kristine at Pink and Polished Nails
Jessica at Blue Velvet Lacquer
ChiChi at I'm Just Me...ChiChi
Chelsea at Nailed Blog
Bridget at A Painted Nail
Amber at Nails Like Lace
Amanda at Fashion Footing
Amanda at Amandalandish

Until next time, <3.

Bestie Twin Nails

Bestie Twin Nails with Fashion Footing! Round 9!

9:00:00 AM


Happy Saturday polished world!  How are you all doing today?  Nothing new to report here!  I'm so happy it's the weekend.  I need to catch up on some sleep and bake either a cake or cookies.  I've been craving baked goods all week, and the mini Chips Ahoy I was getting from the vending machine really weren't hitting the spot.  They were good, just not as good as something fresh out of the oven!

First things first though, I have to get this blog post written and posted, otherwise Amanda may slap me.   Yes, it is time for another round of Bestie Twin Nails with Amanda from Fashion Footing!  It's been quite the long process for this month's feature!  We were inspired by this pretty pink manicure by Young Wild and Polished.  

Now, here comes the part about why Amanda would have come to my state and slapped me if I didn't get the post up.  We selected this manicure back when it was originally posted which according to Nicole's IG post, it was two months ago.  Amanda and I realized we didn't have the proper colors, so we both went on a search for the perfect rose mauve polish like Nicole used.  Well, Amanda found them not only in her stash, but also at her local store.  I, however, was unable to find anything similar other than the Essie Nicole used.  While it was a gorgeous polish, I wasn't spending $8.50 on one manicure.

So Amanda had already done the pink version (twice because she forgot she purchased new polishes for it and just haaaad to use those ones), and I just couldn't find anything.  Therefore, Amanda came up with the idea to switch the colors to blue, which I had no problem with since I love blue.

This meant Amanda painted this design for a third time, and I finally got my butt around to paint it just once.  Let's take a look!


Colors Used:
  • China Glaze - Boho Blues
  • China Glaze - License and Registration Pls
  • Sally Hansen - Breezy Blue

Love these new China Glaze polishes from the Road Trip Collection!  Boho Blues is a gorgeous periwinkle polish which I have searched day in and day out for.  A year or so ago I found Sail La Vie by Sinful Colors, but I rarely used it because I couldn't find a back up.  It would figure that China Glaze releases this beauty at the same time Sinful Colors makes Sail La Vie part of their core collection.  Regardless, I'm thrilled to have Boho Blues in my collection!  It's gorgeous and worked great for nail art!


License and Registration Pls is a perfect blue polish.  I own so many blues, but this one is rather unique in comparison to those I already have.  To me, it's kind of like a crelly.  It applied evenly in two coats and dried with such a gorgeous shine.  I can see myself using this a lot for bases for nail art.  It's just such a unique dark blue!

Overall, I loved the look.  The "X" design on the index finger was the most difficult to re-create, but I think it came out well!

What do you think?  Fan of the manicure?  Happy I finally got around to doing it and posting it??

Make sure to check out Amanda's post!

Until next time, <3.

China Glaze

Neon Floral Manicure

9:00:00 AM


Hi there, Polished World!  How are you all doing today?  It is still bitterly cold here!  Shocking, right?  I'm not going to complain.  I'm healthy, happy, and have a warm place to work and live.  So what it's -2 degrees....it could be so much worse.  At least it was sunny yesterday!  That makes it better!  

So, since it's cold, it's time to break out the neons and at least make my manicures look like it's summer time!  My neon polishes put a smile on my face and make me cheerier, even if it's gloomy.  How can you be grumpy when your nails are so fun?

Today's neon manicure was inspired by this one by the very talented Paulina's Passions.  Love her blog and all her designs!  I need to re-create all of them!

Let's take a look!


Colors Used:
  • China Glaze - That's Shore Bright
  • China Glaze - Too Yacht to Handle
  • China Glaze - Flip Flop Fantasy
  • Salon Perfect - Sugar Cube
  • INM - Northern Lights
  • Gold Glitter
I love every single thing about this manicure.  The flowers, the placed gold glitter around them, the glittery accent, the purple, the teal!  There literally is nothing wrong with it.  Especially now that I learned that China Glaze is re-releasing That's Shore Bright and Too Yacht to Handle!  During Sunday's #NailGlossip I tweeted saying they should be part of the core collection, and they answered saying to check out Sally Beauty Stores soon!  Literally made my night.  Now if they could just re-release I'm Not Lion, my life would be complete.


I need to do more manicures like this.  I love the accent how the flowers frame the nail and not just fill the whole thing up.  The blank white space really makes it pop.  I'm happy I went through and added the gold glitter also.  It truly was missing something without it on my nails.  Paulina's looked perfect without it.

What do you think?  Fan of the manicure?  Loving these polishes?

Have a GREAT day!  Until next time, <3.

Nail Artist of the Month

February Nail Artist of the Month: Riot_PR

9:00:00 AM

Good morning polished world!  How are you all today?!  I hope you are doing fabulously!  We are getting hit by another winter storm...shocking, right?  Pretty much planning on staying in my house today and baking lots of cookies.  I have zero want to go outside in the below zero windchills.  Ugh, is Spring here yet??


Well, the February Nail Artist of the Month is for sure not dealing with any of these cold winter temperatures!  This month I selected Amanda from @riot_pr!  I've been following her for awhile and have been impressed with her clean swatches, and her cute nail art!  It was about time that I feature her!

Enough of my babbling, time to hand the blog over to Amanda!

_____________________________________

My name is Amanda & I'm from Arizona :)

My nail art journey started in 2010, after using some pretty colors to make polka dots, or rotating 2 or 3 colors on every other finger. I would post my creations on facebook, & my friends would comment, "How cute!", or, "These are cool!" They'd ask me to paint their nails; girls at work would ask as well. I thought that was it & I didn't really practice or work on my skills until one fateful day in 2012 when I downloaded a phenomenon known as "Instagram" ;) It was there that I found, I wasn't the only one with a passion for this nail art racket, & I slowly started making friends & learning so many different techniques! It's been a fun ride so far, but I still have so much to learn. If you're new to the IG nail community, welcome! And if you're a seasoned vet, thanks for teaching me some stuff! :)

Okay, okay... enough rambling :)


I decided to do some nail art inspired by my state flag. I used Zoya "Arizona" as my base (orange), red acrylic paint for the stripes & that gorgeous blue glitter is "Friendship" from @simplybeautiful1973 ♡ The gold star is from a variety pack of charms I got from Amazon. Topped it all off with Glass fast dry top coat by @ellageepolish :)

Thank you so much for checking me out, & a big thank you to Alaina @thelittlecanvas for this opportunity! :)
_______________________________________

That Zoya is so gorgeous!  I don't have anything like that in my collection and must find it or a dupe!  So cool that Amanda was inspired by her state flag!  And that the color is called Arizona which is her state....a much warmer state than mine.  Oh how I wish I wasn't up north here in the cold.

Make sure to head on over to Instagram and follow Amanda!!

Thank you so much for this awesome post!!!

Until next time, <3.

FingerPaints

Valentine's Day Manicure + 3 Years of The Little Canvas! :)

9:00:00 AM


Good morning polished world!  How are you all today?  I'm fabulous because today marks the three year anniversary of The Little Canvas!  I cannot believe it's been three years since I started this blog!  Where did the time go?!  As I sit here thinking back on the years, I honestly never thought it would have lasted this long.  I started The Little Canvas on a whim, not only to share my love of nail art but with the hopes to inspire someone like so many other bloggers inspired me.

I didn't think I would get 1 follower, let alone the thousands I do have.  It's still so surreal to me.  The people I have met through something as simple as nail polish is quite amazing.  I've met some of the most awesome people, and gained friendships I truly am grateful to have!  I'm so happy to have The Little Canvas in my life!

So since Valentine's Day is tomorrow, I decided to do a combo manicure not only celebrating the holiday, but also celebrating my blog-versary!  I saw this adorable heart balloon manicure on Pinterest and thought that it would be perfect!  Balloons are festive and belong at any type of celebration!

Let's take a look at what I came up with!


Colors Used:
  • FingerPaints - You Can Crayon My Shoulder
  • Zoya - Kitridge
  • Sinful Colors - Snow Me White
  • Sinful Colors - Love Sprinkles
Want to know the most amazing thing about this manicure?  FingerPaints You Can Crayon My Shoulder!  For months and months and months, I have searched for a red textured polish.  I had my eye on Zoya Chyna but I never could find it at the store, and I skipped the Pixie Dust BOGO awhile back.  The Pixie's can be kind of expensive, and for something I rarely would use, I never could talk myself into doing it.

Well, FingerPaints released a bunch of new colors in 2015, which were sent to me to try.  I figured that this polish was going to be similar to Gogh With the Flow from looking at the bottle; a full coverage microglitter.  After one swipe on the nail, I was mistaken.  It was a beautiful gorgeous PixieDust-esque textured polish!  On my middle finger, there are three coats (I could have gotten away with two) of this gorgeous bright red textured beauty!  It dries matte but sparkles despite the finish.  I added a clear shiny top coat which kept the polish's texture, but made it beyond sparkly!  The polish worked great for nail art and I was able to freehand the heart perfectly with it!  I'm soooo happy to have this polish as part of my collection!


I bought Love Sprinkles by Sinful Colors because after seeing it had heart glitter pieces, I knew I had to have it.  I know this may come as a shock to many of my followers, but I do not own a single heart glitter.  Yes, there are dozens and dozens out there, especially from Indie makers, but I've never purchased one.  Mainly because I rarely use glitter.  So when one came along that was $1.99 and perfect for Valentine's Day, how could I say no?  The polish itself is okay.  It contains light pink and white glitters, with the hearts throughout.  The glitter itself applies evenly, but the hearts I had to kind of dig for and place on the nail.  In the end, it was worth it!

What do you think?  Fan of my Valentine's Day/Anniversary manicure?

Thank you to all of my followers, new and old, who are here supporting my little blogging adventure.  These past three years have been amazing and it's all because of you guys!  This community inspires me daily, and I do not see myself giving up this blog anytime soon!  Who knows, maybe I'll reach 5 years!  Only time will tell!  Again, thank you all! <3

Until next time, <3.

Animal Print

Twinsie Tuesday: Anti Valentine's Day Manicure - Maybe?

9:00:00 AM


Good morning polished world and Happy Tuesday!  How are you all on this fine day?  It's still snowy and cold here.  The end of this week is going to stink because our high temperatures are near a whole 3 degrees.  I'm hoping it's that dry cold and not the damp coldness.  Regardless, I'll be only leaving my house to go to work, and come right back home and crawl into bed.

Since today is Tuesday, that means it is time for yet another Twinsie Tuesday!  Since Valentine's Day is on Saturday, we are sharing Ant-Valentine's Day manicures.  That's right, anti.  I interpreted this as something containing black, not many hearts, and just not your average typical sweetheart looking design.

I had no clue what to do, and I really don't think my manicure fits the prompt so well because it contains pink, and no broken hearts, and not nearly enough black.  It is though not your average Valentine's manicure, so that works, right?  I was inspired by The Nail Polish Challenge for this nice little leopard heart design.

Let's take a look.


Colors Used:
  • OPI - My Vampire Is Buff
  • OPI - Kiss Me I'm Brazilian
  • Orly - Liquid Vinyl
I do love this manicure, which is surprising for me since I am not a fan of pink.  I will use it, but it's not my go to choice.  And this you would never believe either if you opened my Melmer and saw how many pinks I actually own.  I may not use them for bases much, but I do use them a LOT for gradients.  Hmmm, I haven't done a gradient in forever it seems.  I think I know what my next manicure is going to be!!


So anywho, this really isn't a Valentine's Day manicure, nor an anti one either.  It's a good manicure for any time of the year.  Maybe that's what makes it Anti?  I don't know, I really think I'm grasping at straws trying to make this manicure work for today's theme!

What do you think?  Enjoying this manicure?  Something you could see yourself doing?

Let's see what other ladies did!


Tiffany at Polished To Precision
Savannah at Addicted to Polish
Róisín at Cuti-CLUE-les
Marisa at Polish Obsession
​Lisa at The Polish Playground
Lakeisha at Refined and Polished
Kristine at Pink and Polished Nails
Jessica at Blue Velvet Lacquer
ChiChi at I'm Just Me...ChiChi
Chelsea at Nailed Blog
Bridget at A Painted Nail
Amber at Nails Like Lace
Amanda at Fashion Footing
Amanda at Amandalandish

Until next time, <3.

Dot Mani

Retro Dot Mani

9:00:00 AM


Happy Saturday blogging world!  How are you all today?  It's cold and still snowy here.  Literally nothing new to report.  I cannot wait to wake up to the birds chirping and the flowers blooming.  Six more weeks of winter better be true.

Since Valetine's Day is a week away, I should get my act together and start posting some themed manicures.  I honestly have no ideas in my mind and am not a huge fan of the holiday, therefore I'll probably only do one.

Today's manicure could kind of be considered Valentine's Day-ish.  It is pink and purple, which are huge colors for the day.  So if you aren't a fan of the day like me, you could do something similar to this retro dot manicure!

Let''s take a look!


Colors Used:
  • Orly - Charged Up
  • Ulta - Flamingo
  • Orly Instant Artist - White
Kind of a different look from the past retro dot manicures I've done.  For this one, I started off with a base coat of Orly Charged Up.  Such an awesome deep purple polish!  Applies a little patchy with two coats, but evens out in three.  It dries almost like a crelly, but leans more towards the cream.

When my base was dry, I took the pink polish and went right down the middle of the nail.   I then when through with my striper and dotting tools and added all the details.


My only dislike about the retro dot look is how bumpy it ends up being when it's dried.  I have to work on my technique because I don't think that other bloggers look as lumpy as mine are.  They were so lump that I ended picking off the little dots throughout the day.  Oh well, it was still cute.

What do you think?  Fan of this retro dot manicure?

Until next time, <3.

Dry Brush Mani

Twinsie Tuesday: Monochromatic

9:00:00 AM


Good morning polished world!  It is Tuesday so that means it is time for another Twinsie Tuesday!  This week our theme is monochromatic!  I honestly wasn't sure what this meant, so I went to Google and did a quick search for "monochromatic nail art".  I found dozens and dozens of ombre manicures as well as different nail art using different shades of one color.

Now you would think after knowing what it means and seeing dozens of ideas it would be easy for me to come up with a design, but it wasn't.  It took me a whole day to figure out what color I should use.  Then once I figured out the color, I had to pick out the different shades.  And then finally, one I had the shades, I had to figure out the design.  It was one thing after the other, and I'm pretty sure I changed my mind twenty times.

I finally settled on a purple dry brush grunge-y looking manicure.  Let's take a look!


Colors Used:
  • OPI - My Boyfriend Scales Walls
  • Five different purple polishes which I cannot remember at the moment and really should have written down
I know, I know, I failed with the whole not remembering what purple polishes I used.  I'm sure if I went over to my Melmer and opened my purple drawer, I would be able to figure it out, but since I'm already past the color section in this post, I don't feel like going back.  Laziness at it's finest.

After my base of white polish was dry, I used a light purple polish and did a few dry brush marks.  I then added more streaks of slighly darker polishes until I got to the darkest shade.  It looks more variegated in real life, my camera just stinks at picking up the different shades.


Overall, I think it's a monochrome look.  I probably should have just done a regular ombre design and called it a day, but I wanted to try something different.

What do you think?  Pass or fail for today's prompt?

Don't forget to check out the other Twinsies posts!


Amanda at Amandalandish
Amanda at Fashion Footing
Amber at Nails Like Lace
Bridget at A Painted Nail
Chelsea at Nailed Blog
Jessica at Blue Velvet Lacquer
Lakeisha at Refined and Polished
Marisa at Polish Obsession
Róisín at Cuti-CLUE-les
Savannah at Addicted to Polish
Tiffany at Polished To Precision

Until next time, <3.

FingerPaints

Dot Flower Manicure with FingerPaints Sterling Sculpture

9:00:00 AM


Good morning polished world!  Happy Super Bowl Sunday!  I'm not a fan of any part of the game this year.  The teams, the half time act...it's nothing special at all.  I'm looking forward to the food and the commercials the most.

Since I'm not a fan of the game, I decided to not do a Super Bowl themed manicure.  Instead, I have a periwinkle dot flower manicure with one of my new FingerPaints glitters!  That glitter is Sterling Sculpture!

Let's take a look!


Colors Used:
  • Sinful Colors - Sail La Vie
  • OPI- My Vampire is Buff
  • OPI - This Crown Needs a Gown
  • FingerPaints - Sterling Sculpture
I forgot how much I love Sail La Vie by Sinful Colors.  This polish came out two years ago as part of one of the summer collections.  At the time, I had been on the search for a perfect periwinkle and when I found it I jumped for joy.  I'm kicking myself now that I didn't get a second bottle because this polish applies so perfectly in two coats.  Plus, it's the best color ever.  You can imagine my sadness over the fact that the bottle is half gone.  Luckily today, while shopping at Sally Beauty Supply, I found an exact dupe from the new China Glaze collection!  They only had one bottle, but hey it should be enough for now.


The main purpose of this post is to talk about the gorgeousness that is Sterling Sculpture.  For years I have searched for the perfect multi-sized silver glitter.  I thought I found it with OPI In True Stefani Fashion, but it just wasn't hitting the spot.  Sure, I love that polish, but sometimes I want plain silver without holo flecks like it contains.  This FingerPaints polish is exactly what I was looking for.  Small, medium, and larger fleck silver glitters which truly look sterling!  On my ring and pinkie finger is just one coat!  It has a perfect glitter to base ratio, meaning I didn't have to place any glitters or dab in any naked spots!  I love when glitters are like that!  This is a must buy!

What do you think?  Liking this manicure?  Fan of the silver?

I was in Sally Beauty yesterday looking at the Nail Studio, and sure enough on the top shelf of the FingerPaints section, all these new polishes I've been showing you this week are there!  They aren't having a sale on them, but the new FingerPaints endless wears are on sale, so make sure to check those out while you're there!  I may go back and get a bottle or two to try out!

Everyone have a safe Super Bowl Sunday!  If you are going to any parties, remember to be responsible!!

Until next time, <3.