Accent Nail

Twinsie Tuesday: Accent Nail

9:00:00 AM


Good morning polished world!  Happy Tuesday to everyone!  Since it's Tuesday, that means it is time for yet another Twinsie Tuesday!  With "accent nail" being the theme, millions of ideas were running through my head.  Accent nails are the perfect way to add a little spice to a simple manicure.

When my interest with nails and nail art started, I had no idea what an accent nail was.  After reading many blogs, I discovered that girls would paint one or two of their nails differently in order to accent the main color and draw attention to the manicure as a whole.  At first, I wasn't fond of the idea, but after a few accent nail manicures, I fell in love with it.

For today's manicure, I of course did an accent nail which was filled with nail art to the extreme.  I was scrolling through my Facebook and saw a picture of CutePolish's newest design for some bubble look.  I thought this would be perfect to recreate since not only did I recently purchase acrylic paints, but I also failed the bubble theme week here with the Twinsie's.

I cannot begin to tell you how much I love this manicure!  Let's take a look!


Colors Used:
  • Accent Nail
    • Orly - Gumdrop
    • Zoya - Ling
    • NYC New York Color - Copabanana
    • Zoya - Rooney
    • White Acrylic Paint
  • Pink Nails
    • Zoya - Rooney
    • INM - Northern Lights - Silver
Kind of awesome, right?  The accent nail was so simple to do and I can't wait to recreate the look on all ten of my nails!  I started off with a base coat of white polish.  I then sponged on the four colors as if I were doing a galaxy design.  That reminds me, I should do galaxy nails again.  Anyway, after all the colors were sponged on, I added a quick top coat.  

To get the bubbles, I mixed some acrylic paint with a little bit of water.  Using my large dotting tool, I added white dots all over the nail.  After letting the white sit for about 10 to 15 seconds, I took a q-tip and lightly dabbed the white dots which soaked up the water.  This left behind the bubble look.


I picked Zoya Rooney for the main color of the manicure because it went well the best along with the accent nail.  Rooney applied evenly in two coats, but since I can't leave creams alone, I added a top coat of INM Northern Lights.   Pink + sparkle = win.

What do you think?  Like the accent nail?

I can't wait to check out the other Twinsie's manicures!


Amanda at Amandalandish
Amber at Nails Like Lace
UntilAnna at Going to the Showing
Bridget at A Painted Nail
Chelsea at Nailed Blog
Cordia at Seriously Swatched
Elizabeth at Did My Nails
Jessica at Blue Velvet Lacquer
Kelly at Tuxarina
Lakeisha at Refined and Polished
​Marisa at Polish Obsession
Róisín at Cuti-CLUE-les
Stephanie at A Little Polish
Tiffany at Polished To Precision
Traci at Drinkcitra

Until next time, <3.

Accent Nail

The Beauty Buffs: Black and White

8:00:00 AM

Hello again!  How are you all?  Today is Wednesday and that means it is time for another post alongside with the lovely Beauty Buffs!  This is such a wonderful and fun group of ladies, and I'm very happy to be posting with them every other week!  Just as I am very happy to be posting with the amazing Twinsies every Tuesday!  I'm a lucky blogger to have gotten to know all these awesome people!

Today our theme is black and white.  I'm a fan of black and white, especially when it comes to dress clothes.  Black pants, a nice black and white blouse, or a pretty black and white dress....you can never go wrong.  Especially because 99% of my crazy manicures will go with a black and white outfit.  This logic could actually be reversed and I could wear super bright clothes alongside a black and white manicure and it would match 99% of the time as well.

For today, instead of doing a complete black and white manicure, I wanted to add a splash of color because I feel all I've been wearing clothing wise is black and white.  Actually, today I'm wearing a black and white dress, and a complete black and white manicure with it would have probably made me feel like I was matching a little too much.  Also since it's still summer, I feel like I have to wear some sort of bright color on my nails.  Let's take a look!


Colors Used:
  • Color Club - Over the Moon
  • Orly - French Tip White
  • Orly - Liquid Vinyl
My black is a little iffy looking, but overall I think it turned out well!  To get the look, I followed a tutorial by Chelsea Queen which I cannot get to at the moment because Pinterest is being dumb and won't load properly on my computer.  I'll try to link it on my Facebook page when I upload this manicure later.

Until then, I shall explain the technique.  With a nail art brush, I painted two lines down my nail, then created a chevron pattern using the white polish.  I then filled in some of the spaces with the white polish.  Then I went through and filled in the empty spaces with my black polish.  Let it dry a little, add a top coat, and call it a night!


It was actually a pain in the butt to do the design.  My lines weren't perfect and then I flooded cuticles or put the black and white in the wrong spots.  I literally think that middle finger was done 4 times.  I should have stopped around attempt number 2 but it was worth it.

I'm happy I paired it with the holo Over the Moon.  In the sun, this manicure looks really awesome, and kind of trippy due to the chevron checkerboard that is accenting it.  I'll try to get a photo today once the rain clears up and post that on my Instagram!

What do you think?  Liking the black and white look?  Liking that I added a bit of color?

Don't forget to check out the other Beauty Buffs!


Until next time, <3.

Accent Nail

Zoya Hudson, Rebel, and Seraphina Nail Art

9:00:00 AM

Press Sample

Happy Sunday, or as I want to call it, Happy Stupid Daylight Savings Day for those who are affected by it.  Worst time of the year is when we have to Spring forward and forgo that hour of sleep.  I'm all for daylight savings in the Fall when we gain an hour, but this Spring one is awful and it takes me a bit to get used to.  A good thing about it though, is that Spring is right around the corner!  Well, hopefully.  I think we're supposed to get snow again but hopefully it will be the last time.

Even if the weather isn't saying that Spring is right around the corner, the polish companies sure are!  This is one of my favorite times of the year when it comes to polish collections.  So many pastels!  Blues, purples, mints...oh how I love it!  A week or so ago I received the Zoya Awaken collection and I literally tripped over myself to take the mani I had on off my nails and start playing with these pretty babies.

I immediately gravitated towards Hudson and Rebel, the purple and blue shimmers of the collection.  I swatched Hudson on my pointer and Rebel on my middle and decided that there needed to be some sort of accent which incorporated the two.  I grabbed my bottle of Seraphina from the Zenith collection since it had a similar shimmer finish and got to work.

Let's take a look!


Colors Used:
  • Zoya - Hudson
  • Zoya - Rebel
  • Zoya - Seraphina
  • Orly - Instant Artist - Jet Black
Before I get to how I did this manicure, or why I decided to go with a stained glass color block accent, I must talk about how GORGEOUS Hudson and Rebel are.  Hudson is a purple orchid polish with a silver metallic shimmer.  It applied like a dream and I had full coverage in two coats.  I decided to go for three coats with this manicure because I really loved the purple and wanted an extra burst of color.  Rebel is a blue sky polish with a silver metallic shimmer.  Just like Hudson, it applied like a dream and I had full coverage in two coats.  I decided to keep this one at two coats for the manicure because the color was saturated enough and I was scared if I did three that I would overpower the purple.  Since both polishes have that silver shimmer, Seraphina was an obvious choice to pair them with.  I used three coats of Seraphina because I find this one to be a tad sheer.  It's not awful with 2 coats, you most certainly could get away with it, but I think when next to bright beauties like Hudson and Rebel, it really has to pop.

The silver shimmer in both Hudson and Rebel is just gorgeous.  They're not like your typical metallic polishes and they aren't your typical shimmer polishes.  They're somewhat of a hybrid of both.  A couple people actually asked me what top coat I used to get the effect because they didn't think it was part of the actual polish.  They dried sort of like a satin polish in my opinion, they weren't overly shiny but they weren't dull.  They were just gorgeous.

Overall, the manicure is gorgeous in my opinion.  I went with the stained glass color block look because after I put some dots on top of Seraphina, I thought to myself "Goodness, these would look good as a color block."  I removed my dots, and took my Orly Instant Artist striper and added some random lines across the nail.  When the lines were dry, I used my dotting tool to add the color where I wanted it.  Then I went back through with my striper to even some lines out.  You an see where I messed up a little but oh well, from a distance you couldn't tell.  Regardless, who was looking at the accent when the other nails were so pretty!?

What do you think?  Are you a fan of the Awaken shimmers?

I cannot wait to use Dillion, the mint shimmer, from this collection.  I think all three need to be paired together for some Easter nail art!

If you would like to get your hands on any of these polishes from the Awaken collection, they are for sale on Zoya's website for $9 a bottle.  Currently, Zoya has a sale where you buy two polishes you get any green polish for free, so really now is your time to buy!  Think about it, you could get Hudson and Rebel, then Dillion would be free since it's green!  This deal ends on 3/17, you can check out the details here!

Until next time, <3.

Oh oh, If you haven't seen my St. Patrick's Day Nail Art wheel, make sure to check it out here!  And if you haven't entered my giveaway for Incoco Nail Appliques, check that out here

**Polishes used in this post were provided for PR purposes. Please see my disclosure policy**

Accent Nail

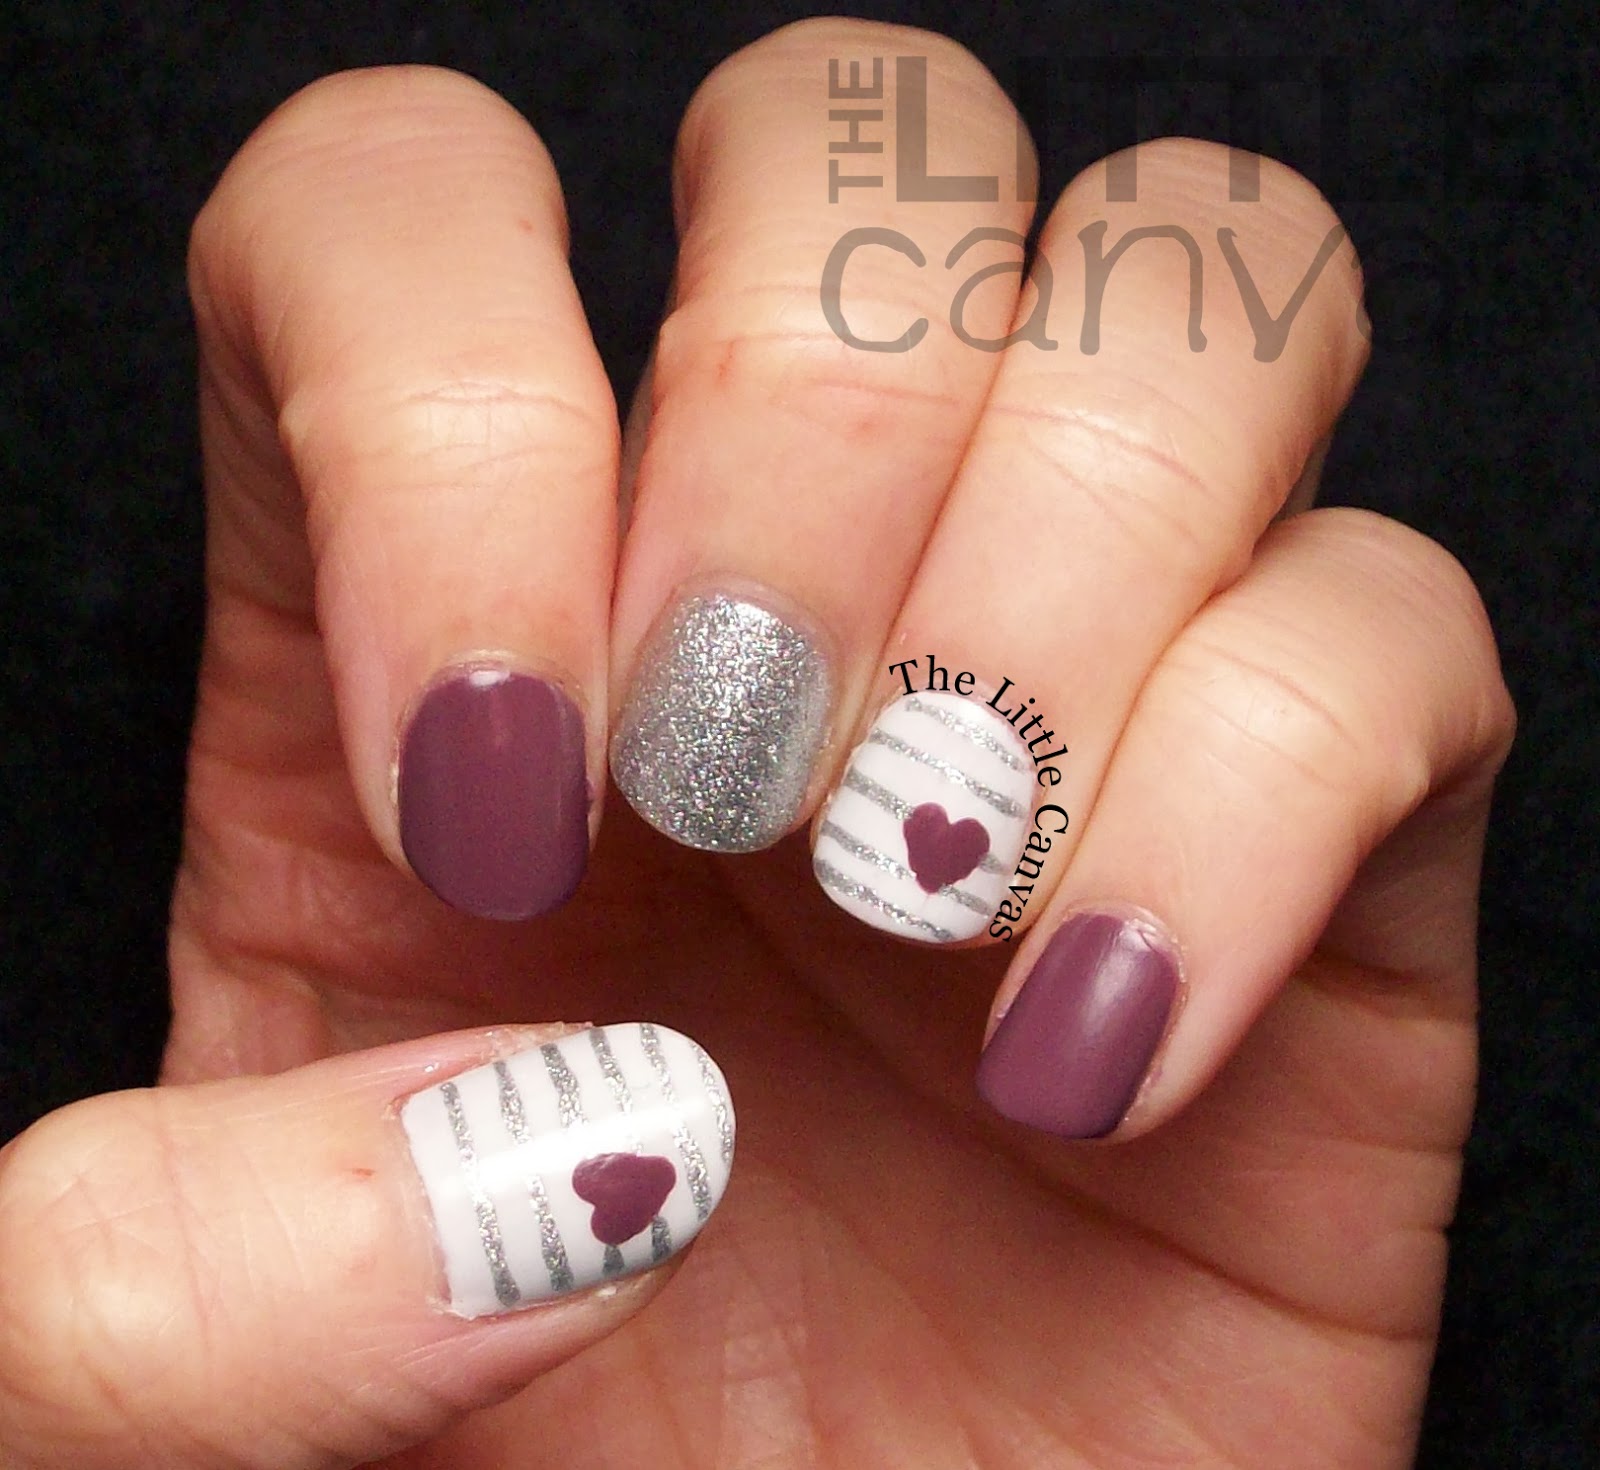
Simple Heart Manicure Inspired by AmKuch1

9:00:00 AM

Happy Sunday!  How are you all doing today??  I'm happy because it's not below zero outside.  Sure, it's damp and rainy and we'll probably have another cold freeze in about a week, but for now it's warmer and that is all that matters!

Today I am bringing you a simple heart design which was inspired by this gorgeous manicure by AmKuch15 on Instagram.  I'm pretty sure this is probably her most re-created design.  It's easy to see why, it's just so simple and so gorgeous.  As soon as I saw it, I knew I wanted it on my nails.

I switched the colors up a bit, and loved the end result.  Let's take a look.


Colors Used:
  • OPI - I'm Feeling Sashy
  • OPI - This Crown Needs a Gown
  • OPI - My Boyfriend Scales Walls
Isn't it so pretty??  I decided to use I'm Feeling Sashy mainly because I had just purchased the polish at the time and was dying to use it.  This is my first polish of this color, so you can imagine my excitement when I finally snagged a bottle.  It has that perfect OPI formula where it applied evenly with two coats.  

Then, instead of using my normal silver metallic polish, I decided to use This Crown Needs a Gown which has quickly become my favorite silver polish.  Goodness, if you don't have it, I suggest you head out and find a bottle!  It dries with this perfect satin finish that requires on top coat.  If you put a top coat on it, the satin is still there but a little more depth is added.  Since I loved this polish so much, I ran out and purchased the gold satin from the Gwen Stefani collection because this silver had to have it's sister!


Both polishes worked great as nail art polishes as well!  As you can see, I was able to get rather straight lines using my nail art brush and This Crown Needs a Gown, and I'm Feeling Sashy made a perfect little heart using my dotting tool.

I had debated on adding INM Northern Lights to I'm Feeling Sashy, but I'm so happy I didn't.  It looks so much better with the cream polish, then the metallic and art nail.  Just so simple and gorgeous.

What do you think?  Have you tried this popular manicure?  Do you own either of the OPI satins and love them as much as I do?

My next post I'm rather excited to share with you!!!  Until then, <3.

**I purchased all the polishes used in this post**

Accent Nail

Ulta Showgirl with Pinata Yada Yada :)

9:00:00 AM

Sometimes I need to take a break from nail art.  I should do it more often because sometimes my "creative" brain becomes fried.  This is an awful thing to happen when sitting down to do a manicure because it always results in disasticure after disasticure.  Then I get frustrated, swear off nail polish forever, end up wearing naked nails, then two days later return to my Melmer and begin painting again.  After doing this simple manicure, I think I may have found a way to break the "I hate my nail polish" cycle for good.....hopefully.

I wore this manicure awhile ago, like beginning of July awhile ago.  I told you I have a back stock of manicures to go through.  I posted a picture of them on Instagram, but never got around to posting them on the blog.  I remember when I did this manicure, I was talking to Amanda, The Nail Polish Enthusiast.  Amanda is the queen of rainbow glitter polishes and always has PERFECT placement of them on the nail.  Seriously, I find this to be the hardest thing in the world, painting a glitter polish on my nail.  I can do a polka dot, tape manicure, you name it, but placing glitter polish, is truly hard work.  Whenever I do it, it globs in one central area on the nail, or pools at the cuticle.  It's just nasty looking.  That's why I'm ALWAYS hesitant to use a glitter polish.

Thanks to Amanda though, she talked me through it and well, I for once got a decent looking glittery manicure!  Hers are still a million times better than this.  Let's take a look!


Colors Used:
  • Ulta - Showgirl
  • Ulta - Pinata Yada Yada
I wish my camera and lightbox cooperated with me to get decent photos of this manicure.  Ulta Showgirl is a gorgeous coral color, which isn't as orange hued as what it came out to be.  If it were sunny, I probably would have gotten more "close to life" photos.  It is one of my new favorite polishes though.  First application, it has a jelly like formula.  I really wasn't sure how it would build up or if I would like it, but after the second coat, I truly was in love.  It has the most perfect shiny finish and leans to wanting to be a jelly while still being a cream polish!  If you're a fan of corals, head on out to Ulta and purchase this!!!  I'm so happy I did.

Pinata Yada Yada is an awesome rainbow glitter with multiple sized glitters in many different colors.  Thus, rainbow.  I used it last year in my birthday manicure and used it once or twice since on my toes.  This was one thickish coat with some random glitter placement to fill in some bald spots.  If you're used to using glitters like this, then you should have no problem because the bottle is packed with glitter.  I love it despite my lack of skill.

What do you think?  Loving the simple? 

Until next time, <3.

**I purchased the polishes in this post.**

Accent Nail

Simple Zoya Dot-icure

9:00:00 AM

Ever have a manicure that you just are head over heels with.  You know, one that you can't stop looking at no matter what you're doing.  Yeah, this is that manicure for me.  It's so simple, but so pretty that I cannot even take it.  As stated in my previous Pixie Dust post, I'm in love with these textured polishes.  I also said that for a few weeks I might be doing some simple manicures featuring these gorgeous beauties.  

Since purple is my favorite color, I automatically was drawn to use Stevie.  It was a no brainer.  When I received the Pixie Dust polishes, I also received Zoya's Stunning and Irresistible collection.  While all the colors are beyond gorgeous, Zoya Rocky has been screaming my name since I opened the box.  I put the two bottles together, and it was fate.  They were destined to be paired together.

Let's take a look at the manicure.


Colors Used:
  • Zoya - Rocky
  • Zoya - Stevie
  • Sinful Colors - Snow Me White
So simple, yet so gorgeous.  As I stated in my previous Pixie Dust post, these polishes are AMAZING to work with when it comes to nail art.  I thought since they dried matte, and with the speed they dry at, I thought that they would be impossible to dot onto a nail and get a round perfect circle.  I quickly found that I was mistaken and wanted to dot all my nails with a Pixie Dust.  So glittery and perfect.  Since you add top coat to it also, it ends up looking like a super glittery polish, which how can you go wrong?

Zoya Rocky is from the new Summer Stunning collection, and well this polish is just that; Stunning.  It is a known fact that I am a sucker for a blue polish, and ever since Zoya posted a sneak peek of this polish on their site, it became a must have.  Zoya describes Rocky as a "serene blue cream."  It is a gorgeous blue which reminds me of a blue summer sky.  What was amazing about this polish, and others from the Stunning collection, was that I had full coverage in one coat.  I did apply two coats to all the nails because I wanted the color to be extra bright.  It's nice not having to put two to three coats on to fill in bald spots. which with some of my Sinful Colors blue in this color I have had to.  Overall: great formula and great color.

What do you think?  Do you have any of these Pixie Dust polishes or Stunning polishes?  Fan of the simple manicure?

Until next post, <3.

**The 2013 Zoya Pixie Dust Polish and Stunning Polish were provided by Zoya for Promotional Purposes.  I purchased Sinful Colors Snow Me White.  The opinions expressed are my own, please view my disclosure policy**

Accent Nail

The Little Mani which had Potential but Never Came to Be

9:00:00 AM

Le sigh, I had such high hopes for this manicure, but it never came to be anything.  The other day I had to go out to the store and did not have time for a big fancy smansy nail art extravaganza.  I didn't want to go naked, so I decided to paint on a base coat and when I came home I had a plan to do a glittery masterpiece.  Of course, when taping up a package to mail out, I ripped the paint off.  Then when at the store I smashed another nail good and chipped it.  Then one nail decided to peel at the tip....just...ugh it was a mess.

Despite it not coming to be anything, I still took pictures since it featured the gorgeous Angel Eyes by Orly and people have been asking my opinion on it, I thought I would share.  In a few weeks, I will revisit this mani and go for my glittery extravaganza.  I have revisited it slightly using the colors in different manicures, but that's to come ;).  Until then...let's take a look at sheer simpleness.


Colors Used:
  • Orly - Angel Eyes
  • Revlon - Dreamer
Angel Eyes, just sheer glitter perfection in a bottle.  Well not sheer, the polish itself is rather opaque because there are so many tiny flecked glitters in it.  With three thin coats I had complete coverage, but if you used 2 thicker coats, you totally could have gotten away with it.  With just one coat it distributed amazingly.  There weren't any areas which were more glittered than others.  Next time I use it, I may wear a blue polish undie so I don't have to use as much of this gorgeous polish.  I really loved it.  It was so sparkly in the sunlight, especially with those larger holo pieces.  I'm really sad that it didn't hold up due to my own roughness.

Dreamer is always a win in my book.  This polish is a dusty baby blue cream which I bought last year after my bright baby blue went dry.  While it is differently colored, it's still gorgeous, and I recommend it to anyone. It works really well for nail art, be it polka dots, stripes, swirls, or gnomes :P.

Do you have either polish?  Thoughts?  Feelings?

I hope you enjoy my next few manicures featuring one or more of these polishes :)