Holiday

The One With the Buffalo Plaid Winter-y Manicure

9:00:00 AM

Nothing to Disclose


Good Morning, Polished World!  How are you all doing on this wonderful Sunday?  First, I want to extend my thoughts and prayers to those who are followers of this blog who were affected by the horrible weather in United States over this past weekend.  I can't stop watching the footage of the tornadoes and have this deep pit in my stomach.  I could never imagine going through that and truly my thoughts and prayers are with every single one of you.

When things like this happen, it really puts things into perspective.  When I was writing this post, I was complaining about the dumbest things.  All which are petty in comparison.  Right down to my complaint being that I didn't get around to posting this blog sooner because I was busy with work.  In the end, I should be grateful that I have a job, a home, and electricity.  Things that so many lost in a blink of an eye.  So if I can teach you all anything this season, it's to please be grateful for what you have.

Today's design is a fun, wintery Buffalo Plaid design.  A few years ago I created a similar design where I accented the whole thing with a holly leave, but I really wasn't feeling that.  So, I opted for the snowflakes, because we all know how much I love doing those this time of year.

Let's take a look!


Colors Used:
  • INM - Red Rover
  • ILNP - Versailles
  • ORLY - Liquid Vinyl
  • Acrylics
Red Rover is a gorgeous red polish that I totally forgot I owned!  For this design, I originally was going to use OPI Having A Big Head Day, but unfortunatly it dried up.  I went on the search for the perfect Buffalo red, and found Red Rover.  Two coats of this beauty and I had the perfect red Christmas polish.  When the two coats were dried, I free handed the buffalo plaid.  Yes, that's right, free hand.  I started off by painting on the little squares, then went on from there.  Tedious?  Little bit.  Worth it?  Of course.


I really like how the snowflakes blended with this design. It feels to me like a mix of a winter-y warm sweater....if that makes sense.  My only regret about this design was that I used Versailles by ILNP instead of Mega X.  The snowflakes were an after thought, so I don't know if gold really goes along with them.  I think silver might have been the better choice.  Regardless, I still love it.

What do you think?  Fan of this manicure?

Until next time, <3.


Christmas

The One With The Final Christmas Manicure

9:00:00 AM


Good morning polished world!  Merry Christmas to all of those who celebrate!!!!  Cannot believe that I have made it a whole month doing nothing but Christmas designs.  I actually took this manicure off last night and got to work on something not so Christmas-y only for the base to turn dark and give it a Christmas look.  Sigh.  I'm going neon for my next mani.

Anyways, today I am bringing you my very last Christmas design!  I believe it was NBNailArt on Instagram who posted a design with a poinsettia over a gold gradient background.  While going through my Pinterest idea board, I saw I had pinned a similar design awhile back.  I loved the look so I thought I'd give it a go.

Let's take a look!


Colors Used:
  • ORLY - White Tips
  • FingerPaints - Golden Glaze
  • Zoya - Maria Luisa
  • Acrylics
Okay, kind of love how these turned out.  If I were to do this design again, I would make the flowers a little smaller so you can see the background clearer, because it truly was gorgeous.  Overall though, I'm impressed with the outcome especially since free-hand designs that are intricate like this usually don't turn out how I want them to.  I cheated and used acrylics because I had to mix a lot of colors to get the desired tones and details.

What do you think?  Fan of this design?  Perfect last Christmas manicure??

I hope everyone has a Happy and Merry Christmas!!!!

Until next time, <3.


Christmas

The One With the Christmas Dotticure

9:00:00 AM


Good morning polished world!  How are you all doing today?  It's finally Friday and Christmas is right around the corner.  That's right, Christmas is almost here and that means it's almost time for me to finish up posting only Christmas manicures.  I'm still surprised that I have gone all month with doing only holiday themed designs.  I really thought I wasn't going to make it because work has been so busy, but here I am!!  Successfully completing my blog task.

Today's design is the child born after a disasticure.  The other night I tried to do this holly design but it looked horrid.  Everything smeared, the leaves weren't shaped right, just everything was horrid.  So when it was midnight and I had naked nails I just decided to grab two of my favorite Christmas polishes and do a simple dotticure.

Let's take a look!


Colors Used:
  • Nine Zero Lacquer - Santa Suit
  • Nine Zero Lacquer - Cat in the Christmas Tree
My two favorite scattered holo Christmas crellys.  They are beyond amazing.  Two coats, full coverage, and gorgeous shiny finished look.  I absolutely love Cat in the Christmas Tree.  It's a green polish that is truly unique to my collection.

What do you think?  Fan of this simple Christmas look?  Like the polishes??

Until next time, <3.


Christmas

The One With the Christmas Snowman Manicure

9:00:00 AM


Good morning polished world!  How are you all doing on this wonderful Saturday?  I'm never leaving my bed, especially since the temperature has dropped down.  My fleece sheets went on a few weeks ago and my bed is this cozy, warm, comfy cocoon which is truly difficult to leave every day.  Now that it's Saturday and I don't have to work, I don't see why I should have to leave.  Well, maybe to be a productive adult, but eh.

Today's design is one I've done every year now for a few years, but I put a Christmas spin on it.  I purchased a snowman sweater dress to wear to the ugly sweater party at work earlier this week, so it was only fitting that I matched my nails to the dress.  Usually I do this snowman manicure on a blue base and give the guy a neutral colored scarf and call it a winter design paired with the snowflakes.  Since I vowed to do only Christmas designs, I went with a red and green theme.

Let's take a look!


Colors Used:
  • Zoya - Merida
  • Zoya - Alicia
  • Zoya - Blaze
  • Acrylics
Oh Zoya, I love your scattered holos.  Please, oh please, give your polishes a wider brush!!  I can't be the only one who hates the thin brushes.  Companies like ORLY, OPI, and Sally Hansen have spoiled me with these wider brushes.  Few swipes and I have one coat.  I find with the narrower thin brushes I end up flooding my cuticles.  Maybe it's just me....

Anyways, these polishes are all gorgeous.  Two coats for each and you have sparkly, scattered holo goodness.  I think when Zoya has their annual New Years BOGO sale, I might stock up on my favorites.  That way I can use them more often without feeling like I'm going to run out.  Part of me feels like I have a back up of a few but still don't use them.  Probably should clean my melmers and check.

What do you think?  Like this little snowman?  Fan of Zoya's scattered holos?

Until next time, <3.


Christmas

The One With the Santa Claus Nail Art

9:00:00 AM


Good morning polished world!!!  Welcome to Wednesday.  Middle of the work week....is it over yet?  We are in a winter storm warning so it will be an interesting day.  Hoping it's a work from home day, aka a work from bed day.  That sounds just so wonderful, but I doubt it will happen.

Continuing with the Christmas manicures and they are starting to get a tad more intricate!  On Sunday at work we had the resident/family Christmas party.  Of course I wanted to be super festive, so I went out and bought myself the cutest Christmas leggings with Santa Claus on them.  It only made sense to match my nails to the leggings.

Let's take a look!


Colors Used:
  • Nine Zero Lacquer - Santa Suit
  • Nine Zero Lacquer - Cat in the Christmas Tree
  • OPI - Pale to the Chief
  • ORLY - White Tips
Isn't this the cutest manicure ever?!  I am obsessed with this little guy.  I was going to take the design off after two days because my right hand chipped some, but I just couldn't bring myself to do so.  I think this is my favorite Santa design of all time.  I don't think I did one last year because I honestly never liked how mine turned out.  I think taking a year off was good for me.

Santa Suit by Nine Zero Lacquer is a gorgeous red scattered holo polish.  Kind of a crelly consistency which needed two coats.  Perfect Christmas red which really does remind me of a Santa Suit.  


Here's a crappy cell phone shot of my manicure with my leggings.  Doesn't my manicure match them perfectly??  My goal now is to get leggings for every holiday and paint my nails to match them.

What do you think?  Fan of this manicure?  Love the leggings like I do??

Until next time, <3.


Christmas

The One With the Christmas Branch Nail Art

9:00:00 AM


Good morning polished world!  How are you all doing on this Sunday?  It's supposed to snow a little bit here today, which I am okay with since it's freezing.  I also have a Christmas party for the resident's and their families at work, so if it's snowing while I'm working, I'm completely okay with that also.  I'm debating on waiting to do snowflake designs until after Christmas....

Until I figure out when I'm going to do snowflake manicures, I'm going to keep sharing Christmas designs.  Today's manicure is Christmas tree branches!  I've seen this design all over Pinterest, then I saw Shannon from Coffee and Nail Polish create a design like it, so I decided it was my turn to try the look.  I was going to try it last year, but I was nervous due to the blending and such.  I felt like I didn't have the talent to be able to make the design look like tree branches.

I think I did a pretty good job.  Let's take a look!


Colors Used:
  • Morgan Taylor - I'm Drawing a Blanco
  • Acrylics
Cute, right??  It took me a bit to figure out how to blend the greens together to make them look like evergreens, but I finally figured it out.  I first started with a really light green acrylic, which was my Holiday Green acrylic mixed with some white.  After I had that down, I took the plain acrylic with no mixed colors and blended it a bit in with the light colored.  Then I mixed the green with some brown to add the darkest details.

Morgan Taylor I'm Drawing a Blanco is a perfect base for this manicure.  It is a white shimmer polish with tiny tiny glitter pieces.  It reminded me of snow.  Perfect winter polish.  Two coats and still a little sheer, but since it was the base for this design, I didn't need it to be completely opaque.

What do you think?  Like the Christmas branches?  Think they look like tree branches??

Can't wait to show you my next Christmas design.  It's adorable.

Until next time, <3.

Christmas

The One With the Poinsettia Nail Art Re-Creation

9:00:00 AM


Good morning polished world!!  How are you all doing on this cold day?  We are getting some snow, not as much as I would like, but some.  You might think I'm crazy for wanting snow, but December is the only month where I truly like snow.  After December 25th it becomes annoying and a bother.  There's just something about a white Christmas.

I'm back today with another Christmas manicure!  So far so good on keeping that promise to myself of posting only Christmas designs this month.  Actually painted another last night so that means I'll have another post in the next few days.  Anyways, today's design is a re-creation of one of my favorites from last year....my poinsettia design!!!

Switched up the accent nail a little bit due to sheer laziness, and made the leaves a tad smaller, and overall loving it.  Let's take a look!


Colors Used:
  • ORLY - Sunset Blvd
  • ORLY - Invite Only
  • Serendipity Polish - Glitzy Gold Champagne
  • Salon Perfect - Glam Glitter
Isn't it lovely??  Kind of love it more than last year's design.  The one thing that bothered me last year was that the leaves were large and I felt like it took over design and took away from the poinsettia.  This year, the red flower really stands out and the leaves are in the background just like they are on the real plant.

Sunset Blvd and Invite Only are from last years ORLY Holiday collection.  These two polishes are the BEST Christmas polishes.  The green applies in two coats.  Last year I had a problem with bubbling and had to add a top coat of Northern Lights, but this year no bubbles.  Must have been I applied it too thick or didn't let the coats dry long enough.  Who knows.  Sunset Blvd also applied in two coats.  Just a gorgeous, bright, Christmas red.

And one of my favorites this time of year - Glam Glitter.  I won this polish a few years ago and am shocked that the red didn't bleed and that the polish itself didn't dry up.  Small gold hexes, mixed with green and red pieces.  The best Christmas glitter.

What do you think?  Fan of this manicure?  Love the polishes used?

Until next time, <3.


Christmas

The One With the Christmas Holly Manicure

9:00:00 AM


Good morning polished world!!  How are you all doing on this fine Monday? That's right, the work week is here again, are you all ready?  I kind of am, I'll know for sure by the end of the day.  Ever had one of those starts to the week.  Go into it all pumped thinking you're ready then halfway through the day you want to start over?? 

Since it is December, I have decided I'm going to bring you only Christmas manicures this month.  Well except for after Christmas when I bring you New Years manicures.  Maybe.  We will see how the end of the month goes.

Today's design is a simple holly manicure inspired by Jessica from LaLaLoveNailArt.  She posted it a few weeks ago and I fell in love.  I searched my melmer for a darker red and green and finally settled on a beauty by INM and Morgan Taylor.

Let's take a look!


Colors Used:
  • INM - Emerald
  • INM - Gold Northern Lights
  • ORLY - White Tips
  • Morgan Taylor - All Tango-d Up
Adorable, right?  So cute and simple.  Perfect introduction to Christmas manicures for the blog.  Emerald by INM is beyond gorgeous.  A deep green polish that covered completely in one coat.  I used two coats because I had an uneven spot on one of my nails.  What's great about these INM polish's is that they dry super quickly so you don't have to wait forever in between coats.

Morgan Taylor All Tango-d Up is going to be one of my go-to red polish's.  Sure, I'm not a huge fan of red, but this one is gorgeous and applied like a dream.  I always have a problem where my reds flood and stain my cuticles, but this one applied perfectly.  Two coats and full coverage.

A few months ago INM sent me a package which contained my favorite, INM Northern Lights in Gold.  I was heart broken a few years ago when my top-coat drawer fell out of the storage unit and this top coat was one of the casualties.  I searched everywhere and never found it.  When the bottle arrived, I literally jumped for joy.  This reminds me, I have those INM Christmas glitters from a few years ago!  

What do you think?  Fan of this holly manicure?  Something you'd try??

Until next time, <3.


China Glaze

The One With The Neon Green Spider Webs

9:00:00 AM


Good morning polished world and Happy Halloween!!!  After days of preparing a group costume of Teenage Mutant Ninja Turtles, I am ready for today.  Sure, I'm probably going to look super stupid, but I'm excited and I know that my co-workers and resident's are going to love it.  I can't wait to see what my other co-workers costumes.  We should have had a contest....

Anyways, to match my costume, and have still Halloween nails, I decided to re-create a spiderweb design by OhMyGoshPolish.  I pinned this design last year since I had all of the polishes, but I never got around to doing it.  I'm kind of mad that I haven't used any of my glitters like this in a while.  I need to go through my glitter collection and force myself to use them.

Let's take a look at the last Halloween design!


Colors Used:
  • China Glaze - Drink Up Witches
  • China Glaze - Something's Brewing
  • ORLY - Liquid Vinyl
Isn't it cute??  Drink Up Witches is such a bright, fluorescent green polish.  I put a base of white underneath because when I tried it alone on the naked nail, it was kind of a thin jelly which probably would have taken three coats to get opaque.  It has a similar consistency to ORLY Glowstick.  Super bright, super thin, but super amazing.

Somethings Brewing is a mixture of green and black hex glitters.  You can't see the black glitters that much due to the black base, but you can kind of see them over the green glitters.  It applied nicely with little to no need to dab or place glitters.

What do you think?  Like this final Halloween manicure??

Until next time, <3. 


Halloween

The One With the Ghost Nail Art

9:00:00 AM


Good morning polished world and Happy Sunday!  How are you all doing today??  I need to carve my pumpkin and make a few more tutus for my group costume at work.  I cannot wait to show you guys this costume.  It's been forever since I dressed up so I am beyond excited.  It's all coming together so nicely!!

Today's Halloween manicure is a re-creation of last years ghost design.  It popped up on my Facebook Memories the other day and I decided I had to re-create it.  Of course this seems to be the trend this year.  Probably a good thing I didn't post any of these to my Facebook because next year I'd just be re-creating everything again.

Let's take a look at today's re-creation!


Colors Used:
  • Sally Hansen - Blacky O
  • Sally Hansen - Electra-cute
  • ORLY - Mirrorball
Super cute, right??  I think my little ghosts last year were cuter, but whatever they still are cute this year.  I forgot what a pain in the behind they were to paint.  I couldn't space them out on my nail right so I had to re-do them like five times before I was happy with this final design.

What do you think?  Like this design?  Have you ever tried to paint itty bitty ghosts and frustrate your self?

One more design coming on Tuesday!!!

Until next time, <3.


Halloween

The One With the Halloween Patchwork Manicure

9:00:00 AM


Good morning polished world and Happy Friday!!!  Super excited that it's Friday, and super excited that Halloween is almost here.  I finally have my costume picked out and it's a group costume with some of my amazingly lovely co-workers.  I haven't dressed up in ages, let alone have a group costume!!!  Cannot wait to show you all!

Bringing you yet another Halloween manicure.  I'm having mixed feelings about Halloween being around the corner.  I'm happy because I'm kind of getting tired of the Halloween designs, but I'm sad because I still have so many ideas that I want to try but not enough time.  Such is life, right?  Never can be happy.

Today's design is a simple Halloween patchwork.  I usually create this design every year in one way shape or form.  This year I opted for simple, and somewhat neon.

Let's take a look! 


Colors Used:
  • ORLY - Thrill Seeker
  • ORLY - Frolic
  • Serendipity Polish - Orange County Girl
Super fun look, but I kind of wish I went for a more traditional Halloween green.  Yes, Thrill Seeker is amazing, but it just leans more yellow than I would have liked.  Actually, it looked greener in person, I think my camera couldn't fully handle the neon and made it look weird.

Easy look to re-create.  First I started off with a base of white polish.  When that was dried, I went through and added the color blocks using a dotting tool.  It didn't have to be done neatly because I knew the black lines would be covering over the spots where the colors met.  When my patches dried, I added the black using a nail art brush.  Top coated, and called it a night.

What do you think?  Fan of this manicure?  Something you'd try??

I should have two more Halloween designs for you before Tuesday!!!

Until next time, <3.


Halloween

The One With the Halloween Smoosh Manicure

9:00:00 AM


Good morning polished people! How are you all doing on this fine Tuesday?  Can you believe Tuesday is already here?  I feel like Monday just came and went.  Actually yesterday was just an odd day.  Work was okay, but when I came home from work, my relaxing night of making dinner and lounging turned into chaos.  It was kind of windy here, so the trees across the street started to hit the power lines, causing the tree to catch fire, which then in turn brought the fire department to the neighborhood.  The fire department brought the electric company who threw the power for the whole street while they fixed it.  Of course, they threw the power off 10 minutes after I started dinner, so everything stopped cooking and just sat.  About an hour or so later the power went back on, I was able to finish dinner, but it just threw my whole night off.  Oh well.

Thankfully I had my nails painted so I didn't have to worry or even consider painting by candlelight which I have done in the past.  Today's design is yet another Halloween one.  It is a recreation of last year's smoosh manicure.  I love the smoosh designs, and rarely do them.  I"m not sure why, especially when they produce such amazing results like this one.

Let's take a look!


Colors Used:
  • Serendipity Polish - Building My Empire
  • Serendipity Polish - Orange County Girl
  • Serendipity Polish - #GoalDigger
I'm finding it hard to believe that I have yet to use Orange County Girl from my Serendipity Polish line.  Still feeling the pains of this company closing.  I seriously love their polish and miss them terribly.  Roxie did begin a new company which is really awesome raising awareness for causes, but I'm selfishly missing these pretty collections.

This manicure is super easy to create. First you start off with a base of white polish.  Then with a stamper, I drip a few drips of white, black, and orange, then smoosh it onto a paper plate, then onto the nail.  Added a little top coat, and called it a day.  Seriously love how each nail looks so differently!

What do you think?  Fan of this look??  Something you've done before??

Until next time, <3.


Gradient Mani

The One With the Halloween Splatter Manicure

9:00:00 AM


Good morning polished world!  How are you all doing on this fine Saturday?  I am planning on laying in bed for 90% of the day ignoring the world.  Okay, maybe I won't.  It's my father's birthday this weekend so I need to get some stuff done for that.  Most importantly, I need to bake a cake.  I guess I could lay in bed while the cake bakes....right?

I'm so proud of myself that I'm still painting and posting Halloween manicures.  I think that I have more ideas than I do time to post them.  We will see what happens.  Today's design is a different take on the candy corn gradient I usually do.  Every year I do that same white, to orange, to yellow gradient.  I admire it but then about a few hours after completing it I kind of hate them.

After searching around, I came across a white, to yellow, to orange gradient which had that candy corn feel, but wasn't your typical candy corn manicure.  I painted that on my nail, and enjoyed it much more, but there was something that was missing.  I came to the conclusion, it was a splatter.

Let's take a look....


Colors Used:
  • OPI - Alpine Snow
  • OPI - Exotic Birds Do Not Tweet
  • OPI - No Tan Lines
Isn't it cool??  I really love this manicure!  I don't think I've ever hated a splatter manicure because each nail looks so different and unique.  Some people avoid them because of the mess, but I don't find them to be much messier than doing a gradient.

When doing a gradient, I always put painters tape around my nails.  I prefer tape over the liquid latex or peel off base coat because I feel like those require much more clean up.  Also, there's that dry time which I don't have time for when it's 10pm and I want to be asleep by 11pm.  So after the nail is taped off, I will add the gradient, then right after the gradient is done, while the tape is still around my nail, I'll add the splatter.  It baffles me when I watch tutorials that people remove the latex or the glue before finishing the full design. Eh, to each their own.

What do you think?  Like this look?  Think it's a Halloween-ish manicure?

Until next time, <3.


Halloween

The One With the Halloween Paint Drip

9:00:00 AM


Good morning polished world!  How are you all doing on this fine Wednesday?  Midweek is upon us.  I honestly don't know where the past two days went.  Work has been busy, life has kind of been blah, so everything is just blurring into the next.  Oh well.

Today's manicure is yet another Halloween design!  After surfing Pinterest, I found a bunch of green nails with black paint drips.  I loved the look and it had been forever since I had created a paint drip look, so I decided to re-create one of them.  Especially since I had a new green polish from INM which I have been dying to use!

Let's take a look!


Colors Used:
  • INM - Survival of Earth
  • INM - Northern Lights
  • Acrylics
Isn't Survival of Earth fabulous!?  It's such a pretty green shimmer polish!!!!  I couldn't help myself and had to add a top coat of INM Northern Lights and I'm beyond happy I did.  It is just beyond gorgeous and I cannot stop looking at them.  Actually, before I put the design on, I debated on just wearing the green polish alone....which if you know me that is shocking since I NEVER wear polish without a design.  That tells you how much I love this shade.

The design on top though really made for a neat looking manicure.  I don't think I would have liked this design as much if I would have used a flat cream polish.  So happy I went with the shimmer.  It made the black drips look like they were stickers.

What do you think?  Fan of this look?  Have you ever used any INM polishes?  Are you not in love with this green??

Until next time, <3.


Halloween

The One With the Googly Eye Nail Art

9:00:00 AM


Good morning polished world!  How are you all doing today??  Welcome to yet another Sunday.  The weather here is mad crazy.  It's going to be 80 degrees today.  So yesterday when I put up my Halloween decorations, it was abnormally warm, the mosquitos were buzzing, and it did not feel like October at all.  I saw though that it's supposed to be 55 on Monday, so that means I'll end up sick or something.  Or we will have a horrid storm.  Either way, no fun.

Continuing on with the Halloween manicures!  Today I re-created a googly eye design which I usually do every Halloween, but for some reason didn't last year.  I think I was going to and then ran out of time.  Well, after seeing Sarah from 25 Sweet Pea's re-creation of one of my past designs using colored pupils, I decided to do the same.

Let's take a look!


Colors Used:
  • ORLY - Liquid Vinyl
  • ORLY - White Tips
  • A bunch of ORLY neons
I don't know how I feel about the photo of this manicure.  Love the manicure, but kind of hate the photo.  Well, I like it because it looks more like the eyes are disappearing into the blackness of the bottle, but then I kind of hate it because you can't see the edge of my nails.  Honestly this is probably just a mind over matter thing that no one would have noticed unless I pointed it out, which I just did.  Oh well.

Easy as heck to re-create this look.  First start off with a base coat of black polish.  When dried, go through with a white polish and a dotting tool and add the white part of the eyes.  When that was dried, you add the colored cornea, then go through with a tiny tiny dotting tool and add the pupils.  Top coat and you have some spooky cute nails.

What do you think?  Like this design?  Something you would do for Halloween??

Until next time, <3.

Gradient Mani

The One With the Orange and Black Gradient

9:00:00 AM


Good morning polished world!  How are you all doing on this Thursday??  It was a super cold rainy day yesterday, and today it's supposed to be a tad warmer.  I hope it does warm up a bit because I feel like I'm starting to get a cold, and if the weather evens out, I think that the cold will go away.  Maybe?  Who knows.

Continuing on with another Halloween manicure today!  Last year Jessica from LaLaLoveNailArt on Instagram created the most perfect PixieDust gradient using Dhara and Dahlia.  I wanted to re-create it last year but never got around to doing so.  Of course that meant that I needed to do it right away.  Sadly though I don't like the look on my nails as much as I did on Jessica, but it's still an awesome manicure.

Let's take a look!


Colors Used:
  • Zoya - Dhara
  • Zoya - Dahlia
I mean, it is a cool looking design.  Now, Jessica kept hers matte, but I made mine shiny because the matte texture was kind of driving me insane.  At first I regretted adding the top coat, but they turned out to be so sparkly.  Literally my nails looked like black to orange gems.

I think the reason I wasn't a complete fan of this manicure was because it really was not easy to do.  I have done a gradient in the past with Pixie Dusts, and I forgot how difficult they are to do.  Maybe it's just me, but it takes forever for the colors to turn out how you want them to.  I also found it hard to get it evenly distributed.

What do you think?  Like this gradient?  Think I should have kept it matte?

Until next time, <3.


Halloween

The One With the Spider Web Re-Creation

9:00:00 AM


Good morning polished world!  Happy Sunday everyone!  How are you all doing today?  The weather is kind of weird here.  Yesterday it looked like a cold, Fall day, but instead it was so humid.  I'm pretty sure I'm going to end up with a pretty nasty sinus infection.  Sigh.

Since it's October, I said I would start sharing some Halloween themed manicures!  Halloween is no where near my favorite holiday, but for some reason I love doing nail art for it.  I have so many ideas and I hope to get through them all.

The first one I'm sharing with you is a re-creation of a last years vampy spider web design.  I loved this look and really wanted to give it a try again this year.  I of course broke a nail right before painting so my nails were shorter than I would have liked them, but I still got it all to work out.

Let's take a look.


Colors Used:
  • Morgan Taylor - Fruit of Temptation
  • ORLY - Liquid Vinyl
  • Zoya - Dahlia
Last year I used a Jessica polish which was more red tinged, where this year I used a more pink/burgundy shaded polish.  I think I like the color better.  Sure, it's not vastly different, but it's different enough for me.

The base behind the spider web is my own concoction.  I mixed some black polish into an old bottle of Out the Door making a sheer black jelly polish.  Actually, I used the same bottle that I mixed last year, which I was surprised I was able to do.  I honestly thought that it was going to be dried up.  Took some shaking, but it came together perfectly.

What do you think?  Like this design?

Until next time, <3.


Animal Mani

Happy Easter!!!!

9:00:00 AM


Happy Easter Polished World!!!!!  What a glorious day, He is Risen!!!  How are you all doing on this wonderful Easter Sunday?  Despite being under the weather, I am wonderful.  Yeah, that's right, it's a holiday and I'm sick...shocker.  Hopefully I'm feeling better so I can return to work tomorrow.  I hate missing work due to sickness.

Easter kind of snuck up on me, so I wasn't able to do as many Easter designs as I wanted to.  Every year I usually do a design that represents the true meaning of the holiday, and of course I didn't this year.  I'm kind of kicking myself for that now.

Today's design is inspired by the lovely Sarah from 25 Sweet Peas.  She did a cute Easter bunny design which she snapped me and I think filmed a tutorial for that I just had to re-create.

Let's take a look!


Colors Used:
  • China Glaze - Lotus Begin
  • China Glaze - Highlight of My Summer
  • China Glaze - Pinking Out the Window
  • ORLY - White Tips
I am absolutely in love with this manicure.  Everyone really is loving the polka dot middle finger I did as an accent.  I'm not going to lie, I do love that one also.  It looks like a cute little Easter Egg.  Which honestly I wasn't going for that look.


I don't think I've used Highlight of My Summer yet.  Maybe for a gradient or something, but I cannot remember if I ever used it as a base color.  I am in LOVE with this bright mint polish.  It's a perfect neon pastel shade.  Covered completely in two coats.  A little streaky, so be patient with it.

What do you think?  Like this cute Easter bunny??

I hope everyone has a Happy and Blessed Easter!!!

Dot Mani

#TheNailArtSquad does St. Patrick's Day!

9:00:00 AM


Good morning polished world!  How are you all doing today??  It's St. Patrick's Day!  That means it is time for everything green!  Except the weather....the weather here is very white thanks to that blizzard we got the other day.  Oh well, that just means that Spring is right around the corner!

Today I am happy to be collaborating again with the lovely ladies of The Nail Art Squad.  For our collaboration today, we decided to create shamrock manicures!  Now, if I had more time, I probably would have come up with something a little different, or done many more festive manicures, but alas that didn't happen.

Let's take a look at my random shamrock manicure!


Colors Used:
  • ORLY - Invite Only
  • FingerPaints - Golden Glaze
  • ORLY - White Tips
  • Zoya - Maria Luisa
Fun, right?  I wasn't sure where I was going with this manicure, but love the end result.  At first I wasn't going to use Maria Luisa by Zoya, but am happy that I did.  I think it blends really well together and adds a little umph to the manicure.  I always forget about how gorgeous this polish is.  I really need to use it more.


My shamrock is a little better than years past.  Usually it ends up looking like a blurred green splotch on my nail.  This year it actually resembles a little clover.  I was going to do a four leaf one, but I wasn't going to risk having it not work and then ruining my manicure.

What do you think?  Fan of this look?  Something you'd try for today??

Stay safe if you all are going out tonight!!!

Until next time, <3.

Dot Mani

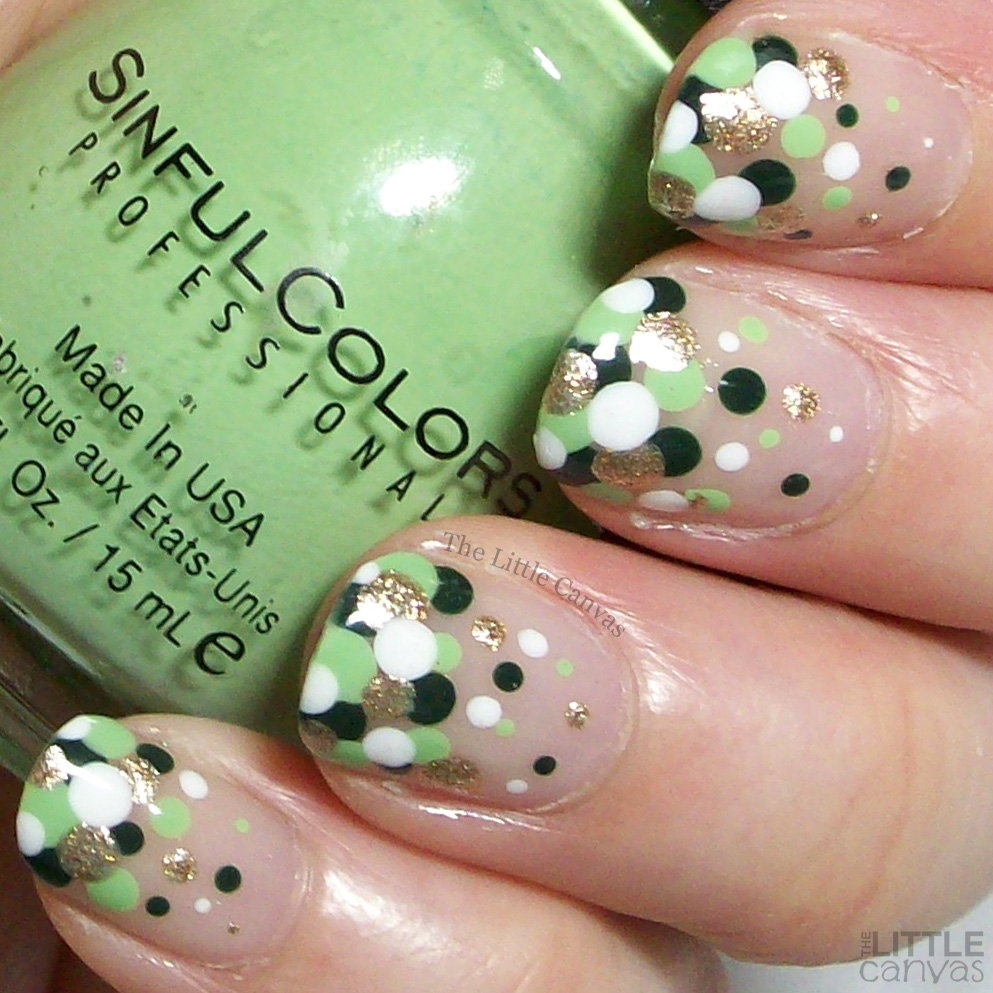
The One With the Dot Manicure for St. Patrick's Day

9:00:00 AM


Good morning polished world!  How are you all doing today?  We are smack dab in the middle of a lovely blizzard, so you know how I'm doing.  They're expecting us to have about 2 feet by the end of all this.  Oh well, we haven't had any snow this winter, and I did want one big storm before winter was over, so I guess that's what this is.

Since my power was out all last week, I wasn't able to do as many St. Patrick's Day manicures as I would have liked.  When the power did kick back on, I was kind of exhausted and just wanted to sit around and do nothing, but needed to do some sort of manicure.  Of course, I opted for something simple....dots.

Let's take a look!


Colors Used:
  • Sinful Colors - Pistache
  • INM - Emerald
  • FingerPaints - Golden Glaze
  • Sinful Colors - Snow Me White
Lovely, right?  I did a similar manicure last year for St. Patrick's Day but I didn't like the colors I used then.  They were similar, but not the same.  Sinful Colors Pistache is a gorgeous light green shade.  Stains awful, but it's beautiful.  Using it for nail art though, you don't get the stains as much as when you use it as a base.


Emerald is a gorgeous polish by the lovelies over at INM.  I love their polishes for bases and for nail art.  They are just perfect all around.  I've had this one for a few months and am kicking myself that I haven't used it sooner!

What do you think?  Like this design?

I'll have one more St. Patrick's Day manicure for you on Friday!  Then I need to start creating some Easter manicures!

Until next time, <3.