Review

Glitter Nail Polish Remover Gel Review

9:00:00 AM


Good morning polished world!  How are you all today?  I'm exhausted and the weather is freezing.  I need a vacation to a warm beach!  Alas, that's not happening, so I will sit around some neon polishes and pretend that it is summer time.

Today I'm bringing you a review of a new nail polish remover!  Back in December, I was contacted by Liz from Vi-Jon asking if I was interested in reviewing a new delivery system for removing Glitter Nail Polish.  If you haven't heard of Vi-Jon, they are the largest manufacturer of Private Label Personal Care, Health, & Hygiene  and they produce over 85% of all polish removers which are sold in the US.  That's a huge amount of remover, so odds are, the remover you're using is manufactured by them!

I said yes because I was very intriqued.  If you know me, you know I hate removing glitter polish.  I avoid it at all costs because I'm not a fan of the foil method.  I want to apply a remover and get the polish off right away.


This new delivery system which Vi-Jon has created is a gel solution instead of your normal liquid.  This solution contains essential oils which will sooth the nail instead of damaging it like harsh acetone.
Review

Katarina Naturals All Natural Nail Polish Remover Review

9:00:00 AM

Press Sample
Happy Monday polished world!  How are you all today?  As promised, today I am sharing a review of some awesome all natural nail polish remover!  I wanted to have it up last Thursday, but I came down with a nasty little bug and I didn't have the energy to write up a decent enough post.

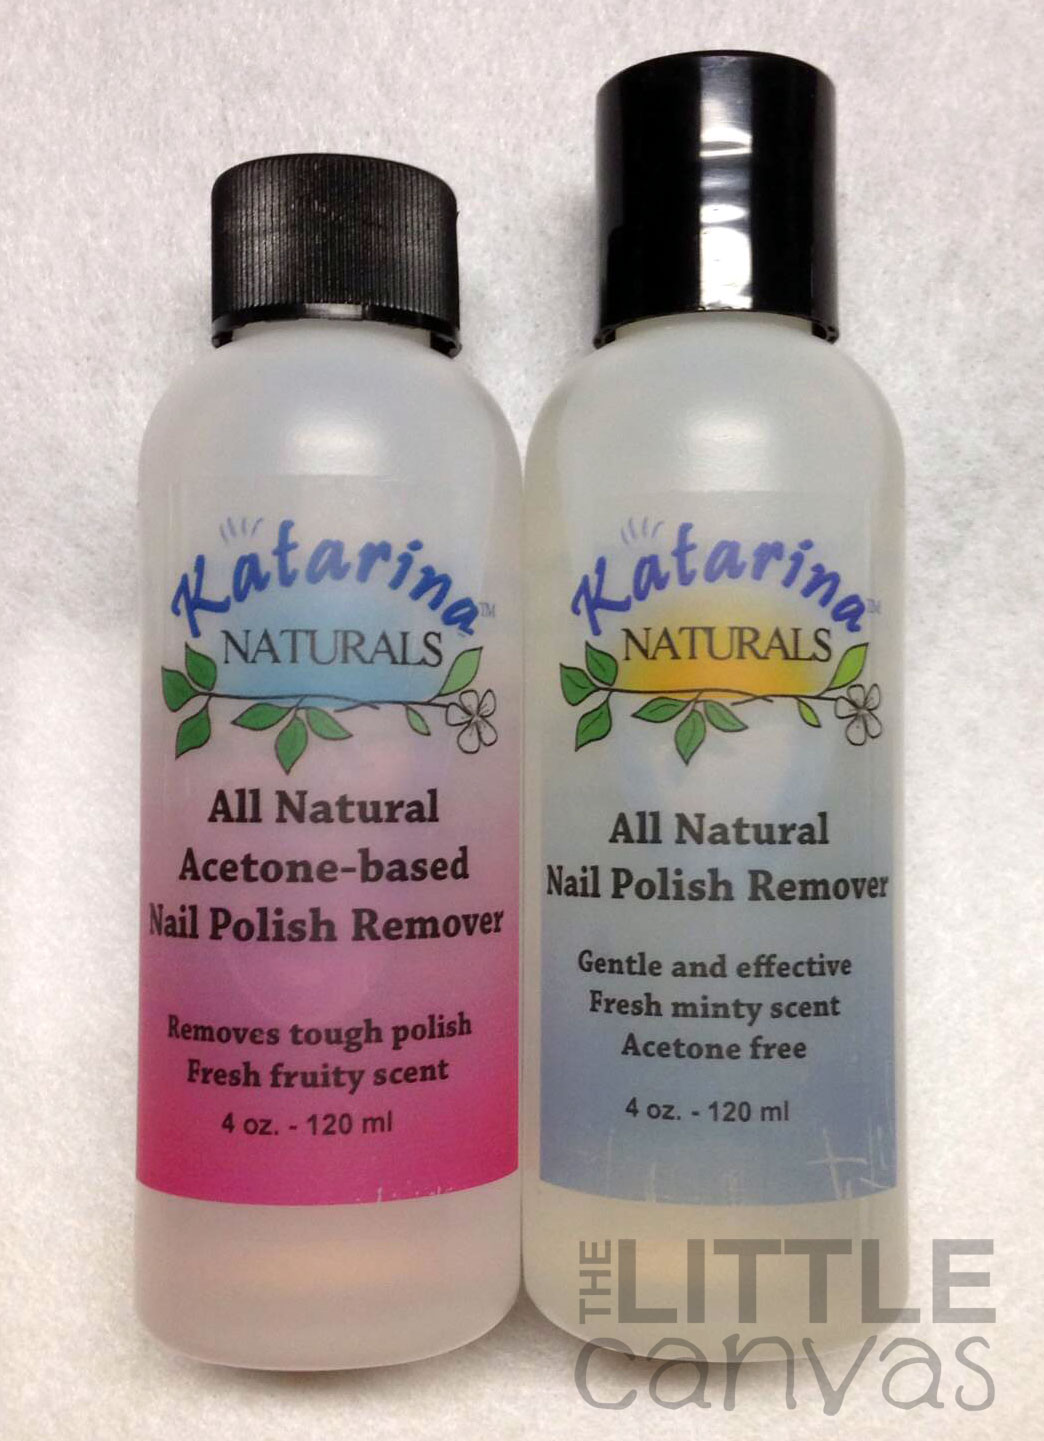
Now that I'm feeling better, I am back and ready to review the awesome removers from Katarina Naturals!  These polish removers are Made in America and not tested on animals.  They are made from agricultural products (mostly corn), which makes them more "green".  Their pink bottle formulation contains acetone, while the blue bottle does not.  Since these products do not contain 100% acetone, they are less drying to the nails and cuticles.  You all may remember my story about how weak and brittle my nails got after using pure acetone, which led to many breaks and sad days for this little nail blogger.  Due to that, I'm a huge fan of anything which is less damaging to my nails!


I received the All Natural Acetone Based Nail Polish Remover and the All Natural Nail Polish Remover with no Acetone.  The pink bottle has less than 45% acetone in the mix and it's ingredients include; acetone, water, ethyl alcohol, n-butyl alcohol, glycerin, aloe vera, and fragrance in the form of essential grapefruit oil. The blue bottle contains no acetone and it's ingredients are; ethyl alcohol, water, n-butyl acetate, n-butanol, and spearmint oil for fragrance.  The solvents in both are from corn stock.


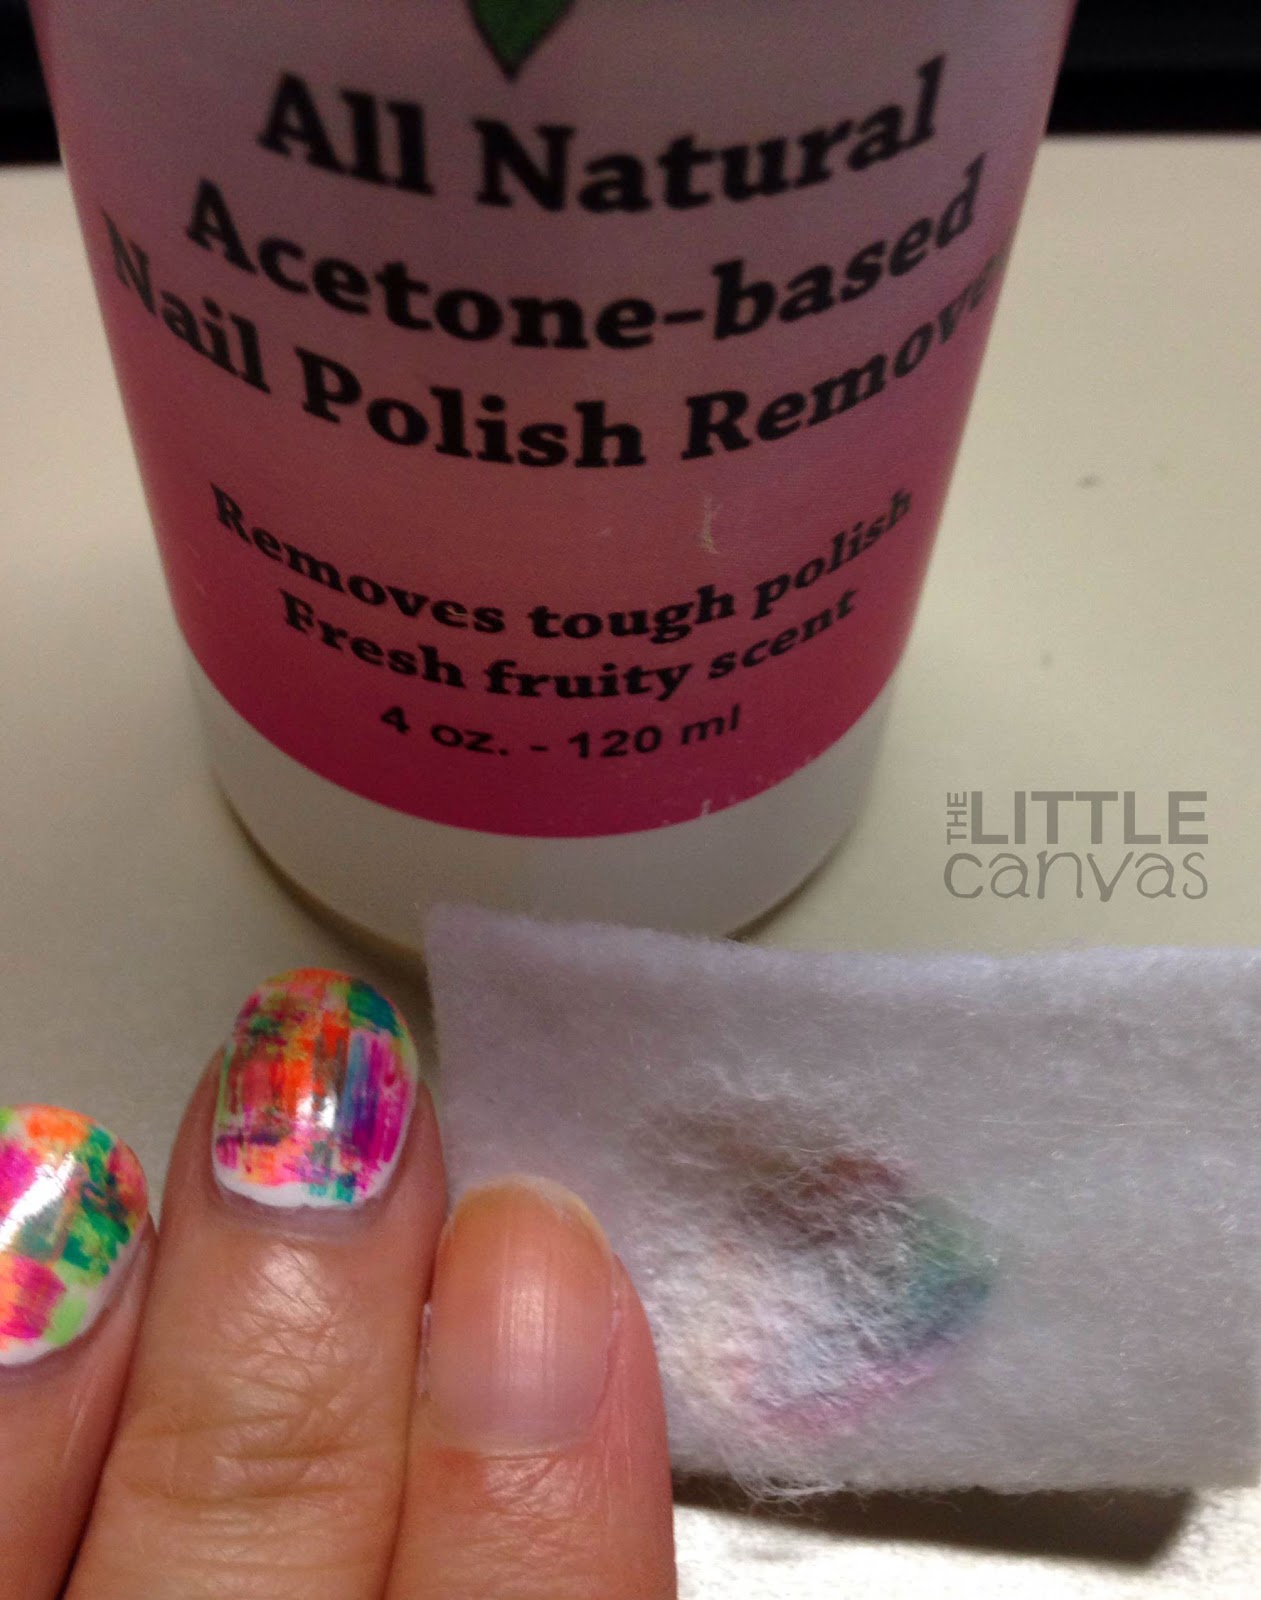
Let's say hello again to my Salon Perfect Neon Pop manicure!  This manicure had two coats of white polish for a base, the random streaks of color which could count for one more coat, then one coat of clear top coat.  When I remove my nail polish, I use square pieces of craft felt.  I have found it's easier to remove polish using these than cotton balls, especially when it comes to glitter removal.


I fold the square piece in half and place it around the top of the remover bottle and let it get saturated.  The remover has a strong scent to it.  I can smell the acetone, but you can smell that it is mixed with the grapefruit oil.  It does have a fruity scent, but it is a tad too strong for me.  It kind of reminded me of a stronger version of my Beauty Secrets pink remover from Sally Beauty Supply.


When my felt is saturated, I rub it across the nail a few times or until the polish comes off completely.  One square piece usually will remove at least 5 nails worth of polish using my store bought polish remover.  I was rather interested to see if one piece would get me through one hand using this remover.  Pictured above is my piece of felt which I brushed across my nail about 3 to 4 times with a little pressure.  It removed the same as my store bought remover.


Happy days!  One piece of felt removed all five of my nails on my left hand!  It does look like my middle finger has some residue left on it, but that white spot is from where I banged my nail and it got a little damaged.  At least, I think that's what those white spots are from when they appear.  I never really know.


Now it came time to remove the polish on my right hand!  For this hand, I decided to use the blue bottle of remover!  I did the same thing I did with my left hand and the pink bottle.  I folded a square of felt in half then saturated it.  Then I got to removing.  I really, really, really, really, REALLY loved the scent of this remover!  It has the most minty fresh scent ever!  It reminded me almost of toothpaste!!  Compared to the nasty smell of some removers, this was a great and pleasant alternative! 


I had to use two squares of felt to remove all 5 nails on my right hand.  One square removed 3 nails.  It did take a little longer than the acetone based remover, but obviously that was because this contains no acetone at all.  To me, I rather have a slightly longer removal process instead of using acetone which destroyed my nails in the past.  Plus, it was really only about 2 minutes longer, not 2 hours.

Overall thoughts:
I loved both products.  If I had to pick a favorite, I would select the blue bottle which contains no acetone.  I really loved that fresh peppermint scent!  If you're a glitter wearer, you could use either bottle, but I would suggest using a soaking method.  Be it using those little pink pods or the foil method.  Sure, it takes a little longer, but why should we be rushing while doing our nails?  Manicure time is relaxation time!

If you would like to learn more about the products, please visit the Katarina Naturals Website!  I love their slogan "Take it Easy on Yourself."  Just hearing that makes me relaxed!

The 4 oz pink bottle can be purchased here on Amazon for $5.99, and the 4 oz. blue bottle can be purchased here on Amazon for $6.99.

Hope you all have a great day! <3

**Products were provided for my honest review. Please see my disclosure policy**

Nail Art Society

Nail Art Society: #NeonPop Kit Review

8:02:00 PM

Press Sample
Hello polished world!  I know it's an odd time for me to be posting, but I really wanted to share with you an amazing Nail Art Society kit I just received in the mail.  I want to start off by saying that I have not been sharing some of the kits recently due to a really hectic schedule, but now that everything is settling down, I'm going to get better at posting the kits once they come in and share with all of you how awesome they truly are!  I've been sad that I haven't been able to use the kits.


The kit I'm sharing with you today is the #NeonPop kit which contains many goodies from Sally Hansen!  In my opinion, this is the perfect kit for any nail artist!


First though, I want to talk about the new box that that was in my mail box!  I'm so used to the normal brown box each month, so when I opened the mail box and saw the black box branded with the NAS logo on the side, I was rather excited.  I think branding is super important in this day and age, and even though this is a small thing, it's a perfect marketing tool.


When I opened the box, I was greeted first with the NAS card which tells you what the theme is and what the kit contains.  I think this is so cute, especially with the nail art look right on the front.


Then I opened the box to see all the goodies laid out perfectly!  White polish, nail art pens, neon polishes, tape, a nail file!  Goodness gracious so much stuff!


As you can see above, with this kit you receive one bottle of Sally Hansen White Out, the perfect base for a neon design!  I quickly saw that the two bottles which I thought were stripers were actually neon polishes!  The green is Hot Wasabi and the purple shimmer is Intense Iris.  So so pretty.  Then there are the two nail art pens, one in yellow and one in black.  The tape is an added bonus, especially since tape manicures are all the rage.  If you have a pair of chevron cutting scissors, I highly suggest getting them out and using them with this tape!  I wonder where my pair is....hmmmm.

I'm in love with this kit and cannot wait to play around with it!  It is such a perfect kit for summer with the neon theme!  What I absolutely love about this kit is how easy it is for someone to create a nail art look.  Literally, the ideas are endless, even for those beginner nail artists.

You can get your own kits by signing up for the Nail Art Society on their website.  Kits are $11.95 each plus shipping.  I honestly do not know if it is too late for you to receive this kit, but usually kits are sold A La Cart in their shop at a later time!

Until next time, <3.

**Kit was provided for review.  Opinions expressed are my own.  Please see my disclosure policy**

Nail Art Society

Nail Art Society: California Dreaming!

3:00:00 PM

Hey polished peeps!  No nails again today, instead I am reviewing the newest Nail Art Society kit.  Have you heard of Nail Art Society?  They are an awesome little company who curates different nail art kits which are delivered to your house monthly.  Each month has a different theme.  Last month was The Great Glitzy, and before that was Accent with Attitude which featured Hex Nail Jewelry.  This month's theme is California Dreaming!


Head on in to see what's inside the cute little bag!

Review

Shimmer Polish Review!

9:00:00 AM

Hello there!  How are you all on this fine day??  I'm doing well and am super excited to share with you my first ever swatch post!!!  At the end of September, Shimmer Polish contacted me asking to review some of her amazing glitter polishes.  I could NOT say no to this incredible opportunity.  

A few days later, 5 bottles of gorgeous, shimmery glitters arrived in the mail.  Sadly, while swatching, I had a horrible accident and broke one of the bottles.  Poor Jovie, it didn't stand a chance against the floor.  Such a pretty pink glitter also.  Sigh.  

Despite the tragedy, I'm able to bring you these four gorgeous glitters today!!!  Bear with my photos as this is my first ever swatching post and it was really capturing a polish versus capturing nail art.  Literally a whole new experience!

Review

INM Nails - The Little Canvas Loves You

9:00:00 AM


Normally I wouldn't write up a post like this, but after the incredible customer service I received from INM Nails, I couldn't contain myself and had to share my experience.  As many of you know, I primarily use Out the Door fast drying top coat on my nail art, which is made by INM Nails.  When I started this blog, I was using a slow drying top coat, which in the end always caused me to ruin my art and it upset me so much.  I went onto Twitter and asked everyone what they used.  I quickly found that people either used Seche Vite or Out the Door.  After reading about shrinking problems and the lovely cancer warning on the back of SV, I decided to purchase a bottle of Out the Door.

Review

Hard Candy - Black Tie Optional

9:00:00 AM

Happy Sunday, dearest readers!  How are you today?  Today I have decided to post a simple manicure for you, since, well why not?  I am allowed to have a nail art break every once and awhile, right?  Typically, I pass on the simple since I normally fail at them, but this one was perfect and I had to share.

A few days ago, my friend and I were hanging out and she was begging me to go to the store.  I really didn't want to since I had just finished an 8 hour work shift and was incredibly exhausted.  I wanted to go in the house, take a shower, paint my nails, and call it a night.  My bestie though kept begging and begging, and finally, she bribed me with a bottle of nail polish.  What can I say, my friend knows my one weakness.  We went off to the mall, ran her errands, and hit up the beauty supply store.  I wasn't seeing any polishes that I wanted, so I told her it was okay, I didn't need anything.  Then, we went to Wal-Mart, and guess what...they had the Hard Candy polish display with my biggest lemming, Black Tie Optional.  Well, you can only guess what she bought me.  Thank you, Anne :).  Ahhhh can't believe it, I seriously love her for it.

I couldn't decide what base to use for the polish, so I decided to do a pastel skittle manicure.  It is perfect....let's take a look at this cute manicure.  Now the pictures are not 100% color accurate thanks to my stupid light box, so you can head on over to my Instagram to see my right hand with the correct colors.


Colors Used:
  • Sinful Colors - Candy Coated
  • Funky Fingers - Mrs. Mint
  • Sally Hansen - Pink Blink
  • Sinful Colors - Sugar Rush
  • Sinful Colors - Unicorn
  • Hard Candy - Black Tie Optional
For the bases, I used 2 coats of each polish.  The Sinful Colors polishes from the Sugar Rush collection are just beyond gorgeous and amazing.  I have to say, Sinful has stepped up their game and really have created some great formula polishes.  Typically with pastels, in two coats I have lots of little streaks and end up having to put on at least one more coat to even them out.  All the Sinful Colors polishes used in this manicure only required two coats, including Unicorn which is a rather thin yellow polish.  

Pink Blink by Sally Hansen went on a little thick, but that was because of that annoying thick stick that holds the brush on.  I love the Insta-Dri polishes SO much when it comes to nail art, but dislike them for painting a base coat on.  I hear they are great for stamping, so I might have to try that since so far I have had no luck with any other polishes.  Funky Fingers Mrs. Mint was my only streaky polish, but again, only had to apply two coats.  I think this is my favorite mint spring polish.  I'm going to cry when it runs out since Five Below doesn't have this color anymore.  Le sigh.

Now on to the best glitter polish I have purchased in a while.  Hard Candy Black Tie Optional is amazing!!!  Now, I am not a bar glitter person, but the bars in this mixed with all the different sized white and black hex glitters just gives such a neat look.  Each nail only has one coat of the polish since it is so glitter packed!  I had to place one or two pieces of glitter on two out of ten nails to fill in bald spots, but personally, I don't think that's bad at all.  This bottle even has some bigger hexes than what can be seen on my pointer nail.  Complete win, I suggest if you have Hard Candy for sale in your area, you go grab a bottle.  Can't wait to do some kitchen sink manicures with this beauty.

What do you think?  Simple Sunday should be a go?  Loving Black Tie Optional?  Still a fan of Skittle Manicures in 2013 or do you think they are going by the wayside?

Now that this simple manicure is out of my system, it's time to go all "Little Canvas" and challenge myself to some new nail art.  Can't wait to see what I come up with!  Until next time, <3

**Sally Hansen Insta Dri - Pink Blink was provided by Sally Hansen for promotional purposes.  All other polishes were purchased by myself or my friend.  The opinions expressed in this post are my own, please view my disclosure policy.**


Review

No Nail Art Today - Sally Hansen Moonstone

9:00:00 AM

Oh lovely followers, I hope you forgive me for not bringing you nail art today.  As some of you may know, I'm working on my thesis project, so my nails have been put on the back burner.  I'm still painting, but not as frequently.  Manicures are staying on for more than 3 days, I'm wearing naked nails to work, it's just been crazy.  In a few weeks though, I should be back into the swing of things.

Luckily, Sally Hansen sent me some GORGEOUS Lustre Shine polishes to review.  I never purchased these polishes when they appeared in the stores because I wasn't sure how I felt about the whole duochrome thing.  After playing around with these polishes, I'm in love, and wish I bought some sooner, or even purchased some of the China Glaze duochromes.  

For this manicure, I used Moonstone, a gorgeous, frosty pearl white.  Originally, this was a base for a Valentines Day manicure, but alas, it really never came to be.  Since I took pictures of the base, and we're expected to be hit by the Winter Storm Nemo today, it's only fitting to post snow white nails.

Let's take a look!  Ignore the dry cuticles and that random hang nail thingy. I'm scared to do anything to it.


Colors Used:

  • Ulta - Snow White
  • Sally Hansen - Moonstone
For this manicure, I used one coat of each polish, and now that I look at the picture, it really looks like I used more.  I wouldn't really thank the Ulta polish for this, even though that polish has amazing coverage.  All the credit goes to the gorgeous Moonstone, which sadly I could not get to properly photograph! 

Application was perfect.  Since it is frosty, if you don't apply it perfectly straight you could have ended up with a crooked brush stroke look, but I really didn't see that as a huge issue.  The formula was great, that over this one coat of Snow White, I only needed one coat.  On the naked nail, to get full coverage, all you need is two coats.

As stated before, moonstone is a gorgeous, frosty white polish, which makes your nails look like pearls.  Depending on the light, it has a really pretty subtle pink shimmer.  Now that I look closely at the first picture, you can see the pink shimmer!  If you angle it in a different way, it turns kind of blue-ish.  Despite the fact it was so simple, I was in love with it!  I wore it for a day with no nail art, then sadly ruined it trying to attempt some.  I was really depressed and wished I wore it plain for days.  I can't wait to use it again

What do you think?  Love the frosty white look?  Have any Lustre Shines?  Ready for Nemo??

Hope to bring you some nail art next post!  I think I can make that happen as I did an awesome holo tape manicure last night.  Then I have some Valentines Day nails which I'm going to save for the awful day.  Just have to edit all them. blech. 

Until then, <3.


**Sally Hansen Moonstone was provided by Sally Hansen for promotional purposes. All expressed opinions are my own. Please see my disclosure page for more info**

BigDaddyBeauty

When Nail Art Fails, Use Some Magnetic Polish!

9:00:00 AM

So it seems I've hit a manicure funk again.  Well maybe I haven't and the ideas in my head were just too big for even my skills.  I was planning on doing Spiderman nails originally for my nephews superhero birthday, but well, I'm not as awesome as the Nailasaurus.  I then was going to do some really super awesome Batman nails, but I didn't want black nails.  I found a city skyline batman nail and since I've done skylines before I knew I could do this.  I was so excited and was even going to make the sky look awesome using some magnetic polish, but after 2 nails, I was hating it.

It really wasn't that I was hating it, it just was too much work for what I was in the mood to do.  I did one nail, but did not wait for any of the layers to dry.  It looked super cool with the starburst magnetic design, the fairy dust stars and the little building.  It was my tester nail, so to say, and well, when I went to do the other nails, I was soooooo unmotivated.  Then to do a Batman logo on top of it? Nuh uh.  I was lazy, my head hurt, and I just wanted something simple and cool. 

Thank goodness my base was the awesome China Glaze Magnetix Polish provided to me by Big Daddy Beauty (who is holding a sweepstakes if you haven't already seen)!  When you have a failure in the nail art department, or you are just too lazy to complete a design, magnetic polish is the way to go!  Let's take a look!


Colors Used:
  • China Glaze Magnetix - Pull Me Close
This is my first successful attempt at using a magnetic polish.  When Sinful Colors first introduced their line of magnetic polishes, I purchased one, but quickly returned it after swatching one nail.  I personally did not like the effect.  I think it was user error on my part, no matter what I did, I could not get the magnet to make the design even on each nail.  It came with this small ring with the magnet attached to it and I don't know why, but every time I held it over the nail (perfectly centered) the design came out crooked or it would partially magnetize my polish.  It was awful, and I was so upset because it was a really pretty purple color with holo glitter flecks found in a polish like Fairy Dust.

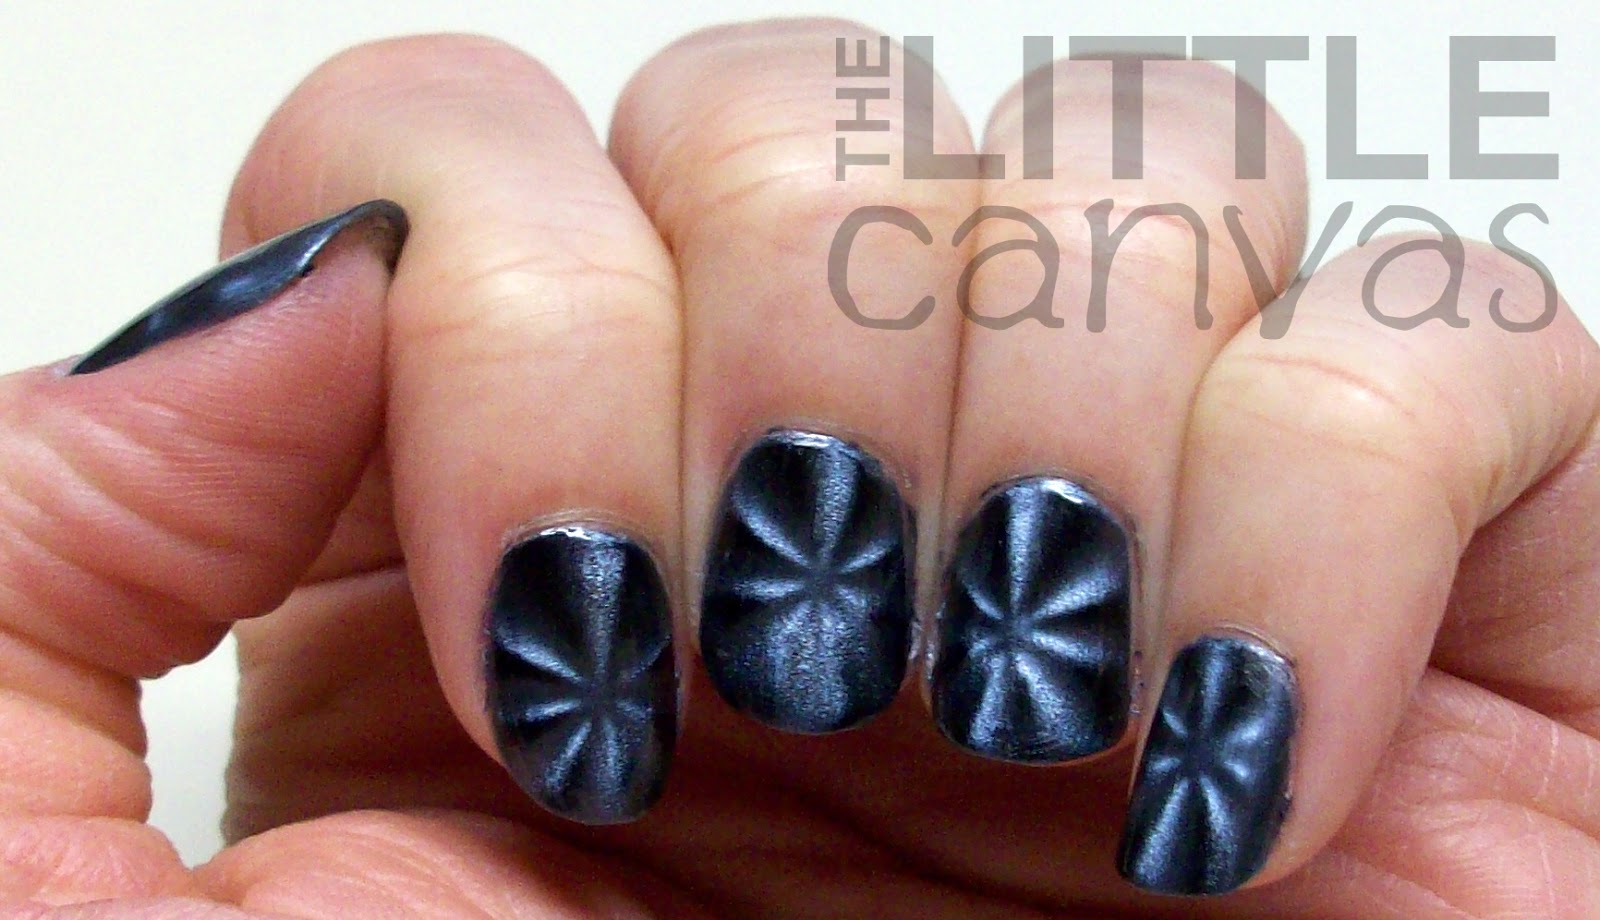
This China Glaze polish though is a hole different story.  Sure I had some user error fails on a couple of nails, but that was only because I wasn't paying close attention, put the magnet on sideways, or slipped and it hit the wet nail.  I'm miss careful as you can tell.  Unlike the Sinful Colors magnetic polish, China Glaze sells their magnets separately from the polish itself.  This really doesn't bother me because it allows you to pick which designs you want.  I believe there are 6 magentic designs total China Glaze has created with their red magnets.  The one provided to me was the starburst design, chevron, and single lines.  The other one I believe is swirls, checkerboard, and maybe straight lines (don't hold me too it though).  These designs were perfect for me and personally i like them better than the checkerboard ones I've seen floating around the blog-o-sphere.  Below is the magnet and the polish.


As you can see from this picture and my swatches, Pull Me Close is a blue/black polish.  I am a sucker for blues, so when I received this polish, I was really happy.  I was even happier when I saw how the effect showed up on the nail.  I had complete coverage of the polish in one coat, but when using a magnetic polish you want to use at least 2 coats.  If your first coat isn't thick enough and you try to use the magnet, you'll end up with some naked spots on the nail.

I loveeeed how the polish looked after the magnet was held over it.  The black came to be so apparent and really created an amazing contrasting 3-D look.  I'm looking at them now as I type this in awe.  It is so simple, and yet leaves you with nails that almost look fake.  I'm very pleased with this over the Sinful Colors magnetic polish.

What do you think?  Ever used a magnetic polish before?  Ever use a China Glaze Magnetix? 

Like what you see and can't find it in a store?  Then click here to purchase the polish from Big Daddy Beauty for $3.99.  The magnet can be found here for $3.49.  Great deal considering the retail on these polishes over at Ulta are $10.00 and then another $6 to $10 for the magnet!

Have a great day everyone!


**The China Glaze Magnetix polish was provided by BigDaddyBeauty.com for promotional purposes. All expressed opinions are my own. Please see my disclosure page for more info.**