Flowers

The One With the Easter Lily Nail Art

9:00:00 AM

Good Morning, Polished World!  How are you all doing on this wonderful Friday?  I've had a few days off of work so I'm just relaxing, catching up on life, and most importantly, catching up on this blog.  I meant to have this post up yesterday, but alas, my day off got away from me, so here we are today.  My goal is to get all my drafts edited so I can just go back to work and have everything over here pre-published.  Wishful thinking, right?


Today's design is best described as an Easter Lily design.  The original by splashnails_lindsay didn't look like lilies, but mine, well they do.  Not sure how I got them to look like that, but alas, it's perfect for the weekend.  I never knew what the Easter Lily symbolizes, but after a little bit of googling, I discovered that it represents purity, rebirth, new beginnings, and hope, and is associated with the resurrection of Christ.  Which if you are a Christian, you know that's the whole reason for the day.

Let's take a look!


Isn't the copper accents wonderful??  A color I never in a million years ever imagined using for an accent.  When I saw the original design, I wanted to recreate it with that beautiful shade, so I started digging through my polishes.  I was so pleased to find a base and a glitter that I've never really used before.  Now I'm obsessed and want to use it all the time.  Wonder what other designs I could do with copper??


I really adore this manicure and love how it turned out.   I do want to work on my "lilies" a little more.  I think I could perfect them and not make them so pointy and blah.

What do you think?  Fan of the look??

Remember, today is Good Friday.  It's a day for us to remember what our Savior did for all of us.  It's the true reason as to why we celebrate Easter.  If it weren't for today and Sunday, I wouldn't want to think where we'd be.  My faith means a lot to me and I know it means a lot to others out there as well. :) 

Until next time, <3.


Flowers

The One With ILNP Better Days and Daisies

9:00:00 AM

Nothing to Disclose


Good morning and Happy Monday!  I cannot believe that it is already October 11th.  I'm literally shocked and so confused as to where the time went.  While I haven't started any of my Halloween designs, I was able to decorate for Halloween at my house, and get some Fall themed decorations up at work.  Now if I can get to my nails to be festive, that would be great.  Usually I bring you all Halloween designs for the whole month of October.  A little sad that I'm behind, but it is what it is.

So, since I don't have anything remotely Halloween related in my drafts, it's fitting that I bring you a daisy design using a fall-ish looking base.  Right?  

Let's take a look! 


Colors Used:
  • ILNP - Better Days
  • Acrylics
ILNP Better Days is now my favorite go to ILNP.  It is such a gorgeous grey blue polish.  The polish itself is described as a muted midnight holographic blue with gold accents. Those gold accents are really what stand out to me in person.  I wish that they captured in the photos, but instead you can see that gorgeous blue color with the lovely holographic.


When I bought this polish, I knew I wanted to do some sort of daisy design on top of it.  This design isn't what originally came to mind, but I'm happy it did.  I was thinking something little more dainty with some green leaves, but I really like this retro looking daisy.  I'm still thinking of doing the dainty design, but this was a good first daisy look with Better Days.

What do you think?  Fan of this manicure?

Until next time when I hopefully have a Halloween design, <3.


Flowers

The One With the Sunflowers and ORLY Blue Tango

9:00:00 AM

Nothing to Disclose


Good Morning!!! Sorry I've gone MIA again, but yet again, work got a little crazy.  I'm still painting my nails, I'm just too exhausted to edit the photos or write the posts.  I still have a palm tree look that I need to post.  Maybe I'll post that when I'm tired of the 10th snowfall of the year.  We aren't here to talk about snow though, we are here to talk about my favorite season - Fall!  Sunflowers, pumpkins, crisp leaves, apples....ahhh it's all so wonderful.  I truly wish Fall was longer.

Today's design is always my Fall kick off design, the sunflowers!  I meant to post these a few weeks ago, so they're delayed on the blog, but I did have them on my nails in the height of sunflower season.   Now we are onto apple season...and to be honest, I don't think I've ever done apple nails. I should look into that.

Until then, let's take a look at the sunflowers!!


Colors Used:
  • ORLY - Blue Tango
  • Acrylics
Guys - Blue Tango from the Wild Natures collection is GORGEOUS.  By far one of my all time favorite blue polishes.  It applies perfectly in two coats and has such a shiny finish.  No patches, just a beautiful cream polish.  It is by far the best base for the bright yellow sunflowers.


After the sunflowers were painted, I decided to go through and outline them with the black polish to really make them pop.  They looked good without the outline but it truly did add another element to the design.  Then it needed something a little more, and that was the polka dots.  I'm not going to lie, I'm rather impressed with how well i fit the dots on the nails after the fact.  Usually when I do a dot base, I put it down first then paint the design over it.

What do you think?  Love Blue Tango? Love the sunflowers?

Until next time, <3.


China Glaze

The One With A Cute Little Floral Manicure

9:00:00 AM

Nothing to Disclose 


Well hello there, Polished World!  I apologize for my lack of posting, but I've been slacking on all parts of my nails.  Literally back to the swatches up until last night when I painted the most fun sunflower manicure.  I've been dying to paint a sunflower design for the longest time, but work has consumed my life again that I haven't had the time.  Last night I purposely made the time because I haven't been feeling myself without my nails done up all pretty.  I'm sure glad I did because it also forced me to write this post and get more of my art out there.

Today's design is another design inspired by Pippy Polish.  I swear, I found her Instagram and I've been beyond obsessed wanting to re-create every design.  And as you know a few post back, I went on a spree about how much I have been loving doing these negative space designs, so it makes complete sense that I'm in love with her Instagram.

Let's take a look!


Colors Used:
  • Sally Hansen - Blacky-O
  • China Glaze - I Got a Blue Attitude
  • OPI - Exotic Birds Do Not Tweet
  • Sally Hansen - Wet My Thistle
  • Black and White Acrylic
Let's take a moment and applaud the fact that I wrote out the polish colors in this post back when I painted the design.  I've only been saying I need to do this for the past 3 years and never actually have.

The star polish of this manicure - China Glaze's I've Got a Blue Attitude.  The most perfect blurple polish ever.  That's right, blurple...a mixture of blue and purple.  It applies perfectly in two coats and has such a shiny finish.  I've been obsessed with this color this year using it non stop for pedicures with a holographic top coat.  For this design though, there was no need for holographics as it stands out on it's own just fine.


I love the mixtures of colors she used.  Never in a million years would I have thought have blending these colors together.  I'm so glad I found her blog so I can come out of my normal blue, pink, purple color zone and use some things I never would have before.  I think it all comes together so well, especially on top of the naked nail.

What do you think?  fan of this look?

Until next time, <3.


Flowers

The One With the Daisy Manicure

9:00:00 AM

Nothing to Disclose Press Sample Affiliate Link


Good morning, Polished World!  And welcome to August!!!  Can you believe how this year has just flown by?  In a few short days, it will be my birthday and in another few weeks it will be my favorite season!  Don't get me wrong, I love that end of summer warmth, but there's just something about Fall that I absolutely am drawn to.  It is by far my favorite season and I wish it lasted longer.

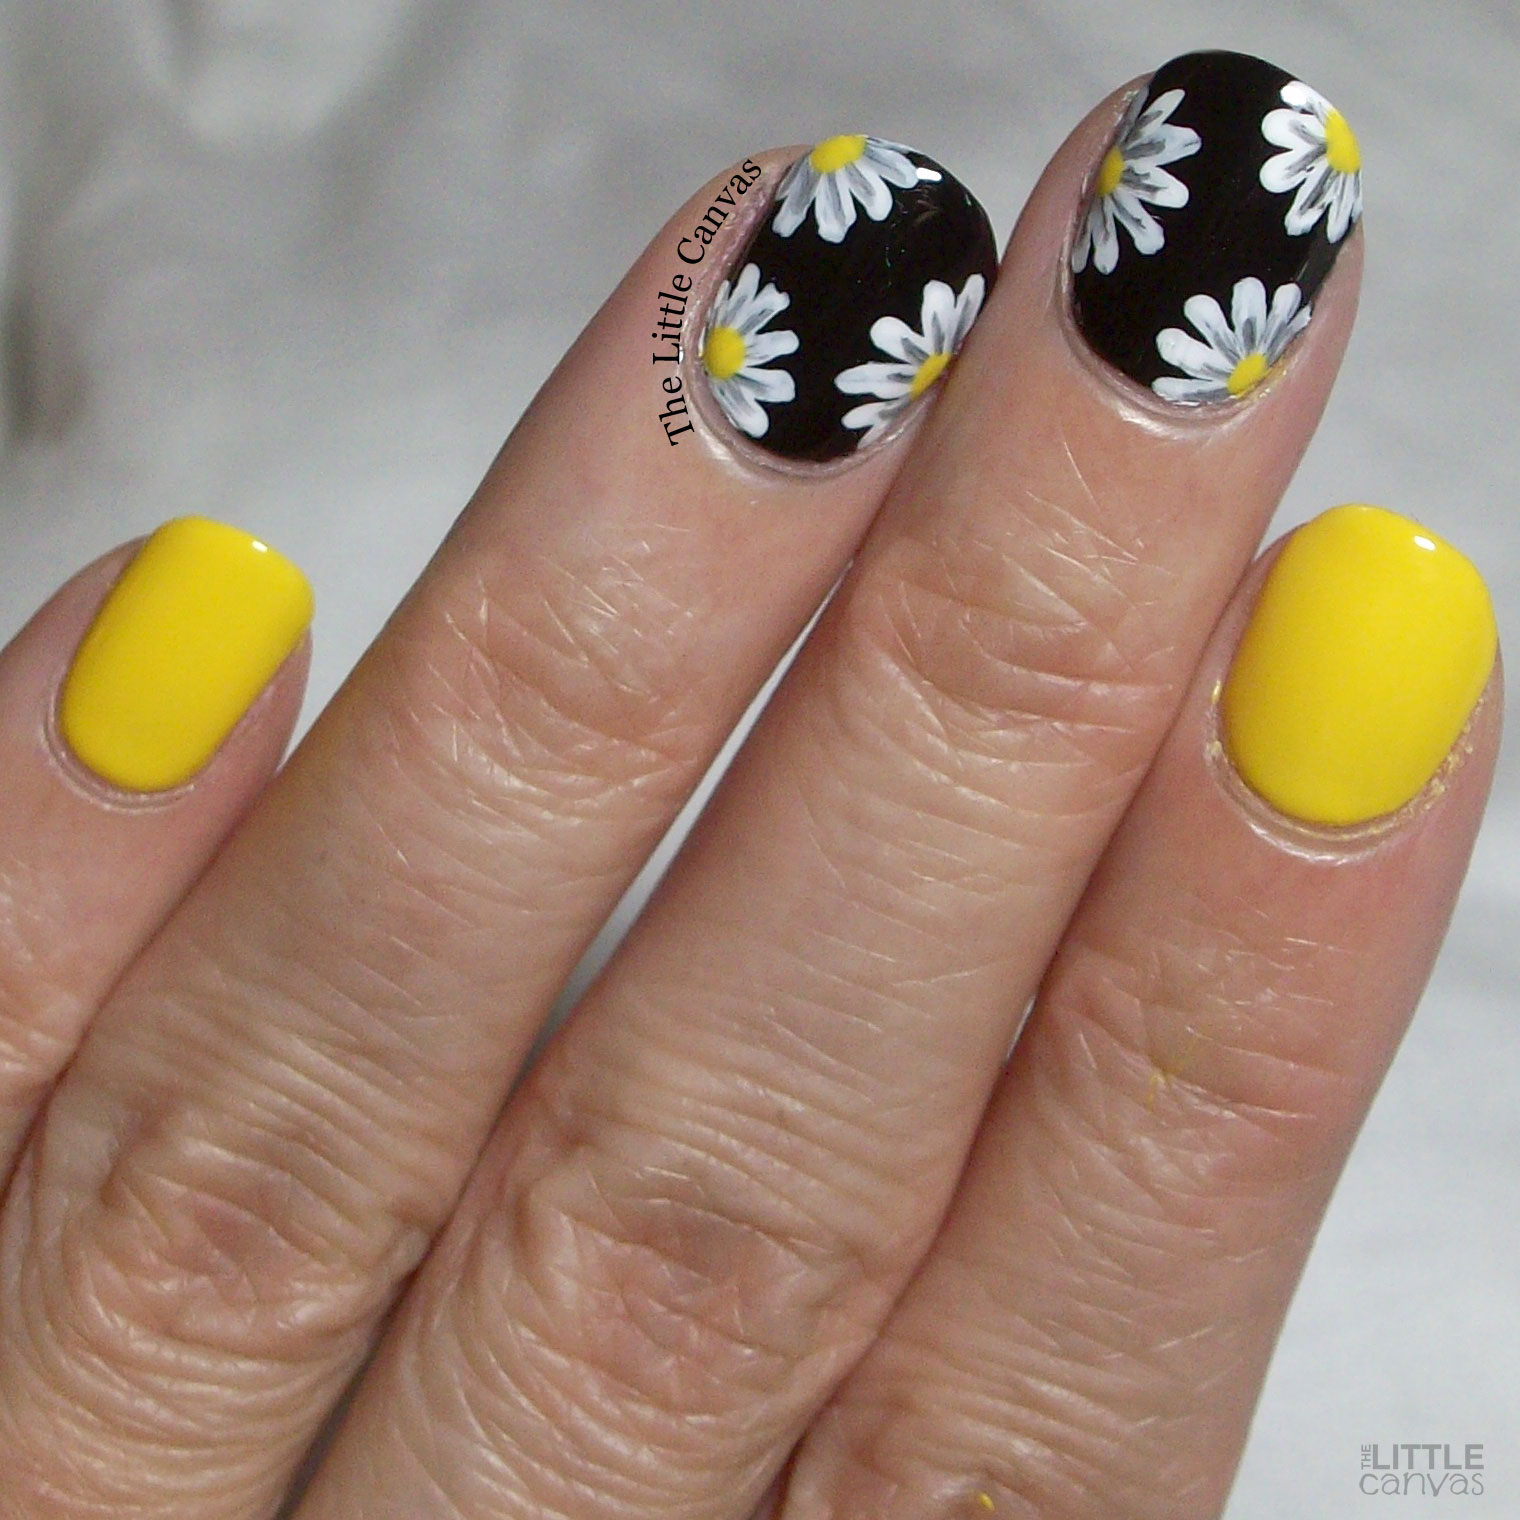
Regardless of my love for fall, I'm still here sharing some summer-ish manicures!  Every year I create a black and yellow daisy manicure and every year they are my favorite designs.  I saw PippyPolish added some dimension to her daisies and I thought I'd give that a go by doing a little swipe of black on the petal.  To be completely honest, I think it made the manicure.

Let's take a look!


Colors Used:
  • Sally Hansen - Blacky-O
  • OPI - Exotic Birds Do Not Tweet
  • White Acrylic
What is it with this color palette that just screams gorgeous?!  The black, white, and yellow is just so striking to me.  Especially using Exotic Birds Do Not Tweet, one of my all time favorite OPI polishes.  I took some pictures holding that bottle but it took away from the design so I opted to hold Blacky-O.  Both polishes apply wonderfully in two coats.   Once Black-O was dried, I went through with my white acrylic and added my little daisies.  Added the details, slapped on a topper, and called it a night.


I'd also like to take a moment to look at how long my nails are compared to what they were in the beginning of the year.  This has taken some time, and switching of many base coats, to get here.  I can't tell you how brittle my nails have been in the last year due to all the hand washing.  Now that I'm using ORLY Top 2 Bottom Base Coat, alongside FingerPaints Ridge Filler, my nails are truly sturdier than ever.  I also lotion them up before applying anything which I think has helped a bit too.  Maybe that's mind over matter.

Until next time, <3.

Flowers

The One Inspired by PippyPolish

9:00:00 AM

Nothing to Disclose Press Sample Affiliate Link


Good Morning Polished World!  Welcome to another week!  This weekend was partially a bust for me.  Yesterday I spent most of the afternoon in bed with the worst migraine.  Woke up, felt fine, went outside and was hit by the humidity and it just did not play well with my head.  Came back inside, laid down, fell asleep, then woke up hours later not even sure what day it was.  Not going to lie, it was a great nap despite the confusion upon waking up. 

Today's design is one that is inspired by PippyPolish on Instagram.  Since my nails are finally healthy again after months of peeling and breaking, I'm able to go back to my favorite type of manicure, a negative space manicure!  You know, the one where you create the design on top of your naked nail, or leave some blank space.  I apologize in advance for the sheer amount that will be posted over the next few weeks. 

Let's take a look!


Colors Used:
  • ORLY - Liquid Vinyl
  • ORLY - White Tips
  • ORLY - some bright pink which the label fell off the bottom -_-
Negative space, daisies, and a neon?  Can't get much better than this!!  Now, PippyPolish used a yellow for the centers of her flowers, but since it's summertime, I decided to go for a neon pink.  I'm really happy with the decision.  It gave the manicure a retro feel.


In order to do a perfect negative space design, you cannot put the nail art direct on the nail.  You have to start off with a base coat.  For me, I use ORLY Top 2 Bottom.  I then add a layer of FingerPaints Smooth Over Ridge Filler.  This adds a little cloudy look to the nail, but still shows off the naked base.  Once it's dried, you have the perfect canvas for any nail art.  When you add your top coat, it all turns shiny and the design really holds onto the nail.  I've found when I don't use a base, it chips off super fast.

Until next time, <3.


China Glaze

The One That Took Way Longer Than It Should Have

9:00:00 AM

Nothing to Disclose


Good morning Polished World!  How are you all doing on this wonderful Monday?  Can you sense the sarcasm in my voice?  It's been a crazy few weeks at work.  There's been some turnover where I work due to the lovely COVID burn out, so I'm stuck doing a few extra tasks until the new team members can start.  I'm super excited for the new team, but also super tired in the interim.  I can't be too mad because everything does truly happen for a reason. 

Today's design is one I did prior to my little hiatus where I was only painting swatches.  It's a cute design inspired by....well now for the life of me as I sit here and write this, I cannot remember who it was who originally did it.  Let's just say hers was better and mine ended up looking like little snowflakes from a distance.

Let's take a look!


Colors Used:
  • Serendipity Polish - CaLOVEfornia
  • China Glaze - Boho Blues
  • Acrylics
Boho Blues is one of my all time favorite China Glaze polishes.  Perfect color, perfect application, and perfect glossy finish.  I couldn't leave well enough alone.  I had a weird dent on my index finger due to some peeling on my natural nail and the plain polish just didn't look good.   So, instead of adding my go-to INM Northern Lights, I grabbed my bottle of holographic top coater by Serendipity Polish.  This is a polish I've owned for years but just recently started using.  I'm not sure why I waited so long, because truly it becomes the star of any manicure!
 

Just look at that gorgeous holo on top of Boho blues!!!  It truly added a new dimension to this manicure.  I'm now obsessed with holographic top coats and finally the four I have in my collection are being put to good use.  

What do you think?  Fan of this manicure?

Until next time, <3. 


Flowers

The One With Yet Another Floral Recreation

9:00:00 AM

Nothing to Disclose 


Good Morning, Polished World!  How are you all doing on this wonderful Wednesday?  I'm still slacking and have yet to transfer my blog over to another platform, but to be honest I'm debating on even doing that now because Google seems to have restored my posts which were removed.  I'm still iffy because I'm nervous I'm going to lose everything that I've done on this blog for so many years of my life.  When work slows down some, I'll get to moving it.

Today's manicure is yet another floral re-creation.  I'm not going to lie, I painted this design a few weeks ago and shared a sneak peek to Instagram, and never posted it.  Again, slacker.  When I was painting this design, I was looking through old floral posts and debating on what to do.  I had completely forgotten about these flowers and as soon as I saw them I had to try them again.  This has to be my favorite one out of all of them.

Let's take a look! 


Yeahhhhhhhhhhhh, we are going to skip right past the colors used on this post.  Not because I forgot the name of the polish.  No, we are skipping because this ORLY is one of my OG ORLY's from when I started blogging and the sticker has fallen off the bottom of the bottle.  I call it my highlighter pink pretty.  It's actually one of my go-to colors for pedicures in the summertime.  Super easy to apply and full coverage in two coats.  Shame I don't know the name so you all can go out and buy it.  I do know though that it was for the longest time part of their core collection.


The flowers are actually SUPER easy to paint.  I started out by outlining the design with an acrylic paint.  When I had the flower just how I wanted it, I went through with the polishes and filled in the color as if it were a coloring book.  Once that dried, I cleaned up the lines a bit again with the acrylic and added the little details.  Added a top coat and called it a night!

What do you think?  Fan of this floral?  Any clue what that ORLY is?

Until next time, <3.


China Glaze

The One With a Fun Watercolor Recreation

9:00:00 AM

Nothing to Disclose 


Good morning Polished World!  How are you all doing today?  It's another Tuesday.  I meant to post yesterday but life got crazy, and honestly I was thinking about pausing the blog utnil i get it up and running on the new platform.  Yes, you read that right.  I'm switching the blog off of Blogger.  Last week two of my posts were removed for guideline violations, and if I didn't fix said violations then my whole blog would be removed.  When I read that I had an instant feeling of panic because this blog has been a huge part of my life since 2012 and I just couldn't imagine it being erased off the face of the Earth.

So, I took a deep breath, backed up the blog, and started the transition.  I need to set it up just how I want to and then I'll be live on the other platform.  I need to figure out how to switch the domain.  But basically, you all will have no interruption.  Most of the links will probably be dead but we will figure that out when we get to it...right?

Anyways, today's manicure is one I absolutely adore.  The weather here is getting Spring-y so it is only fitting that I re-created one of my crazy watercolor splash flower designs.  It's been awhile since I've created something that looks this fantastic.  I forgot how much I love crazy nails.

Let's take a look!


Colors Used:
  • Pretty much every single China Glaze Neon I own....lol
Yeahhhhhh, you guessed it, I forgot to write down the names of the polish.  You can't blame me this time, I took the photos for this design and then opened my email to see that my posts were being removed.  Oh to circle back on that, my posts were reinstated.  Now I could leave my blog here, but I just don't have much faith in the system after what happened.  Can't blame a girl.


But with nails like these, who can panic or be upset?  Seriously, this manicure made my day and I couldn't stop looking at my nails.  I love how the gradient in the background look like a watercolor.  This kind of was a multi-step process.  First I had to paint my nails white, then I used the different color neons and sponged them around the nail filling in all the white.  This left a VERY bright neon base.  To tone down the bright neon, I took a make up sponge with white polish and dabbed it over the nails, softening the neons and giving them a more pastel look.

What do you think? Fan of this design?

Until next time, <3.


Flowers

The One With One of my Favorite Floral Designs

9:00:00 AM

Nothing to Disclose Press Sample Affiliate Link


Good Morning, and welcome to another Monday!!  Can you believe it is already May 10th?  This month is flying by.  While I realize we have yet to experience Spring or Summer, I'm low key not mad that it's flying by because I love Fall and I'm ready for all things cozy again.  Although, I don't want to skip summer all together though because I have the makings for an amazing garden this year.  I have so many little seedlings, including flowers!  Never before have I started flowers from seeds, so I am really excited for that.

Since I'm in the flower mood, that means it's going to be a very heavy floral season on The Little Canvas.  Today's manicure is one of my all time favorite floral designs that I created years ago.  While it's nothing special to look at, for me it holds tons of memories.  This was one of the designs I'd frequently do on my resident's nails at the facility I used to work at.  Ohhhh the simpler, Pre-COVID times where I was able to paint my people's nails.  I need to get back into the swing of it.  Anyways, today's manicure popped up on my Facebook memories a few days ago lined up next to one of my resident's nails.  I just had to paint them again.

Let's take a look!


Colors Used:
  • Morgan Taylor - Potts of Tea
  • Assorted polishes
Yeah, I don't know what colors I used for the flowers.  To be honest, I think it was a mixture of OPI polishes because OPI has some of the most gorgeous, eye catching colors for little designs like this.  Potts of Tea though is a true beauty.  It's a white/blue polish with this very subtle pink shimmer.  It gives a boring plain polish such dimension with that shimmer.  It truly is the perfect base for this manicure. 


I'm not going to lie, I get a bit teary eyed looking at this manicure because I truly miss the wonderful women whose nails I painted with this design.  It's been almost three years since the first one passed and it's just shocking to me that time went by that fast. It feels like it was just yesterday that I was sitting in Pretty Polish chatting with them and painting.

People ask me all the time why I work in nursing homes, and it's reasons like this.  For those connections that I made that I still hold near and dear to my heart.  I have learned and continue to learn so much from my residents..

What do you think? Like this manicure?

Until next time, <3.

Dot Mani

The One With A Floral Manicure Inspired by SRG.Nails

9:00:00 AM

Nothing to Disclose 


Well, good morning and Happy Tuesday to you all!  How's the weather where you are?  Finally it's getting a tad warmer here, but it looks like it's going to drop down again later this week.  Kind of upsetting to me because my seedlings are doing really well and I'm getting impatient and I want to plant them into my garden.  You should see how much I've grown this year so far.  Tomatoes, onions, cucumbers, and a mixture of flowers.  Oh the flowers, I'm going to have a huge flower garden before I know it.

And since the flowers have sprouted, that means it's time for me to start floral manicures.  Today's design is yet again inspired by SRG.Nails.  I've done something similar to this in the past, but this time I switched up the color of the flowers.  I wasn't feeling the red like she did, I wanted that Spring umph.

Let's take a look! 


Colors Used:
  • Zoya - Dahlia
  • OPI - My Boyfriend Scales Walls
  • ORLY - Liquid Vinyl
  • Acrylics
Now, the pink and purple are nail polish, but you guessed it....I can't remember what colors!!!  In the end, I did remember that I'm holding Dahlia, one of my all time favorite Pixie Dust polishes from Zoya.  Who else thinks that Zoya needs to release a new collection of these beauties?!  Maybe a holographic PixieDust line?!  I'm just imagining how beautiful it would be.


I love how this manicure turned out.  I'm super impressed with my leaves this time around.  That's one thing I've struggled on in the past few years, the little finer details.  Finally, I think I'm starting to get it.  Stay tuned because you know me, I get obsessed with a look or a design and I re-create it a million times in a row.

What do you think? Fan of this look? Something you'd try?

Until next time, <3.


Flowers

The One With the Spring Floral Manicure!

9:00:00 AM

Nothing to Disclose Press Sample Affiliate Link


Happy....ummm is it Wednesday?  Yes.  Happy Wednesday!!! Goodness this week is flying by and to be completely honest with you, it's just been a weird week.  Not because it's super busy, but because it's just....odd. I can't put my finger on it.  It's kind of slow, but I'm able to catch up on work.  I think I'm used to the go, go, go that when normal life hits I don't know how to handle it and automatically assume it's odd.  Regardless, the weather has been gorgeous so I've been enjoying every moment outside that I can.

Of course, with every moment outside working on my garden and cleaning my car, that has led to some massive breaks in my nails and I'm back to short little nubs.  Which means I'm only swatching again.  Therefore, today's post is from The Little Canvas vault.  Thank God for that vault so I can bring you content.  Today's design is a random floral one which just screams Spring.

Let's take a look!


Now to see if I remember what colors I used since I did this an eternity ago....

Colors Used:
  • ORLY - Pink Noise
  • ORLY - Mirrorball
  • ORLY - Vintage
  • ORLY - White Tips
Four out of five colors isn't bad.  I can't remember that dark pink polish I used for the flower.  Oh, and the dark green leaf.  That honestly might be an acrylic. Now, is it just me, or does this color combination make my hand look kind of yellow and jaundice?  Okay, I'm being dramatic, but it did wash me out a bit.  In person, this manicure was drop dead gorgeous and didn't give me that washed out look.


Now that I said it though, it can't be unseen.  Despite the yellow tinged hand, the color combination worked really well together.  I think if I were to create this manicure again, I might skip the silver accent nail and do another vintage nail or another polka dot nail.  You know me and my silver accents, I just have to throw one there.

What do you think?  Love this look? 

Until next time, <3.

Flowers

The One With the Daisy Re-Creation

9:00:00 AM

Nothing to Disclose Press Sample Affiliate Link


Good Morning Polished World!  Welcome to yet another week.  Can you believe that Thanksgiving is next week?  Where did this year go?  Oh, that's right...COVID ate it all and spit it out leaving us here to wonder what the heck just happened.  Hopefully this second wind that is coming right now will come and go quickly and we can have a nice little Christmas season.  I'm not going to lie, I started decorating today for Christmas.  Earliest I've ever done, but hey, I wanted a little Christmas cheer in my office.

Today's post though has nothing to do with Thanksgiving or Christmas.  It's actually got quite the summer vibe to it.  It was in the 70s last week which is very odd for November.  I was able to get a lot of outdoor work done, and since I felt like it was a little second wave of summer, I thought my nails should match.  So I recreated a daisy dotticure that I did yearrrrs ago.

Let's take a look.


Colors Used:
  • Sally Hansen - Blacky O
  • Sally Hansen - Wet My Thistle
  • Acrylics
Yes, I cheated and used acrylics for my daisies.  It got late after doing the base coat and the dots that I just didn't feel like waiting for polish to dry.  I can't be the only one who is obsessed with using acrylics for easy and fast nail art.  How could you hate using them when they dry so fast, you can manipulate the design more, and if you mess up you can wipe it off and start over.  The only issue is that the tips will chip a tad easier than normal paint if you have a design that overlaps the end of the nail, but whatever.  I change my nais every 3 to 4 days.


Anyways, Blacky-O was the perfect glossy black polish for the base of this manicure.  After the two coats dried, I went through with Wet My Thistle and created the polka dots. I was a tad nervous at first that the polish wouldn't show up on the black because it was a pastel, but it worked wonderfully for the dots.  No need to go over them again or anything...just one dab and done.  After they were dried  added my flowers and some top coat and admired my work.

What do you think?  Fan of the daisies?  Did you have the same heat wave where you were?

Until next time, <3.


Dot Mani

The One With the Daisy Manicure and Serendipity Polish

9:00:00 AM


Good morning polished world! How are you all on this fine Monday morning?  The weather is warming up here some and we are finally having some sunshine.  Maybe that Groundhog was right after all and we will have an early Spring!  Although, I have a suspicion that this isn't going to last and before we know it, it's going to be below zero and there's going to be a snowstorm again.

Well, since it's warmer, and I'm attempting to stick with the pink theme for the month of February, today I'm sharing a fun, Spring-Time pink manicure with you all!  I have to say, the pink is starting to grow on me. Maybe it's because of the design on top.

Let's take a look!


Colors Used:
  • Serendipity Polish - Poinsettia
  • Serendipity Polish - Holoday Lights
  • Serendipity Polish - #GoalDigger
  • Serendipity Polish - Bottomless Mimosas
Ahhhh my beloved Serendipity Polish's.  Oh how I miss this brand.  Poinsettia is a perfect pink which has full coverage in one coat.  Yes, one beautiful coat.  I of course use two because I'm crazy like that.  I just feel like my nails are more durable with two coats.


Once the base was dry, which was super fast because the dry time on these Serendipity Polish's are no lie 5 seconds, I went through with #GoalDigger and created my designs.  Added the finishing touch of the center of the flower using Bottomless Mimosas and I topped the whole design off with their Fast Dry Top Coat.

What do you think?  Fan of this look?  Loving that 60s kind of look to the daisy?

Until next time, <3

Dot Mani

The One With the Pink Roses for Valentine's Day

9:00:00 AM

Nothing to Disclose

Good Morning Polished World, and Happy almost Valentine's Day!!  Also, happy blog-versary to me!!  That's right, 8 years ago today, this little blog was formed.  It is beyond shocking to me that I have stuck to this blog for that long.  Sure, last year was a tad rocky, but I'm back.  Maybe not better than ever, but I'm back!  Thank you EVERYONE who has stood by me and followed me for this long.  It seriously does not feel like it was that long ago.

Today's design is a re-creation of one of my all time favorite rose designs.  I wanted to post another pink manicure before this one, but I got a lovely migraine the other night and just did not want to blog.  Anywho,  I remember years ago when I created this manicure that it took me a super long time to get everything just how I wanted it.  Now, here I am, years later, re-creating a design that took close to three hours in just under an hour and a half.  Now sure, an hour and a half seems long, but I was in the midst of playing an intense round of Candy Crush and I kind of abandoned the nails before my endless lives ran out.

Let's take a look at the manicure!


Normally this is where I tell you what colors I used, but I have absolutely zero clue.  The sticker at some point or another fell off the bottom of the bottle and I couldn't find it anywhere.  My assumption is that it fell off in the bottom of my drawer, and when I was cleaning out my drawers last, I just threw it out instead of looking to see where it belonged.  Kind of a shame because I really truly wish I knew this polish's name because it's GORGEOUS.  Two coats of this perfect, subtle, neutral pink.  Perfect base for this design.


Once my mystery pink polish was dried, I went through with a white polish and added polka dots on all my nails.  I let them dry a bit and then added the pink circles for my base of my roses.  Then with a toothpick, I paintstackingly (just kidding it went really fast) added the leaves.  Grabbed a small nail art brush, some black acrylic, and added the detail.  Slapped on some Out the Door and went to sleep.

What do you think?  Fan of this look?  Perfect for Valentine's Day without being too Valentine's-y?

Again, I want to thank you all for sticking by me for the past 8 years.  I truly cannot believe I'm still blogging after all these years and that this hobby would mean so much to me.  I love you all.

Until next time, <3.

China Glaze

The One With the Neon Dot Flower Manicure

9:00:00 AM


Good morning polished world!  How are you all doing on this fine Sunday?  I'm off to a rocky start with 2020 and this blog, but I really hunkered down last evening and edited all of my photos and set up some posts for you all.  Kind of proud of that.  I actually have one more post to edit which is the manicure I painted last evening, but since today it's going to rain, I have some time.

Speaking of weather, it was in the 60s yesterday.  I kid you not, it went from 20 degrees to 60 in a matter of 24 hours.  Now we have high winds and enough rain where you can swim down the street.  Last night driving home there was so much fog that you could barely see five feet in front of you.

Since we had this warm break in the normal winter cold, I felt it necessary to have a neon floral manicure.  This summer since I was on my hiatus, all of my gorgeous neons sat in their drawers never touched.  You know I jumped at the opportunity to use them.

Let's take a look!


Colors Used:
  • China Glaze - That's Shore Bright
  • China Glaze - Too Yacht to Handle
  • China Glaze - Pinking Through the Window
  • Zoya - Tomoko 
  • ORLY - White Tips

This is a recreation of a manicure I did a few years ago.  Only thing I did differently this time around was added the random black dots on the floral accent nail.  I also think that my dot flowers were a tad larger.


Still a cute, simple manicure which brought a refreshment to the boring winter color palette.  Too Yacht To Handle is my all time favorite neon polish.  Many complained about it's formula, but I never have had a problem with it and can have full coverage in two coats.

What do you think? Fan of this manicure?

Until next time, <3.

Flowers

The One With the Random Floral Manicure

9:00:00 AM


Good morning polished world!  Happy Sunday to you all!  I'm so excited that the holidays are over and the work week can go back to being just that; a work week.  Nothing was worse than the past two weeks working a Monday, being off on a Tuesday and Wednesday, then returning on Thursday to a day that feels like a Monday.  I miss the days of being a kid where I just had full weeks off of school and didn't have to worry about working.

But alas, I am an adult, who paints nail art on her nails.  Today's design is a simple floral manicure I did back in the Fall, but never got around to posting.  I tried my hardest this Fall to use some of my darker toned polishes.  My goal last year and this year was to stick with the whole color pallette of the season, but I'm going to tell you that I painted neons on my nails last night so it's safe to say I already failed.  Regardless, this manicure was perfect for Fall, and works for winter too.

Let's take a look!


Colors Used:
  • ORLY - Mystic Maven
I'm only putting the bottle color I used, because as usual I don't remember what the other polishes are and I didn't put them in the post when I created the draft.  You think after all these years of blogging, I would have learned by now.  Oh well.  Mystic Maven deserves her own post though because she truly is a gorgeous purple, mauve cream.  Truly unique to my collection and one I should wear more often.  Two coats and full, smooth coverage.  Not shocking since we all know ORLY is perfection.


I was rather proud of my floral design.  I'm getting better at creating leaves with some form of dimension to them with the random green shading.  I can tell you that I cheated and used acrylics for those little babies, but the flower itself was all polish.

What do you think?  Fan of this manicure?  Love the color combo?

Until next time, <3.

Flowers

The One With the Little Daisies

9:00:00 AM


Good morning polished world!  It's Thursday and we have had our first snowfall, and it feels like mid January outside.  I'm telling you, this cold weather makes me lazy.  I need to start updating my Instagram again.  I'm over here blogging, but not sharing.  The sharing part is the easiest too, so that's why this is all a shock to me.  I need a personal assistant to share my posts for me!

Today's design is a cute little floral manicure I did using my favorite ORLY polish - Blue Suede.  I truly have zero idea where my inspiration came from for this manicure, but I'm not 100% fan of the manicure.  I love the blue, love the holographic accent, but the floral design....meh.  I think I could have done better.

Let's take a look!


Colors Used:
  • ORLY - Blue Suede
  • INM - Granite
  • ORLY - Mirrorball
  • Acrylics
I think it's the green leaves I don't like.  They're a tad messy for my liking.  I go from these highs when it comes to my details, to these lows where I just feel like I can't nail art anymore.  I realize I'm being hard on myself because yes, the manicure is cute, and really no one sees what I see when it comes to the "messiness".


I love ORLY Mirrorball, but I think it might have added too much to the manicure.  I think I should have gone with a plain grey nail, or maybe another Blue Suede nail.

What do you think?  Like this look?  Think I should have done it differently?

Until next time, <3.

FingerPaints

The One With the FingerPaints Gold Negative Space Manicure

9:00:00 AM


Good morning polished world!  How are you all doing today?  I've been better.  Friday I ended up getting sick with some sort of allergic reaction where my breathing got all messed up and I've had the WORST stomach cramps for the past 24 close to 48 hours.  I'm hoping today it gets better and I can leave my house for more than 5 minutes.  Especially because it's supposed to be a perfect Fall day today.  Sunny, in the 70s...really hope I get outside.

Since I've been since, I haven't wanted to edit my latest Fall themed manicure.  Lucky for me, I had edited all my old photos over this past week and have 8 posts to share.  After looking through all the photos, I felt this negative space, gold, daisy manicure was fitting for a nice, sunny, Fall day.  Maybe.  

Let's take a look!


Colors Used:
  • FingerPaints - Beverly's Touch
  • ORLY - White Tips
Pretty sure this is a re-creation of a manicure I did a few years ago.  I painted it back in April when I was feeling very uninspired but wanted some sort of floral design.  I remember looking on Instagram and finding a negative space manicure, and this one flew back into my mind.  Now you know me, I'm not a huge fan of gold, so this was a manicure that was way out of my comfort zone then, and was again when I recreated it.  Both times though, I absolutely loved the white and gold color combination.


Beverly's Touch is an oldie but goodie from my polish stash.  You can totally get away with one coat of this gorgeous yellow gold, but I used two.  I love how saturated it is because it makes it easier to use for nail art.

Fan of this manicure? Ever enjoyed the negative space look?

Until next time, <3.

Flowers

The One With the Sunflowers and ILNP Sundance

9:00:00 AM


Hey there polished world!!  I told you I was back!  Twice this week I have painted nail art, and I have a surplus of drafts.  I didn't realize until I took my picture card out of the camera how many manicures I never edited from before I stopped painting.  I think I have about 8 manicures to post, which is just beyond crazy to me.  Now, I just have to find the appropriate time to post them since it's Fall and most of the designs are Spring/Summer.  Guess I'll be creative....

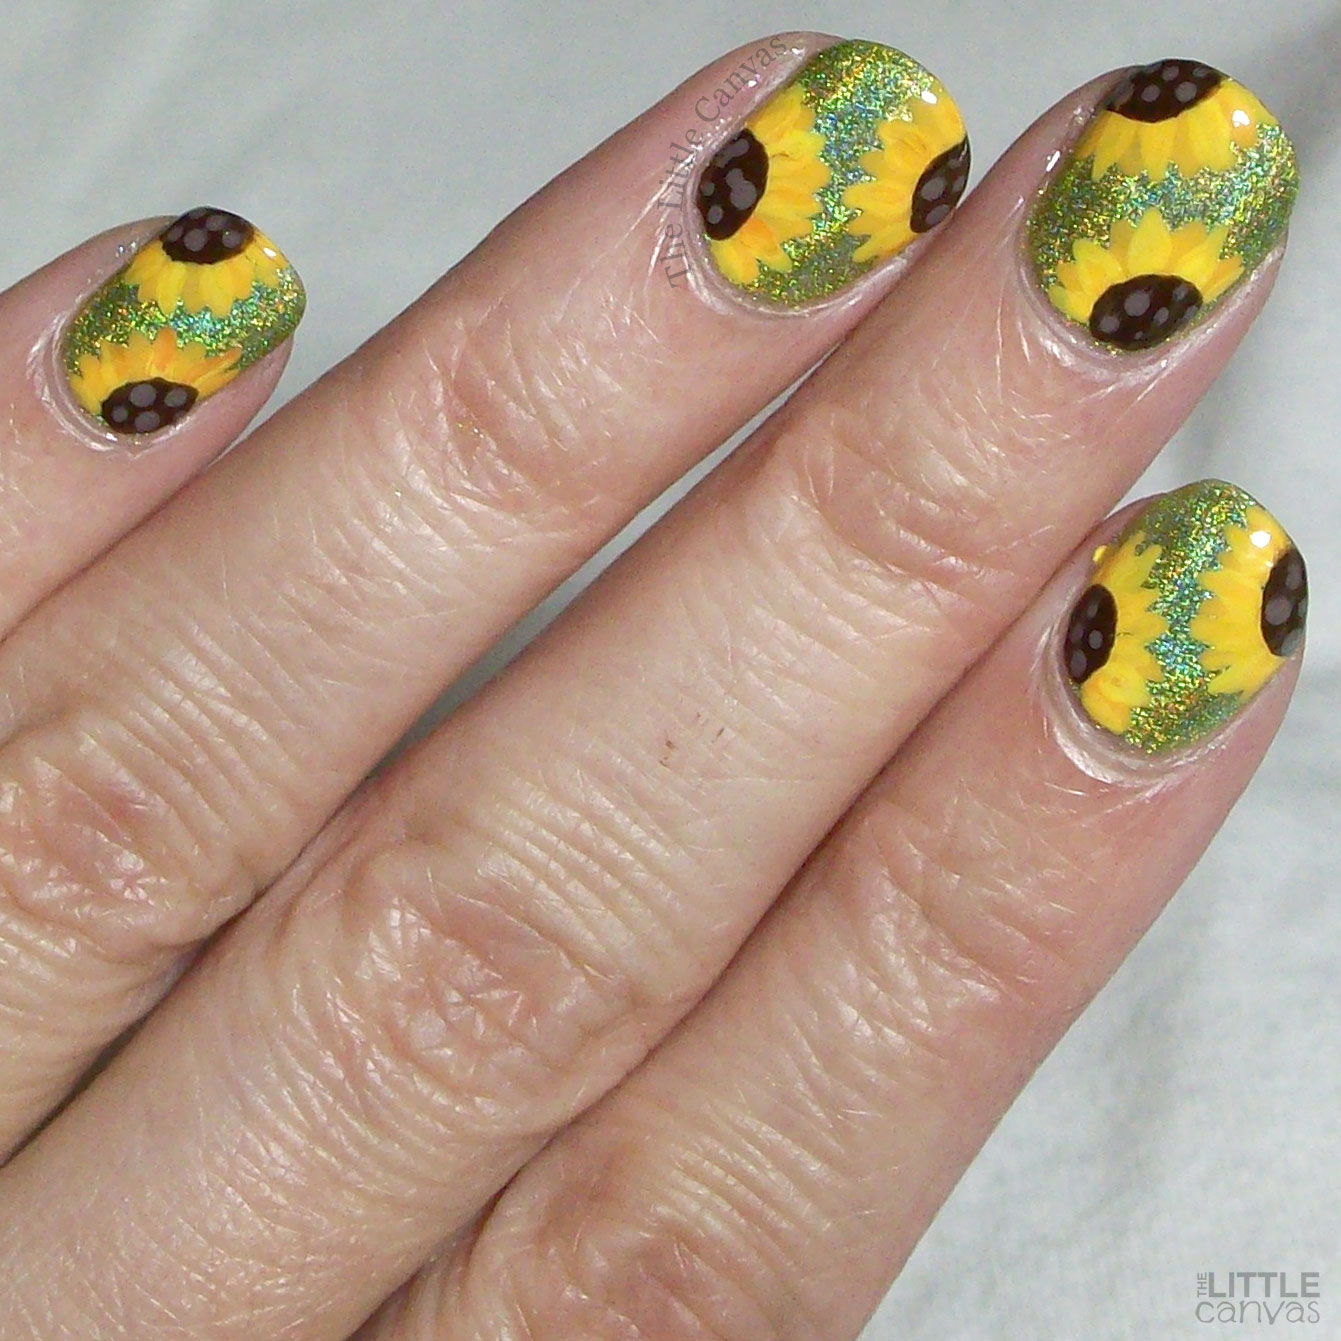
Today's manicure is one I painted the other night, aka the first nail art after my hiatus!  For the past two months I have been wanting do sunflower nail art.  Summer, then September came and left, and I never painted any sunflowers.  Since it was super warm out the other day, and sunflowers are a Summer to Fall transition flower, I figured it would be appropriate to still paint them.

If you've been following me for a while, then you would know that annually I paint sunflowers on top of a glittery cobalt blue base.  Since I've done it so many times,  I really wasn't feeling it.  I then found my bottle of ORLY Olive You Kelly and was going to use that as my base, until I remembered that last year that's the base I used for my sunflowers.  Then, sitting next to the ORLY bottle was Sundance by ILNP; the perfect base for this design.

Let's take a look!


Colors Used:
  • ILNP - Sundance
  • Acrylics
Look at how gorgeous Sundance is!!!!  Two coats of this beautiful, green, holographic beauty.  All of my ILNP polishes are the same, saturated with color with a gorgeous holographic effect no matter what type of lighting you are in.  I can't tell you how many times this summer when I was wearing plain swatches I would get distracted and get lost in the holo.


I love how nail art on top of a holographic base gives the manicure a 3D illusion.  I debated on adding little flat green leaves but felt like the green background really gave it a leafy-field feel!

Not going to lie, I was a tad rusty when it came to nail art and working with the acrylics.  After a few nails it all started to come back to me.  I think it's going to be a slow and steady type thing as I start to get back into the swing of nail art!

What do you think?  Fan of this manicure?  Loving that beautiful base.

Until next time, <3.