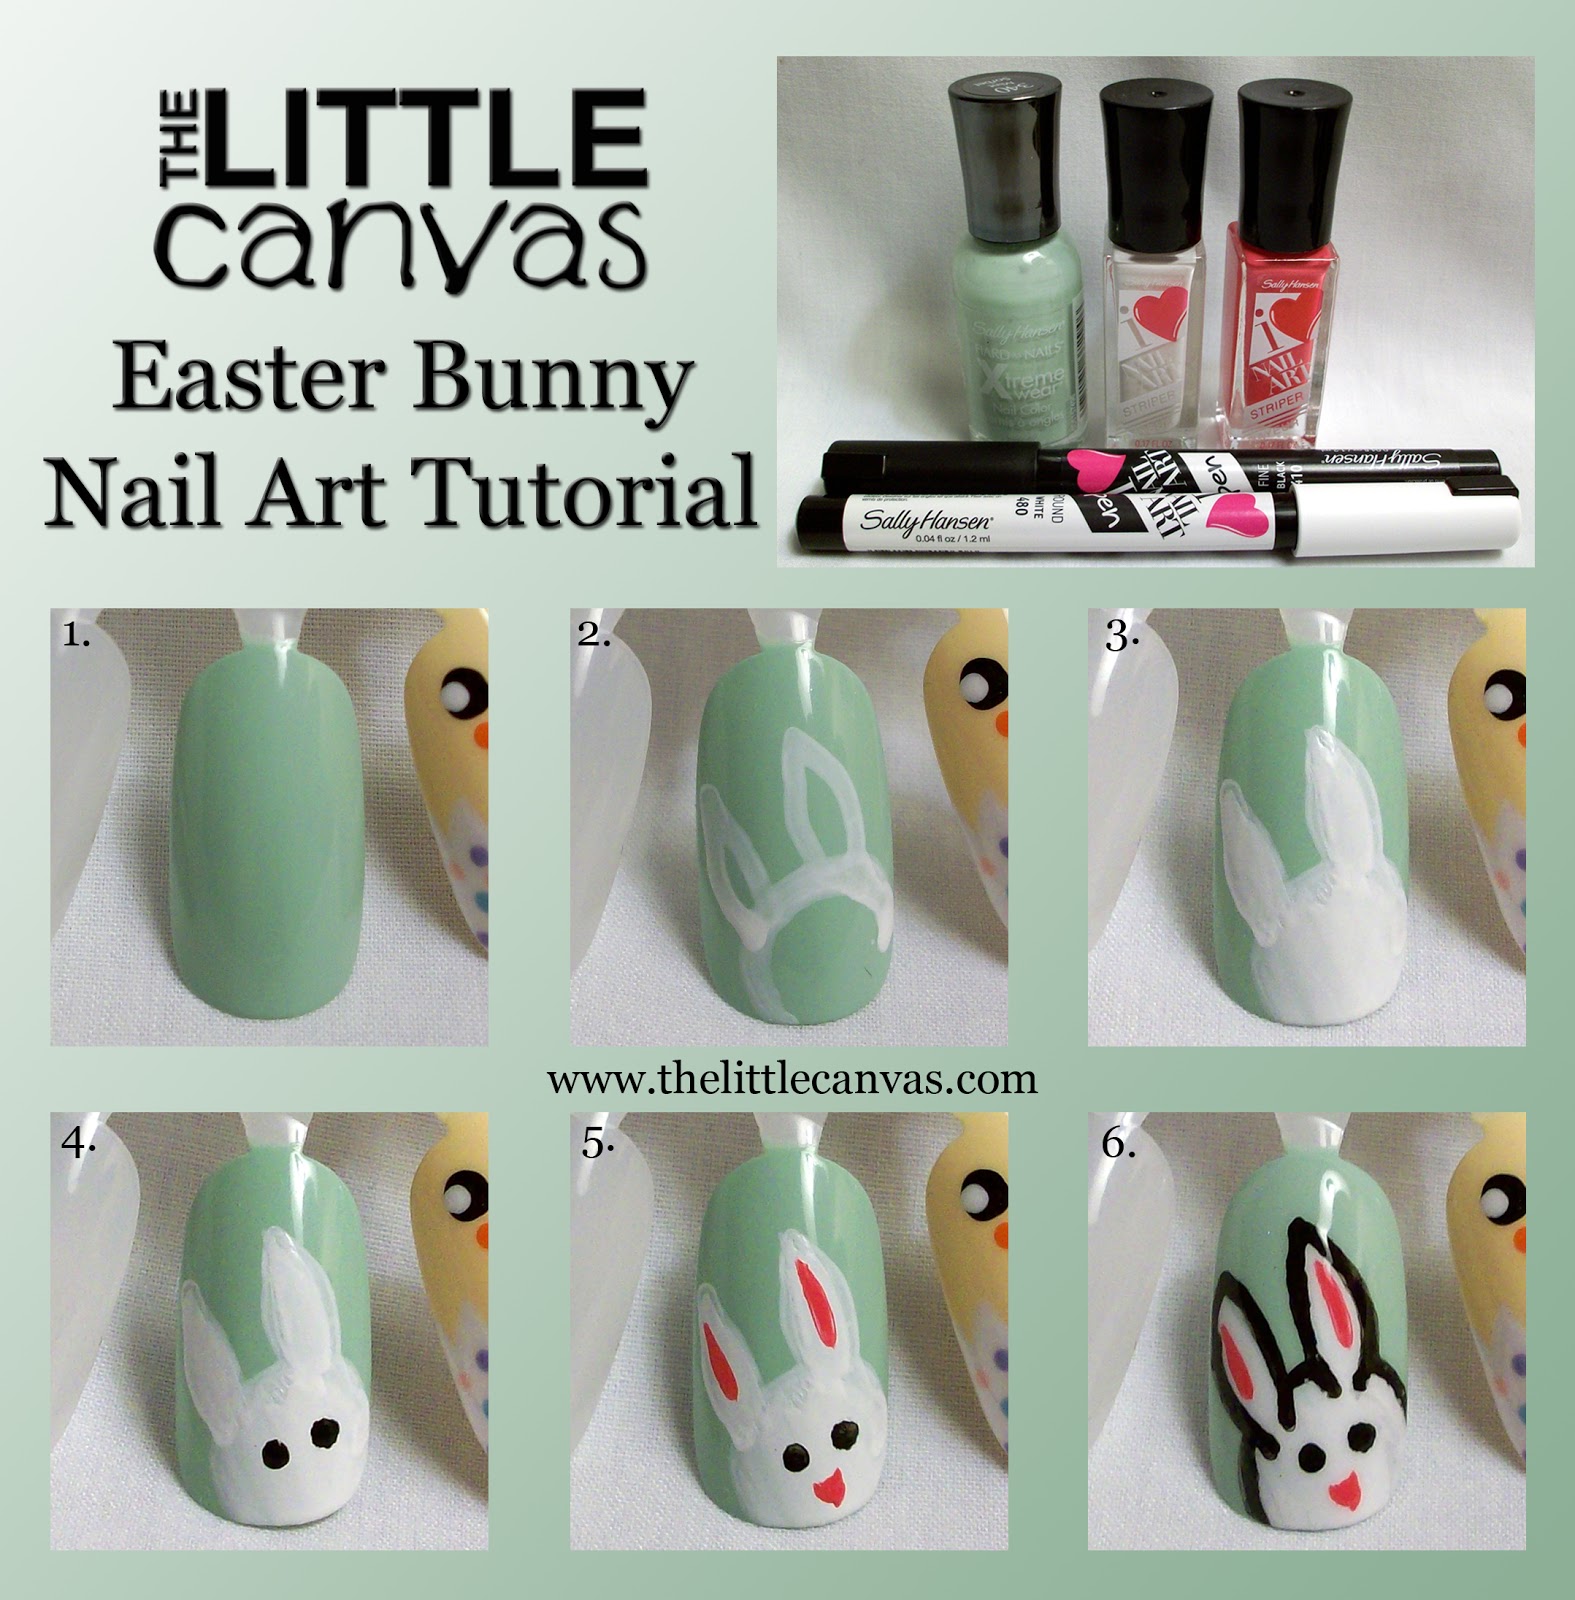
Easter Bunny Nail Art Tutorial with Sally Hansen
9:00:00 AM
Press Sample
Good morning polished peeps! Did you see yesterday's Easter Bunny nail art? If you did read it, then you know today's post is dedicated to how you can get the look for yourself using polishes that you can purchase at your local drug store. For my actual manicure, I used Orly Instant Artist polishes which only can be purchased on Orly's website or on Amazon. If you want to get the look by Sunday, well it's impossible to do so with shipping times, so I decided to re-create the look using polishes you can purchase from your local drug store!
Sally Hansen recently released nail art striper polishes and nail art pens under their I <3 Nail Art line. The amazing people at Sally Hansen sent me some of the lovely products for review which I just received on Tuesday. Ever since I opened the box, I've been dying to use them to see how they work and get a review up on the blog. As you know, I truly believe that there is a nail artist within each and every one of us, and products such as these which are readily available to the public at drugstores really make it easy for us to find our inner nail artist!
So, enough of my babbling, let's get to the tutorial using all Sally Hansen products!
Colors Used:
- Sally Hansen - Mint Sorbet
- Sally Hansen - I <3 Nail Art Pen - White
- Sally Hansen - Striper - White
- Sally Hansen - Striper - Hot Pink
- Sally Hansen - I <3 Nail Art Pen - Black
Tutorial
- Start off with a base coat of a pastel polish. For this post, I used Sally Hansen X-Treme Wear in Mint Sorbet.
- With the Sally Hansen I <3 Nail Art Pen in white, draw the outline of the Easter bunny. I started off with the circle, then added the ears.
- Using the white striper, fill in the head of the bunny.
- With the black I <3 Nail Art pen, dot on the eyes.
- Using the Hot Pink striper, draw a line in the middle of the ears, then create a tiny triangle under the eyes for the nose.
- Outline the bunny using the black I <3 Nail Art Pen. Add a top coat and enjoy!
Cute right? Honestly, the lines were a lot cleaner using these products than my actual post where I used my nail art brushes and dotting tools. I'm first going to talk about the striper polishes. I LOVE these! Now, these aren't like your normal everyday striper polishes. I was expecting to open the bottle and see one of those super long awkward thin brushes that are impossible to work with. I've started to get the hang of them, but honestly still hate those long things. Instead, I found an awesome surprise when I opened the bottle.
The polish had a short thin brush! See, isn't that awesome?! When I opened the bottle, I thought to myself "If these polishes are awful to work with, I'm cleaning them and keeping all the brushes because this is awesome." Luckily though, the white and pink that I used for this tutorial were awesomely formulated. Even application and full coverage without having to continually apply separate coats. From my first experience using this, I would say it's a must have.
The pens are rather neat as well! I was expecting to see something similar to a ball point pen when I opened them, but instead the tip is a hollow white tip that fills with the polish. The white one I have is a rounded tip, and the black is a fine tip. As you can see from step number 2, the white is rather thin. Both this and the black were kind of watery and not like a typical polish. I felt that I had more control creating a straight line since I was using a pen and not a nail art brush. Since the black was just as thin as the white, I found that I had to go over the outline for the final step a couple times times before it became dark enough. I think if you want to outline your design, I would use the striper instead of the pen. I liked the pen for creating outlines for the designs I fill in. If that makes sense.
What do you think? Like the design? Will you recreate it? Have you tried any of the Sally Hansen I <3 Nail Art supplies?
The X-Treme Wear polish I purchased for $2.89 at my local drug store. The I <3 Nail Art Pens are $5.99 and the stripers are $3.99 at Walgreens. According to Walgreens website the striper's are Buy One Get One 1/2 off.
I hope you enjoyed the tutorial! If you recreate the look, please, oh please, share it with me! I can't wait to see. Remember to tag those manicures with the #tlcinspiredmani tag on Instagram!
Until next time, <3.
**Sally Hansen provided the I <3 Nail Art Products. All opinions expressed in this post are my own. Please see my disclosure policy**


0 comments
Oh how I love reading all of your comments! I truly appreciate each and every single one!