China Glaze

The One With the Scarecrows and Jessica Cosmetics Tangled Secrets

9:00:00 AM


Good morning polished world!  Happy Saturday!!!!  The weekend is finally upon us, but just like every other weekend it will be way too slow, and Monday will be here before we know it.  Clearly I am miss party pooper over here.

Since October is here, it's only fitting that I start doing some Fall themed manicures.  I know, I should be starting Halloween designs, but I just haven't had the want to start that quite yet.  Since I didn't want to start Halloween, I took to Pinterest and looked for a super Fall design.  I pinned a cute scarecrow manicure last year by Sensationails4u on Instagram, and lately it keeps getting re-pinned.  Almost daily I have 30 notifications from this pin alone.  I took that as a sign that I should re-create the design.

Let's take a look!


Colors Used:
  • Jessica Cosmetics - Tangled Secrets
  • OPI - Pale to the Chief
  • China Glaze - License & Registration Pls
  • Acrylics
Isn't this one of the cutest designs you've ever seen???  I haven't done a "hardcore" manicure like this in a long time, and boy have I missed it.  You think it would have been a difficult design to re-create, but really it wasn't.  I think I might make a tutorial for it just to prove to you that it wasn't bad!


Jessica Cosmetics Tangled Secrets from the Into the Wild collection is a gorgeous burnt orange red polish which I think was PERFECT for this scarecrow manicure.  Couldn't you see a scarecrow wearing that color shirt??  Two coats and full coverage.  Just a beautiful shade.


OPI Pale to the Chief is a real winner.  Just like all other OPI nude polishes, this one is a beauty.  Two coats and full coverage.  Dries fast, looks amazing. Cannot wait to use this one for more nail art bases.  From here on out, I'm purchasing all OPI nude polishes.

What do you think?  Cute design?  Something you'll re-create if I post a tutorial?

I'm super happy with how this turned out.  I'm sad it only lasted two days though because I used a new top coat which did not like my nails.  My index finger chipped off within 24 hours.  I patched it up....hehe....but it didn't last much longer after that.  Note to self: always stick to INM Out the Door or Serendipity Polish Finishing Touch.  All other top coats hate me.

Until next time, <3.

Fun and Random

Lightening Bug Nail Art Inspired by Chalkboard Nails

9:00:00 AM


Hello polished world!  How are you all doing today?  It's Sunday, which means the weekend is almost over....yet again.  I would say that I wish I had another day this weekend to relax, but I pretty much spent 90% of my Saturday lounging around.  It was by far the laziest I have been in a long time, and I wouldn't have had it any other way.

Summer is coming to a close, and it's a perfect time for me to share this perfect summer manicure with you all.  A week ago or so I decided to re-create Chalkboard Nails firefly nail art!  It was such an awesome manicure that I fell in love with when I first saw it, but I never had the guts to actually attempt it.  Finally the day came and I gathered up all my courage and re-created her awesome manicure.

Let's take a look!


Normally this is where I tell you what colors I used to create the look, but I honestly cannot remember!  I think the purple is NYC New York Color Jacaranda Flower, but for the pink and coral I used for the gradient, I cannot remember to save my life.  This is why I need to write down the colors as soon as I finish my manicures.  Maybe draft the post up right then and there?  That would be the smart thing.


Anyways, to get the look, I started off with a base of white polish.  When dried, I went through and added my gradient.  I then created the grass using my black striper.  I then added the fireflies glowing halos using acrylic paint mixed with water.  I then went through ad added the yellow lil fireflies.

I added a quick dry shiny top coat, then went back over it with a matte.  I find that if I were to just add a matte top coat, the art ends up smudging.

What do you think?  Like this manicure?  I think Sarah's is a million times better.

Until next time, <3.

Fun and Random

Winter Nail Art!

9:00:00 AM


Good morning polished world!  Happy Sunday!  Again, I ask of you, where did the weekend go!?  I felt like the work week dragged on, then the weekend came and now it's almost over.  It just isn't fair.  Oh well, what can you do!?

Winter is here and not going anywhere for the time being.  Our high today is in the 30s which is a lot better than the 8 degrees earlier in the week.  Sure, it's awful, but when it snows it's rather pretty, especially when it's that cold out.  The snow sticks to all the branches of the trees, and then when the sun actually does show itself, it looks like there are millions of little diamonds on the ground.  I wish that I could see that on an 80 degree day, but alas that won't ever happen.

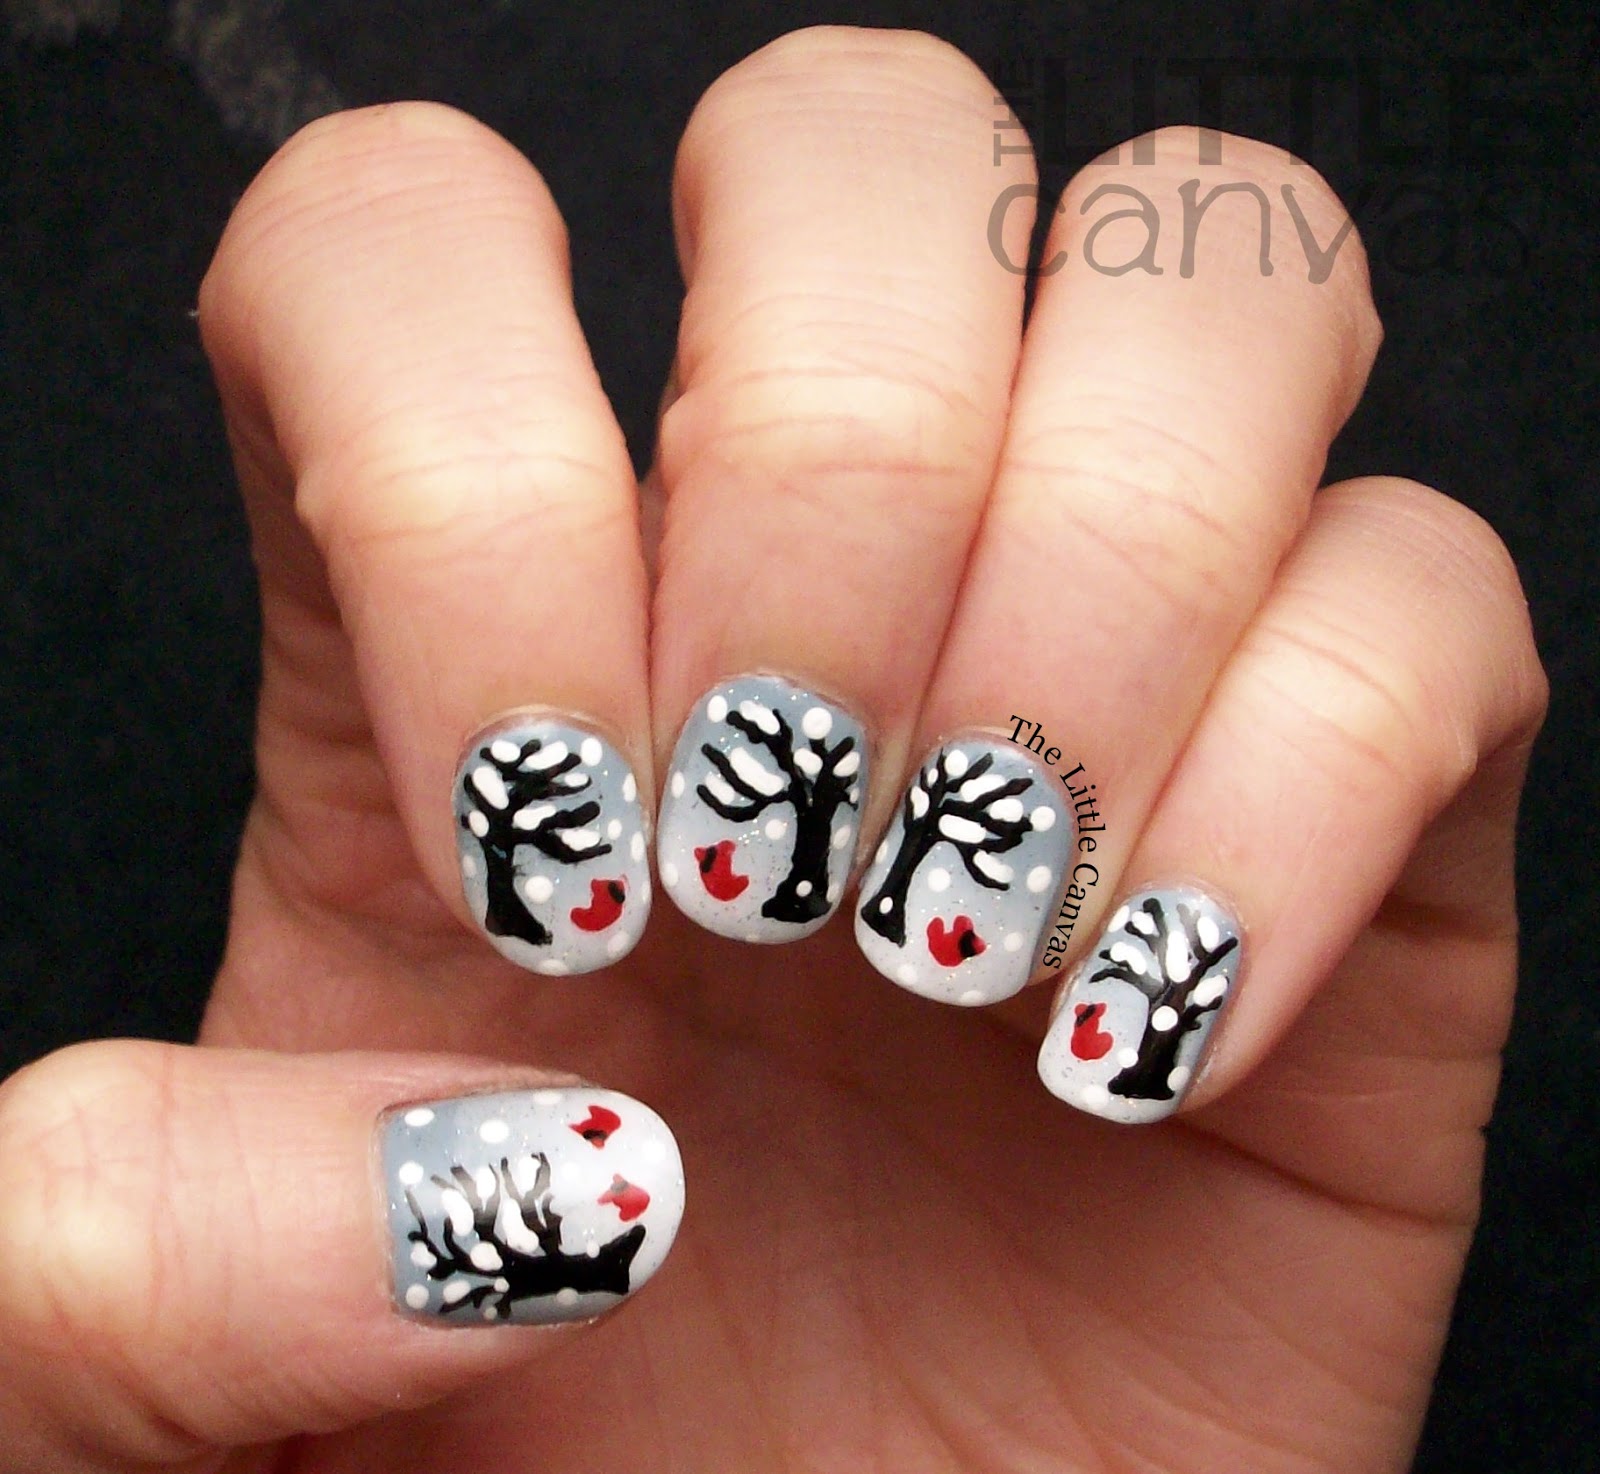
Since it's been so cold, I decided it would be a good idea to do a little winter scene on my nails.  I did one last year that I loved so much, so I took inspiration from that.  Instead of doing the little weird cats like last year, I went with cardinals.  At work, there is a little bird feeder outside of one of the windows and the cardinals jump around it all day long.

Let's take a look!


Colors Used:
  • Orly - Boho Bonnet
  • Sinful Colors - Snow Me White
  • INM - Northern Lights
  • Acrylics
I started off with a base coat of Orly Boho Bonnet.  This is a soft grey blue shade which I think screams winter.  I then took a make up sponge and created a gradient using Boho Bonnet and Snow Me White.  This created the winter snow effect.

Last year, I didn't add a top coat of INM Northern Lights, so this year I decided to do so.  To be honest, it really didn't make much of a difference.  It did add some sparkle to the snow tips, but it wasn't anything that I thought was essential for the manicure.


With my nail art brush, I created the trees.  When the trees were dry, I used a dotting tool and added all the little snow flakes and cardinals.  Yes, the cardinals were done using a dotting tool!  I think the little guys look amazing!  They were the perfect addition to add some color to the winter scene.  Just like they do in real life!

What do you think?  Loving this look?  Fan of the cardinals?

I hope you all have a great Sunday!

Until next time, <3.

Fun and Random

Twinsie Tuesday: Inspired by Shoes!

9:00:00 AM


Good morning!  How are you all today??  It's Tuesday again which means it is time for another Twinsie Tuesday.  Time is just flying by again.  It's already January 13th, I swear Christmas was yesterday.

Today for Twinsie Tuesday we are sharing manicures which are inspired by our shoes!  Since it's winter time, my shoes are rather boring.  I basically go from knee high black boots, to mid calf black boots, or my fake Ugg boots which are also black!  I didn't want to just share a swatch of black polish, so I started to think about all the different shoes I own.

Then it hit me, my favorite pair of Converse!  Yes, they are also black, but they are so unique!  A few years ago for my birthday, all I wanted was a pair of polka dot Converse, and my parents found me a really awesome pair!  The eyelets are random colors which match the polka dots on the inside of the shoe.  Instead of the shoes being laced through the eyelets, the laces goes inside along the tongue so the polka dots on the inside really show.  It's hard to fully explain, but I did include a photo of them at the bottom of this post.

Enough of my babbling, let's take a look!


Colors Used:
  • Orly - Liquid Vinyl
  • Zoya - Tilda, Wendy
  • Random Acrylics
Fun right?  I followed my Converse Nail Art Tutorial to get the sneaker itself on my nail.  Instead of the normal white eyelets, I matched the pattern on my pair of Converse.  Since I couldn't get all six on one nail, I split them up between the pointer and the thumb.  For the other fingers, I tried to match the polka dot pattern on the inside of the sneakers.


Now that I see the photo below, I forgot that they had rainbow stitching on them which matches the polka dots!  It's been awhile since I've worn them since I refuse to wear them in the snow and salt.  I did once last year and my poor feet were so so cold.  Canvas shoes never mix with the snow!


Look how awesome they are.  I'm so sad they're rather beat up....I hope I can find another pair which is like them.  If not, I'll have to get the galaxy pair I saw the other day in the store.  Or just wear the cute pink laced ones which are in the photo next to them.  I may or may not have a Converse obsession.  I love them so so much.

What do you think?  Fan of the manicure?  Jealous of my sneakers?

Make sure to check out the other Twinsies!


Róisín at Cuti-CLUE-les
Savannah at Addicted to Polish
Marisa at Polish Obsession
Chelsea at Nailed Blog
Bridget at A Painted Nail
Amber at Nails Like Lace
Amanda at Fashion Footing
Amanda at Amandalandish

Until next time, <3.

FingerPaints

The Beauty Buffs - Metallic - Steampunk Nail Art

8:00:00 AM


Good morning polished world!  How are you all today?  If you live in the Buffalo, NY area, I hope you are all safe and warm after that heavy lake snow.  Goodness gracious, the photos are crazy, and I'm so happy that I didn't get hit where I am!  It's crazy how early in the season it is and already places are getting slammed like that!  What can you do though!?

I also want to apologize that I didn't post alongside the Twinsies yesterday for Twinsie Tuesday.  I did next weeks prompt by accident and had no time to re-create a design for this week.  I will be back next week though for sure!

Today though I am posting with the lovelies from The Beauty Buffs.  This week we are focusing on all things metallic.  I don't have many metallic polishes because I'm not really fond of the finish on my nails.  I was planning on doing a tape design using Essie Nothing Else Metals as a base and a black top, but I loathed how it looked.  That polish was so difficult to apply so it was lumpy and uneven, and since it is a metallic polish, it is very unforgiving if you have one single thing go wrong.

So I went to the drawing board and thought of different nail art that I could do using metallic polishes!  I asked one of my friends and they suggested Steampunk!  I did a quick search online for ideas and found an awesome tutorial on YouTube by Arcadia Nail Art (my internet is not working right at the moment so I cannot link it without freezing my whole computer).

Let's take a look!


Colors Used: 
  • Zoya - Normani
  • FingerPaints - Glitz and Glam
  • OPI - Love Angel Music Baby
Awesome, right?  I started off with a base coat of Zoya - Normani.  This polish is from the first Natural collection, and it is quite amazing.  A perfect base for this type of nail art!  It applied evenly in two coats.

Using some new nail art brushes, I painted on the gears and chains using the metallic silver and gold polish.  Glitz and Glam is part of FingerPaints Holiday Glitz Manicure Kit which I will be posting a review of soon.  It is an awesome full coverage silver metallic polish which stood out perfectly on this base.

Now I do not own a bottle of silver or gold large fleck glitter, so to do the glitter placement on these nails, I dug through a bottle of Ulta Pinata Yada Yada.  I was rather dedicated to getting the most metallic look possible, and the glitter really made that more possible!


I love doing art with metallic/foil polishes on a cream base.  They really stand out and add a whole new dimension to the art!  I'm very happy that my friend suggested this design also, because it was something I never would have thought of in a million years!  I cannot tell you how much I love this design!

What do you think?  Liking the steampunk look?

Do not forget to check out the other Beauty Buffs posts!


An InLinkz Link-up

Until next time, <3.

Fun and Random

City Skyline = Take 2

9:00:00 AM

Well hello there polished world!  How are you today?  I'm doing well, especially since last night I edited four posts worth of photos!  I have two awesome manicures that I cannot wait to share with you on Tuesday and Wednesday.  Then at the end of the week, I'll be debuting another Nail Artist of the Month.  This blog is booming with posts and I wouldn't have it any other way!

Well, after editing so many photos, I had honestly no idea which design I should share today.  I pretty much had to close my eyes and point at the screen and wherever my finger landed was what I was going to post.  When that didn't really work, I just went with the design that was the oldest....and that was my second take on the City Skyline nails.

I did these nails back in the beginning of June around the time that my team leader discovered my Instagram account and found my first attempt at the look which was done after I saw CutePolish's video.  She was in love with the design and it was all that she could talk about, so I thought it was the perfect time to try them out for a second time.  I meant to get them on the blog sooner, but for some reason they weren't in my "To Be Edited" folder and they slipped my mind.

No worries though, here they are!  So let's take a look!


Colors Used
  • FingerPaints - Paper Mache
  • OPI - Eurso Euro
  • Ulta - Tutu Cute
  • Orly - Liquid Vinyl
  • Mary Kay - Lemon Parfait
  • INM - Northern Lights
I started out with a base coat of white polish.  Once the white was dried, I grabbed my make up sponge and painted on the gradient of OPI Eurso Euro and Ulta Tutu Cute.  I dabbed it on the nail a few times leaving the tip of my nail white.  Since it was going to be covered by the buildings, I didn't think it was necessary to have the gradient go all the way to the tip of the nail.  Plus, I was scared that if I did put the gradient to the tip of the nail, the building would cover the transition and it would just look like a funky blue sky and not the electric night sky.

When my gradient was dried, I added a top coat of INM Northern Lights.  Clearly I'm obsessed with this top coat.  It's perfect for this type of manicure because it really makes the night sky look like one with zillions of twinkling stars.

Once that was dried, I took my brush from my Orly Liquid Vinyl and painted on the buildings.  I used my striper brush to add details for the little antennas on the top of the buildings.  Then when the black was dried, I used my dotting tool and Lemon Parfait to make the glowing windows. 


I had mixed feelings about this manicure.  The second attempt sure was a lot better than the first, but I still need to work on the whole building situation.  They just didn't turn out how I imagined them, and my windows were all wonky.  I think when I did them it was late and I was tired and really didn't care that my windows looked so crappy.  It's just something I'm seeing now.  Like look how that middle finger has huge windows where as all the others are all uniform.  Oh well, OCD pet peeve right there.

What do you think?  Liking the skyline look??

Hey so side note, would you like to see me do any tutorials for any of my recent designs?  I know it's been awhile since I've asked so I thought I would throw it out there.  I feel like I haven't done one in forever and am kind of itching to start doing them again.  I miss doing nail art wheels also.  Well, keep it in mind and let me know on here or any of my social networks!

Until next time, <3.

Fun and Random

Converse Nail Art Take 2 + Tutorial!

9:00:00 AM

Hello polished world!  Happy Saturday!  As I write this post, I'm not a happy camper about my current manicure which is going up on the blog later this week.  If I have time this weekend I most likely will re-do it.  It got super hot here all of a sudden, and with that all the formulas on my polish I swear changed and it's frustrating me.  Maybe it's mind over matter, but I swear it's the humidity.

So, to make myself happy, I am sharing one of my all time favorite manicures that I have re-created.  This manicure being the converse nails!  I originally did converse nails when I first started blogging.  To this day, it's one of my most popular posts, and the pictures are unfortunately the most stolen.  Due to it's popularity, I really wanted to re-create the design and see how my skills have improved.  Then maybe people could start sharing a better version of the ones that are kind of a huge mess.

Earlier this year (literally I think I did these in February or March), I finally got around to doing the design.  Due to other things going on with the blog, they were put in the drafts folder and kind of forgotten about, until now!  Plus it's perfect since now that it's warmer I'm living in my Converse.

Let's take a look!


 Colors Used:
  • China Glaze - Splish Splash
  • China Glaze - That's Shore Bright
  • Orly - Oh Cabana Boy
  • China Glaze - Flip Flop Fantasy
  • China Glaze - Too Yacht To Handle
  • Orly Instant Artist - White
  • Orly Instant Artist - Black
Tutorial Time!  At the time I did this post, this was my first tutorial using the nail art wheel.   I think I've gotten a little better creating them since this! 


  1. Start off with a base coat of your favorite neon polish.  For this tutorial, I used Orly Oh Cabana Boy.  You could also use a black polish for a traditional Converse look.
  2. With a white striper, create a white line across the nail.
  3. Fill in the tip of your nail with a white polish.
  4. With a dotting tool, create six dots on the nail for the shoe's eyelets.
  5. With the white striper, create the laces.
  6. After the laces are drawn in, with a dotting tool, create the black dots in the eyelets.
  7. With a black striper, create the black U on the shoe's toe.
  8. Finish off with a top coat and enjoy!

These make me so happy.  I love my Converse and  I really wish I had a pair in all these colors.  Especially that mint on my pinkie finger.  It would make me so happy, especially since I'm mint obsessed lately.  I noticed on Converse's website that you can create your own Chuck's now and I might have to do that for my birthday.  If I do, you can bet your booty that I'll create a manicure to match them.

What do you think?  Better than the first attempt?  Will you re-create the look?

As a reminder, if you are going to share my image, please do NOT remove my cuticle watermark.  I work hard on my nails and this blog, and it is upsetting when I see my nails appearing on other people's Instagram accounts with no credit, or my favorite 'Look at my nails" caption.  Myself, along with other bloggers, put a lot of time into our sites...it truly is a labor of love.  So please, give credit where credit is due.

Until next time, <3.

Fun and Random

Winter Nails Inspired by Pshiiit

9:00:00 AM

Good morning polished world!  How are you all today?  Yet again, it is freezing here.  Below zero nights with wind chills to match, it hasn't been pleasant.  Personally, I'm enjoying my time inside baking, painting my nails, and lounging watching Netflix in my pajamas.

Since it is freezing, I decided to paint my nails with another winter scene.  This manicure was completely inspired by this gorgeous creation by Pshiiit Polish.  I stumbled across the design before Christmas on Pinterest and fell in love.  I didn't think I was going to ever attempt it, but I'm so happy I finally decided to.

Let's take a look.


Colors Used:
  • Orly - Boho Bonnet
  • Sinful Colors - Snow Me White
  • Orly Instant Artist - Jet Black

It looks complicated and like it took a lot of time, but I swear, this manicure was so simple.  I started off with a base coat of Orly Boho Bonnet.  Even though this polish was released as part of last years Spring collection,  I think it's a perfect winter polish.  You know how the sky gets that dusty gray blue look this time of year, well to me, this polish resembles it most closely.

When my base was dried, I sponged Sinful Colors - Snow Me White onto the tips of my nails to look like a blustery, winter scene.  To me, it really looked like the wind was making snow drifts across my nails.

After the white was dried, I dripped out some of the Instant Artist polish on a plate and used my nail art brush to create the trees and little kitty cats that Pshiiit had.  When the black dried (which was super fast), I went through and added the white snow dots on the branches, and random snow flakes with my dotting tool.


So my kitties kind of looked like little fat squirrels.  If you click the link above, you can see that Pshiiit's clearly look like little cats.  Doesn't really matter to me though, squirrels are around in the winter time, so it totally worked.

What do you think?  Do you think I should have added INM Northern Lights?  Part of me wishes I did, but the other part of me is glad I didn't because I think it would have taken away from the design.

I hope everyone is staying warm!!!  Until next time, <3.

Fun and Random

Snowman Nails!

9:00:00 AM

Hi Polished World!!!  How are you today??  Hopefully you are all staying warm the past few days!  Seriously, where did this blizzardy weather come from?  On Tuesday morning the temperature was -4 and the windchill was -20.  I did not want to leave my house.  Today it's going to be a bit warmer, and by warmer, it's supposed to be 23 degrees.

Since it's been so cold and snowy, it was necessary to create some sort of snow scene on my nails.  Last year I did a polar bear and penguin manicure, and since I recently did a penguin manicure, I decided to do a snowman manicure!  The last time I painted a snowman on my nails was before I started blogging.  When I started the blog in February of 2012 (oh man we're close to the 2 year anniversary!), I shared the little guys!  Not too shabby for only having toothpicks to work with.  Honestly, I was beyond proud of them.

So, now that I have nail art tools, more polishes, and longer nails, it was about time I try a snowman manicure again.  Let's take a look.


Colors Used:
  • Sinful Colors - Sugar Rush
  • Precision Lacquer - Shake Your Bon Bon
  • Sinful Colors - Snow Me White
  • Orly - Liquid Vinyl
  • China Glaze - That's Shore Bright
  • Zoya - Beatrix
Cute, right?  To get the look, I started off with a base coat of Sugar Rush and added one coat of the gorgeous Shake Your Bon Bon glitter by Precision Lacquer.  When that was dried, I went through with my white polish and added un-even french tips to make it look like snow had  fallen across my nails.  On my accent nails, I did a snowman using my nail art brush.  I started first by outlining the body, adding the little head, then filling the rest in.  While the little guy was drying, I went through and added the dots for the snowflakes.  I then took my nail art brush and drew on the little hat, eyes, mouth, buttons, and scarf.


I really am happy that I decided to add the coat of glitter to the base.  I don't think I would have enjoyed the manicure as much if it didn't have that sparkle.  I got the idea after seeing my polar bear manicure last year where I put a thin coat of Orly Angel Eyes down before I drew my designs.  I was going to do Angel Eyes again, but I decided to go with the softer baby blue glitter.  Maybe I'll re-do my polar bears before winter is over just to use Angel Eyes again.

What do you think?  Like the little guys?

Hope you all have stayed warm in your neck of the woods!!!

Until next time, <3.

Fun and Random

Lightning Bolt Nail Art - Another Take 2

9:00:00 AM

I love recycling manicures and attempting them a second time around.  If it weren't for the blog, I probably would never try a technique or a nail art look another time if it originally failed.  Well, I lied, I won't ever try water marbling again, but that's just out of principle.  Seriously, it wastes too much of my polish.

Last year, after seeing a pin on Pinterst, I attempted these lightning bolt nails.  I loved this manicure, and thought it looked SOOOOO cool!  Now, if you know me, you know I loathe storms, so it was so odd that I loved the nails as much as I did.

The thought to re-create this manicure never crossed my mind until I got caught driving in one of the worst storms of my life.  I was coming home from one of my jobs a few weeks ago when the storm struck.  There were numerous cloud to ground lightning strikes, rain and hail which quickly flooded the roads, and the loudest thunder ever.  I had to pull over and wait out the storm because I was having such an awful panic attack driving in it.  Come to find out later, the storm dumped about 2 inches of rain in 30 minutes and of course hit my area the hardest.

After this rainy day, and very rainy summer, I thought, eh why not.  Since it's supposed to storm tonight, I thought it was fitting to finally share them!  So let's take a look!!!!


Colors Used:
  • Base
    • Orly - Liquid Vinyl
  • Bolt Colors
    • Sinful Colors - Sugar Rush
    • Maybelline - Beach Plum
    • Sinful Colors - Snow Me White
Kind of cool, right?  I think both this year and last years manicure were great attempts at this technique.  I really have no complaints about last years seeing as I was a fairly new nail artist.  Plus, I created last years bolts using toothpicks, where as this year I used a nail art brush.

Getting the look is rather simple.  First you start off with a base coat of black nail polish.  I used Orly Liquid Vinyl because I think it's the best black polish ever.  Full coverage in two coats and it is so shiny.  Plus, it wears great too!  Totally worth the price!  When the coats of black were dry, I used a make up sponge and sponged on the blue polish where I wanted the beginning and end of the bolt to be.  I did a little down the middle area as well.  When that was dry, I used a dark pink polish and sponged it lightly over the blue.  Now, when this was done, it didn't look too pretty.  It kind of was a blur of colors which looked like they had no reason to be together.  It all starts to fit when you add the bolt itself using a white polish.  You can use a toothpick, dotting tool, or a nail art brush like I did.  When that's all dry, add a top coat and trust me, it all comes together!

What do you think?  Enjoy this years or last years better?  Any other manicures you'd like to see me re-try??

Pardon this post, I doubt it makes sense since I wrote it at midnight....again.  Exhausted Alaina shouldn't be allowed on her blog, but the posts must go on!!!  

Until next time, <3.

**I purchased all the polishes used within this post**

Fun and Random

Sunset Palm Tree Nails - Take 2

9:00:00 AM

It feels like I haven't blogged in ages.  Reason being, the last three posts were all written about 2 weeks ago when I was working my desk job.  I got a little ambitious and decided to get ahead on the whole blogging thing, told myself that I was going to stay on top of it from there on out, and well, here I am, the night before a post is due to go up, writing about a manicure I did awhile ago.  I'm not complaining, but I'm not going to lie, it was amazing not having to worry about writing posts!  At least for this post, I was ahead of the curve and had the photos already edited.

I wish that I had gotten photos of these nails in the sun, but they do look rather amazing with the black, lightbox background!  Last year, I did a similar manicure where I created a sunset gradient and then used black to draw palm trees, beach french tips, and some little seagulls!  I really loved the manicure, but hated how my black tips covered the tips of the pretty gradient.  This year, I was more cognizant of the gradient, and made sure that the tips still were showing.

Oh, how I loved this manicure.  Let's take a look!


Colors Used:
  • Ulta - Flamingo, Show Girl, Sun-Sational
  • Orly - Liquid Vinyl
Amazing, right?  It looks just like a gorgeous sunset with the purple, coral, and yellow.  Best thing, this look is rather easy to obtain!!!  Just as with any gradient, I started out with a thin coat of a white polish.  I can't remember to be honest what white I used, but I used a thin coat of one.  When that was dried, I painted the gradient onto a make up sponge and then dabbed the sponge onto the nail.  When i got the coloring I wanted, I added a thin coat of top coat to blend the gradient.  When that was dried, with a nail art brush, I added the details of the palm trees, beaches, and seagulls.  Added another coat of topper and they were done!

I decided to use all Ulta polishes for the gradient because my OCD set in and I wanted to see if there was a difference if you blend three of the same brand versus three different brands.  Crazy, right?  To be honest, I saw no difference.  I didn't feel as bad using the Ulta polishes because I purchased all of them for $2 so if I used a little extra, I wasn't using up an OPI or China Glaze.  If that makes any sense.  It makes sense in my brain, but probably not down on the blog.

What do you think?  Liking the summer beach sunset look?  I should do a night time one....ooo it'd be pretty!

Until next time, <3!

**All polishes used in this post I purchased**

Fun and Random

Despicable Me Minion Nails + Tutorial!

9:00:00 AM

This time next week, I will be preparing for the premier of Despicable Me 2.  You know, the sequel to one of the greatest animated movies ever.  Now, when Despicable Me first came out, I was bitter, I was a Pixar fan and thought "eh, it's going to stink, I don't want to ever see it."  One night, maybe 3 years ago now, I was hanging out with a group of friends.  We were bored of random games and such and decided it was time to watch a movie.  As soon as everyone found out that I had never seen Despicable Me, they turned that movie on.  There we were, a group of 20 somethings watching Despicable Me on a Friday night.  Regrets?  None what so ever, probably the best Friday ever.

This movie became one of my favorites.  It has such a cute story line, and well who doesn't love Gru, the girls, and most importantly, the minions!  The cute, adorable, little yellow guys that run around helping Gru perform his "evil" deeds.  They're just the cutest characters ever.  Well, last year, before I started blogging, I painted minions on my nails.  Now, I warn you, before you click the link, you should know, this was one of my very first attempts at nail art, I owned about two polishes, and used only toothpicks.  Now that you've been warned, here are my very first minions.  Not so bad especially since I really had no idea what I was doing.

Well, ever since I heard that there was going to be a sequel, I have been dying to re-do these nails.  Now that my stash has grown, I have nail art supplies, and my hand is a bit steadier, I was really anxious.  Miss Susan from Subtle Shimmer told me that I should do them and maybe make a little tutorial so some of you other ladies could paint your nails for the premier!!!  I listened to her advice, and well, let's take a look!!!


Colors Used:
  • Ulta - Sun Sational
  • Sinful Colors - Endless Blue
  • Sinful Colors - Cool Grey 
  • Orly - Black on Black
  • Sinful Colors - Snow Me White
  • Ulta - Flamingo

How I got the Look (I broke it up into Two Eyed Minions and One Eyed Minions):


  1. Paint your nails in your best banana, minion colored yellow.
  2. You can do step two a few different ways.  I placed  piece of nail art tape towards the tip of my nail, and with a dotting tool filled in my "french tip" with a blue polish.  I wanted my lines to be very straight for the lil guys overalls.  If you have a steady hand, you can use the paint brush and slowly paint the tip onto your nail.  You could also use a striper or a nail art brush.
  3. With a nail art brush, paint two black rectangles on the sides of the minions heads for their goggles.
  4. With a dotting tool, either create two grey dots, or one large dot depending on if you want a two eyed minion or a one eyed minion.
  5. While the grey polish dries, with a nail art brush, create the little minions mouth.  On the two eyed minions, I decided to create a simple smirk.  On the one eyed minion, I made the mouths a little more crazy.
  6. When the grey is dried, with a smaller dotting tool, add white polish.
  7. When the white is dry, with an even smaller dotting tool, add the black pupils.
Make sure each of the layers are dried before adding a top coat.  I was a little thick with my top coat because I didn't want my black pupils to smear and drag down on the white.  Sadly, it still happened.  No matter what I do, or how long I wait, black polish always drags.  My right hand looks awful, but hey there is a reason why I do not photograph that hand!!! 

Compared to last years, I decided to make the overalls smaller because I wanted their faces to be the center of attention.  I feel like my first attempt was too overall-ed and their faces weren't apparent enough.

What do you think?  Are you excited for the film?  Will you be painting your nails special for the movie?

If you use my tutorial, please tag #thelittlecanvas and share your design!!!  I love seeing your work when you have been inspired by something I have posted!!

Ahhhhh, this makes me so excited for next week!!!!!  Loving my lil minions.

I want to also quickly say, I know that CutePolish did a similar tutorial on her YouTube channel.  I love CutePolish and have copied many of her manicures and give her credit when I copy her manicures.  It ended up being bad timing that she did the same thing around the same time I did.  I had this planned for awhile, and was planning on changing up the overalls and such.  When doing the manicure, I actually stared at a personal friends Facebook page because she did them last year like this and I loved how hers turned out.  CutePolish, I love ya, but I didn't copy you on this one :).

Until next time, <3.

**I purchased all the polishes used in this post**