Gradient Mani

Happy Halloween!!! Graveyard Nails!

9:00:00 AM

Happy Halloween, polished world!!!  Are your nails all dressed up for the big day?  I sure hope so!  Of course mine are with my favorite Halloween design of the month!  I most certainly believe I saved the best for last with these spooky haunted graveyard nails!

I first was inspired to do this design after Kelly from Nails for the Sake of Sanity showed me this manicure she did for a guest post.  I had never seen a silhouette graveyard design and loved how unique it was.  I needed it on my nails!  I delayed and did my other designs first because I was scared that I was going to mess it up.  I thought about crossing it off my list until I saw this manicure by Janice from _Nail_Bliss_ on Instagram and that flame was re-ignited within me to do this design.

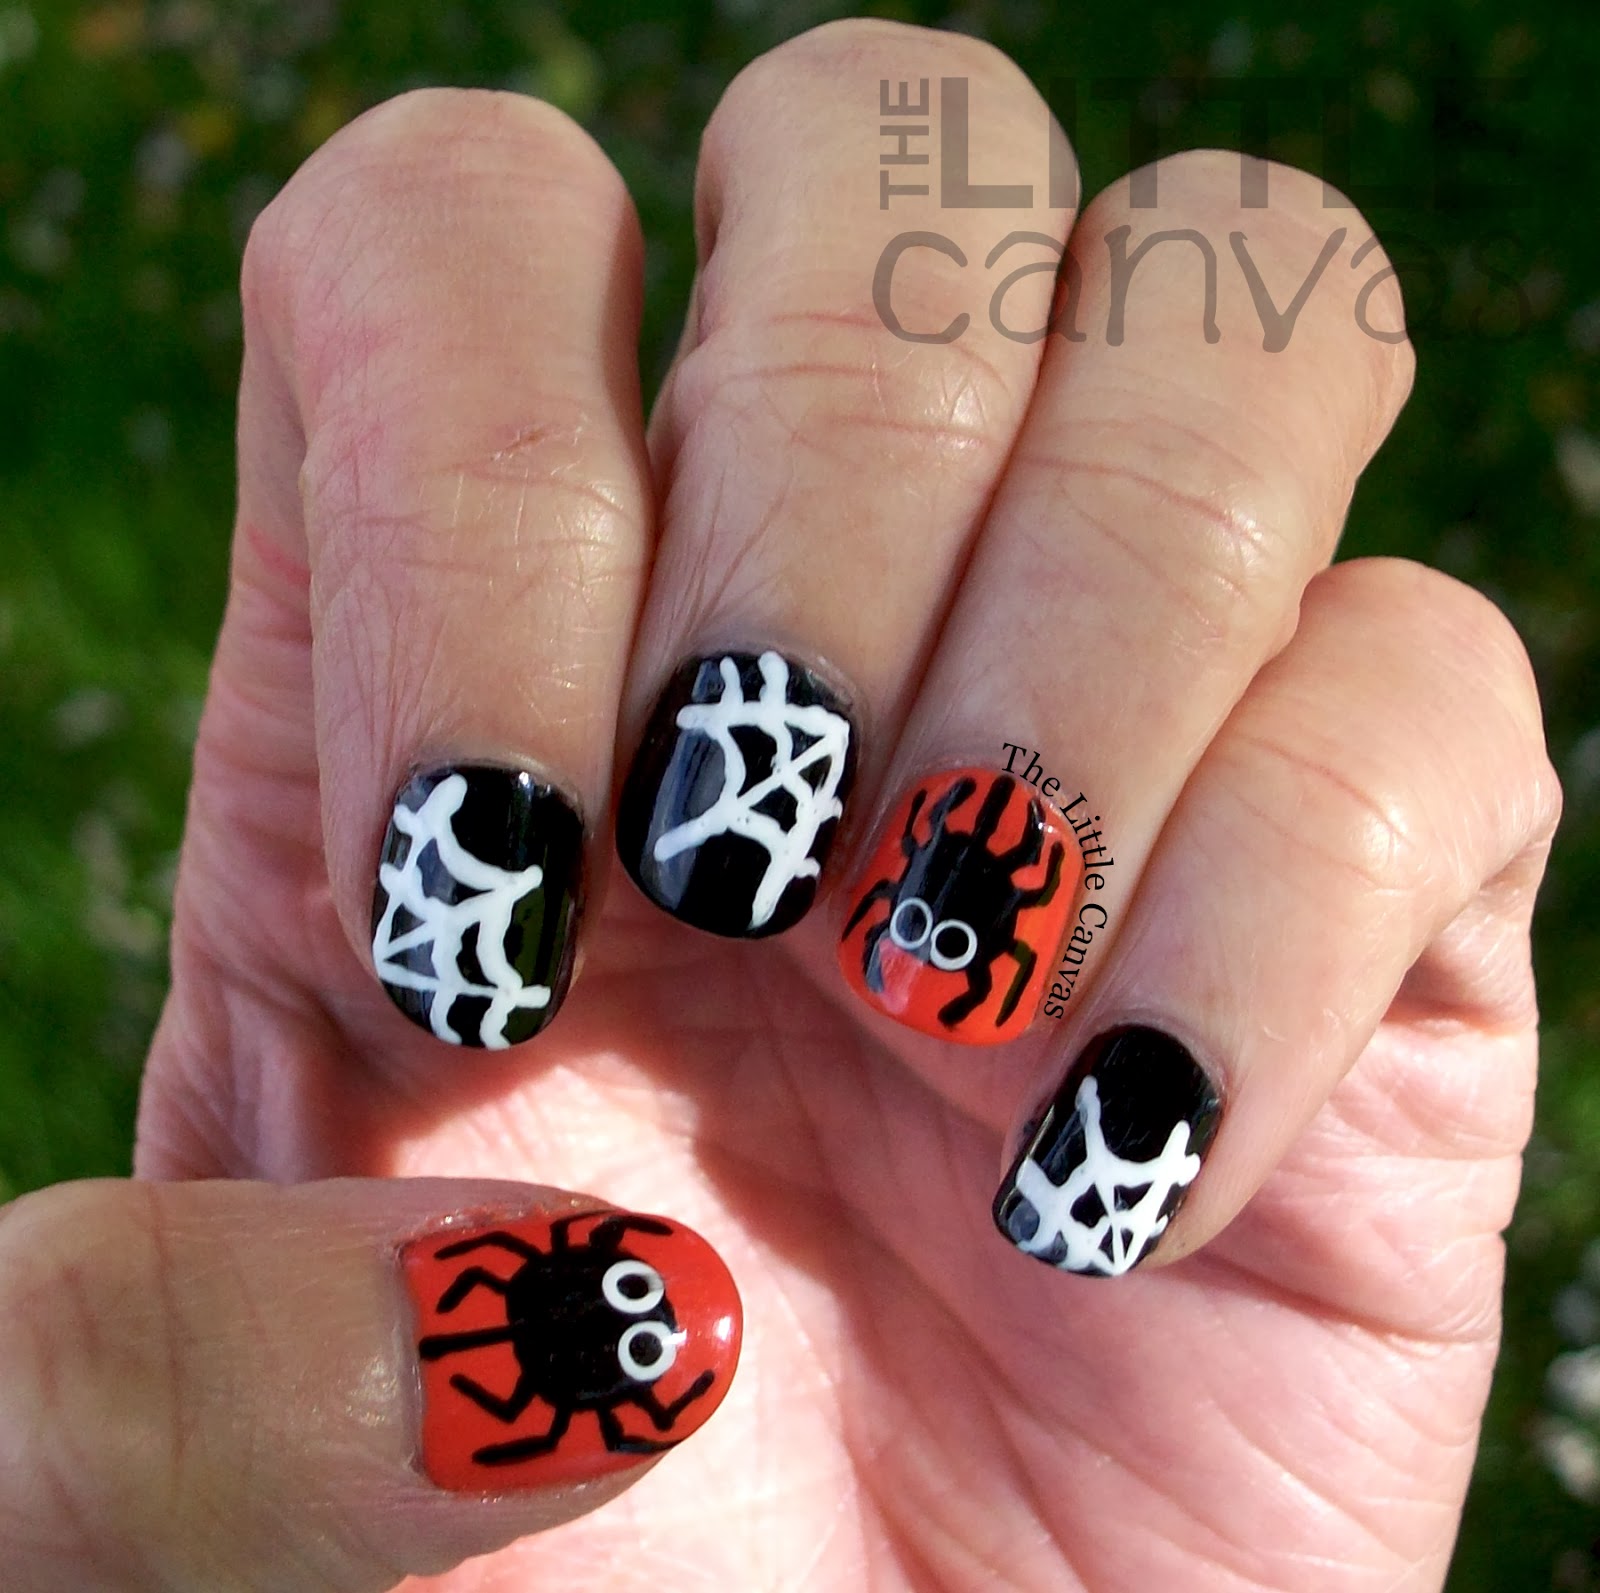
I finally mustered up the courage, sat down, and began painting this design on my nails!  Let's take a look!


Colors Used:
  • Base
    • Sinful Colors - Amethyst
    • Sinful Colors - Cool Grey
    • INM - Out the Door
  • Designs
    • Orly - Liquid Vinyl
    • Sinful Colors - Unicorn
Amazing, right?!  I'm so happy I decided to do this design because I'm in LOVE with the end result!!!

To get the look, I started off with two coats of Sinful Colors - Amethyst.  I have owned this polish for at least a year and the bottle is half gone since I have mainly used this polish for gradients and random nail art details.  I want to kick myself for never using it as a base because it applied perfectly and had such a rich color!   I may go out and purchase another bottle just to have as a back up, I loved it.

After seeing that Kelly started off with a dark base color and did the gradient on top, I thought I would do the same instead of starting off with a white base coat.  When my two coats of Amethyst were dried, I took a make up sponge and painted on a line of the purple and a line of Cool Grey.  I dabbed it on the nail and was beyond ecstatic with the result.  It so pretty how the purple blended into the grey polish!

I liked how Janice applied a coat of Fairy Dust over her gradient to look like a starry night, so I decided that would be perfect on top of this purple.  Since Northern Lights dries fast, I was able to start designing my graveyard shortly after finishing my gradient.  With my nail art brush, I drew on all the little designs.  I decided to use Sinful Colors Unicorn for the moon and glowing windows since it has that subtle glowing look.

What do you think?  Liking these nails?  Did you do a haunted graveyard scene this year?

I have enjoyed bringing you Halloween manicures all month and I truly hope you have enjoyed each post.  I may do something similar in December for Christmas, but I'm not 100% positive yet.  As of right now, I have a back log of manicures that I'm dying to share with you which I did before I decided to challenge myself with these Halloween manicures.  I'm also dying to play with all my new polishes.  It's going to be rather nice not having a theme for a bit!

Until next time, <3.

Halloween

Mummy Nail Art

9:00:00 AM

Halloween is just two short days away!!!  Are you ready??  I can tell you that my nails are!  I'm so proud of myself that I have been able to bring you Halloween manicures all October!  I'm even going to bring you one on the 31st, which is outside of my normal posting schedule.  Trust me, you'll want to see those, I just finished them and they are amazing looking, I'm so proud of myself.

I'm also proud of these little mummy nails that I'm bringing you today!  They are so festive and a great simple manicure!  Last year I did a single mummy as part of my Halloween Creature skittle manicure.  I wasn't too thrilled with how he came out, but it was an overall good first attempt.  To test myself and see how my skills have improved over the past year, I thought it would be a good idea to re-attempt the little guys on all the nails, or at least the accents.  Googly eyes and all!  

Let's take a look!


Colors Used:

  • OPI - My Boyfriend Scales Walls
  • Orly - Liquid Vinyl
  • China Glaze - Ghoulish Glow
Yes, you see that right, I used Ghoulish Glow again!  Let's take a look at the glowing mummies!


Awesome, right?!  I love how these guys looked when they glowed!  I am beyond impressed with Ghoulish Glow by China Glaze and am so happy that I picked a bottle up!  I only used one thin coat over the white polish to get them to glow.  I'm sure if I used two coats, it would have been even brighter, which would have been awesome, but I decided one was enough.  Plus, I didn't want to make my mummies a weird color.

To get the look, I started off with a base coat of My Boyfriend Scales Walls.  I decided to use this white polish instead of a stark white one because mummies are kind of dirty and not bright white and clean.  When the base was dried, with my nail art brush, I painted on the eye area and filled it in with black polish.  After I had the "eye mask" on where I wanted it, I started painting the random lines using the brush to represent the wrapping.  Once the "eye masks" were dry, I used my dotting tool and dotted on the whites of the eyes.  I then took Ghoulish Glow and dotted over the white.  When the eyes were dry, I used the smaller dotting tool and added the pupils.

I waited a good half hour before applying a top coat to ensure that the black polish was 100% dry and the top coat didn't drag the black.  Despite my efforts, it still dragged a little.  I need to use more top coat on the brush it seems.

What do you think?  Like the glowing mummies?  Will you attempt them??

I can't wait to bring you my last design.  I love seeing your recreations!  I promise I'm going to start posting them again to my Facebook page, so please tag me so I can snag them! :)

Until next time, <3.

Bestie Twin Nails

Bestie Twin Nails - Jack O'Lantern Nails!

9:00:00 AM

Well hello there!  How are you all today?  Are you getting ready for Halloween and sporting a festive manicure?  I'm proud of myself that I have continued to bring you Halloween manicures!  Today's manicure is particularly festive and one of my favorites so far since they are jack o'lanterns!  I also am enjoying today's manicure because it's a twinsie post with my buddy Casey from Casey Lane Loves Polish!!!

That's right!  Miss Casey Lane and I are both bringing you cute jack o'lantern nails today!  I messaged her a few nights ago asking if she would be interested in doing a Halloween themed manicure and she kindly said yes.  She asked me what I was thinking of doing and the most Halloweenish thing that popped into my mind was jack o'lanterns!  I keep seeing awesome manicures by other artists on Instagram of the little pumpkins, and I have been dying to try them out myself.

What I didn't know when I brought up the idea to Casey was how labor intensive this manicure really was going to be.  Casey painted hers before mine, so when I completed my manicure, I sat back and thought "wow, Casey must hate me, I picked the most complicated design!"

Luckily she doesn't hate me, and we both have adorable nails!  So let's check them out!!!


Colors Used:
  • Maybelline - Sweet Clementine
  • Sinful Colors - Courtney Orange
  • Zoya - Josie
  • Orly - Liquid Vinyl
Cute, right?  I may or may not have went out and purchased Maybelline - Sweet Clementine just to get the perfect pumpkin orange base.  I had Thandie by Zoya that I was going to use but it was a tad dark, so I looked online at Sally Hansen's website and found Sun Kissed.  Before making a trip to the store, I took to Facebook asking if the two polishes were a dupe of one another and the lovely Lustrous Lacquer answered and posted a swatch of each for me!!!  They were slightly different and I thought perfect for the manicure, so I ran out to the store to purchase the Sally.  Well, after seeing Sweet Clementine on the shelf, it started yelling at me to buy it, so I went with that instead.  I'm kind of happy I did...it's an orange that my collection was lacking.

Let's take a look at Casey's manicure before I get to how I got the look!  I like hers more than mine!


To get the look, I started with a base coat of Sweet Clementine.  When it was dried, I added dark orange lines with Courtney Orange.  I tried Thandie, but it wasn't showing up how I wanted it to.  I sat a bit and waited for the lines to dry.  When those were dried, I went through with my nail art brush and created each of the little faces.  I then added the stems using Josie.  After I thought they were all dried, I added some top coat to seal in the design.  It doesn't seem overly complicated, but all the dry time and paint brush work just took some extra patience and time.

What do you think?  Loving the Bestie Twin Nails?  Have you ever done jack o'lanterns?

Make sure to head on over to Casey's blog and see what colors she used and if she did anything different than I did.  Plus, you can check out all her other amazing posts!  Thank you Casey for doing these nails with me, and thank you to Lustrous Lacquer for creating those swatches for me of the polishes!

Only two more Halloween manicures left!!!  Until next time, <3.

Halloween

Spider & Webs Nail Art + Tutorial!

9:00:00 AM

Good morning polished peeps!  How are you all today?  I'm bringing you yet another Halloween manicure today!  I'm so proud of myself that I have stuck to Halloween all month!  Maybe this means I should try to do Christmas manicures all of December?  Hmmmm decisions. 

Today I'm bringing you a spiderweb manicure with little spiders.  Now, if you know me, you know that I absolutely HATE spiders.  I find them to be the most disgusting little creatures with their 8 nasty legs and those big bodies...blech.  So gross!  

After seeing this manicure by Alli over at The Daily Varnish, my fear for spiders diminished a tad. They weren't scary at all, actually, I found them to be quite cute!  I love how polish can do that!  Please, I beg of my followers, do not send me someones recreation of scary spider nails which will most likely give me nightmares.  I'm sticking with only looking at the cute ones!

I took inspiration from Alli's manicure and switched up the design a little bit, and well I'm super happy with the result.  So happy, that I decided to create a tutorial!  Let's take a look! 


Colors Used:
  • Jessica - Shiny Black
  • Zoya - Thandie
  • Sinful Colors - Snow Me White
How to Get the Look:


Spiders

  1. Paint your nails with your favorite Halloween orange polish.  For my manicure, I used Zoya - Thandie
  2. In the center of your nail, with a large dotting tool or nail art brush, create a circle for the spiders body.
  3. Using a nail art brush or striper, from the cuticle down to the "butt" of the spider, draw a single line to represent the web the spider is hanging from.  Then draw the little legs.  I did the bottom legs and moved to the front of the spider.
  4. When the black body is dried, with a small dotting tool, add white eyes.  If you want, you can go back and add black dots for the pupils.
Webs
  1. Paint your nails with your favorite black nail polish.  For this manicure, I used Jessica Cosmetics in a Shiny Black from the Black Beauties kit.
  2. With a striper or a nail art brush, draw three lines from either the tip of the nail or the cuticle of the nail outwards.  The two outer lines should be a large "V" with a third line coming out from the middle.
  3. With the striper or a nail art brush, draw swooped lines in between the main three lines.
  4. Repeat step number 3 but further up the web.
Don't forget to finish with a top coat on all the nails when the designs are dried!  I used Out the Door shiny top coat on my nails, but this design would look great using a matte top coat as well!!

What do you think?  Liking the design?  Will you maybe do it on your nails for Halloween?

If you recreate this design, please share your recreations with me!  If it weren't for The Daily Varnish, I never would have thought to do this design in the way I did.  Be sure to check out The Daily Varnish and all the amazing manicures that Alli and Katie do :).

Until next time, <3.


Halloween

A Halloween Kitchen Sink Manicure

9:00:00 AM

Good morning polished world!  Hope you are all doing fantabulous.  Today I am keeping somewhat with the Halloween theme by bringing you a kitchen sink manicure using some Halloween colors.  I am going to start off this post by saying it did not turn out exactly as planned, but I think it is decent.  In the end, you really can't go wrong with a Kitchen Sink manicure, can you?

When I made my list of ideas for the month, I put "tape manicure" on there, which transformed into a kitchen sink manicure.  My thumb and ring finger were supposed to have a diagonal checkerboard design with an orange base and black and white squares, but it just failed.  Even though the polish seemed to be dried, the tape still managed to rip it off.  I was so upset.  Since it was 11pm, and  I didn't want to sit around and wait for more dry time, I just opted for a simple swirl design.  

I'm still not 100% positive if the swirl fits with the rest of the nails right, but eh, I'll let you all be the judge.  Let's take a look.


Colors Used:
  • Zoya - Lianne
  • Orly - Liquid Vinyl
  • Hard Candy - Black Tie Optional
  • Sinful Colors - Snow Me White
For this manicure, I decided to use Zoya - Lianne.  To me, Lianne is a shimmery tangerine polish.  It's an oldie but goodie in my book which doesn't get the attention it deserves.  It was actually my first ever orange polish that I purchased about 2 years ago when Zoya was having a BOGO.  Pretty much one of the best decisions of my life, since I have used it a lot in the past.  

When Lianne was dried on my pointer and pinkie, I added a coat of Black Tie Optional.  I have talked about how much I love this polish in the past.  It just is perfect for this type of manicure.  After Liquid Vinyl dried, I added some orange and white dots.  Lianne was a bit sheer for dotting so I had to go over each dot twice to make them really stand out on top of the black.

For my ring and thumb, the failed nails, I did my Curly Q design.  This time around I added a few dots in the blank area like AyDii did when she was my Nail Artist of the Month back in July.  I really love how it looks with those dots!

What do you think?  Think this works for a "Halloween" kitchen sink manicure?  Does the Curly-Q's work?

Here's to hoping my next Halloween manicure turns out exactly as I picture it!!!!  Only a few more to go before the actual day!  I really hope you're enjoying each manicure I post :)

Until next time, <3.

Halloween

Frankenstein Nail Art

9:00:00 AM

Hello polished world!  How are you on this fine Thursday.  I hope you are all doing well!  I'm super happy because it is my day off, and at the time this post is going to be published, I will more than likely still be sleeping.  Oh, how I love Blogger's scheduling feature.

Today I am bringing you Frankenstein nails!  Frankenstein's were one of the first designs I ever did before I started blogging.  Last year, I did one little Frankenstein on a Halloween character skittle manicure and really enjoyed the little guy.  This year I decided to switch it up, change how I painted them.  I played around, and well I wasn't 100% pleased with the end result.  The little guys ended up looking so happy that I personally thought they looked like children dressed up as Frankenstein.  In the end, it is fitting since kids do dress up as Frankenstein each year.

Let's take a look at them!  Pardon the pictures, I'm re-entering the world of using the lightbox and am having some difficulty adjusting.  Oh how I dislike cloudy days.....


Colors Used:
  • China Glaze - I'm With the Lifeguard
  • Orly - Liquid Vinyl
Okay, they're adorable...but Frankenstein shouldn't be adorable!  He should be angry!  I should have added some angry eyebrows or made their smirks into frowns or straight lines.  Maybe next year.

To get the look, I started off with a base coat of my lovely neon China Glaze I'm With the Lifeguard from last years Summer Neon Collection.  This is by far one of my favorite polishes and am so happy that China Glaze decided to add it to their permanent line.  If only they would do the same with Hang Ten Toes.

When my base was dried, with my nail art brush I began painting the different designs no the Frankie's and the scar nails.  I went a little crazy it seems on their faces with the scars, but I kind of like those.  It's just those dang smilie faces!  I should have made them grumpy!!! 

What do you think?  Love, hate?  Think they look like little kids dressed up as well?

If one of my other manicures fails in the next few days, I may re-do them or do another character skittle manicure.  Maybe I can make a true, angry Frankenstein.

Until the next Halloween manicure, <3.


Halloween

Ghost Nail Art - My First Stud Manicure!

9:00:00 AM

Good morning!  How are all you lovely people today?  I'm doing well!  Especially because I have yet to bail on bringing you a Halloween manicure each post during October!  I'm really loving today's post since it turned out exactly as I pictured it in my head!  Don't you love it when that happens?

I completed today's manicure using the new Nail Art Society kit curated by my fellow renowned artist Emily of Very Emily.  This kit, known as the I Love Studs Kit, contains a bottle of Jessica polish in Black Matte, 2mm orange studs, 2mm purple studs, 2mm pink studs, and 3mm gold studs.  If you have yet to dive into the world of studs, this kit might be perfect for you!  I never have used studs, and this kit was a perfect introduction to them!

Since I wanted to stick with the Halloween theme, I decided to use the orange and purple studs along with the Jessica Black Matte polish.  Let's take a look at what I came up with....


Colors Used:

  • Jessica - Black Matte
  • Sinful Colors - Snow Me White
  • China Glaze - Ghoulish Glow
Yup, another glowing manicure!  Let's take a look at the glowing ghosts!


Cute, right?!  I love this manicure so much more because of the studs!  I started off with a base coat of Black Matte on all my nails.  This polish applied decently and I had full coverage with two coats.  When my thumb and ring finger were dried, I took my nail art brush and painted on the little ghosts.  After the white was dried, I used my smallest dotting tool and dabbed on Ghoulish Glow.  With my medium sized dotting tool, I created the little eyes and mouth.

Applying the studs was easier than I thought it would be.  I asked some of my fellow renowned artists how they applied studs and followed their advice.  When the polish was still wet, I used my stud Picker Upper (purchased from Sally Beauty), and placed them on the nail.  As the polish dried, the studs dried exactly where I wanted them to.  If you don't have a handy dandy Picker Upper, you can use a toothpick that's a little wet, or your dotting tool with some top coat on it.

What do you think of the look?  Liking the studs?  Liking the glowing ghosts?

If you like this kit and are interested in purchasing it, head on over to the Nail Art Society's website and subscribe!  You must subscribe by October 15th to receive the I Love Studs kit.  If you miss the deadline, then you can purchase it at a later date from the new NAS Shop!

I'm so happy with this kit and can't wait to see what other looks I can come up with using this polish and these studs!  The other renowned artists have come up with some great manicures, so be sure to check them out below!!!

Until next time, <3.

**The NAS I <3 Studs Kit was provided to me by NAS for my honest review.  Please see my disclosure policy**

Gradient Mani

Candy Corn Gradient

9:00:00 AM

Hello there polished world!  Hope you having a great October so far!  It's been rather lovely here.  We have had some gorgeous Fall days, you know the cloudless blue skies with the smell of Fall in the air.  Sure, the sun sets earlier, and my nail blogger self has to be in my front yard at 2pm instead of 4pm to take photos, but it's so worth it.

I can't begin to explain how happy I was to get outdoor photos of today's manicure!  I just think they look so much better in an outdoor setting that inside of the light box.  Last year I did a candy corn manicure, and well I really wasn't too fond of it.  My orange was too dark, my lines kind of wonky, and well they just didn't resemble candy corn enough for me.

This kind of upset me because I used to loooove candy corn.  That's right, used to.  I have a pesky food dye allergy which prevents me from eating the delicious candy.  Even though I can't consume them, I still see the candies around every corner in the stores.  I noticed that candy corn doesn't have straight lines dividing the white from the orange from the yellow.  The colors seem to blend into one another.  Meaning, I could get the perfect candy corn on my nail if I used a make up sponge and gradient'ed the colors!

Let's take a look.....


Colors Used:

  • Sinful Colors - Snow Me White
  • Zoya - Thandie
  • Zoya - Darcy
Kind of perfect, right?  I cannot begin to tell you how much I'm liking the look of this manicure compared to last years.  I feel that these look more realistic.

To get the look, I started off with a base coat of white polish.  When that was dried, I took a make up sponge and painted a line of Snow Me White, Thandie, and Darcy.  I then dabbed the sponge on my nail until I got the colors to pop enough.  Once I added my top coat, I was so pleased because it helped to blend the colors together a little more.

Notice how my cuticles are clean for the first time ever after doing a gradient??  I figured out the last time I did a gradient that if I put tape all around my nail before sponging the color on, I would have far less clean up and polish around my nails.  So, yes, I looked a little weird with blue painters tape around all my nails, but it was so worth it in the end!

What do you think?  Liking this candy corn look using a gradient?  Have you ever done candy corn nails?

Now I really want candy corn.  Is it worth the allergic reaction?  Maybe....possibly.....hmmmm.  Ugh, why must I be allergic to all the yummy things?!

Until next time, <3.

**The Zoya Nail Polishes were provided by Zoya for promotional purposes.  Please see my disclosure policy**

Halloween

Halloween Googly Eye Nail Art

9:00:00 AM

Hi everyone!  How are you today?  I hope you are all well!!!  Can you believe it's already October 8th?  I swear this month is going to go by fast and before we all know it, Thanksgiving will be here.  I'm enjoying each day as they come though and trying not to rush it, but sometimes the days do get away from you.

Today I'm bringing you a very cute and simple Halloween design since I have vowed to bring you Halloween designs all month!  Last year I originally saw the googly eyed design on My Nails, My Polish and fell in love with it.  I remember being sad that I had already planned out my Halloween manicures and wasn't able to squeeze it in before the actual day.

This year though, I have more than enough time and thought I would start off with it to ensure that I would get around to having this cute design on my nail.  Instead of copying Nicole's manicure identically, I decided to do one larger set of eyes on all my nails.  Let's take a look!


Colors Used:
  • Orly - Liquid Vinyl
  • Sinful Colors - Snow Me White
  • China Glaze Ghoulish Glow
Yes, you read that right, I used Ghoulish Glow and made these little guys glow in the dark!


Awesome, right?!  I started off with two coats of Orly Liquid Vinyl.  When my base was dried, with my larger dotting tool, I dotted on the white eye balls.  After the white was dry, I used the same dotting tool and dotted on Ghoulish Glow.  Once the Ghoulish Glow was dried, I took a smaller dotting tool and added the little black pupils looking in different directions.  Smacked on some top coat, and watched the nails glow!

What do you think?  Have you done the Googly eyed nails?  Loving that glow in the dark effect?

I cannot wait to make more of my nails glow!  It was such a cool effect!!!

Until next time, <3.

**I purchased all the polishes in this post**

Halloween

Precision Lacquer - Hazel & Gretal

9:00:00 AM

Hi everyone!  Happy October!  Did you enjoy Nail for the Sake of Sanity's post a few days ago?  I still cannot get over how perfect her tattoo letters were!  I love that I started this Nail Artist of the Month feature because I'm continually being inspired!

Since it's October, I have decided to put some old manicures that I have yet to share on the back burner and bring you Halloween manicures the whole month.  I came up with this idea at the end of September, but became very hesitant and thought that I would only do a few manicures at the end of the month and fill the beginning of the month with some Fall inspired nails.  Well, after unsuccessfully painting leaves on my nails, I gave up on the whole Fall inspired manicures and have now created a list of Halloween manicures to do.  

At the time I gave up on Fall manicures, it was 11pm and let's face it, who wants to get into extensive nail art at that time of night?  I recently received the Sprinkles Collection from Precision Lacquer which is 6 gorgeous micro glitter polishes.  After feeling defeated, I wanted just to have a plain glitter on my nails.  Yes, shocking for me, The Little Canvas, who always has to have nail art.  I picked Hazel & Gretal since it seemed to be the most Fall like color, and got to painting. 

The next night, I decided to "Halloween" the manicure by adding some black chevron tips.  Let's take a look, I'm really pleased with the final result.


Colors Used:
  • Precision Lacquer - Hazel & Gretal
  • Orly Instant Artist - Jet Black
  • Orly - Liquid Vinyl
Do you see that sparkle?!  Isn't it gorgeous!!!  Hazel & Gretal is a burnt orange jelly base with bronze and silver micro glitters throughout.  In the bottle, it looks like a coppery/bronze, but on the nail I definitely saw it more as a burnt orange glitter.  I used three coats, but you definitely could have gotten away with two.  This was my first time using Precision Lacquer and I must say, I'm kind of in love.  This polish applied like a dream, the brush was easy to hold as the cap wasn't an awkward shape, and the brush itself was the perfect thickness that I didn't feel like I had to keep swiping the color up and down my nail for coverage.  I actually had a conversation with my co-worker about brush size the other day and we both were saying how we both disliked Essie not because the polish was a poor quality, but because the brush was so small!  I love the size of Precision Lacquer's brush!

To get the chevron tips, I used Orly Instant Artist in Jet Black.  I received this polish in the Nail Art Society relaunch kit and really have been in love with it ever since.  I'm typically not good with stripers, but for some reason I can use this one perfectly.  I was super happy with how straight my lines turned out.  I almost tricked myself into thinking I had used tape.  Instead of using the Instant Artist to fill in the tips, I used Liquid Vinyl and painted down from the outline.  Finished with some Out the Door, and I had a manicure I loved for a few days.

What do you think?  Have you ever used Precision Lacquer?  Liking this as a Halloween manicure?

If you want to purchase this Precision Lacquer or any of their other beauties, you can head on over to their website and purchase a bottle for $5.95.  Their polishes are made in the USA and are free of all major chemicals!  Totally worth the price!  I cannot wait to make more looks using the Sprinkles collection, after I bring you more Halloween manicures, of course!

Until next time, <3.

Nail Artist of the Month

October Nail Artist of the Month - Nails for the Sake of Sanity

9:00:00 AM

Good morning!!!  It's October!  Can you believe that September is already over?  Since it's the first post of the month, you know what that means, it's Nail Artist of the Month time!!!!  This month I again posted on Instagram for suggestions, and thanks to my followers found so many great new artists!  Heather, from Peace, Love, and Polish suggested Kelly from Nails for the Sake of Sanity.  As soon as I saw what Heather suggested, I couldn't believe I hadn't of thought of it myself.

In a previous post, I mentioned that I am now a Guru for the Nail Art Society.  Kelly is also a fellow guru who I have gotten to know over the past few weeks.  Just like the other gurus, Kelly is a sweetheart, and one of the nicest people that you will meet in this blogging community.  And with a blog name like "Nails for the Sake of Sanity", how could you not like her?  I think that's a main reason why a lot of us do our nails - for the sake of sanity!

Enough of my babbling, it's time for Kelly to take over!
__________________________________

Hey everyone! I'm Kelly from Nails for the Sake of Sanity and I am beyond excited to be guest posting for you at The Little Canvas today. I've had the privilege to get to know Alaina through the Nail Art Society Guru group we both belong to, and I adore her and this blog! I wanted to come up with a fun nail art design to share with you, but also one that was easy enough that you can recreate on your own. :)

Here's what I came up with:


I drew inspiration from several "tattoo lettering" fonts I found online, and also from Sammy, the Nailasaurus' mani that you can find here. I started with a base coat of NYC Mulberry Street, then one coat of OPI Bubble Bath, then one coat of Mentality Holo. Then, I freehanded the letters on using my Stripe Rite brush in black. 

Honestly, this was way easier than I thought it would be! I started with the big chunks of the letters first, then went from there. I added the little swirls and accents last. For the heart, I started by free-handing a white heart and then filling in all but a little with a red striping brush. A coat of Seche Vite and you're good to go!


So what do you all think of this design? Is this something you would wear? I thought it was really classy, yet striking at the same time! Personally, I have 8 tattoos...for now...;) so I love anything tattoo related!

I want to thank you all for looking, and I hope you'll check out my blog! Most of all, I want to thank Alaina so so much, for giving me the opportunity to share my nail art with The Little Canvas!

<3

__________________________

I love these nails, Kelly!!!!!  Kelly sent me this along with another design and let me pick which I wanted her to use.  It was one of the toughest decisions because both were so great.  Hopefully she features that other manicure on her blog!  Maybe you should head on over and see if she did :).  Again, her blog is Nails for the Sake of Sanity.

Hope everyone has a great day!!!!  <3