ILNP

The One With the New Years Eve Manicure

9:00:00 AM

Nothing to Disclose


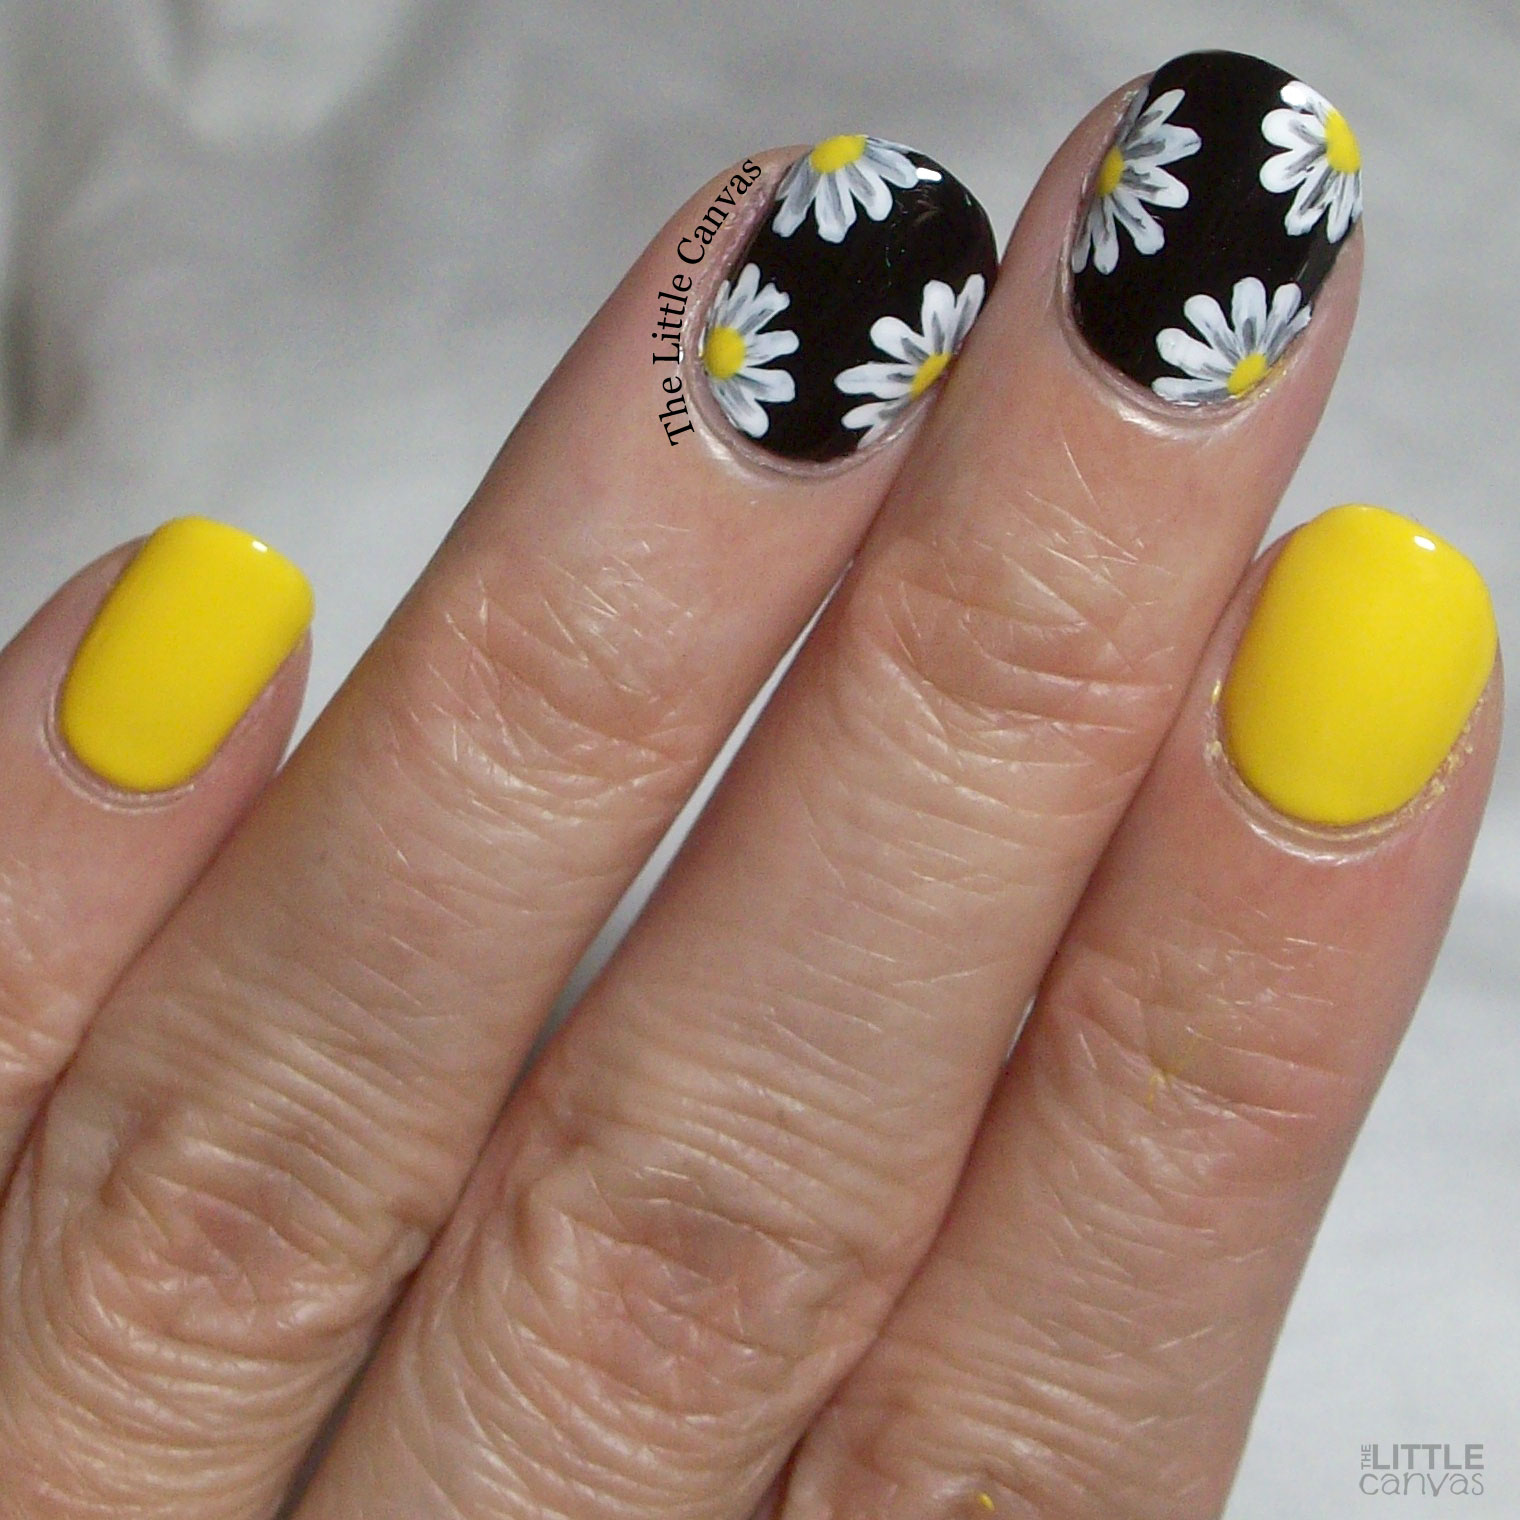
Good morning, Polished World!  Happy New Years Eve to you all!!!!  Can you believe that 2021 is now coming to a close and we are entering into 2022??  I feel like the past two years flew by.  The other day I was texting my one friend and I had to ask them how old I am because I couldn't remember.  That's how crazy my life is!

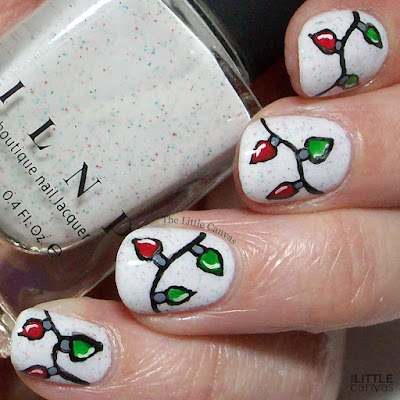
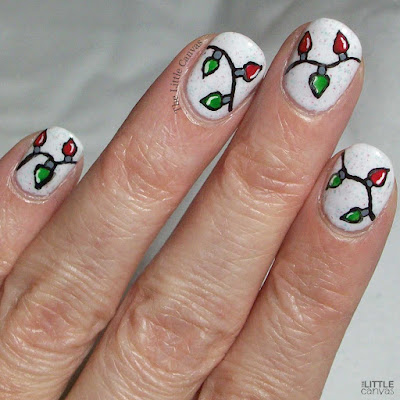
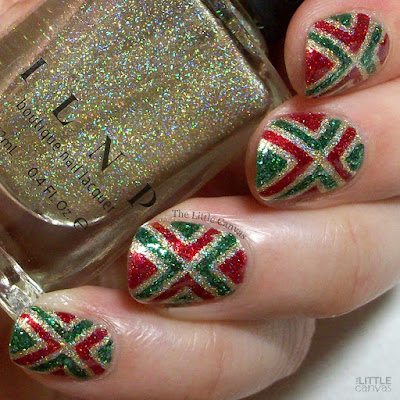
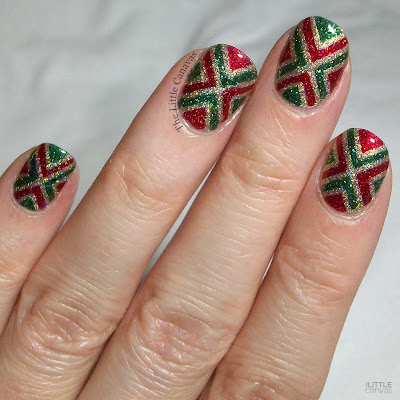
Despite the crazy, I wasn't going to miss painting my nails with the annual NYE manicure.  The main rules - has to be sparkly, and has to have black.  So, I created an idea that consisted of a mish mosh of manicures from the past year, grabbed a trusted ILNP, and got to work! 

Let's take a Look!


Colors Used:
  • ILNP - Clockwork
  • ORLY - Liquid Vinyl
I forgot that I owned Clockwork by ILNP!!!!  Absolutely in LOVE with this bronze colored beauty.  Two coats and you have full coverage of this holographic/metallic polish.  It's truly unique how it has that holographic and metallic look.  Beautiful!   Worked wonderfully for nail art, and that gorgeous pinkie nail gradient.  Of course, the camera didn't capture that glitter gradient, but trust me, it's gorgeous.


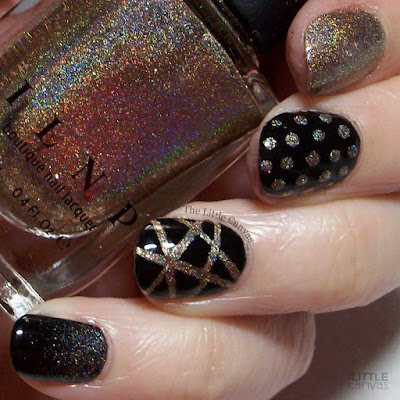
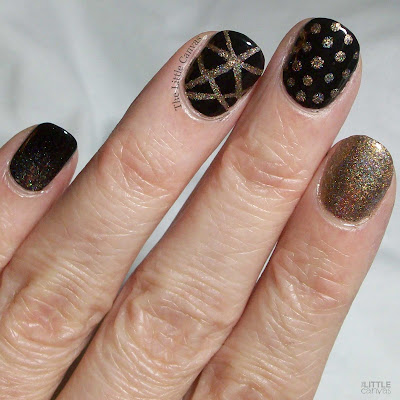
Now, my one issue had nothing to do with the nail art, but everything to do with me being impatient and not letting the polish dry.  I put the nail art tape on too soon, so when I peeled it off, some of the base went with it.  What did my tired self do at 12am when this happened?  I filled in the empty space with the polish and straightened the lines the best I could.  Overall, I think it turned out well!!!

What do you think?

I hope that everyone has a Happy and Safe New Years Eve!!!  See you all in 2022!


Christmas

The One With the Annual Christmas Light Manicure

9:00:00 AM

Nothing to Disclose


Good Morning, Polished World, and Merry Christmas!!!!!!  Now, I'm going to say I'm a bit disappointed in myself that I only had 4 Christmas Manicures this year.  I really wanted to create a whole lot for you all, but life really got in the way.  Let's just say I'm really tired of COVID and everything associated with it.  It just is allll consuming in my line of work and it's quite exhausting.

Despite all that exhaustion, I did find time to paint my nails one more time for Christmas.  Every year I create a Christmas Light manicure. I've been doing this since The Little Canvas was born, and I wasn't going to miss this year.  Last year I created a red and green light manicure using Christmas Cookie from ILNP as a base.  I loved it so much that I decided to re-create it this year.  Maybe next year I'll go back to the classic look over the snow.  

Until then, let's take a look!


Colors Used:
  • ILNP - Christmas Cookie
  • Acrylics
Yes, I cheated and used acrylic paint for my lights, but it's so much easier, especially when you're painting your nails at 11pm and just want to go to bed.  Christmas Cookie is my all time favorite Christmas polish.  It's a sheer white polish with tiny tiny red and green flecks.  I'm not sure how ILNP did this, but it's gorgeous and I love it.  It builds perfectly in two coats for full, Christmas-y coverage.  The best part - it dries rather quickly so you're able to just start your artwork.  Or throw on a top coat and go to bed.


This was the first year where I was able to paint the "string" perfectly in the first try.  Probably because I didn't do any curly q's like years prior.  Despite the one imperfection on my pinkie finger on that green light, all the other lights are perfect.  I'm really happy with how this turned out.

What do you think?

I wish all my followers and readers a Very Merry Christmas!!  I'll be back with at least one New Years Eve look. Hopefully.

Until then, <3.


Christmas

The One That Looks Like Wrapping Paper

9:00:00 AM

Nothing to Disclose


Good morning, Polished World!  Less than seven days until Christmas!!!  Are you ready?  I am not!  I'm so behind this year because work is kicking my behind and taking all my time.  I had so many plans to create a bunch of Christmas manicures, but alas I've been unable to.  I'm hoping to have at least two more by Saturday.  We shall see.

Today's design is....well....amazing.  I really don't know how else to describe it.  The look took forever to complete, but in the end it was well worth it.  I wore in on my nails for much longer than I normally wear nail art, but who could blame me??  It's so cute, beyond Christmas-y, and just all around perfect.

Let's take a look!


Colors Used:
  • ILNP - Versailles
  • ILNP - Say Love
  • ILNP - Lucky One
Amazing, right?!  I cannot get over how perfect this manicure is for Christmas!  At first I thought it looked like ornaments, but the more I looked at it, the more I realized that it was a dead on duplicate of wrapping paper.  All that was missing was a little bow in the middle.  The glitter, the holo, the colors, everything about it just screams Christmas.


ILNP never ceases to amaze me.  Her polishes are beyond perfect, especially when it comes to nail art.  You wouldn't think glittery holos would build so well, but they do.  To get the look I started off with two coats of Versailles, then threw on some quick dry topper.  When that was done, I started adding the 10, yes that's right, 10 pieces of nail art tape to each nail.  I then filled in the areas I wanted with Say Love and Lucky One.  Pulled off the tape, added a top coat, and admired my work.

What do you think?  Fan of the look? 

Until next time, <3.


Holiday

The One With the Buffalo Plaid Winter-y Manicure

9:00:00 AM

Nothing to Disclose


Good Morning, Polished World!  How are you all doing on this wonderful Sunday?  First, I want to extend my thoughts and prayers to those who are followers of this blog who were affected by the horrible weather in United States over this past weekend.  I can't stop watching the footage of the tornadoes and have this deep pit in my stomach.  I could never imagine going through that and truly my thoughts and prayers are with every single one of you.

When things like this happen, it really puts things into perspective.  When I was writing this post, I was complaining about the dumbest things.  All which are petty in comparison.  Right down to my complaint being that I didn't get around to posting this blog sooner because I was busy with work.  In the end, I should be grateful that I have a job, a home, and electricity.  Things that so many lost in a blink of an eye.  So if I can teach you all anything this season, it's to please be grateful for what you have.

Today's design is a fun, wintery Buffalo Plaid design.  A few years ago I created a similar design where I accented the whole thing with a holly leave, but I really wasn't feeling that.  So, I opted for the snowflakes, because we all know how much I love doing those this time of year.

Let's take a look!


Colors Used:
  • INM - Red Rover
  • ILNP - Versailles
  • ORLY - Liquid Vinyl
  • Acrylics
Red Rover is a gorgeous red polish that I totally forgot I owned!  For this design, I originally was going to use OPI Having A Big Head Day, but unfortunatly it dried up.  I went on the search for the perfect Buffalo red, and found Red Rover.  Two coats of this beauty and I had the perfect red Christmas polish.  When the two coats were dried, I free handed the buffalo plaid.  Yes, that's right, free hand.  I started off by painting on the little squares, then went on from there.  Tedious?  Little bit.  Worth it?  Of course.


I really like how the snowflakes blended with this design. It feels to me like a mix of a winter-y warm sweater....if that makes sense.  My only regret about this design was that I used Versailles by ILNP instead of Mega X.  The snowflakes were an after thought, so I don't know if gold really goes along with them.  I think silver might have been the better choice.  Regardless, I still love it.

What do you think?  Fan of this manicure?

Until next time, <3.


Christmas

The One With the First Christmas-y Manicure

9:00:00 AM

Good Morning Polished World!  I am so sorry that I have been gone for so long, but work really took over my life.  As you know, I work in the healthcare industry and we just are going through a rocky patch.  I'm trying to keep my life as sane as possible by doing the things I enjoy, but that seems to be more baking than nail painting.  Doesn't help that my nails are so dry from the constant hand washing and it now being winter that I've suffered many breaks and right when my nails are long again, they snap.


Regardless of all of this, I am determined to bring you all Christmas manicures throughout the month of December.  Similarly to my promise of the Halloween Manicures in October.  I did start sooner with another Christmas design, but it was a complete failure and I'm deciding not to share them with you.  So we are jumping right to my second design of the season, a fun simple dotticure using one of my favorite reds.

Let's take a look!


Colors Used:
  • Morgan Taylor - All Tango-ed Up
  • ILNP - Christmas Cookie
  • Zoya -  Tomoko
Isn't this red Morgan Taylor polish to die for?  It is by far one of my favorite red polishes, and if you know me, I'm not a huge red fan.  This color doesn't make my nails look nubby like other reds.  It's more muted and vampy, which is why  I think I love it.  It applies perfectly in two coats, and I'm sure you're going to see it a lot more this month.


For my accent, I used ILNP Christmas Cookie, but unfortunately you can't see the gorgeous glitter in it because it's hidden under all those dots.  I think I might have to use it for a holly manicure in the next few days.  That would really make the glitters pop.  Regardless, it's a gorgeous polish which works well under those fun dots.

What do you think?  Fan of this manicure?
 
Until next time, <3!


INM

The One With the INM Smoosh Manicure

9:00:00 AM

Nothing to Disclose


Good Morning Polished World!  How are you all doing today??  I apologize for being absent again, but I had a weird injury.  The other day while I was ironing my clothes, I hit the steam button while I was on the last part of my shirt, and I burned my fingers.  Yes, you read that right, I burned my index and middle finger on my swatching hand.  It hurt so bad, but luckily wasn't too bad.  For a few days my hand was beat red, then the skin got all hard, and then it all peeled weird and my cuticle was all a mess.  I didn't want to paint anything fancy because there was no way in hell that I was taking photos of that.

So, because I went on this little hiatus, I'm again posting from the vault.  This manicure I did earlier this year and to be honest, I have zero clue why I didn't post it sooner.  I absolutely love the color combination, and it's totally perfect for Fall.  Maybe?  Well, you can be the judge.

Let's take a look!


Colors Used:
  • INM - Dali
I don't remember what other colors I used, because of course, I forgot to post the colors when I edited the post.  At least I remembered the main blue color!  How could you forget such a gorgeous blue?  Dali covers completely in two coats, but you literally could get away with one coat.  And of course, it worked wonderfully to create a smooshy marble look!!  After my Halloween smoosh manicure, and now seeing this one, I'm thinking I need to create another Fall one.


I truly love the color combination here.  You know me, I'm not usually a fan of the gold accent, but it just goes so well with this.  I'm sure silver would have looked great, but I need to get out of my comfort zone a little more often.

What do you think?  Fan of this manicure?

I promise I'm going to be posting more consistently!  Especially when we get to December and Christmas manicures!

Until next time, <3.


OPI

The One With the Really Separated OPI Polish, but Still Works

9:00:00 AM

Nothing to Disclose 


Hey there Polished World!  Sorry that I took a week off, but I needed to focus a tad on my work life.  I also went back to a week of swatching because my nails were peeling and I had to cut them down short again.  Now, I should have gone into the archives and posted from there, but I kind of forgot and here we are now!

Today's design is one from the archives since I have been painting swatches.  When I went into the drafts, this one was actually painted a year ago.  Yes, that's how far back the archives go here on The Little Canvas.  Since this is a fall-ish colored looking floral design, I decided it was appropriate to look at.

Let's take a look!


Colors Used:
  • OPI - I'm Feeling Sashy
  • ORLY - White Tips
  • Some Gold Polish I Can't Remember
I'm going to give myself points for remember which OPI polish that I'm holding. That's mainly because I used it the other day for a swatch.  Despite the fact that this polish is extremely separated, it still applies wonderfully.  Two coats and fully, shiny, beautiful coverage.  One of my favorite colored polishes as well.  


I don't know what else to say about this manicure because it was so long ago, but it's cute!  Absolutely love the floral look.  I really need to re-create this design this year, maybe with one of my newer OPI polishes which aren't separated.

What do you think?  Fan of this?

Until next time, <3


Halloween

The One With the Halloween Manicure I Did When I Should Have Gone to Bed

9:00:00 AM

Nothing to Disclose


Good Morning and Happy Halloween!!!!  Whew, I'm exhausted from this marathon of nail posts!!!  I think I might need to take a week break before I post again.  Maybe.  I actually realized I have to catch up on posting some manicures over on Instagram so I'll probably do that, edit some new photos, and then come back here.  I'm not going to lie, even though I'm posting more consistently, I'm a little disappointed that my engagement is down across all social media.  I need to rebuild myself it seems.  So that's why I'm going to keep posting so when it comes time for Christmas manicures, my engagement is back to where it should be!

Today's design is one I came up with last minute the other evening.  I was exhausted but needed to have festive nails for work.  Plus, I couldn't give up on Halloween posts literally right before Halloween.  Of course, I didn't plan this out right, because now I'm bringing you two spider web designs in a row, but oh well.  It was either that or bringing you two candy corn themed posts in a row.  The Smoosh needed to break that up.  Maybe?  Who knows.

Anyways, let's take a look!


Colors Used:
  • Jessica - Sahara Sun
  • Zoya - Dahlia
  • Acrylic black
Yup, cheated using acrylics, and I'm not going to lie, I'm a little mad at myself.  I feel I should have done the designs with the sparkly polish.  Zoya Dahlia, along with all the other Pixie Dust polishes, really are amazing when it comes to manipulating for nail art.  I kid you not though, I painted this at 11:30pm the other night and I just wanted to get them painted and done so I could go to sleep.


For being as exhausted as I was, overall, I did a pretty decent job.  Dahlia really was the perfect accent and I couldn't ignore that beauty during the Halloween season.  Zoya really needs to come out with more Pixies, don't you agree?

What do you think? Fan of this final Halloween manicure??

Now, it's time to think of some Fall/Thanksgiving designs, and then Christmas!!!!  The best nail art time of the year!!!

Have a Happy and Safe Halloween!


Gradient Mani

The One With the Candy Corn Spider Web

9:00:00 PM

Nothing to Disclose


Happy Friday to everyone!  How are you all doing??  Started out sunny here then turned into a rainy day really fast.  Yes, I'm posting this in the evening when I usually post in the mornings, but I was a total space case and forgot to write up the post and actually publish it.  Edited the photos the other day, uploaded them, pre-published the post, but then never wrote anything.  I really am wondering if I'm losing my mind.

Today's design is a re-creation of my candy corn spider web design.  Again, I'm in a little bit of a funk with new ideas, so I'm hitting up the oldies but goodies.  It's been awhile since I've created a gradient, and what better time to do one than with the candy corn colors?! 

Let's take a look! 


Colors Used:
  • Sally Hansen - Electra-Cute
  • Sally Hansen - Blacky O
  • Sally Hansen - some white that the label fell off of
  • ORLY - Mirrorball
Yeah, I had to break away from using only Sally Hansen polishes in this manicure because I just needed to have a holographic accent.  How can you blame me, Mirrorball is amazing and by far one of my favorite silver holographic polishes.  Plus, it really makes this whole manicure pop, don't you think?


I'm going to have one of those pat myself on the back moments with this design.  I'm very proud of my gradient, spider web, and my nail length.  You have no idea how long it has taken me to strengthen my nails and get them long again.  Now if I can only keep them this way through the Christmas season....

What do you think of this design?  Are your nails ready for Sunday??

I have one more post for you for Halloween.  Nothing fancy, but still worth sharing since I did it.

See you soon! <3 


China Glaze

The One With the Frankenstein Smoosh Manicure

9:00:00 AM

Nothing to Disclose


Good morning Polished World!  I told you that you were going to be seeing a lot of me over the next few days!  I'm really painting a decent amount of Halloween manicures, and I need to share them all before Sunday!  I think I will have them all timed out perfectly come Halloween.  Not going to lie, I'm rather proud of myself for keeping up on it.  Now if I can do this for Christmas, it will be a perfect end to the year.  We all know though that Christmas manicures are some of my favorite to paint, so I don't forsee myself having a problem.

Today's manicure is a fun one.  A few years go, I created an orange, white, and black Halloween smoosh manicure.  It came up on my facebook memories and I screen capped it as a reminder to re-create it this year.  The other night when I sat down to paint, I just wasn't feeling the colors.  I wanted to do the smoosh look, just didn't want that color combination.  While scrolling on Facebook, I came across one of those pages where they decorate cookies, and they were icing these cute purple and green Frankenstein's.  My color inspiration was born.

Let's take a look!


Colors Used:
  • China Glaze - Drink Up Witches
  • Color Club - Plumeria 
  • ORLY - White Tips
  • ORLY - Liquid Vinyl
I'm not going to lie, I felt guilty that I gushed about other black and white polishes and veered from using my ORLY loves that I had to go back and use them for this look.  Happy I did, because they are the perfect consistency for the perfect smoosh manicure.  But let's get real here, Drink Up Witches is the real star of this manicure.  The perfect neon green for the Halloween season.  I've owned this polish for awhile, and I can't remember a time where I used it on it's own.  Maybe for my neon green drips last year....or was that two years ago?


Look at me getting off track.  The smoosh mani is very easy to re-create.  First, you start off with a base of white polish.  When that's dry, either use liquid latex or put tape around your nail to help with the clean up.  Now, there are two ways to do this, but both require a stamper.  The way I create it is by dripping the polishes on a paper plate.  For instance, I used about three little drips of green, two of purple, one larger black, and one white.  You then take the stamper and smoosh it into the paint on the plate.  I then dab some of the excess off the stamper once on the plate, then I stamp right onto the nail.  The second way to do this which can be a tad trickier and messier is to drip the polish directly on the stamper, then dab it onto the plate, then onto the nail.  I feel I don't have as much control over the polish the second way, but it still works.

What do you think?  Fan of this manicure?  Somthing that screams Halloween?

See you in a few days for another mani! <3 


Halloween

The One With The Candy Corn Patch Work

9:00:00 AM

Nothing to Disclose Press Sample Affiliate Link


Good Morning, Polished World!  I meant to post this yesterday, but hey it's better than being a week late on posting.  I now have two more Halloween designs to share before Sunday.  Might even have three more depending on how my week goes with painting.  I'm actually enjoying keeping up on this blog.  Not going to lie, a little upset that my photos aren't getting as much traction on Instagram, but I blame myself.  I kind of fell off the face of the earth so I'm shadowbanned or something.  Maybe this week will help.

Today's design is a re-creation of one I did a few years ago.  Maybe it was even last year.  Who can even remember.  Regardless, I always love the Halloween patchwork designs but not the color combos, so I came up with a Candy Corn patchwork.  When I did it the first time, I fell in love, so it makes sense that I re-created it again this year.

Let's take a look! 


Colors Used:
  • Sally Hansen - Blacky-O
  • Sally Hansen - Electra-Cute
  • OPI - Exotic Birds Do Not Tweet
  • OPI - Alpine Snow
We all know that ORLY Liquid Vinyl and White Tips have been my favorite black and white polishes for quiet a long time.  I think that they have been replaced by Sally Hansen Blacky-O and OPI Alpine Snow.  The two of them apply so perfectly in two coats and dry super fast.  It actually shocks me the dry time on them.  Then I'm able to get right to work on the nail art.  Don't get me wrong, I still love my ORLY's but these are just wonderful.


I love the patchwork and the color combination.  Something about it framed with the black index and pinkie finger just really goes together well.  I didn't think people would notice these nails, but they did and I received a lot of compliments.  Now that I'm looking at the photos, they are rather eye catching.

What do you think? Fan of this manicure?

Until next time, <3.

Halloween

The One With the Halloween Drip

9:00:00 AM

Nothing to Disclose


Good Morning, Polished World!!!  Yes, that's right, two posts in one week.  Can you believe it?!  Well, I'm really knocking it out of the park with painting Halloween manicures and I need to share and post them as soon as I finish them.  Unlike my other designs, these can't disappear in a vault and be posted in two months.   I'm not going to lie, I'm enjoying getting back into a regular schedule!

Today's design is by far one of my favorite Halloween designs of all time.  The other night I was surfing Pinterest for some new ideas.  I came across a few Halloween drips on top of the negative nail. Most of them were plain black or red.  Now, I'm not one for the gruesome Halloween designs that look bloody, so I was drawn to the black drips.  Then, I came across the perfect one.  A black drip with a foil overlay which gave the drips a cool 3D look.   Since I didn't have foils, I got creative with some of my green polishes.

Let's take a look!


Colors Used:
  • FingerPaints - Smooth Over Ridge Filler
  • Acrylic Black
  • ORLY - Thrill Seeker
  • ILNP - Sundance
Before I get into gushing about how much I love the design, I need to share my secret for the perfect negative space manicure.  I am in LOVE with FingerPaints Ridge Filler.  It's come to my attention that this is on clearance at Sally Beauty, so I need to get to all my local stores and stock up.  It's the perfect nude-clear cream which still gives the illusion of the naked nail.  It also fills in my little gaps from when my nails are peeling.  For today's manicure I used two coats, which I normally do not do, but I felt like I wanted the background to be more cloudy.


Once that was dried, I went through and added the drips with my black acrylic.  Yes, I cheated, but I didn't feel like trying to manipulate black paint when it was 11pm.  When the paint was dry, I used a toothpick and created the Thrill Seeker outline.  Then went over that green outline with Sundance.  The two polishes together gave that 3D look that the foils gave other manicures.

What do you think?  Fan of this manicure? Something you'd try for Halloween?

Until next time, <3.


Halloween

The One With the Halloween Googly Eyes

9:00:00 AM

Nothing to Disclose


Good Morning and Happy Monday!!!  It's finally truly Fall here.  The cold, rainy weather is here in full force.  I'm not angry about it as we all know this is my favorite season.  Love the chilly weather, don't really love the rain though.  This week we are expected to have some sunny days so that means the leaves will turn more and it's going to be gorgeous outside.

And since it's mid-October, I am finally here with some Halloween designs!  The other night when I was painting a swatch on my nails because I was tired, I realized that I had yet to create any Halloween nails.  If you've been following my blog, you know that every year, even during my little breaks, I always came back around the holidays to post.  So, I grabbed my white polish, threw some googly eyes on the swatch, and started planning out other nails for the rest of the month.

Let's take a look!


Colors Used:
  • Zoya - Storm
  • ORLY - White Tips
Let's face it, Storm is the highlight of this manicure.  Two coats and you have a gorgeous scattered holographic black polish.  I need to purchase a back up bottle because mine is getting low.  I believe this is one of my very first holographic polishes.  I can't believe that it still applies like it were brand new all these years later.  I kid you not, this has to be at least 7 years old.


I debated on adding more eyes to the nails, but I'm happy I just went with the single set on each nail.  Less clutter, cuter, and just adorable.  I really love them on top of Storm.  It's like they're spying through a starry sky trying to figure out what's going on.

What do you think? Cute little Halloween design?

Until next time <3.


Flowers

The One With ILNP Better Days and Daisies

9:00:00 AM

Nothing to Disclose


Good morning and Happy Monday!  I cannot believe that it is already October 11th.  I'm literally shocked and so confused as to where the time went.  While I haven't started any of my Halloween designs, I was able to decorate for Halloween at my house, and get some Fall themed decorations up at work.  Now if I can get to my nails to be festive, that would be great.  Usually I bring you all Halloween designs for the whole month of October.  A little sad that I'm behind, but it is what it is.

So, since I don't have anything remotely Halloween related in my drafts, it's fitting that I bring you a daisy design using a fall-ish looking base.  Right?  

Let's take a look! 


Colors Used:
  • ILNP - Better Days
  • Acrylics
ILNP Better Days is now my favorite go to ILNP.  It is such a gorgeous grey blue polish.  The polish itself is described as a muted midnight holographic blue with gold accents. Those gold accents are really what stand out to me in person.  I wish that they captured in the photos, but instead you can see that gorgeous blue color with the lovely holographic.


When I bought this polish, I knew I wanted to do some sort of daisy design on top of it.  This design isn't what originally came to mind, but I'm happy it did.  I was thinking something little more dainty with some green leaves, but I really like this retro looking daisy.  I'm still thinking of doing the dainty design, but this was a good first daisy look with Better Days.

What do you think?  Fan of this manicure?

Until next time when I hopefully have a Halloween design, <3.


Animal Print

The One With the Fun Leopard Gradient Re-Creation

9:00:00 AM

Nothing to Disclose


Hey all, and welcome to another Wednesday!  Here we are, smack dab in the middle of another work week.  I feel this week is going by super slowly, but that's probably because I'm just really looking forward to my Sleep-in-Saturday.  I feel like last weekend I was busy decorating for Halloween and running errands that I truly didn't have that fully relaxing weekend like I normally have.  Don't get me wrong, it was relaxing, but I just prefer more sleep.  What can I say, I work in healthcare, I'm always tired.

Today's design is a re-creation of an oldie but a goodie.  This fun gradient leopard print came up on my Facebook memories and I couldn't stop thinking about it, so of course I had to re-create it.  I need to continue to grow my nails out because I feel the design looks better when the nails are a tad longer, but overall, I still loved it.

Let's take a look!


Colors Used:
  • China Glaze - Capacity to See Beyond
  • Some purple that I don't know the name of
  • Serendipity Polish - Holoday Lights
  • ORLY - Liquid Vinyl
So, Capacity to See Beyond by China Glaze is part of The Giver collection.  I can't help but laugh that each time I a description of the collection it starts off with "Fun colors inspired by the movie The Giver". Last time I checked The Giver wasn't a fun movie or book and was actually quite dark.  Pretty sure it's one of those books we all grew up reading that now aren't allowed in schools kind of like To Kill a Mockingbird or The Catcher in the Rye.  Literary classics, but you know, whatever.


Despite the premise of the book, the polish truly is a gorgeous fun blue that works wonderfully for gradients and nail art.  I actually have about three back up bottles of this color because I loved it so much when it came out.  I actually need to start investing in China Glaze again because they truly do make gorgeous polishes, I just always forget about the brand.  And, I'm not going to lie, the bottles are awkward to hold for photos so I kind of shy away from them.  Dumb reason not to use my China Glaze, but again, whatever. 

What do you think?  Fan of this look?

Until next time, <3.


Flowers

The One With the Sunflowers and ORLY Blue Tango

9:00:00 AM

Nothing to Disclose


Good Morning!!! Sorry I've gone MIA again, but yet again, work got a little crazy.  I'm still painting my nails, I'm just too exhausted to edit the photos or write the posts.  I still have a palm tree look that I need to post.  Maybe I'll post that when I'm tired of the 10th snowfall of the year.  We aren't here to talk about snow though, we are here to talk about my favorite season - Fall!  Sunflowers, pumpkins, crisp leaves, apples....ahhh it's all so wonderful.  I truly wish Fall was longer.

Today's design is always my Fall kick off design, the sunflowers!  I meant to post these a few weeks ago, so they're delayed on the blog, but I did have them on my nails in the height of sunflower season.   Now we are onto apple season...and to be honest, I don't think I've ever done apple nails. I should look into that.

Until then, let's take a look at the sunflowers!!


Colors Used:
  • ORLY - Blue Tango
  • Acrylics
Guys - Blue Tango from the Wild Natures collection is GORGEOUS.  By far one of my all time favorite blue polishes.  It applies perfectly in two coats and has such a shiny finish.  No patches, just a beautiful cream polish.  It is by far the best base for the bright yellow sunflowers.


After the sunflowers were painted, I decided to go through and outline them with the black polish to really make them pop.  They looked good without the outline but it truly did add another element to the design.  Then it needed something a little more, and that was the polka dots.  I'm not going to lie, I'm rather impressed with how well i fit the dots on the nails after the fact.  Usually when I do a dot base, I put it down first then paint the design over it.

What do you think?  Love Blue Tango? Love the sunflowers?

Until next time, <3.


China Glaze

The One With the Funky Dots and Colors

9:00:00 AM

Nothing to Disclose 


Good morning Polished World!  How are you all on this fine Wednesday?  My whole week is thrown off because of the Labor Day Holiday.  I thought it was Monday all day yesterday, and I'm sure today I'm going to think it's Tuesday.  Hopefully I figure it out by Friday and don't show up to work on Saturday.  Speaking of work, as you can tell from my lack of posting, I've been a bit preoccupied.  I have so many posts to edit, and here we are in September and I have many summer-y looks still to post.

At least we are in early September and not late, so it's not too weird to be posting today's manicure.  Today's design is inspired by one I saw on Instagram.  And of course, I can't find the original link, so I apologize to whoever this was who gave me the inspiration.  If I find your page again, I will give you proper credit.  Regardless, there was something about the manicure that was so fun.  It got stuck in my head and I had to re-create it.

I apologize for the photos, they don't give the manicure justice.  The neons blew out the camera.

Let's take a look! 


Colors Used:
  • China Glaze - Lady and the Vamp
  • China Glaze - Let's Jam
  • China Glaze - Glow With the Flow
  • China Glaze - Lime After Lime
  • Color Club - Under the Black Light
  • ORLY - Skinny Dip
And look at me, remembering to post all the colors so when I came here to write the post, I didn't have to dig into the deep, dark crevices of my brain to figure it out.  As you can see, I used mainly my China Glaze neons to achieve the design.  All funky colors that normally i never would have used side by side.


Throw in a little negative space with some dots, you have a winner of a manicure.  I really am pleased with how the design turned out.  Many people thought that they were stickers, but nope, that was just my skills with the a dotting tool and a steady hand.  Seriously, my lines were low key perfect and I didn't even use tape.

What do you think?  Like this look??

Tomorrow I plan on going on an editing spree and getting some other designs out here.  I neeeeed to get back into blogging.

Until next time, <3.


Animal Print

The One With the Leopard Manicure I'm Pretty Sure I've Already Done

9:00:00 AM

Nothing to Disclose


Good Morning and Happy Friday!  I realized I have failed yet again at posting to the blog.  And on top of it, I'm again behind when it comes to editing nail photos.  I'm planning on spending this weekend inside and just working on the blog, my nail polish storage, and catching up on some much needed sleep.

Today's design is a fun little leopard manicure, which as the title states, I'm pretty sure I've already done.  It's one that I absolutely love because it's one of those color combinations that I normally do not attract to.  The subtle gradient I feel really makes it.

Let's take a look!


Colors Used:
  • Sally Hansen - Sweet Tea
  • ORLY - White Tips
  • Some random gold polish'
Sweet Tea by Sally Hansen really is one of my favorite polishes.  It's such a gorgeous peach color which applies completely in two coats.  That's impressive since I typically find that polishes in this shade usually are extremely patchy and take at least three coats to have full coverage.  It worked wonderfully for the gradient with the white polish.


When that gradient was just how I wanted it, I went through with a dotting tool and added the gold centers for the leopard design.  I then went through with a tooth pick and painted the black accenting.  I know that some use a small paint brush or the dotting tool to complete the details, but I find I have more control with the tooth pick.  Plus, I can make it look more "leopard-y".

What do you think?  Fan of this look?

Until next time, <3.


China Glaze

The One With A Cute Little Floral Manicure

9:00:00 AM

Nothing to Disclose 


Well hello there, Polished World!  I apologize for my lack of posting, but I've been slacking on all parts of my nails.  Literally back to the swatches up until last night when I painted the most fun sunflower manicure.  I've been dying to paint a sunflower design for the longest time, but work has consumed my life again that I haven't had the time.  Last night I purposely made the time because I haven't been feeling myself without my nails done up all pretty.  I'm sure glad I did because it also forced me to write this post and get more of my art out there.

Today's design is another design inspired by Pippy Polish.  I swear, I found her Instagram and I've been beyond obsessed wanting to re-create every design.  And as you know a few post back, I went on a spree about how much I have been loving doing these negative space designs, so it makes complete sense that I'm in love with her Instagram.

Let's take a look!


Colors Used:
  • Sally Hansen - Blacky-O
  • China Glaze - I Got a Blue Attitude
  • OPI - Exotic Birds Do Not Tweet
  • Sally Hansen - Wet My Thistle
  • Black and White Acrylic
Let's take a moment and applaud the fact that I wrote out the polish colors in this post back when I painted the design.  I've only been saying I need to do this for the past 3 years and never actually have.

The star polish of this manicure - China Glaze's I've Got a Blue Attitude.  The most perfect blurple polish ever.  That's right, blurple...a mixture of blue and purple.  It applies perfectly in two coats and has such a shiny finish.  I've been obsessed with this color this year using it non stop for pedicures with a holographic top coat.  For this design though, there was no need for holographics as it stands out on it's own just fine.


I love the mixtures of colors she used.  Never in a million years would I have thought have blending these colors together.  I'm so glad I found her blog so I can come out of my normal blue, pink, purple color zone and use some things I never would have before.  I think it all comes together so well, especially on top of the naked nail.

What do you think?  fan of this look?

Until next time, <3.


Dot Mani

The One With The Blue ORLY Dry Brush Mani

9:00:00 AM

Nothing to Disclose


Well Good morning!  Here we are on another bright, sunny Monday!  I don't know what it's like in your neck of the woods, but it's going to be a hot one here this week.  Also, if you're home town is anything like mine, your city is overrun with mosquitos and you can't even go outside without getting ten bites.  It's awful.  My poor garden needs some TLC but everytime I go out there, it's like I'm dinner for those dang bugs!

Being inside more means I've had more time to do my nails, and my nails are longer because I'm not digging around in the dirt and breaking them every five seconds.  Longer nails means more abstract designs since I feel like abstract nails on little nub nails don't look as good.  And that's just what I have for you today, a little abstract design using one of my favorite blue polishes.

Let's take a look!


Colors Used:
  • ORLY - Skinny Dip
  • ORLY - White Tips
  • ORLY - Liquid Vinyl
I absolutely adore Skinny Dip by ORLY.  It was my first ever "funky" colored polish back when I started this blog.  Funny enough, this bottle is the original one I purchased way back in the day, and it still applies as if it were brand new.  What I love about Skinny Dip is the subtle shimmer the polish has.  It adds a different dimension versus a flat polish in this same color. Two coats and you have the most amazing blue nails in the whole world. 


I love the little abstract design.  I saw something similar on Pinterest using a pink polish, but I really wasn't feeling the pink the other night.  I cannot begin to tell you how many people complimented me on these easy nails.  To get the look, after the white polish was dried, I quickly did a dry brush with Skinny Dip across the nail.  Then, I went through with my dotting tool and added the black dots.  Literally five seconds and I was done.

What do you think?  Love this look? Love the blue?

Until next time, <3


Flowers

The One With the Daisy Manicure

9:00:00 AM

Nothing to Disclose Press Sample Affiliate Link


Good morning, Polished World!  And welcome to August!!!  Can you believe how this year has just flown by?  In a few short days, it will be my birthday and in another few weeks it will be my favorite season!  Don't get me wrong, I love that end of summer warmth, but there's just something about Fall that I absolutely am drawn to.  It is by far my favorite season and I wish it lasted longer.

Regardless of my love for fall, I'm still here sharing some summer-ish manicures!  Every year I create a black and yellow daisy manicure and every year they are my favorite designs.  I saw PippyPolish added some dimension to her daisies and I thought I'd give that a go by doing a little swipe of black on the petal.  To be completely honest, I think it made the manicure.

Let's take a look!


Colors Used:
  • Sally Hansen - Blacky-O
  • OPI - Exotic Birds Do Not Tweet
  • White Acrylic
What is it with this color palette that just screams gorgeous?!  The black, white, and yellow is just so striking to me.  Especially using Exotic Birds Do Not Tweet, one of my all time favorite OPI polishes.  I took some pictures holding that bottle but it took away from the design so I opted to hold Blacky-O.  Both polishes apply wonderfully in two coats.   Once Black-O was dried, I went through with my white acrylic and added my little daisies.  Added the details, slapped on a topper, and called it a night.


I'd also like to take a moment to look at how long my nails are compared to what they were in the beginning of the year.  This has taken some time, and switching of many base coats, to get here.  I can't tell you how brittle my nails have been in the last year due to all the hand washing.  Now that I'm using ORLY Top 2 Bottom Base Coat, alongside FingerPaints Ridge Filler, my nails are truly sturdier than ever.  I also lotion them up before applying anything which I think has helped a bit too.  Maybe that's mind over matter.

Until next time, <3.

Flowers

The One Inspired by PippyPolish

9:00:00 AM

Nothing to Disclose Press Sample Affiliate Link


Good Morning Polished World!  Welcome to another week!  This weekend was partially a bust for me.  Yesterday I spent most of the afternoon in bed with the worst migraine.  Woke up, felt fine, went outside and was hit by the humidity and it just did not play well with my head.  Came back inside, laid down, fell asleep, then woke up hours later not even sure what day it was.  Not going to lie, it was a great nap despite the confusion upon waking up. 

Today's design is one that is inspired by PippyPolish on Instagram.  Since my nails are finally healthy again after months of peeling and breaking, I'm able to go back to my favorite type of manicure, a negative space manicure!  You know, the one where you create the design on top of your naked nail, or leave some blank space.  I apologize in advance for the sheer amount that will be posted over the next few weeks. 

Let's take a look!


Colors Used:
  • ORLY - Liquid Vinyl
  • ORLY - White Tips
  • ORLY - some bright pink which the label fell off the bottom -_-
Negative space, daisies, and a neon?  Can't get much better than this!!  Now, PippyPolish used a yellow for the centers of her flowers, but since it's summertime, I decided to go for a neon pink.  I'm really happy with the decision.  It gave the manicure a retro feel.


In order to do a perfect negative space design, you cannot put the nail art direct on the nail.  You have to start off with a base coat.  For me, I use ORLY Top 2 Bottom.  I then add a layer of FingerPaints Smooth Over Ridge Filler.  This adds a little cloudy look to the nail, but still shows off the naked base.  Once it's dried, you have the perfect canvas for any nail art.  When you add your top coat, it all turns shiny and the design really holds onto the nail.  I've found when I don't use a base, it chips off super fast.

Until next time, <3.


OPI

The One With the Re-Creation of Yet Another Floral Manicure

9:00:00 AM

Nothing to Disclose


Good Morning, and welcome to another Monday!  I apologize for posting only weekly, but life has been crazy.  I'm not going to lie though, I'm super proud that despite the crazy, my nails are grown out again and I've been creating nail art.  That means I'll just have a lot of content coming your way!!  Not to mention, I also have a lot of new polishes that I need to start using.  That just means more nail art!

Today's design is a re-creation of one of my all time favorite rose designs.  I did the design years ago when I first purchased this OPI.  I loved it so much that it was my profile picture for ages on my Facebook and Instagram.  Then I got fancy and had the little logo made, then I just now opt for selfies.  How the times have changed, but one thing that hasn't is that this is one of my favorite designs.

Let's take a look! 


Colors Used:
  • OPI - Crawfishin For a Compliment
  • OPI - My Vampire is Buff
  • OPI - I'm Sooo Swamped
Isn't it adorable?!  Those dainty little roses paired with that gorgeous peach polish!?  Crawfishin For a Compliment was one of my first polishes in this gorgeous shade.  I never bought anything like it before because I didn't think it would look good on me, nor was it a color I usually gravitated towards.  I'm glad I bought it oh so long ago, because it's one of my secret favorites.  Two coats and you have full perfect coverage.


Now as I look at this design, I kind of want to try to do some peach fruit nail art with these colors.  Maybe little branches with peaches hanging off of them?  Ehhh I won't get it to work.  I think I'll stick to the dainty little roses.

What do you think?  Love the colors and the flowers?

Until next time, <3

China Glaze

The One That Took Way Longer Than It Should Have

9:00:00 AM

Nothing to Disclose


Good morning Polished World!  How are you all doing on this wonderful Monday?  Can you sense the sarcasm in my voice?  It's been a crazy few weeks at work.  There's been some turnover where I work due to the lovely COVID burn out, so I'm stuck doing a few extra tasks until the new team members can start.  I'm super excited for the new team, but also super tired in the interim.  I can't be too mad because everything does truly happen for a reason. 

Today's design is one I did prior to my little hiatus where I was only painting swatches.  It's a cute design inspired by....well now for the life of me as I sit here and write this, I cannot remember who it was who originally did it.  Let's just say hers was better and mine ended up looking like little snowflakes from a distance.

Let's take a look!


Colors Used:
  • Serendipity Polish - CaLOVEfornia
  • China Glaze - Boho Blues
  • Acrylics
Boho Blues is one of my all time favorite China Glaze polishes.  Perfect color, perfect application, and perfect glossy finish.  I couldn't leave well enough alone.  I had a weird dent on my index finger due to some peeling on my natural nail and the plain polish just didn't look good.   So, instead of adding my go-to INM Northern Lights, I grabbed my bottle of holographic top coater by Serendipity Polish.  This is a polish I've owned for years but just recently started using.  I'm not sure why I waited so long, because truly it becomes the star of any manicure!
 

Just look at that gorgeous holo on top of Boho blues!!!  It truly added a new dimension to this manicure.  I'm now obsessed with holographic top coats and finally the four I have in my collection are being put to good use.  

What do you think?  Fan of this manicure?

Until next time, <3.