Monthly Mani Favs

The One With the September Monthly Mani Favs

9:00:00 AM

Good morning polished world!  Can you believe that today is the last day of September?  Where did this month go???  October will be here tomorrow, and that means I need to start planning my Halloween manicures!!!  Before I know it, Thanksgiving will be here, then Christmas.  Before we know it 2017 will be here.

Since it is the last day of September, it's time to share my monthly mani favs!  Let's take a look!!!


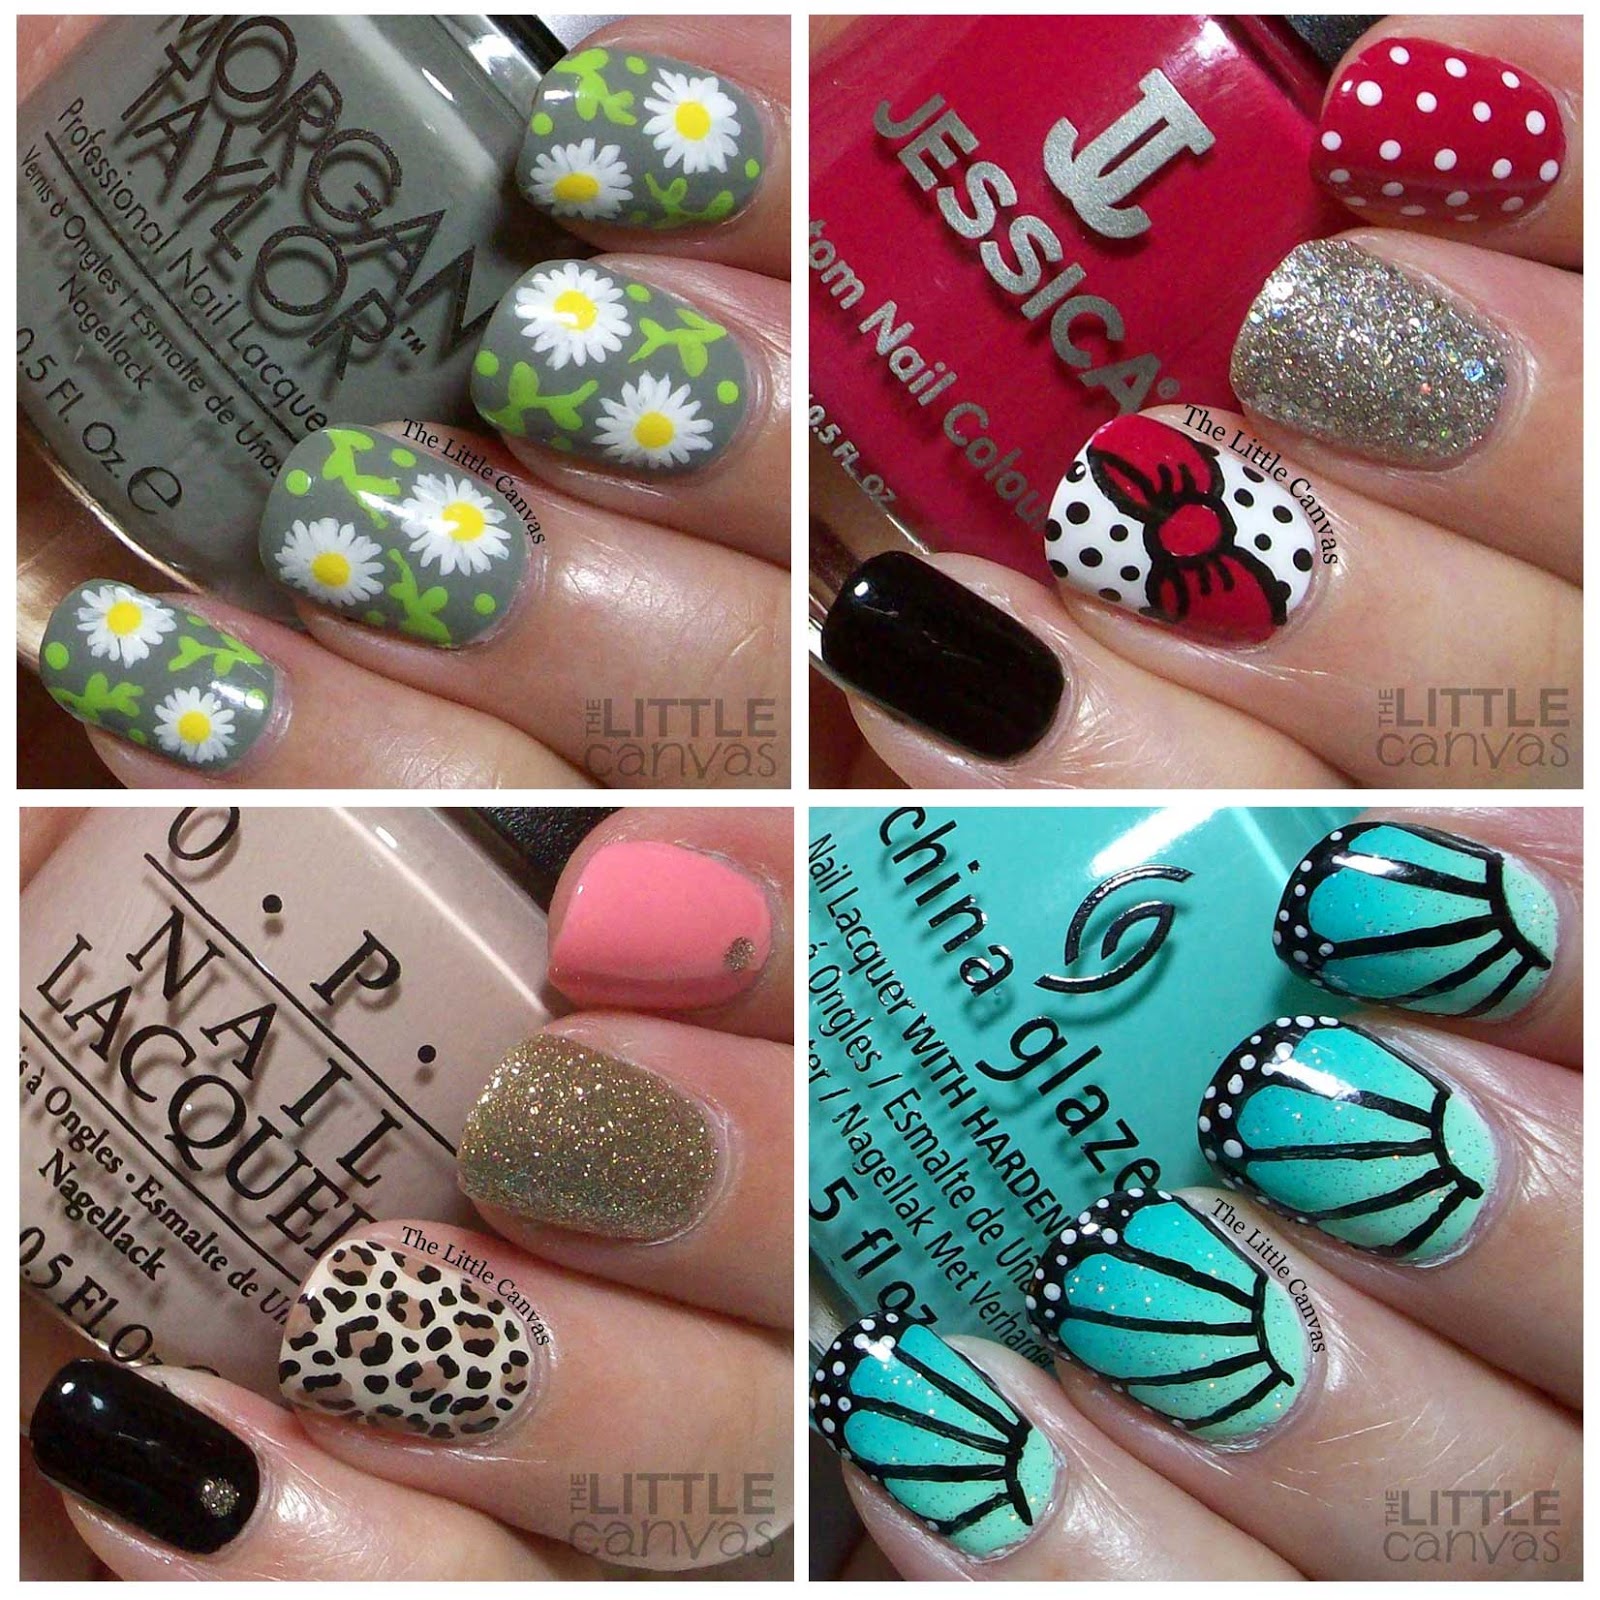
  • The One With Morgan Taylor Oh Para-Chute! and Daisies - Oh Para-Chute! by Morgan Taylor is SUCH a gorgeous shade!!!  I think it was the perfect base for this fun daisy manicure.  It's a sage green cream which leans towards a gray, aka the perfect base for nail art.  Going to be using this beauty a lot more!
  • The One With the Bows and Jessica Cosmetics The Luring Beauty - This month I swatched the Jessica Cosmetics Into the Wild collection.  One of the beauties from that collection is The Luring Beauty.  I came up with this fun bow manicure and may or may not have created a tutorial so you can re-create the look yourself!
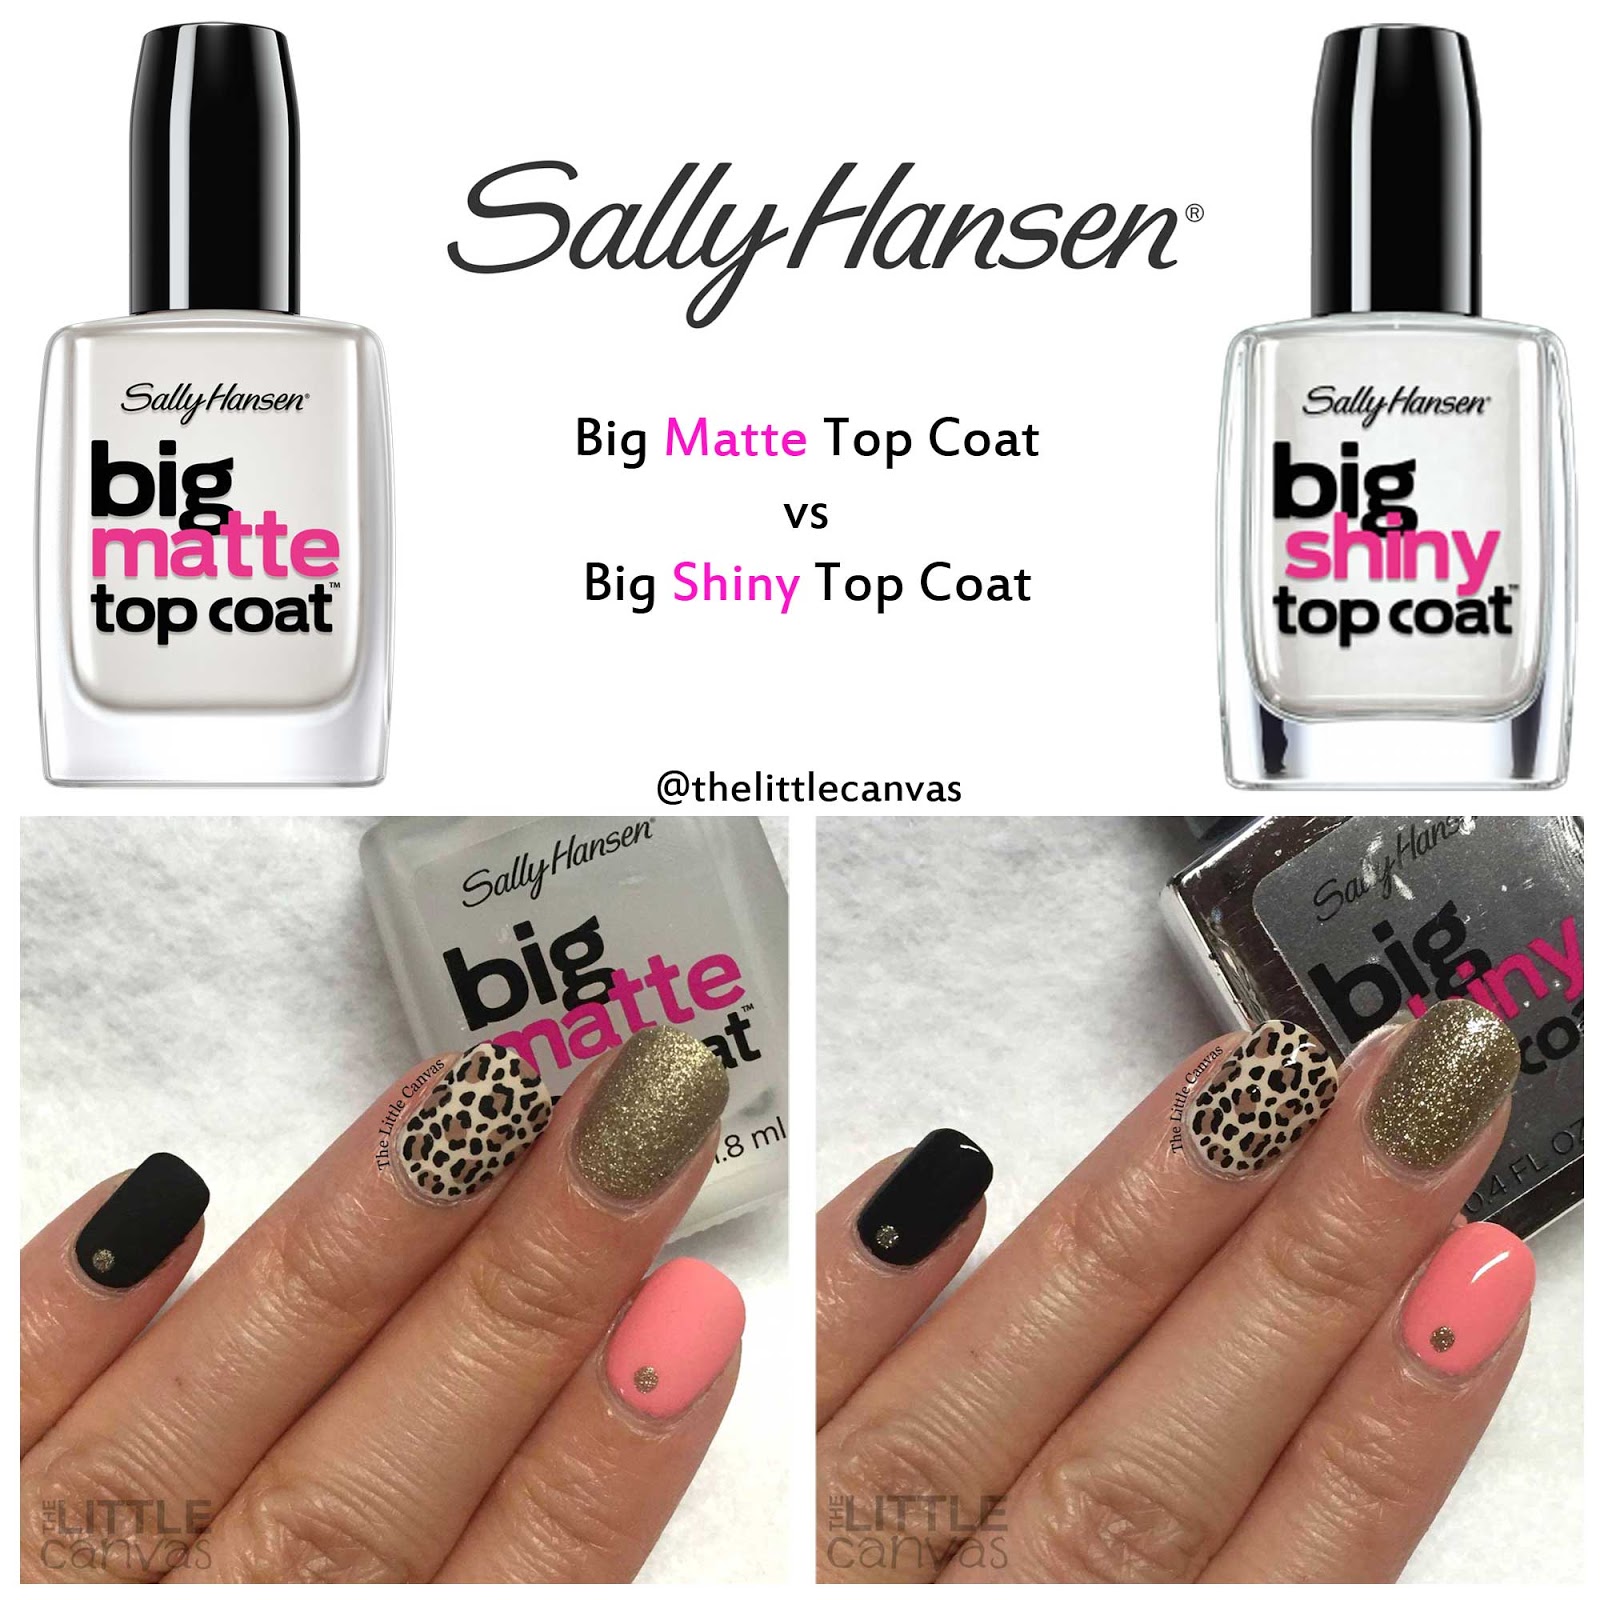
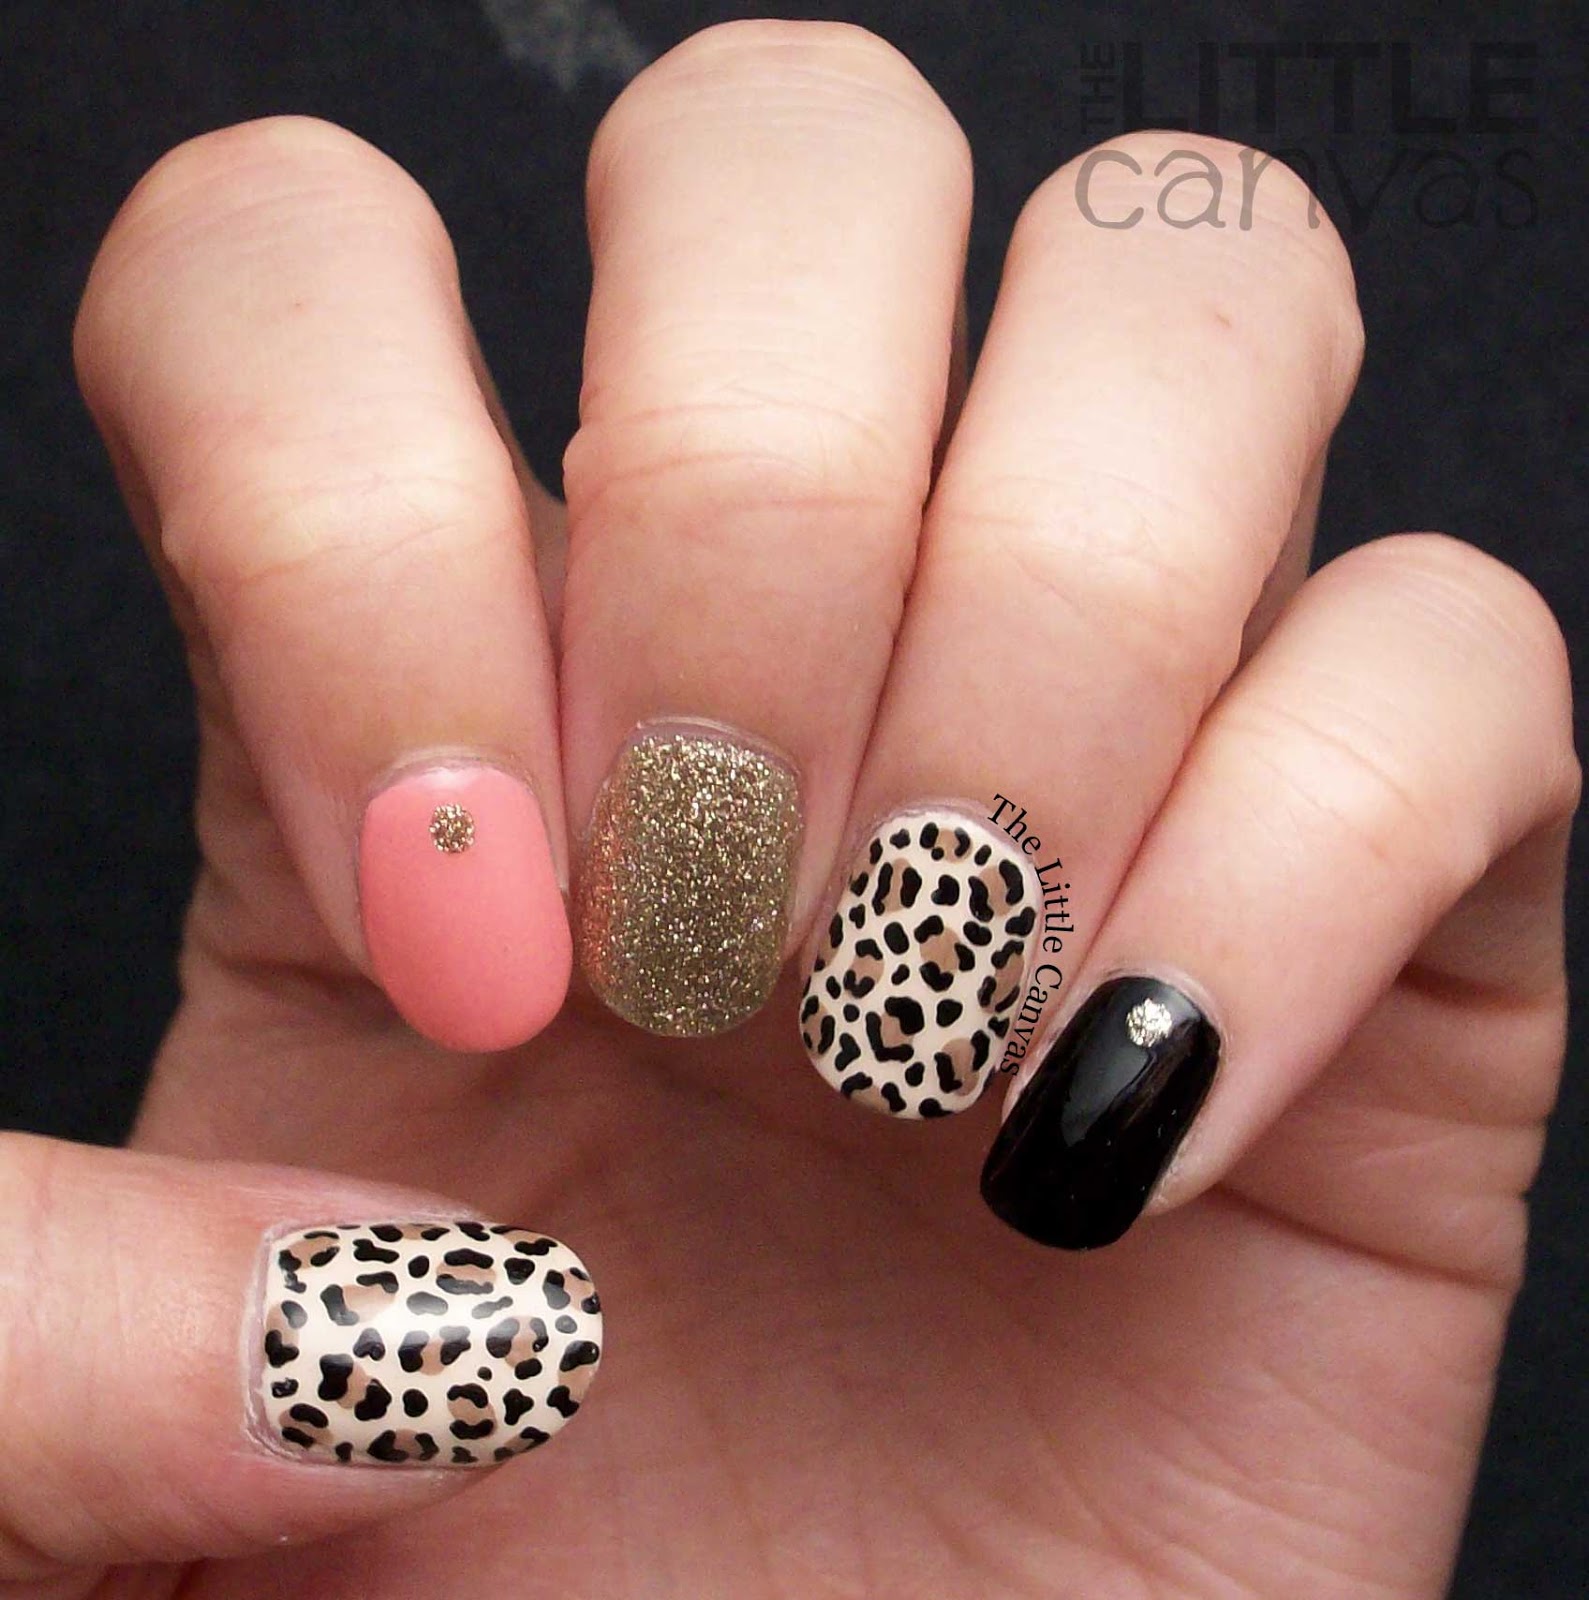
  • The One With the Random Leopard Manicure - I love leopard manicures, but this one inspired by Bad Girl Nails is one of my favorites!  Neutral with just a small pop of color....you can never go wrong.  I also did a comparison of the Sally Hansen Big Matte and Big Shiny Top Coat using this manicure. While I have the shiny version featured here, I think I preferred the matte version!
  • The One With the Butterfly Wings - Love, love, LOVE this butterfly wing nail art that I did.  Every year I try to do a monarch design, and this year I really wasn't feeling the typical orange pattern.  So, I went crazy and did a mint gradient!  I think they're so cool looking.  They were beyond bright and fun!
What do you think?  Any of these your favorite?  Excited for October??

Can't wait to do more tutorials next month and Halloween manicures.  I already have 6 Halloween tutorials from a few years ago, so I think it's time to create new ones...right?  Maybe??

Until next time, <3.

Bestie Twin Nails

The One With Round 28 of Bestie Twin Nails With Fashion Footing

9:00:00 AM


Good morning polished world!!  How are you all doing today?  It's quite the busy week for me, so I might be MIA from updating my social media accounts until odd random hours.  Usually those odd, random hours are when I have two seconds to update the blog before my head hits the pillow and I fall fast asleep, then wake up and start yet another busy day.

Today is round 28 of Bestie Twin Nails with Fashion Footing.  Usually we try to post this feature mid month, but not only has this month been busy for me, but also for Amanda.  Due to our crazy schedules, we decided to do something simple this month.   Amanda found this grey to black gradient manicure on Pinterest and we decided it would be perfect to do.

Let's take a look!


Colors Used:
  • INM - Granite
  • Jessica Cosmetics - Black Lustre
  • INM - Northern Lights

Isn't this gorgeous?  I received so many compliments on this manicure.  I think I might need to start doing more gradients with no nail art.  Maybe I'll do one once a month as a break from the nail art?  Hmmm.

Anyways, To get this look I started off with a base coat of INM in Granite.  This polish is one of my favorite grays.  Two coats and complete coverage.  Not too light and not too dark.  Perfect shade.  When that was dried, I painted Granite on a make up sponge next to Jessica Cosmetics Black Lustre.  Sponged the nail a couple of times, then added my sparkly top coat.


I forgot I even owned Jessica Cosmetics Black Lustre and Black Matte.  I have zero idea where they came from.  All I know is that I was going through my Melmer and found the two bottles intermingled in with my other black polishes.  I'm honestly surprised I have so many black polishes.  Kind of crazy since I tend to just use my ORLY Liquid Vinyl or Serendipity Polish Building My Empire.  I probably should purge the ones I never use.

Sorry, getting off topic here.  While I don't remember where the polishes came from, I do remember that I loved them and put them in the melmer to save because I wasn't sure if I could get more.  Weird how all that came back to me, but where I got them I can't figure it out.  Black Lustre was perfect for the gradient.  Full coverage after a few little dabs of the sponge.  Might need to use it some for Halloween designs!

What do you think?  Like this gradient?  Think I should do more plain gradients?

Don't forget to check out Amanda's manicure!

Until next time, <3.

China Glaze

The One Inspired by Those Nails I Did For a Wedding

9:00:00 AM


Good morning polished world!  Happy Monday to you all!!!  Sorry that I didn't write a post yesterday, but I kind of got a little side tracked with a Pinterest project.  If you follow me on Snapchat and Instagram, you saw a little sneak peek.  Hoping my pallet creation turns out as planned!  I guess now is also a good time to say that I didn't do a Twinsie Tuesday manicure due to said Pinterest project, soooo I'll be back for that feature in another two weeks.

Today I'm sharing with you a manicure I did after I painted the same design on my friend's daughter's nails.  The girls had a wedding to go to, so of course they needed to have their nails done to match their dresses.

Let's take a look!


Colors Used:
  • ORLY - White Tips
  • ORLY - Liquid Vinyl
  • China Glaze - I'll Pink to That
  • FingerPaints - Glitz & Glam
  • FingerPaints - Sterling Sculpture
Isn't this adorable?  Now the color is different than the one's I did on Samantha.  Her's were a mint, which while I'm loving the pink, I think I like the mint more.  Simple, quick design which is super eye catching.  I think the silver accent is a perfect addition of glitz to this design.  Looking at the photos now, I think I might have added a top coat of INM Northern Lights to it because neither of those silvers have holo micros in them.  Hmmm....my brain is fried.  This is yet another reason as to why I should draft my posts the same night I paint.  Or at least just create a post with the colors in it.


I'll Pink to That is from the China Glaze Lite Brites collection.  Love this beauty.  Two coats and full coverage.  Super glossy for a bright neon!  Another home run from China Glaze.

What do you think?  Like this manicure?  Do you think you would prefer this with a mint polish instead?

I'm off to plan more of my Pinterest project!  I promise to keep you updated!  I also have to start planning my Halloween nails!!  Can you believe October is almost here??  Where has this year gone?!

Until next time, <3.

Flowers

The One With the Roses Feat. Serendipity Polish!

9:00:00 AM


Morning polished world!  How are you all doing today?  It's Friday!  Although I have a super busy weekend, so really Friday is just another day at this point.   Oh well, I love being busy so I shouldn't complain.

Short post today since I'm quiet exhausted  Today's manicure is done using some Serendipity Polishes.  What I love about this brand is that the colors can be used year round.  Also their formulas are great!

Let's take a look!


Colors Used:
  • Serendipity Polish - Summer Sunnies
  • Serendipity Polish - Get it Girl
  • Serendipity Polish - Holo Day Lights
  • Serendipity Polish - Mint Martini
I feel like it's been forever since I've done a rose manicure.  I'm not so sure how I completely feel about this design.  I love the colors, I love the layout, I just think I did too many roses on the ring finger.  It feels a little cluttered....maybe that's just me.


As I said, I love the colors!!  Get It Girl is a gorgeous navy blue polish which covers in one coat.  That's right, you are looking at one coat of that blue!!  Since all of the Serendipity Polishes are one coat, doing nail art with them is so simple!  Everything applies easily with good coverage.

What do you think?  Fan of this look?  Do you own any of the Serendipity Polishes??

Until next time, <3.

Jessica Cosmetics

The One With the Bow Nail Art Tutorial Feat. Jessica Cosmetics

9:00:00 AM


Good morning polished world!  How are you all doing today??  I meant to have this post up yesterday, but forgot to hit the publish button so it sat as a draft.  I then meant to post it during my lunch break from my phone, but I cannot for the life of me figure out how to get blogger to work from my phone.  I'm sure there's an app for it, but I would never use it so why waste the space?

Today I'm sharing with you a tutorial for the bow manicure I shared the other day using Jessica Cosmetics The Luring Beauty from the Into the Wild collection.  I absolutely loved that manicure.  It's super simple to re-create, so I thought I would share!

Let's take a look!
What You Need:

  • White Polish
  • Jessica Cosmetics - The Luring Beauty
  • Black Acrylic or a black polish
  • Small Nail Art Brush
  • Small Dotting Tool
Tutorial:
  1. Start off with a base coat of white polish
  2. With a small paint brush and a black acrylic or nail polish, draw the outline of the bow from the edge of the nail towards the center
  3. Using the same brush and paint/polish, draw a circle in between the middle of the two edges of the bow.
  4. With a dotting tool, color in the bow.
  5. Clean up the lines, and add the details to the bow using a small nail art brush and the acrylic/polish.
  6. Add dots to the white empty space.
  7. Finish with a top coat and enjoy!
I find it easier to draw the outline of the bow, or really any intricate design for that matter, and then filling it in like a coloring book.

What do you think?  Do you think you'll try to re-create this design?  If you do, promise you'll share with me?

The Into the Wild collection is available now through Jessica Cosmetic's website!

Until next time, <3.

Dot Mani

The One With the Bows and Jessica Cosmetics The Luring Beauty

9:00:00 AM


Happy Monday polished world!  Can you believe it, another Monday?  Work and life has been crazy busy lately, and normally I don't mind it, but right now time is flying by too fast and I just cannot keep up.  There are not enough hours in the day, or days in a week!  Before we know it, October will be here.  And with October comes Halloween nail art!!!!

Let's not rush things though.  Today's manicure is a design inspired by my friend Samantha's polka dot shirt.  I'm a huge fan of polka dots, and I'm extremely jealous of this shirt.  It's white with black polka dots, then on the back there is a red bow.  It's super cute.  I should have taken a photo of it when she wore it on Friday.  Maybe I can have her snap a photo and I can put it on Instagram or something.  So anyways, after I saw her in it on Friday, I decided I needed to have some similar design on my nails.  That's normal, right?

Let's take a look!


Colors Used:
  • Jessica Cosmetics- The Luring Beauty
  • ORLY - White Tips
  • ORLY - Liquid Vinyl
  • Zoya - Cosmo
Isn't this manicure the cutest?  It's one of those that I never want to take off.  I think I might keep it on longer than my three-day maximum.  So far it's been three days and I don't have a single chip.  I bet tomorrow after a day of typing and running around one or two nails will randomly pop off.  That seems to be the luck of the draw.


The Luring Beauty is a gorgeous pink/red shade from the Jessica Cosmetics Into the Wild Collection.  Best part about this polish, you can have complete coverage in one coat!  I used two coats because I knew that the bow would look darker than the plain swatched nail since art usually is more layered than a swatch.  In my mind that description makes sense, but reading that really doesn't.


Got to love Cosmo!  My favorite of the Ultra Pixie Dust polishes.  The others didn't layer as nicely as this one does.  Two coats and pure gorgeous Pixie coverage with those large holo flecks.  I think it accents this manicure perfectly.

What do you think?  Fan of this look?  Something you would try?

I may or may not have a tutorial for this design coming up soon!  I love that little bow so much.  It looks extremely difficult to do, but it really isn't!  Reason I decided to do a tutorial.

The Luring Beauty is available now through JessicaCosmetics.com.  The whole collection is quite gorgeous.  If you don't believe me, then click here to see my swatches!

Until next time, <3

**Some products are provided for PR purposes.  Opinions are my own.  Please see my Disclosure Policy**

China Glaze

The One With the Butterfly Wings

9:00:00 AM


It's Saturday!  Finally!!!!!!  This week has been extremely crazy and honestly I didn't even realize it was going to be Saturday until I started drafting this post last night.  How many of you have had a week like that where you can't even remember what day it is?

Today I'm sharing with you some monarch nails.  Each year I do this design and try to switch it up a bit.  Actually, last year I think I did this look twice, once orange, and once with a sunset looking gradient.  Maybe I'm delusional due to the whole busy week and am messing up what year I did what.

This year's monarch nails are a fun neon gradient.  Let's take a look!


Colors Used:
  • China Glaze - Highlight of My Summer
  • China Glaze - Too Yacht To Handle
  • Salon Perfect - Gone Sailing
  • INM - Northern Lights
  • Acrylics
Wouldn't monarchs look awesome if they looked like this??  I'm sure that there is some sort of blue/minty looking butterfly, but I doubt it has a monarch pattern.  I actually wore this manicure at a butterfly release at work, and the people who came to do the program were talking about how cool it would be if monarchs looked like this.  Maybe someone can breed one....


I've owned Salon Perfect Gone Sailing for awhile now, and I have not used it enough.  I feel like it's a dupe of China Glaze Turned Up Turquoise , which makes sense since Salon Perfect and China Glaze are the same company.  It's  beautiful shimmery shade which really blended with the other polishes well.


Love, love, love this gradient!  The more I look at it the more I love it.  I think I might have to re-create it and use it as a base for another design.  Although, now that I've done it with the butterfly wings, it probably won't look as good as a base for another design.  Won't know until I try!

What do you think?  Like these non-traditional monarch wings??

Until next time, <3.

China Glaze

The One With the Watermelon Manicure for a Picnic

9:00:00 AM


Hey all!!!  How are you all doing today?  Remember when I shared with you swatches of the new Serendipity Polish Call Me Boss Lady collection and I said I was going to start sharing some nail art using them?  Well here I am today with a post!

A few weekends ago, my job had our annual family picnic.  For the picnic, I wore a black shirt which had watermelons and white dots, with a pair of green crop pants.  It was the perfect picnic outfit.  Of course I had to paint my nails to match.  Did you expect anything less?

Let's take a look at what I came up with!


Colors Used:
  • ORLY - White Tips
  • Serendipity Polish - Holo-Day Lights
  • Serendipity Polish - Building My Empire
  • China Glaze - Treble Maker
  • OPI - Spoken From the Heart
Cute, right?  The little watermelons were a PAIN to do!!!  I might do them again now that I had some practice and figured out how to get them to work properly, but when I painted them I really was loathing the fact that I got the bright idea to match my outfit in the first place.

So, what I did was after my black base was dry,  I went through and created watermelons using white acrylic paint.  That way if I didn't like the layout, I could just wipe off what I had done and start over.  Trust me, I did this about 30 times before I had a layout i kind of liked.  My thumb I loved, but I really wasn't 100% happy with the ring finger.

When I got the layout to be just how I wanted it, I dipped a toothpick in Treble Maker and outlined the rind of the watermelon.  I then did the same thing with Spoken From the Heart.  When that was dry, I went through with white acrylic and cleaned up the white line in between the rind and the melon.  A few black dots for seeds, and I was done.  Really, the coloring in wasn't the hard part, it was figuring out the dang spacing and layout.


The black used for this manicure is Building My Empire.  Awesome base which dried super fast.  Since it had such a fast dry time, it allowed me to really use it as a canvas and paint and erase my melon layout a million times.  My base never was ruined, it stayed just as shiny as if I had just painted it on.

It worked amazingly for the dots on my index finger.  Some black polishes dry too fast and I end up using acrylics for my black dots because they drag or leave those stringy lines.  This worked wonderfully.  I had time to work with the polish and didn't feel rushed to apply my dots because it was going to dry.

What do you think?  Fan of this look?  Something you might try?  Want me to try to get a photo of my outfit??

Until next time, <3.

China Glaze

The One With the Bright Manicure for Twinsie Tuesday

9:00:00 AM


Good morning polished world!  How are you all doing today?  It's Tuesday and the Twinsie's are returning for Twinsie Tuesday!  This week we are sharing "bright" manicures!  China Glaze came out with some amazing polishes this summer with the Lite Brite collection!  I snagged a lot of them but am sad I do not own them all.

One of my favorites from the collection is Bite Me.  A gorgeous coral shimmer cream.  Super bright, and perfect for today's post!

Let's take a look!


Colors Used:
  • China Glaze - Bite Me
  • Orly - White Tips
  • Orly - Liquid Vinyl
  • FingerPaints - Champagne Toast
This dotticure was inspired by Polish and Beyond.  I was surfing Instagram and stumbled upon it a few months ago and saved it.  While China Glaze Bite Me is not the same color she used, it was close enough and I knew would still look great with black, white, and cold dots over it.


Super gorgeous color.  In this picture, you can really see the shimmer.  Bite Me has full coverage in two coats.  It's one of those neons that can be kind of difficult to apply.  The polish dries rather fast so it can pull if you aren't careful.  Second coat for sure has to be a little thicker as to not drag the first coat.  I hope that makes sense, in my polished mind it does.  Regardless, the difficult application is worth it because the color is amazing.

What do you think?  Bright enough manicure?  Have you had troubles with this China Glaze formula??

Until next time, <3.


Jessica Cosmetics

Jessica Cosmetics Into the Wild Collection Swatch and Review

9:00:00 AM


Good morning polished world!  How are you all doing today?  It's Sunday meaning we are beginning yet another new week.  I'm hoping that this week isn't going to be as crazy as last.  I'm way too busy for my own good.

Today I have swatches of the new Into the Wild Collection from Jessica Cosmetics!  This Fall collection contains six gorgeous cream shades.


Let's take a closer look!

Sally Hansen

Sally Hansen Big Matte Top Coat Versus Big Shiny Top Coat

9:00:00 AM


Good morning polished world!  How are you all doing today?  It's Friday!  Not Thursday like my mind thinks.  These dang three day weekends which throw me off.  Oh well, what can you do?  I enjoyed my three day weekend, so that's all that matters.

As promised yesterday, today I am sharing with you a comparison of the Sally Hansen Big Matte Top Coat and Big Shiny Top Coat.

Let's take a look!


Animal Print

The One With the Random Leopard Manicure

9:00:00 AM


Good morning polished world!  How are you all doing today??  It's Thursday but thanks to this holiday week, it feels like a Wednesday.  Don't get me wrong, I love the three day weekend, but it throws me all off and takes me a good few days to get used to the schedule again.  I'm not meant for days off or vacations.

The other night I had planned on swatching the new Jessica Cosmetics Into the Wild collection, but of course my migraine got in the way and I had no want to do my nails at all.  Since I had naked nails and work the following day, I needed to do something.  So I went on Instagram and looked up BadGirlNails because Sonia has great eye-catching nail art which is quick and easy.  A few weeks ago, she posted an easy leopard design which I loved.

I switched up the color and re-created the design, and within a half hour I was done with all 10 nails and ready to rest my migrained head.  You can also thank the migraine for me not having this post up yesterday.

Let's take a look!


Colors Used:
  • China Glaze - Pinking Out the Window
  • Zoya - Tomoko
  • OPI - My Vampire is Buff
  • ORLY - Liquid Vinyl
China Glaze Pinking Out the Window is new to my collection.  I bought it a few months ago during a Sally Beauty BOGO sale when I was stocking up on some of my old favorites.  It was just sitting there on the shelf calling my name.  It's a pretty light pink shade which has a coral tint to it.  Two coats and complete coverage.  After the first coat, I thought that I was going to have to do three because it was very sheer.  It built up very nicely though.


My Vampire is Buff is my all time favorite OPI nude polish.  I was going to use Pale to the Chief from the new collection, but went with this oldie but goodie.  Two coats, full coverage.  Perfect base for a leopard design!

What do you think?  Fan of this look?  Something you think you'll do?

Tomorrow I'll be using this manicure to do a comparison of a matte and shiny top coat so come on back for that!!

Until next time, <3.

Serendipity Polish

Serendipity Polish: Call Me Boss Lady Collection Swatch and Review

9:00:00 AM


Good morning polished world!  How are you all doing today?  I'm trying to cram in some swatches among my nail art, so you're going to see a bit more of me lately than usual.  I try to stick to the every 3 day posting schedule, but I have way too many drafts that it's making me nervous.  Plus some of my drafts are these Fall collections and I really want to get them out to you while they're still new.

Today I am sharing with you the new Serendipity Polish Call Me Boss Lady Collection!  Earlier this year I purchased the Beach, Please summer collection was super impressed.  All polishes were one coat creams with super fast dry times, which for a nail artist like myself, I could get a lot of use out of.  On top of that they are gorgeous colors.  When I saw on Serendipity Polish's Instagram page that they introduced a Fall line, I didn't think twice.  I immediately purchased the polishes because I knew I wouldn't be sorry!  Plus with the name "Call Me Boss Lady", I couldn't resist.


Thank you to Sarah from 25 SweetPeas who created this awesome collage for me.  I tried to but it just didn't work out well.  That girl is a guru when it comes to graphics and collages.

Anyways, the Call Me Boss Lady collection consists of four creams and one holographic polish.  Let's take a closer look!

Flowers

The One With Morgan Taylor Oh Para-Chute! and Daisies

9:00:00 AM


Good morning polished world!  How are you all doing today?  The weather has been gorgeous the last few days.  Blue skies, no clouds, no humidity and temperatures in the 70s.  What more could a girl ask for?  I love this weather and wish we could have it year round.  Sadly though Winter will be here before we know it and it's going to be snowing.  Oh well.

The other day I shared with you swatches of the Morgan Taylor Sweetheart Squadron collection followed by a post using one of my favorites as a base for a nail art.  So it's only fitting that I bring you another post using another favorite from the collection!

Let's take a look!


Colors Used:
  • Morgan Taylor - Oh Para-Chute!
  • Acrylics

I love, love, LOVE Oh Para-Chute!  It's such a unique color which stands out in my collection.  It's a dusty sage green cream which has complete coverage in two coats.  A perfect color for a base of any nail art or accent nails.


I saw a similar daisy manicure on Pinterest.  I wish I could get my Pinterest to load right now to share the link here, but go to my Nail Ideas board and you'll see it.  Super cute, something fun, and a PERFECT design for this color.  I love how the daisies and green really pop.

Very simple design to re-create with either polish or acrylics.  Let me know if you would like to see a tutorial and I'll create one ASAP.

What do you think?  Fun design?  Love the base color??

Oh Para-Chute! by Morgan Taylor is available now at LoxaBeauty.com.  Individual polishes from the Sweetheart Squadron collection are $9.00 each, and duos and minis are $14.95.

Until next time, <3.

Dot Mani

The One With the Sunflower Nail Art Tutorial

9:00:00 AM


Hey all!!  That's right, two posts in a row!  Can you believe it??  That's because today I'm sharing with you a tutorial!  It's been a long time since I created any tutorials.  I really don't know why I stopped.  I always meant to start doing them again but never really got around to doing so.  Well last night I had some time and I wanted to paint, but didn't want to paint my nails.  So, why not doodle on the nail art wheel and create a tutorial??

Today's tutorial is for my sunflower nails which featured Morgan Taylor Rule the Runway!  Let's take a look!

What You Need:

  • Morgan Taylor - Rule the Runway or a taupe polish
  • Acrylic Paints - white, brown, light orange, and yellow.  You can also use nail polish, I find acrylics to be easier and quicker
  • A small dotting tool
  • A small nail art brush
  • Top Coat 
Tutorial:
  1. Paint your nail with a base coat of Rule the Runway! by Morgan Taylor or a similar taupe colored polish
  2. With a small dotting tool, create a polka dot pattern on your nail using a white acrylic paint or white polish.
  3. Use a nail art brush and the brown acrylic or nail polish, create the centers of the flower wherever you want on the nail.  For this tutorial, I did one on each end.
  4. Use a small nail art brush and a light orange acrylic or nail polish and create the petals.  I do this by drawing an oval eye shape then fill in the center.  Leave space in between each petal.
  5. With the same nail art brush and a yellow acrylic or nail polish, fill in the empty spaces between the light orange petals.
  6. Clean up your brown center of the sunflower.  Using a small nail art brush, just even out the edge and cover any of the orange or yellow that overlapped the brown.
  7. Finish off with a top coat, and enjoy!
What do you think?  A tutorial you might try?  Should I start making more tutorials??

I would love to get into the world of YouTube but I don't see that happening yet.  That whole process seems very time consuming.  Filming, editing - I give you vloggers so much credit!

Let me know what else you would like to see!!

Morgan Taylor Rule the Runway is available now at LoxaBeauty.com

Until next time, <3.

Dot Mani

The One With Morgan Taylor Rule the Runway and More Sunflowers

9:00:00 AM


Hey all!  Happy Thursday and Happy September!  Can you believe Fall is right around the corner?  I'm not upset that summer is coming to a close.  The heat has been unbearable so I'm really looking forward to the temperatures being in the 60s and 70s.  Plus Fall is such a pretty season!  Don't worry, I have a lot of fun bright nail art to still share with you, but for now, we are going to take a little turn towards Fall.

A few days ago I shared with you the Morgan Taylor Sweetheart Squadron polishes for Fall.  If you haven't seen the swatches, then you need to head on over to the post and take a look.  Before I ever swatched, I immediately knew that Rule the Runway was going to a perfect base for nail art.  I wasn't wrong.

Let's take a look!


Colors Used:
  • Morgan Taylor - Rule the Runway
  • Acrylics
Sunflowers, the summer to fall transition flower.  I know what you're all thinking, I just shared a sunflower manicure two days ago, but how could I not share another?  It's sunflower season!!!  Actually it's close to the end of the season here, the fields are all wilting and dying.  The stores still are getting them in but you can tell that the local ones are coming to an end.  Seems like it was just yesterday the field bloomed.  I think the heat made them come and go super fast.  Maybe not, I really do not know anything about flowers.


The other reason I had to share this manicure with you was because it's just a PERFECT Summer-Fall transition design, mainly because of the gorgeous taupe color.  Rule the Runway has full coverage in two coats.  Dries super fast so you don't have to wait a long time before starting the nail art.  All ten nails took me about an hour to do, which really isn't a lot when looking at all the details.

What do you think?  Like this sunflower manicure?  Think it's better than the blue ones I shared the other day?   Think I need to take a break from floral manicures?  Hate to break it to you, floral manicures are never going away!!!

The Morgan Taylor Sweetheart Squadron collection is available now at LoxaBeauty!  Single bottles are $9.00 each and duos and minis are $14.95.  Honestly must have if you like Fall colored polishes.

Until next time, <3.