Halloween

Happy Halloween!!!

9:00:00 AM


Happy Halloween polished world!  Are your nails all decked out?!  I don't want to hear that you had no idea what to do, especially since I posted the nail art wheel and zillions of tutorials!  No excuses lovelies!!  LOL.

For today's manicure, I decided to do a mish mosh of designs using my own tutorials!  You can't go wrong with a cute little mish mosh character manicure!

Let's take a look!


Colors Used:
  • Sally Hansen - OMGhost
  • Sally Hansen - Pumpkin Queen
  • Sally Hansen - Fright Night
  • Zoya - Tilda
  • Zoya - Beatrice

Five polishes and all these designs!  Yes you read that right!  I swear, it really is easy to get awesome looking nails!  You do not have to have a large stash and really, you don't even need zillions of tools!  Don't have a dotting tool?  No problem, use a bobbing pin!  No nail art brush?  Pshhhh, just use a tooth pick!  I started using toothpicks for everything, and yes, the tools make life easier, but it was just as easy to accomplish the designs without them.


I think this is my favorite Halloween manicure ever.  I've done character ones in the past, but this one was just so cute.  I love seeing for myself how I have grown as a nail artist in the past few years.  It really makes me hope that next year I'll still have the time to blog so I can see how far I've again come!

Liking the design?  Do you have a favorite little character?  Are these designs you have attempted??

I hope you all have a Happy and SAFE Halloween.  If you are going to any parties, please do not drink and drive!  While adults have fun on Halloween partying, remember that there are kids out walking up and down the roads trick or treating.  Just please, everyone be safe!

Whew, now that October will be over, I can take a break from blogging!!!  The Nail Artist of the Month post will be coming up soon!!!!  :)

Until next time, <3.

Halloween

Frankenstein and His Bride - Nail Art Tutorial

9:00:00 AM

Good morning lovelies!  How are you all today?  As promised, I'm here posting the last of my Halloween Tutorials!  I've shared with you jack o'lanterns, vampires, and mummies!  Now it's time to show you how to do Frankenstein and his bride!

Let's take a look!

Frankenstein


  1. Start off with a base coat of green polish.
  2. With a nail art bush, create the hair at the cuticle.
  3. With a dotting tool, add two white eyes.
  4. With a nail art brush or striper, draw the stitches for his mouth and two eyebrows.
  5. With a small dotting tool, add the pupils!
Bride of Frankenstein!


  1. Start off with a base coat of green polish.
  2. Make a "M" shape a little more than halfway down the nail and fill in the hair with a black polish.
  3. With a dotting tool, add the whites for her eyes.
  4. Using a nail art brush or striper, create the white lightening bolt on her hair.
  5. With a dotting tool, add the pupils, and use a striper or nail art brush to draw the eyelashes.
  6. With a dotting tool, add a bow to her hair!
Don't forget to finish with a top coat!

What do you think?  Designs you may try?

As always please tag me in your recreations!  I hope your nails are all decked out for Friday!

Until next time, <3.
Halloween

Mummy Nail Art Tutorial!

9:00:00 AM

Good morning polished world!  How are you all today?!  As promised I am bringing you another Halloween tutorial before Friday!  One today, two tomorrow, and wraping it all up Friday with my last Halloween manicure!  Busy busy week for The Little Canvas!

Today's tutorial that I'm sharing with you is an adorable cute mummy design!  I loved my mummy nails from last year.  After going through my old posts before creating my nail art wheel, I knew I wanted to create a tutorial for this design.  It looks complicated, but it's really simple!

Let's take a look!


  1. Start off with a base coat of white polish.
  2. With a nail art brush and a black polish, or a black striper, create a "mask" where the eyes will be.
  3. While the "mask" is drying, take the nail art brush and black polish or black striper and draw random lines on the nail to represent the mummy's wrapping.
  4. With a small dotting tool, add white eyes on the mask.
  5. With a smaller dotting tool, add the pupils!
Make sure to top it all off with a top coat!

What do you think?  Cute simple design?  Something you think you may try?? 

As always, please tag me in any re-creations!  I love seeing them!

See you tomorrow, <3.

Halloween

Twinsie Tuesday - Halloween!

9:00:00 AM


Good morning everyone!  How are you today?  I'm having a bit of an Indian Summer here today!  It's supposed to be 75 and sunny!  Perfect pumpkin carving weather!  Of course, tomorrow the temperature is going to drop and the forecast says we are going to have some snow this weekend.  Typical weather for this time of year!

It's Tuesday, so that means that it is time for another Twinsie Tuesday!  Since Halloween is Friday, we are posting Halloween themed manicures!  I have yet to mention on the blog that I'm really not the biggest fan of Halloween.  I hate all the gruesome and gross things that go along with it.  I only enjoy the cute little decorations.  Therefore, you can guess that I only really enjoy the cute Halloween designs.

For my manicure, I went simple and re-created my googly eye design, which I did last year and again on my nail art wheel!  It's one of my favorite Halloween manicures and I've been dying to do it for a few weeks now.  Reason being, it's adorable!

Let's take a look!


Colors Used:
  • Faby - Black is Black
  • Black and White Acrylic
  • China Glaze - Ghoulish Glow
Adorable, right?  Another manicure where I'm using Faby Black is Black.  Awesome black polish.  Two coats and pure perfection.  I actually could have gotten away with one coat this time around, but I went for the two because I did notice a few nails had some bald spots.

When my black base was dry, I started to use my white acrylic paint and add the white dots.  Normally, I would have used white polish, but all my whites decided to turn goopy.  Wait, I have that new Sally Hansen one I could have used!  Dang it, anyway, I used acrylics because I forgot about that polish until now as I type this.  This is what happens when you have too many polishes, you forget about what you actually own  Goodness.


Anywho, after I let the white dry, I went through and dotted Ghoulish Glow, China Glaze's glow in the dark top coat, over the whites of the eyes.  After that was dry, I took some black acrylics and made the pupils.  The addition of ghoulish glow is really what makes this manicure!  The eyes actually glow!  This year I couldn't capture a photo of it.  My camera just refuses to pick it up!

What do you think?  Cute Halloween manicure?

Don't forget to check out the other Twinsie's!


Amanda at Amandalandish
Amber at Nails Like Lace
UntilAnna at Going to the Showing
Bridget at A Painted Nail
Chelsea at Nailed Blog
Cordia at Seriously Swatched
Elizabeth at Did My Nails
Jessica at Blue Velvet Lacquer
Kelly at Tuxarina
Lakeisha at Refined and Polished
​Marisa at Polish Obsession
Róisín at Cuti-CLUE-les
Stephanie at A Little Polish
Tiffany at Polished To Precision

Posting a tutorial tomorrow and Thursday!  Friday I'll be posting an actual manicure!  Busy week here!

Until next time, <3.

Gradient Mani

Candy Corn Nail Art

9:00:00 AM

Good morning polished world!  How are you all today?  Halloween is Friday!!!  Are your nails ready?!  If you're still unsure what to do, make sure to check out my Halloween Nail Art Wheel for some ideas!  I've also posted some tutorials, and will have a few more up this week!

Today I'm sharing with you a Halloween manicure that I do every October - candy corn nails!  It's one of the easiest designs to do, and one of my favorites for the whole season!  Who doesn't love candy corn this time of year??

Let's take a look!


Colors Used:
  • Sinful Colors - Snow Me White
  • Zoya - Thandie
  • Zoya - Darcy
Awesome, right??  And super easy!  You start off with a base coat of any white polish!  I used two coats of Sinful Colors Snow Me White.  While that was drying, I prepared for my gradient by taping off all my cuticles.  By the time I was done taping, I was all ready to start my gradient!

Using a make up sponge, I painted a strip of Snow Me White, Thandie, and Darcy.  I did a thicker strip of Thandie since the orange part on the candy corn is the largest.  I then dabbed the sponge on the nail a few times until I got the desired look.  Topped it off with some Out the Door and admired my work!


Love, love, love how these turned out!  I was sad when I took them off.  To be honest, wish they were still on my nails because I'm not too fond of my current manicure.  It bubbled weird and ugh...you'll see later this week what I mean.

What do you think of the candy corns?  A look you'd try??

Lots of posts coming up this week!  Hope to see lots of re-creations!

Until next time, <3.

Halloween

Vampire Nail Art Tutorial

9:00:00 AM


Good morning polished world!  I'm going to be a busy blogger over the next few days posting my own Halloween manicures and the few tutorials I created when I did my nail art wheel!  Ever since I posted the pumpkins, I've had 4 more designs to share, and have had no clue which to share with you all first!

After one of my very amazing followers posted a re-creation of my vampire from the nail art wheel on my Facebook page, I decided it was time to share the vampire tutorial!

Let's take a look!


  1. Paint your nails with a light gray polish
  2. With a nail art brush, draw the hairline and fill in the top part of your nail with black polish.
  3. With a dotting tool, add two white eyes.
  4. With a nail art brush, draw the smile and eyebrows.  You can skip the eyebrows if you want.  I was trying to make him as scary looking as possible.
  5. With a nail art brush, draw the little teeth
  6. Using a small dotting tool, add red eyes and blood drips to the fangs.
  7. Using a small dotting tool or nail art brush, add the black pupils.  Then go through with a fine nail art brush and outline the fangs.
Don't forget your top coat!

Very straight forward, just a little tedious.  You'll see on my character nails that I tend to do the hair first.  This is because I can have a better idea as to where to place the eyes.  If the eyes are too high up, then the face can look disproportionate.  I also set up my tutorials in a way that takes drying time into consideration.  You cannot do the eyes all in one step because the red and pupils will blend into each other.  I usually will do the white and then let them dry, add the random details, then go back through and add the finishing touches.

What do you think?  Like the little vampires?  Is this a design you would try?

As always, if you re-create the design, please share it with me on my social networks!!  I cannot begin to tell you how much I love seeing your designs!

Until next time, <3.

Animal Print

The Beauty Buffs: Animal Print

8:00:00 AM


Good morning polished world!  Hope you all are doing well!  Fall is in full swing here.  Leaves are falling and it's getting cooler out each day.  It's also getting darker out earlier, which isn't so great.  It's also not great when it's cold, rainy, and dark out.  Regardless, it's one of my favorite times of year!

Since it is a Wednesday, I am back posting with The Beauty Buffs.  Today we are talking all about animal prints!  I decided it was appropriate to take a break from Halloween designs for this post and do an animal print manicure which is perfect for this season.

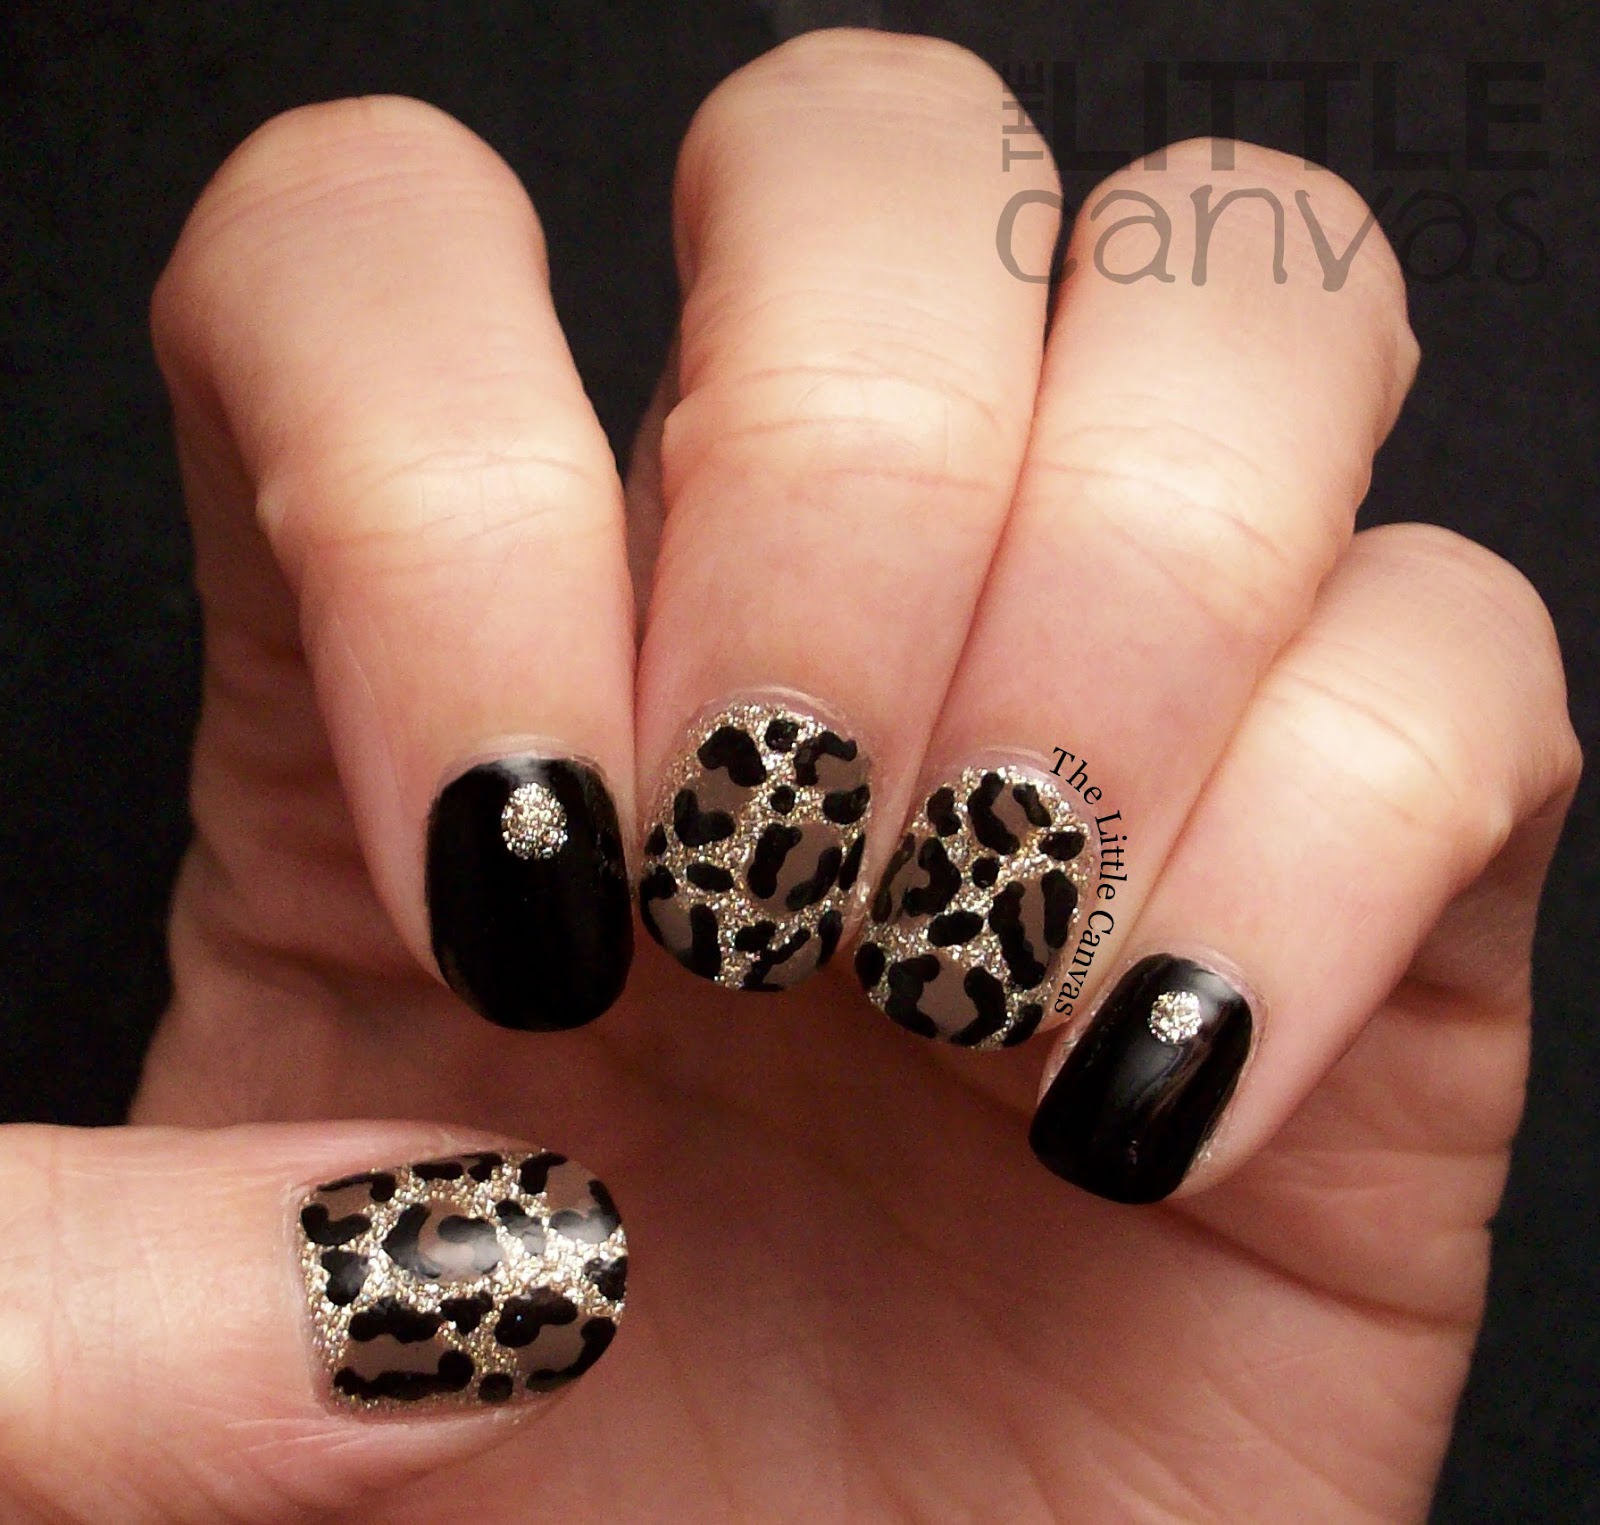
Normally, I do crazy, funky, neon animal print nails where typically a gradient is involved.  Years and years ago when I first started blogging I created a leopard print manicure using a tan base with brown spots that were outlined in black.  For today's manicure, I decided to take inspiration from that design and do a classic looking leopard print with a flash of some glitter dazzle.

Let's take a look.


Colors Used:
  • Faby - Black is Black
  • China Glaze - I'm Not Lion
  • Sinful Colors - Nirvana
New black polish alert!  I received some polishes from Faby International.  Faby is a polish company out of Italy which has 160 different colors to offer.  Each of their polishes are free of the major chemicals, which is a must have.  I was excited to try this product which is making it's way into the USA.

One of the six colors I received was black which really made my day.  I said this past weekend that I'm always on a hunt for the perfect black polish because at least 95% of my manicures have some form of black in them.  Orly Liquid Vinyl is typically my go to, but I have been known to use Sinful Colors, Sally Hansen, and Jessica black polishes.  Faby's Black is Black is certainly going to be added to that go-to list!  Perfect application in two coats and perfectly shiny.  You can see how shiny they really are in the photos above and below!  I wore this manicure for four days without a single chip...just a little tip wear, but that's to be expected.

I was shocked that my China Glaze I'm Not Lion didn't chip for four days.  If you own this polish, I'm sure you know that usually it just peels right off in a sheet.  First time EVER since I've owned it I didn't even have a teenie tiny little chip.  I was so pleased!  It was the perfect base for the leopard print too, so I was thrilled it stayed on!


 What I love about this manicure is that it is totally work appropriate!  I was able to match it with so many different outfits throughout the week!  And I felt less awkward with it on my nails versus my current hautned house manicure.  It is great because it's subtle, and yet upon closer examination you can see that there is a fun nail art design, with that little bit of glitz!

What do you think?  Liking the animal print manicure?

Make sure to check out the other Beauty Buff's posts!


Until next time, <3.

Halloween

Twinsie Tuesday: Odd Inspiration - Halloween Socks!

9:00:00 AM


Happy Tuesday everyone!  Hope you all are doing fantastically!  It is yet another busy week for me!  I swear I never get a break anymore.  Few more months and I will be able to!  Until then, my life is eat, sleep, work, blog.  Normal, right?

Since it is Tuesday that means it is time for yet anther Twinsie Tuesday!  This week we are finding inspiration in odd things.  For example, one of us could be inspired by a design on a pair of underwear.  Honestly, that was what I was going to do until I realized Halloween is around the corner and I'm really wanting to do as many Halloween designs as possible before the 31st.

I debated on skipping but then I realized, I have lots of pairs of Halloween socks!  Growing up, each year my mom would get my sister and I a new pair of Halloween and Christmas socks.  While most kids probably would have hated this, my sister and I loved wearing our holiday themed socks.  The ones I currently own are rather boring, just pumpkins or little Frankensteins, so I decided to look for inspiration online.

I found this pair of haunted house socks in orange.  Not going to lie, I would love to own a pair in either orange or purple.  Since I did a purple themed Haunted House design last year, and again on my nail art wheel this year, I decided to take inspiration from the orange pair of socks and go nail art crazy!

Let's take a look!


Colors Used:
  • Maybelline - Sweet Clementine
  • Black and White Acrylic
  • Zoya - Darcy
Kind of awesome, right?  After I found my inspiration and had my base and tips done, I was surfing Instagram, I found this similar themed manicure by The Nail Tail.  I loved how she sponged black around the tips to make it look like fog.  Since I already had painted on black grass tips, I kind of went over it with the sponge, so it's kind of uneven.  If I saw hers sooner, I would have just done the sponged tips and not painted on the grass, but anywho.

I added little trees like on the sock, a haunted house, and of course the little ghosts.  I had the ghosts just with eyes like on the socks, but I thought they were cuter with little ghost mouths.  I copied my graveyard nail from my nail wheel for the middle finger.  This nail was the one I was so happy I had the added sponging for.  It looked so cool and haunted there.


I think my little ghost/tree nails are my favorite.  It's like one is heading to the haunted house while the other is heading to the haunted graveyard!  I wasn't too sure about using a glossy top coat on these, but now that I'm looking at the photos, I'm happy that I did.

What do you think?  Good odd inspiration?  Does that question even make sense?

While I go and debate on purchasing those socks, check out the other Twinsie's posts!  I wonder if anyone else has a Halloween themed post!


Amanda at Amandalandish
Amber at Nails Like Lace
UntilAnna at Going to the Showing
Bridget at A Painted Nail
Chelsea at Nailed Blog
Cordia at Seriously Swatched
Elizabeth at Did My Nails
Jessica at Blue Velvet Lacquer
Kelly at Tuxarina
Lakeisha at Refined and Polished
​Marisa at Polish Obsession
Róisín at Cuti-CLUE-les
Stephanie at A Little Polish
Tiffany at Polished To Precision

Until next time, <3.

Dot Mani

Sally Hansen Halloween Dry Brush Mani

9:00:00 AM


Good morning polished world!  How are you all today?  Did you see the Halloween Nail Art Wheel yet??  Any designs that you're thinking of trying?  I'm planning on having another tutorial up sometime this week!  I need to actually sit down and start that planning soon so I can ensure they're all up before Halloween so you all can re-create the designs if you want!

Today I am sharing with you a Halloween manicure which is a bit different than anything that was on the Nail Art Wheel.  I received the Sally Hansen Insta-Dri Halloween polishes a few days ago in the mail and really wanted to do something different with them.  I started brainstorming and I came up with a grunge design with some of my favorite polka dot accents!

Let's take a look!


Colors Used:
  • Sally Hansen - Pumpkin Queen
  • Sally Hansen - Omghost
  • Sally Hansen - Fright Night

Awesome right?  I'm loving the Halloween grunge/dry brush nails!  I started off with a base of Omghost which applied evenly in two coats.  When the white was dry, I took Pumpkin Queen and brushed almost all the polish off of it.  I then lightly brushed it down and across the nail.  I did the same with Fright Night after Pumpkin Queen was dried.

For the black nails, I used a base of Fright Night which is an awesome black polish that could have technically been a one coater.  I used two for the manicure above.  For the white polka dots, I used Omghost.  I'm a huge fan of the Insta-Dri polishes for nail art!  They create the most perfect dots ever!  And since they dry fast, when you apply the top coat, the designs don't smear!


While this collection consists only of a matte and shiny black, a white, and an orange polish, it is the perfect Halloween set.  The orange is the perfect pumpkin orange, the white is perfect for ghosts, and the black is awesome for a base....or even for drawing little jack o'lantern faces on a plain orange nail.  You should check out my tutorial if you like that idea ;).

What do you think??  Liking this different Halloween design?

These polishes are available now in different drug stores for $4.99 each.  Really worth the price, especially if you're into nail art.  So happy the Insta-Dri line finally came out with a white and black!  Rumor has it, they're perfect stamping polishes too!

Until next time, <3.

Halloween

Halloween Nail Art Wheel

9:00:00 AM


Hello there!  Hope you all are doing well today!  I meant to publish this post yesterday but was a bad blogger and didn't hit the Publish button.  So instead it sat as a saved draft forever waiting to be posted.  I'm mad at myself because I really wanted this wheel up as soon as possible so you all could get lots and lots of ideas for Halloween.  Well, there are still 13 days before Halloween so it totally works out.

I love creating nail art wheels!  So far I have done one for Christmas, Valentine's Day, and St. Patrick's Day.  I planned on doing an Easter one but ran out of time, so when October came around, I was super excited to break out the wheels again and start creating!

Every time I create my designs, I first brainstorm them out on paper.  I draw 18 poor looking ovals, use one color pen and sketch out many different looks.  Sometimes I struggle to get 18, while other times it comes easily.  This time it came easily, and I had 19 designs so when one didn't work out, I had a quick substitute!

Let's take a look!


I think this is my favorite wheel so far!  Don't get me wrong, I love the other three, but something about this one stands out to me more than the others.  Maybe because I've grown as a nail artist and my lines are neater, or maybe because it's just so dang adorable.  Seriously, I'm the only person who can make a cute instead of scary Halloween nail art wheel.  I tried to make my vampire and Frankenstein look mad, but they still ended up looking kind of happy/adorable.


One of my favorite designs on the wheel is the haunted graveyard.  For this nail, I started off with a base coat of INM Brighella, then sponged the tip with a light grey polish.  I then added a coat of INM Northern Lights to give it that night time star look.  Then using my nail art brushes, I created the tree and the little grave yard.  I did this design last year on my actual nails and am hoping to attempt it again!  I'm very excited to see how I've grown in a years time!

Which design is your favorite?  Is there any that you think you will recreate?

As promised, I did create some tutorials for random designs on the nails.  The other day I posted the two jack-o-lanterns and already I'm getting a positive response and re-creations!  Thank you all for sharing those tutorials!  The others will be up randomly throughout the next two weeks!

I can't wait to re-create some of these designs on my own canvases, and hope to see some on yours!  As I said, I've already seen some re-creations, and I'm really loving it!  Please continue to share your designs either on Facebook, Instagram, or Twitter.  There still is that #tlcinspired hashtag on Instagram you can use also!

Until next time, <3.

Halloween

Jack O'Lantern Nail Art Tutorial = Times Two!

9:00:00 AM


Good morning polished world!  As promised, I created tutorials for designs that I did on my Halloween Nail Art Wheel.  While the wheel won't be up on the blog until tomorrow or Friday, yesterday I shared a cute jack o'lantern design which is one I created a tutorial for while painting the wheel! 

Since it was posted yesterday, it's only fair to share the tutorial, right?  Bonus; not only am I sharing the tutorial for yesterday's design, but for another jack o'lantern creation so you can pick which you want on your own Little Canvas'! 

Let's take a look first at the design I shared yesterday!


  1. Start off with a base coat of grey polish.  If you don't like grey, this design would look awesome on a nude base, or even a purple one!  I bet you could even do it on a naked nail also!
  2. With any orange polish, use the brush to create the pumpkin.  I did the same technique I would to get a cloud design.
  3. OPTIONAL STEP:  When the orange is dry, take a darker orange and draw lines down the pumpkin using a nail art brush.  This is optional because it will look just as cute without it!
  4. With a nail art brush and a green polish, draw a little stem.  You can also do this with a small dotting tool.
  5. With a nail art brush and black polish or acrylics, add the face.  You can do any fun or spooky face you little heart desires.
  6. With a nail art brush and the same blacks, outline the pumpkin.
Make sure to let it all dry for a few minutes and don't forget a top coat!

Now for the second tutorial!


  1. Start off with a base coat of orange polish
  2. OPTIONAL STEP: With a nail art brush and darker orange polish, draw lines down the nail.
  3. With a nail art brush and black polish or acrylics, draw a spooky or silly face!
  4. With a nail art brush or dotting tool, add green polish to the top of the nail for the stem.
Let the design dry for five minutes, then add the top coat!

Which design do you prefer!?  Do you think you will try either of these designs!?

If you re-create these designs, please share them with me on Twitter, Instagram, or Facebook!  I love seeing your re-creations!  They truly make my day!  You all are so incredibly talented!

Can't wait to share the wheel with you soon!  Until next time, <3.

Halloween

Twinsie Tuesday: I Keep Meaning To.....USE GLITTER!

9:00:00 AM


Happy Tuesday polished world!  How are you all today?  I'm doing well!  Today I will be photographing my final Halloween Nail Art wheel and hopefully have it on the blog Thursday or Friday!  I'm so excited to share it with you!  Until then, I do have a Twinsie Tuesday Halloween manicure to share with you all.  It is a design that is included on the nail art wheel, which...BONUS, there is a tutorial for!  That tutorial will be posted tomorrow ....maybe along with another.....

For Twinsie Tuesday we are sharing manicures which we keep meaning to do.  Most of the time, I'm really good with doing manicures as soon as I see them.  Posting them is a different story.  I debated on posting a manicure that I keep meaning to share with you, but I thought that would be boring.  Plus, after finishing the Halloween wheel and tutorials, I wanted to share a Halloween manicure.

Then it hit me.  I keep meaning to use more glitter in my manicures.  I have a whole drawer of glitter polishes which I continually forget exist.  They would be great for accent nails, but typically I tend to stick to just my beloved In True Stefani Fashion and call it a night.  So I went digging in the drawer and found a Halloween glitter from China Glaze which I keep meaning to take out and use this season, and I decided it was time to pair it with my nail art.

Let's take a look!


Colors Used:
  • Sinful Colors - Cool Grey
  • Maybelline - Sweet Clemintine
  • Zoya - Thandie
  • Zoya - Tilda
  • China Glaze - Glitter Goblin
No cheats today on how to get the look!  That will come tomorrow!  Today you get to hear me rave about how gorgeous Glitter Goblin is and how happy I am to have it in my collection.  It's a pretty bronze, orange glitter with holo flecks that is perfect for Fall, Halloween, and even Thanksgiving.  I only did one coat over the grey Sinful polish and had amazing coverage.  The glitter payoff is fantastic.  I wish you could see the holo sparkle!


I love how the glitter frames the pumpkins.  I really need to continue using glitter!  If it weren't for this prompt, I never would have pulled out Glitter Goblin this year, and I would have had these pumpkins on all ten of my nails.  I love the framed look!

What do you think?  Fan of Glitter Goblin?

Don't forget to check out the other Twinsie's manicures!


Amanda at Amandalandish
Amber at Nails Like Lace
UntilAnna at Going to the Showing
Bridget at A Painted Nail
Chelsea at Nailed Blog
Cordia at Seriously Swatched
Elizabeth at Did My Nails
Jessica at Blue Velvet Lacquer
Kelly at Tuxarina
Lakeisha at Refined and Polished
​Marisa at Polish Obsession
Róisín at Cuti-CLUE-les
Stephanie at A Little Polish
Tiffany at Polished To Precision

Until next time, <3.

Bestie Twin Nails

Bestie Twin Nails with Fashion Footing!

9:00:00 AM


Good morning polished world!  How are you all today?  I'm doing fabulously!  The Halloween nail art wheel is near completion!  Just one more nail to complete.  I believe I have completed six tutorials, so keep an eye out for those coming soon!  I'm hoping to have the wheel on the blog by Thursday or Friday! Maybe I'll sneak in a tutorial before the wheel is posted....we shall see.

Today I'm posing another edition of Bestie Twin Nails with Amanda from Fashion Footing!  This is round six, or five?  Honestly, I cannot remember!  I'm just happy she's still wanting to do nail art each month with me!

This month we wanted to do something Fall themed.  We settled on this tree manicure which I found on Google.  I cannot find who the original artist is, so if it's yours, thank you for the inspiration!  Mine turned out looking more like a Halloween manicure instead of a Fall one.  Regardless, I still like it!

Let's take a look!


Colors Used:
  • OPI - My Boyfriend Scales Walls
  • NYC New York Color - Copabanana
  • Zoya - Thandie
  • NYC New York Color - Carnival Red
  • Orly Instant Artist - Jet Black
Such a neat manicure!  To get the look, I started off with a base of MBSW.  When that was dried, I took a make up sponge and sponged on the yellow of the tree.  Then I did the same thing with the orange, then red, then went over it one more time with the yellow to blend it in.  

When that was dried, I used my Orly Instant Artist striper and added the trees.  The trees were a major pain in the butt, and I'm not happy with how some of them turned out.  My OCD didn't like the branches on the ring finger's tree waws thicker than any of the other trees.  Then the pinkie finger had that random top branch that was weirdly thick.  As Amanda said to me when I was telling her how I didn't like some of the branches "Nature isn't perfect." 


I did attempt this design last year and hated it so much that I took it off within five seconds.  Compared to what I remember, this is a million times better.  I think I need to start photographing my fails so when I try them again later on I can compare and see how my skills have developed.  I have for sure come a long way since the blog started.

What do you think?  Like the design?  Think it looks more Halloween than Fall?

Don't forget to check out Amanda's manicure!

Until next time, <3.

INM

The Beauty Buffs: Neutural - Fall Tribal Nail Art

8:00:00 AM


Happy Wednesday!  How are you all today?  I'm backing posting with The Beauty Buffs today!  I'm sorry that I skipped out two weeks ago, but life was a little crazy!  I'm very happy to be back though!

This week we are posting all about neutrals.  I'm not a huge fan of neutrals.  From my nails to my clothes, I'm always wearing something bright and colorful.  I need to have my teals, purples, and pinks.  So when I saw today's theme, I really wasn't sure what to do.

Luckily, the season itself inspired me.  I've always considered Fall colors to be very neutral and toned down in comparison to Spring and Summer.  For me, anything goes in Winter, so that means it's a very bright season as well.

So I started looking up different Fall designs and I found some cute tribal designs.  From there, I started to research Fall Tribal Nail Art and I stumbled upon a lovely design by Demelza's Nails.  I fell in love with it because it was a design created on a neutral base using some more toned down colors.  It was perfect for me because I could do a neutral design while adding the splash of color I needed!

Let's take a look!


Colors Used:
  • INM - Exposed
  • Zoya - Odette
  • Orly - Gumdrop
  • NYC - New York Color - Sweet Melon
  • Black Acrylic
Cute, right?  I am in love with INM Exposed.  It is a new polish from the company and it is the perfect neutral polish.  I should have taken a swatch shot of it because it really is gorgeous.  It applies perfectly in two coats.  A perfect neutral polish such as Exposed really makes me want to try more neutral designs.

The colors that went with this manicure I believe were perfect to keep the design neutral while adding a little bit of umph.  They weren't too bright and weren't too dark.  Odette by Zoya is an awesome polish.  Such a pretty dark mauve....is that what we would consider it?  That's what I would...


After I did this manicure, I really realized that neutral doesn't always have to be boring.  I think I might have to try more looks like this in the future.

What do you think?  Liking the look?  Still passable as a neutral design?

Don't forget to check out the other posts by The Beauty Buffs!


An InLinkz Link-up

Until next time, <3.

Halloween

Twinsie Tuesday: Polish Roulette

9:00:00 AM


Happy Tuesday everyone!  Hope you all are having a great start to your week!  I have been a busy little bee working on my Halloween Nail Art Wheel and some tutorials for you all!  So far, 8 our of 18 nails are complete on the wheel, and 4 of them will have a tutorial!  I'm hoping to get the wheel up by the end of this week with tutorials all intermingled in between!  I still have to plan out how I want to schedule it all....but that's not a discussion for this post!

Today is Twinsie Tuesday and we are doing Polish Roulette.  This is where we blindly pick two or more polishes and try to get them to work together in a manicure.  Now, my Melmer is color coded so it would have been near to impossible for me to blindly put my hand in a drawer and pick two random colors.  I would have purposely picked the blue and purple drawer and made this easy for me.

So in order to make it not so easy, I picked one of my favorite colors from each drawer.  The colors I selected from were Zoya Livingston, Zoya Thandie, Zoya Darcy, Zoya Tilda, INM Bridgette, INM Brighella, Orly Oh Cabana Boy, Zoya Louise, Orly Liquid Vinyl, OPI My Boyfriend Scales Walls, OPI This Crown Needs a Gown, OPI Love Angel Music Baby, and I threw a glitter in there of Sally Hansen Black Tie Optional.  I laid out all the polishes, closed my eyes, shuffled them around blindly, then picked.

I ended up picking Zoya Thandie, an orange, Zoya Tilda, a green, and INM Brighella, a purple.  Ew, what was I going to do with those colors.  Why oh why couldn't I have picked My Boyfriend Scales Walls alongside a blue and a purple, whyyyy?!  So I sat and glared at the colors and then noticed on my nail art wheel (which you'll see soon) I had a purple, green, and orange nail painted next to each other!  DUH these are perfect Halloween colors!  Thank goodness for my wheel because I never would have figured that out.

I Googled Halloween Nail Art ideas and came across The Nailasaurus' Halloween Patchwork Manicure! and had to try it.  I also remembered that the lovely Casey Lane re-created this look last year.  So I decided to give it a try.

Let's take a look!


Colors Used:
  • Zoya - Thandie
  • Zoya - Tilda
  • INM - Brighella
  • Black Acrylic
Perfect manicure for Halloween!  I'm liking this roulette thing.  It made me try a manicure I never would have remembered existed or ever tried!  And now I have a spot filled on my nail art wheel!!  Who needs to see three ghosts anyways?

To get the look, I started off with a base coat of Thandie.  Love this orange, it's not too bright and it is not too dark.  Full coverage in two lovely coats.  Once Thandie was dry, I followed Sammy's tutorial and taped off my nail and added the green.  let them dry a little more, then added more tape then the purple.  I then went through with my nail art brush and acrylic and added the stitches.

It was a slightly time consuming manicure due to the dry times.  If I didn't have to wait and just freehanded the color blocks, it would have taken a lot less.  I wanted to do the tape though because I wanted my blocks to be super crisp, which I think they are.


Is it cheating in polish roulette to use a black acrylic paint?  Maybe it is, but it made the colors work and that was the rule.....right?

What do you think?  Liking this manicure?  

Don't forget to check out the other Twinsie's posts!!!


Amanda at Amandalandish
Amber at Nails Like Lace
UntilAnna at Going to the Showing
Bridget at A Painted Nail
Chelsea at Nailed Blog
Cordia at Seriously Swatched
Elizabeth at Did My Nails
Jessica at Blue Velvet Lacquer
Kelly at Tuxarina
Lakeisha at Refined and Polished
​Marisa at Polish Obsession
Róisín at Cuti-CLUE-les
Stephanie at A Little Polish
Tiffany at Polished To Precision
Traci at Drinkcitra

This post turned out to be super long!  Goodness gracious!

Until next time, <3.