Fun and Random

Lightning Bolt Nail Art

3:45:00 PM

Hello polished peeps!  Hope you are all doing well today!  This post is a bit delayed, I know I had promised it yesterday, but I got really busy with some school work.  I'm pretty much the Queen of Procrastination, it's quite bad.  Let's take last night for example.  It was about 11pm, I was supposed to be working on my paper, but instead I was Googling the average length of a hug while talking with Amanda from Fashion Footing about hugging Ryan Lochte.  Clearly, my priorities are in order.

Instead of editing the pictures last night and posting, I decided I should ignore the blog and do my paper.  Good news, paper is submitted and I'm able to blog again!  Which I know one person who is thrilled with that.  That is Miss Gabi (@RubyStein79), my official mani inspector.  I did not let her inspect this manicure, as I did it for her birthday which was Friday.

Gabi loves storms, I hate them, with a passion.  They freak me out and I act like a two year old.  When I saw this nail art idea tutorial, my fear subsided and I had to paint lightning bolts on my nails!  A few months ago, I did do some storm nails, but they definitely were not as cool as these.  As soon as I showed the mani inspector the tutorial, she was hooked and couldn't wait for me to try them!

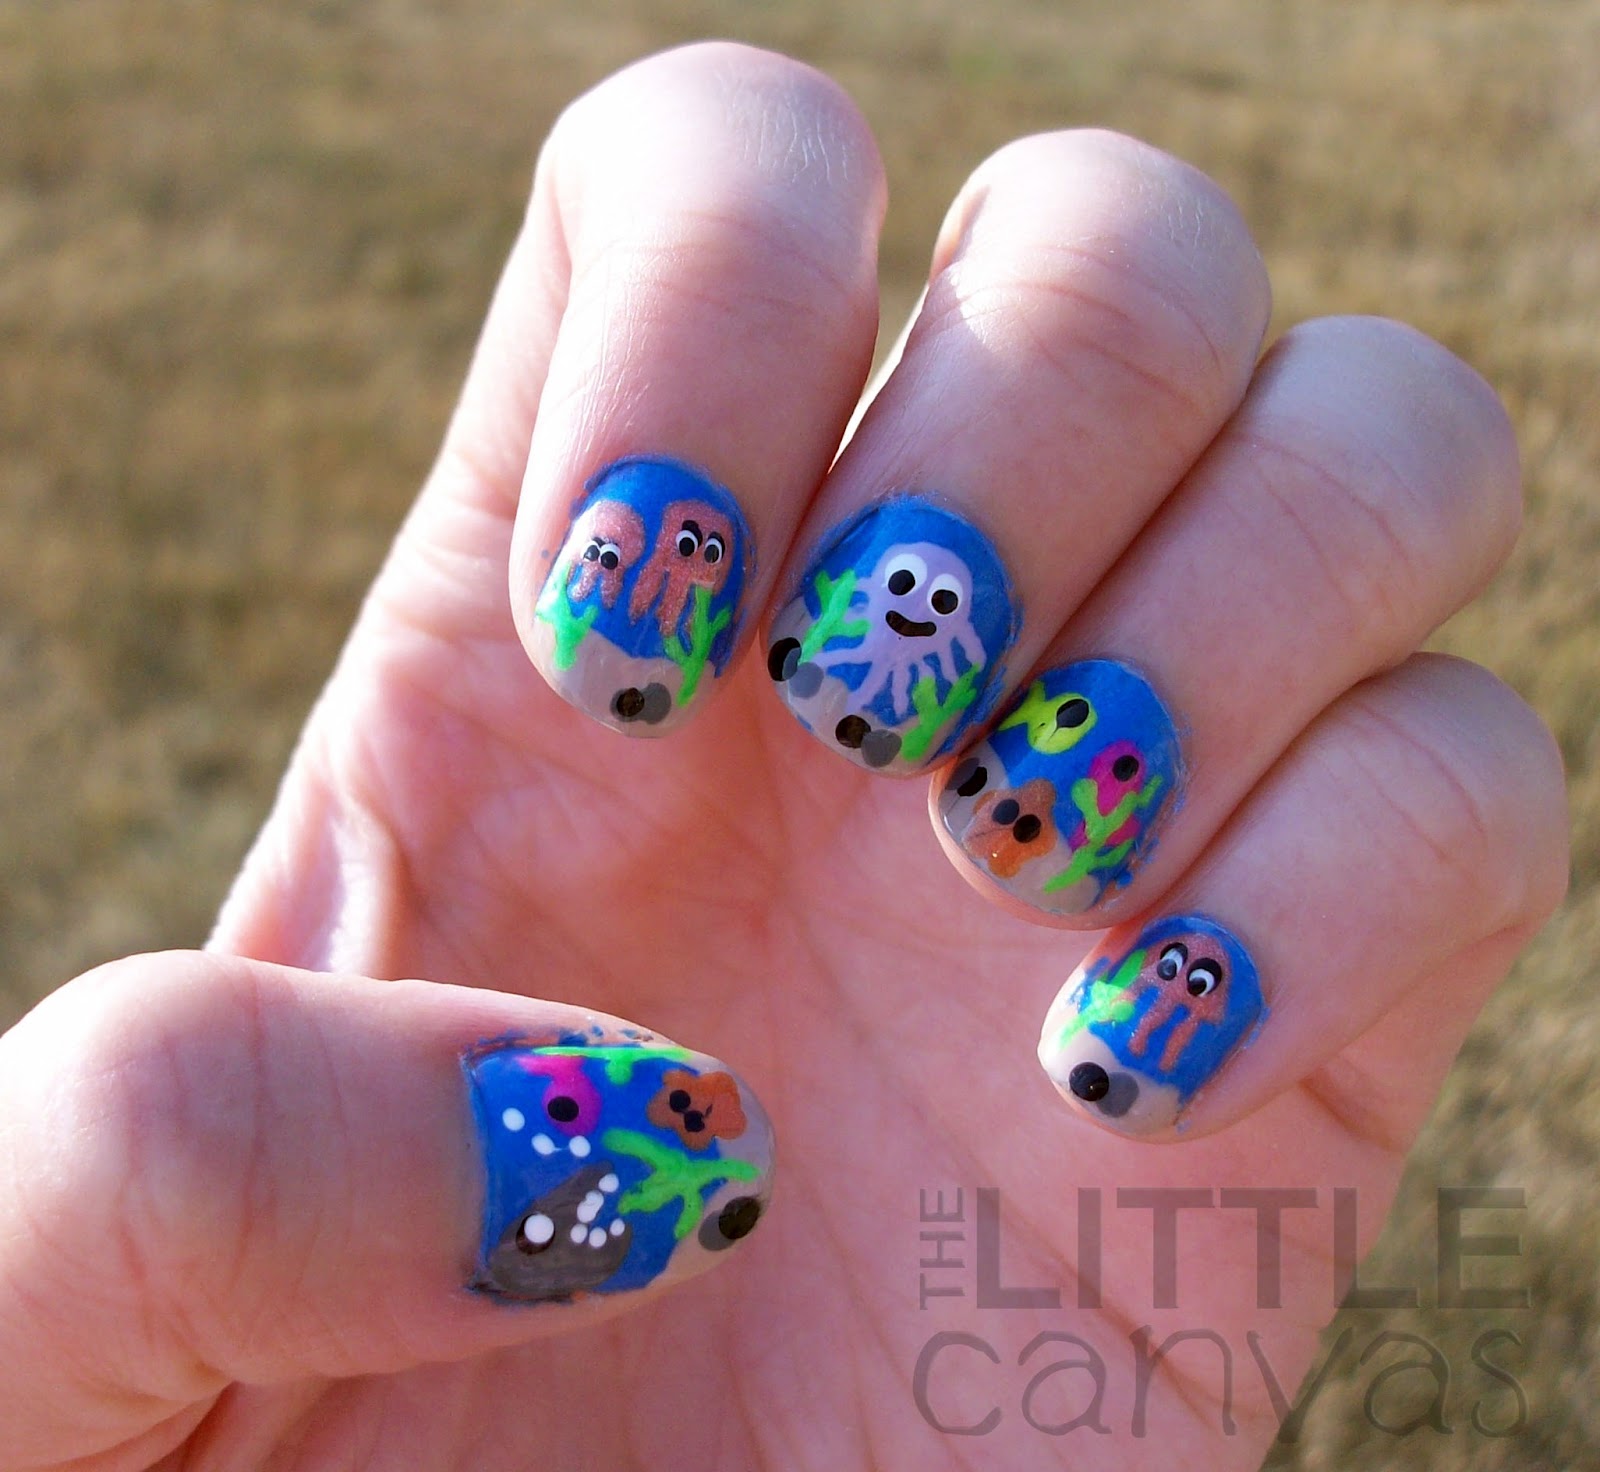
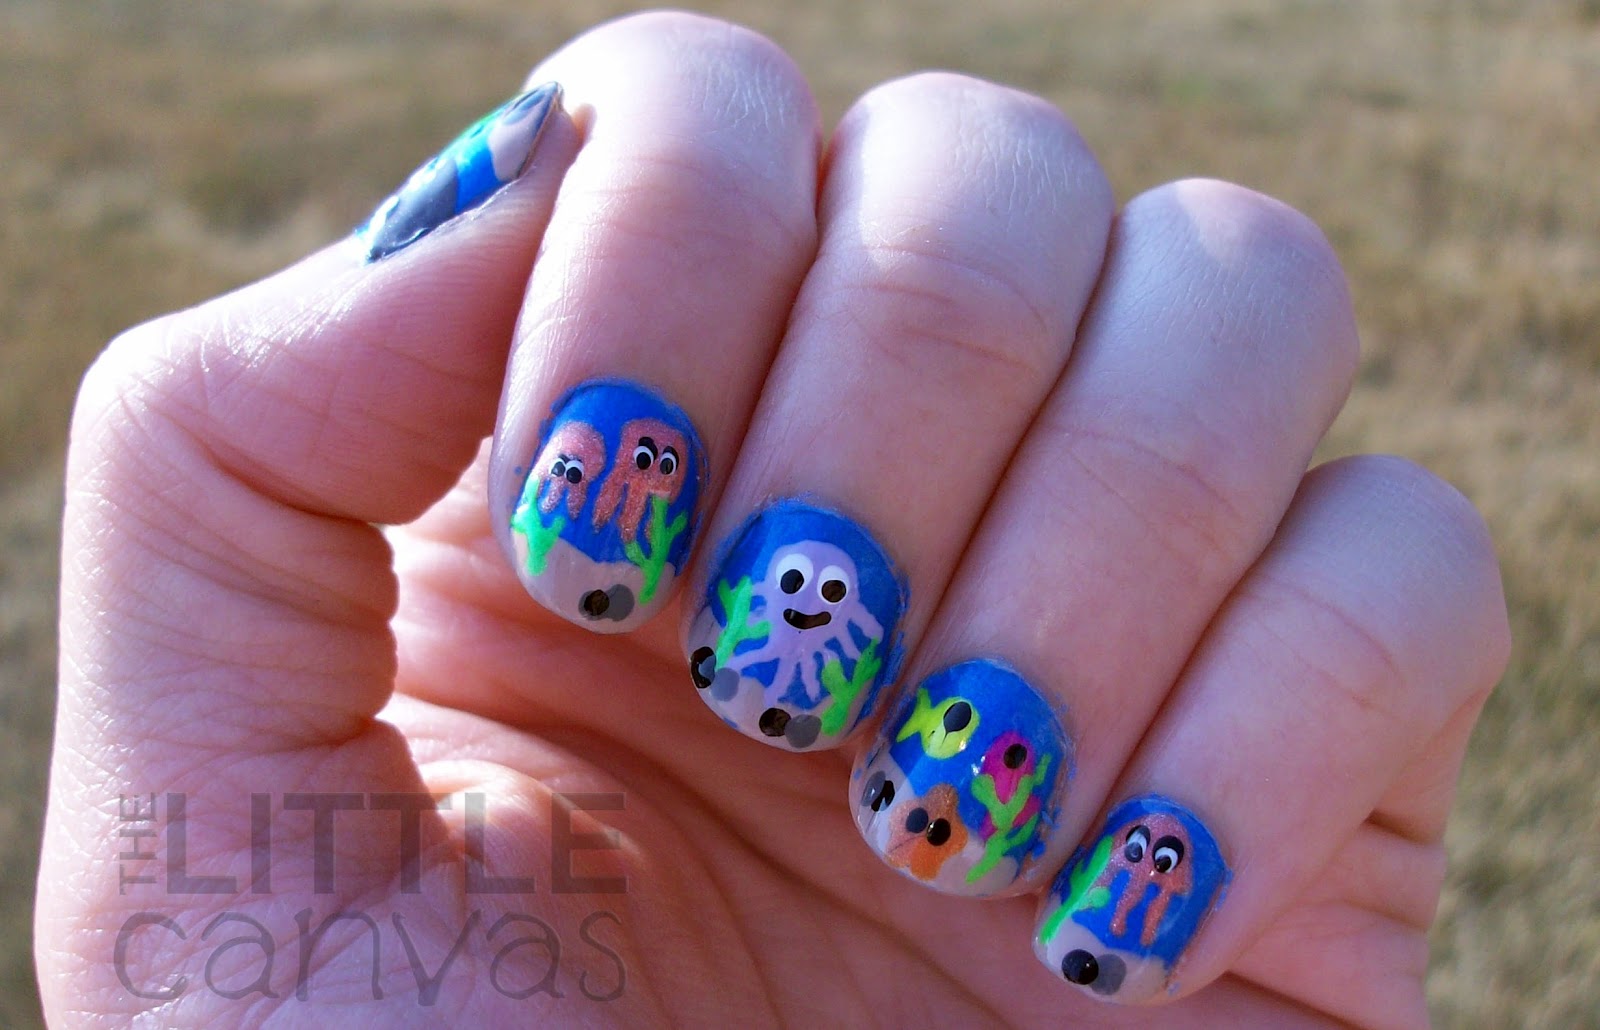
Here's how they turned out!


Colors Used:
  • Base
    • Sinful Colors - Black on Black
  • Bolt
    •  Sinful Colors - Snow Me White
  •  Sponged Cloudy Light Stuff (I don't really know what you call the glow that comes from lightning)
    • Sally Hansen - Blue Me Away!
    • Funky Fingers - Factory Girl (I don't know the actual name lol)
    • Maybelline - Beach Plum
Pretty neat, huh?  This was one of those manicures I could NOT stop staring at when on my nails.  I was kind of hesitant about having black nails in the summer, since I'm all for neons and bright, but boy were these amazing.  They just stuck out.

I followed the tutorial the best I could, picture tutorials are always kind of hard.  I started by painting on my base coat of black polish.  From there, I sponged Blue Me Away! on my nails in the areas where I was going to draw the actual bolt.  When that was dried, I added some of the Beach Plum.  With a toothpick, I drew on the bolts over the areas where I sponged the color.  When the bolts were dry, I took Factory Girl and sponged over the bolt, followed by just a tad more Blue Me Away! and Beach Plum in the center.  Added a top coat, and was done.

I hated them at first, like beyond hated them.  The sponging looked awful and they just didn't pop.  When I added the Out the Door Top Coat, all the colors blended together, and that's why I fell in love.  It added a shine and made the sponging not look so harsh I guess you could say.  If you ever do attempt these, make sure you add a coat of top coat, otherwise, blech.

What do you think?? Cool?? You want to try them!??! If you do, I want to see!  Post pictures to my Facebook page anytime or Tweet me

Hope you all enjoyed, especially Miss Gabi!!!!  Have a great day everyone!!

Quick Post

11:28:00 AM

Everyone should head on over to Twitter and wish the awesome Gabi (@RubyStein79) a Happy Birthday!!!

If you do not know Gabi, she is my official mani inspector, and also featured her nails in this post!  My post tomorrow will feature a manicure which I did for her birthday since it was one of her favorite designs on my "Nail Ideas" board over at Pinterest!  So stay tuned for that!

Until tomorrow, Happy Birthday, Gabi!!!

Guest Post

nAil Art Guest Post by Polish Pixelle

6:00:00 PM


Hi ho cherry-o! Ave from Polish Pixelle here with the first of hopefully many guest posts in a series we are calling nAil Art.

For this month we chose the theme of bugs - I had initially planned on doing ladybug nails but at the last minutes decided to go with bees instead. Alaina knew from the beginning that she would be doing bee nails so I suppose the theme kinda just turned into... well, bees.

For my sky background I chose to use Avon 'Vintage Blue' which I just picked up from a flea market (random, I know) this past weekend. A perfect sky blue!


My weapons of choice:


- OPI 'Osaka-To-Me Orange' for sun accent/rays
- Julep 'Blake' for sun and bee stripes
- Sally Hansen Xtreme 'Black Out' for bee and bee trail
- Avon 'Vintage Blue' for the base/background


I have been dying to do a dotted trail bug mani for a while now - I see these often and always think they are so adorable. A really quick and easy way to have some fun nail art!


Unfortunately about a week ago one of my nails split horribly and I had to cut my nails down to nubbins. I had originally intended to do some more designs (I wanted to add 'BzzZZzzz...' somewhere!) but didn't have enough room on my pathetic nubs. So if I could change anything I wish I had been able to add that in!

I'm extremely pleased with how this came out - super fun and easy, and excellent for summer!


Don't forget to check out Alaina's version of bee nails over at my blog. If you have any suggestions for themes for our guest post series, please let us know in the comments section!

Love,

The Sinful Colors Debacle

12:52:00 AM

As I am sure most of you know in the nail polish blog-o-sphere, Sinful Colors stole bloggers photos, removed watermarks, and falsely distributed them in pamphlets in Walgreens.  For more information, you can click this link.

I have debating all day on if I should say something or not regarding the situation, as majority of my stash is Sinful Colors and I use them for practically every manicure.  After reading other blog posts, creating a guest post, and thinking about it, I thought I should say something quick.

My opinion: Sinful Colors was wrong.  They should not have taken bloggers photos without permission or removed watermarks.  They also should not have created a pamphlet, which falsely demonstrated a technique.  I believe that this situation is going to be best handled by Revlon (who owns Sinful, which I totally didn't know until tonight), and the individual bloggers who were affected by the situation.  I do pray that they do the right thing.

Cliff Notes (even though this post is rather short lol): I do not favor what Sinful has done.

Have a good night everyone!

Guest Post

Are You Ready?

10:23:00 PM

Tomorrow, my lovely friend Ave, from Polish Pixelle, and I will be kicking off our Guest Post Series!!!  Each month, Ave and I will be posting to one another's blog with some lovely nail art!


I'm loving this series mainly because it forces Ave, the Queen of the Indies (notice her Nerd Lacquer nail wheel in the graphic), to do nail art.  Okay, that's not the main reason, but I had to say it was.

What I really love about Guest Posts is the fact that they exist and they occur!  Back in February when I started The Little Canvas, I never knew a "Guest Post" was a thing.  Through the awesome connections I have made through blogging, I have been able to share my designs on other blogs, as well as have some people share on mine!  It's a world of nail networking, which I am happy to be a part of.

So, I hope you all enjoy the series!  Stay tuned for Ave's post tomorrow on here, and mine over at Polish Pixelle! :)

A Pinterest Manicure

3:03:00 PM

Hello lovelies!  How are you today???  After my hardcore Under the Sea Nail Art, I had to take a little break and take it easy.  I know, I know, how boring.  I just didn't want to spend another hour and  a half on a manicure.

I needed something simple, but not too simple, since I'm sure some of you recall, I stink at simple manicures. Okay, maybe I do not stink at them, but I just feel like I do.  Something always goes wrong.  For example, they're bumpy and diseased or they turn into disasticure.

In order to avoid a disasticure, I started searching pinterest for a simple idea.  I came across this pin which I thought was simple enough.  I got a new gold polish I was dying to try, and I've been addicted to my neons, so I thought why not.  Grabbed my bottle of Hang Ten Toes, Snow Me White, Black on Black, and Golden-I, and got to painting.

Of course, the middle finger was a disasticure, so I opted for polka dots instead....


Colors Used:
  • Sally Hansen - Golden I
  • Sinful Colors - Snow Me White
  • Sinful Colors - Black on Black
  • China Glaze - Hang Ten Toes
  • New York Color - White Lights Glitter
I am really happy I added the glitter to the pink nails.  I think that really made them pop.  The gold polish is just gorgeous.  It is literally the gold  version of Celeb City which is my favorite silver polish.  If you have Celeb City, then you need to go out and find Golden-I to complete your metallic silver/gold fix.

I am really, really happy with how my dotting turned out.  I have stated it in the past that my dotting tool skills are not 100%.  Sometimes they turn out crooked or not a perfect circle, but this time, they ended up being almost perfect!  I think it was because my black polish is getting a tad thick, so it's easier to work with on the dotting tool.

Despite the fact I was happy with the individual nails, I just wasn't happy with them all together.  I liked it, but it just wasn't something I was jumping for joy over.  I will try it again with some tape and the zig zagged pattern.

Do you like it?  Have you ever had a manicure which you loved the individual nails but when they're together you're just meh?

I know, I know, I stink at posting

12:09:00 AM

Yes, I fail at posting.  I wrote up a post earlier today (well now it's yesterday since it's midnight here) and then just never got around to fully editing it and posting.  I've had a headache all day thanks to this lovely hot cold weather we're having, so my mind just was not in it.  Seriously, it was 98 and humid here two days ago, and today it was 78 with no humidity.  My sinuses are AWFUL.

I will be posting either Saturday or Sunday with a simple manicure, then will be back at it with my every three day posting.  I hope...lol.  No I will not be leaving you hanging out to dry, I will be posting.  The every 2 day thing though was getting crazy and I used up a lot of my pre-published posts, so right now I'm kind of behind.  Do not fear though, I have a lot of ideas stashed away and I will not stop painting and sharing anytime soon.  I just hit a lil speed bump lol.

While I am writing this quick post, I would like to add that my thoughts and prayers go out to the victims and families of the awful tragedy in Colorado.  Such an awful thing to happen to innocent people sitting and enjoying a midnight screening of a movie.  I pray that peace will be brought to the Aurora community and those affected.  I hope the families find comfort in knowing that their loved ones are in a much better place. <3

Until next time, have a great night.  Oh, and Hi to my new followers!!! This week I hit 200 followers on Twitter and I'm now over 70 followers on here!  It's amazing to me, and I never thought I'd get 3 followers when I started this thing!!!  I'm still a baby blog, but who knows what will happen in the next few months!!!  Thanks again!!!  :)

Fun and Random

Under the Sea Nail Art

9:00:00 AM

I have done it again, I have returned to the world of crazy nail art.  The last time I did something so intricate, it was before the great injury when I did my Gnome Nail Art.  Life got a little hectic, and I didn't have the time to sit down and actually do something extreme I guess you would say.

I found this idea a long time ago on Pinterest.  I re-pinned it immediately and was all excited because finally my collection was big enough and I had all the colors.  With the addition of Splish, Splash from the China Glaze Summer Neon collection, the blue for the water was even more perfect.

So I sat down, grabbed all the colors I needed, which ended up being 10 bottles, and I got to painting.


Colors Used:
  • Base
    • China Glaze - Splish, Splash
  • Sand Tips
    • Zoya - Avery
  • Jelly Fish
    • Sinful Colors - Luminary
  • Octopus
    • Revlon - Charming
  • Fishies
    • China Glaze - Sun Kissed
    • China Glaze - Hang Ten Toes
  • Shark
    • Pure Ice - Kiss Me Here
  • Seaweed
    • China Glaze - I'm With the Lifeguard
  • Details
    • Sinful Colors - Snow Me White
    • Sinful Colors - Black on Black
    • Pure Ice - Kiss Me Here
  • Top Coat
    • Out the Door
Crazy right?  You all probably thought I was lying when I said ten bottles, but I was dead serious.  

I started with the base of Splish, Splash.  When that was dry, I french tipped on some Zoya Avery using the polish brush.  I purposely didn't do them evenly because sand on the ocean floor isn't even.  All the designs were drawn on with tooth picks, except for the lil starfish on the thumb and ring finger.  For those guys, I used my dotting tool.  Added some little rocks and the seaweed, put on a top coat, and was done.  All together the design took an hour and a half.

I forgot how relaxing doing this nail art can be.  It gives me the time to sit, relax, and concentrate on one thing, while at the same time forgetting about all the other little issues that might be occurring.  Then in the end, I get a cute design which I cannot stop staring at and get a bunch of compliments on.  Win, win situation.

Have you ever done any nail art like this?  Have you ever used more than 5 bottles of polish for one manicure?

Foodie Mani

Blueberry Nail Art

9:00:00 AM

Thank you to the wonderful Nicole from Polish Me, Please! for the awesome Peacocks on Crack Guest Post!!!!  So bright and neony, I was in love.  If you didn't know, I have given Nicole the title of Stamping Queen, and with that guest post, she did not disappoint.  Check it out if you already haven't!


_______________________________________________

This is not a neon manicure.  Shocker, right?  I had to take a break from my neons and have a more conservative, toned down design for my one job.  I doubt they would care if I had neon nails, but they just would not go with my cute dresses.  Well that's kind of a lie to, neon would look amazing with a black dress and the right flats.

Anyways, I took to pinterest and started searching for ideas.  Something simple and plain.  I didn't want a plain swatch of color and as usual I needed nail art.  I remembered a video I saw on CutePolish which were beyond adorable and I wanted to copy.  At the time the video was published, I had new polishes and a list of ideas, so I really wasn't wanting to do them right away.  I'm glad I waited because they are perfect for work.  Well, as perfect as any form of nail art will be.

My camera has not been cooperating with me lately, so this post only contains two photos.  For the life of me I could not get my other angles to look decent.  They either were washed out or too dark, and I couldn't even properly fix them with Photoshop.  I need to figure this camera situation out ASAP.


Colors Used:
  • Base
    • Sinful Colors - Snow Me White
  • Leaves
    • Sinful Colors - HD Nails
  • Blueberries
    • Sinful Colors - Midnight Blue
    • Sally Hansen Xtreme Wear - Blue Me Away!
    • Color Club - Factory Girl (aka my mystery blue polish)
I'm not going to lie, I was rather nervous when painting these on.  My dotting tool skills aren't always 100%. Sometimes the dots are not perfectly circular, I can't get the polish to lay right, or the dots just are too close together and are million different size.  I don't know, in the end, dotting tool manicures always end in a disasticure.

If you didn't watch the video or do not have time to, I will quickly explain what how CutePolish created this design.  First, you paint on the coat of white.  Once dried, with a striper, create random lines to represent the leaves/branches.  With a dark blue polish, dot on your first blueberry.   Then with the lighter blue polish, add another, and another with your next lighter blue.  With the lightest blue polish, add a dot close to the edge of the two darker blue polishes.  Then with the original color, add one more dot.  Once complete, add a few more lil leaves around the blueberries, finish with a top coat, and you're done!

A bit time consuming but totally worth it.  They look so classic, almost vintage to me.

How are you with dotting tools?  Any dotting tool tips?  I find practice makes somewhat perfect.

Thanks to Gina from Polish Nation for my new watermark I'm trying out! Let me know what you think of it!!!

Guest Post

Peacocks On Crack (Guest Post by Nicole from Polish Me, Please!)

9:00:00 AM

Hey There Polished People, it's Nicole from Polish Me, Please! :)

First off, let me tell you that I'm super-hyped to be doing a guest post for Alaina. She is one of my favorite nail polish friends and we are always giving each other a hard time (playfully of course) about something. You may remember my name from her "crazy gnome lady" post a little while back.... yup! That's ME! ;) I could go on about how she's scared of her own cuticles (which you probably already know) or how she's a closet gnome lover, OR how she enjoys a good red neck drive in once in a while, but instead I think I'll just get to the nails. ;)

Being the "stamping queen" and all, I knew I had to do some stamped nails. :) The colors for these were inspired by Gabi, our resident mani inspector. I showed her the nails I was going to do for the guest post (you can see them here and here) and asked her to pick one of the two. Well, she was like, "Nope, not bright enough!!" and suggested neon peacock colors. So naturally, when I hear a good idea I go with it and that is how the Peacocks on Crack nails were born. :D Have a peek and let me know what you think!

Peacocks on Crack Nails


How To Get These Nails

  1. Apply base coat. I use SH Hard As Nails.
  2. Paint your nails with your favorite white polish, I like my old, thickened up OPI Alpine Snow. You want to paint your nails white first to make sure your neon nails pop ;)
  3. Apply 2-3 coats of ChG I'm With The Lifeguard.
  4. Apply 1 coat of Seche Vite, allow your nails to dry thoroughly. If you're not confident in your stamping ability, double up on the top coat here. That way, if you mess up on the stamp you can use a saturated cotton ball and lightly swipe it over your nail, removing the stamp but leaving your base color. This is soooo much better than having to start from scratch! Trust. Me.
  5. When your nails are totally dry and hard, use SH Brisk Blue and stamping plate BM212 to stamp the peacock feather-ish design on your nails.
  6. Use a toothpick or a dotting tool and OPI Alpine Snow to dot a tiny white circle in the middle of each of the shapes that make up the design.
  7. When you're done with the white dots, repeat step number 6 but instead of white, dot Color Club Mrs. Robinson (neon magenta) over the white dots. Make sure you cover all the white. 
  8. Give the dots plenty of time to dry and then top coat those bad boys. ;) 
  9. Impress your friends ;)
 One thing I have to tell you is that these nails were BRIGHT!!! Holy moly people, these were like retina-searing, catch-everyone's-attention-and-get-arrested-by-the-TSA-for-distracting-pilots-on-international-flights bright!! The pictures don't quite do them justice. I wore these nails for 3 days and got tons of compliments. Everyone loved them. And- I hope you do, too!!

Are these nails too bright for you? Are you on the neon color bandwagon or are you more of a classic color lover? Let me know what you think about these nails in the comments below! :D Feel free to check out my blog, Polish Me, Please! for more fun nails. ;) Thank you everyone for reading, and till next time- Happy Polishing!! :D

Animal Print

More Neon, More Leopard

9:00:00 AM


Did I not say I was obsessed with neon?  If you missed it, then I shall say it again...I AM OBSESSED WITH NEON!  I seriously cannot get enough of these polishes.  I keep painting and painting and painting and using them up.

The great thing about them though is that a little goes a long way. Seriously, these China Glaze bottles look like I've never used them. Each of them I have applied two coats and had full coverage. For this manicure though, I used three coats. I really wanted them to pop and to catch people's attention. And boy did they, I received so many compliments on them that I'm going to do them again.

When I sat down to do this manicure, I knew I had to use I'm With the Lifeguard. It was my only un-tried from my recent neon splurge. I didn't want to have all green nails, and after seeing how Hana had her nails accented on Pretty Little Liars, I decided to copy the accenting. I grabbed Hang Ten Toes, and got to painting.


Colors Used:

  • Base
    • China Glaze - Hang Ten Toes
    • China Glaze - I'm With the Lifeguard
  • Leopard Spots
    • Sinful Colors - Black on Black
    • Sinful Colors - Snow Me White
  • Top Coat
    • Out the Door
Love.  Literally, that's all I can say about this manicure.  I was in love with the plain colors, but you know me, I have to add some form of nail art.  I wasn't sure what to do, until I saw the manicure my friend Tianne did.  Remember Tianne, the girl who did the awesome Galaxy Nails guest post?  She had partial leopard tips, I guess you would call it.  Since I didn't want to do another full leopard manicure, this was perfect!

I originally painted on the leopard print only on the two pink accented nails, but I was bored with the green nails having no art.  I attempted to paint a zebra tip.  I wasn't too fond of the result. (warning, horrid webcam shot)


The zebra print looked more like sticks.  I was semi happy, just not 100% happy.  I took off the two green nails and painted on the leopard print starting from the cuticle down.  And well, you know how happy I was with that.  Leopard spots are easy to do, just dot on some white polish (or whatever color you want as the spot) and outline it with the black polish using a tooth pick.  Then fill in the empty spaces with some more black spots.

The leopard just seems to pop and stand out more on the neon than the black zebra lines do.  Maybe I'll attempt it again in the near future, but who knows.

Which did you like better?  Do you like the zebra?  Think it would look better as a full zebra print and not just a few lines?

China Glaze

Fruit Stripes

10:34:00 AM

Sorry for the lack of posts...I've been MIA since July 5th!  I got a bit busy and my camera has been on the fritz, but here I am!

My neon obsession continues.  I said it before, and I'll say it again, my China Glaze Summer Neons were my BEST purchase.  Splish, Splash, I'm With the Lifeguard, Sun Kissed, and Hang Ten Toes are my current favorites in my collection.  Ever since I purchased them, every manicure has had used at least one or more of the polishes, and this is no exception.

Neons and animal prints always seem to go, so why not do a zebra print?


Colors Used:

  • Base 
    • Sinful Colors - Snow Me White
  • Neon Stripes
    • China Glaze - Sun Kissed
    • China Glaze - Hang Ten Toes
    • China Glaze - Splish, Splash
    • China Glaze - I'm With the Lifeguard
  • Top Coat
    • Out the Door
When coming up with this manicure, I wasn't sure if I should do neon nails with a black stripe or white nails with colored stripes.  As I sit here writing this post, for the life of me I cannot remember who it was who said doing white base with colored stripes would look like the Zebra from Fruit Stripes Gum.  Do you remember Fruit Stripes???
Ahhhh childhood memories...how I loved this gum.  I remember though the temporary tattoos rarely worked, mainly because they were on the cheap gum wrapper.  Either way, this stuff was addicting.

For the manicure, I started with a base coat of white polish.  With a tooth pick, I drew on the individual lines in the different colors.  If you want to know how, you can take a look at my Tiger Tutorial which explains how you can add these lines without a stamper.  To be honest, I never knew stamps existed until I started blogging.  I figured everyone drew lines on lol.  

Have you ever drew on your own animal prints?  Leopard, zebra, giraffe??  Do you find stamping easier?  Are you as addicted to neons as myself?

Until my next neon filled manicure, I hope you all have a good day!!!

4th of July

Happy 4th of July!!!!

2:20:00 PM

Happy 4th of July to all my American followers!!!  I'm loving all the patriotic manicures that have been appearing on my reading page for the past few days!!!! The 4th is one of my favorite holidays, mainly because of the food!  Hot dogs, hamburgers, potato salad, watermelon...yuummm.  It's so delicious.  Then on top of it all, we end the night with carnivals and fireworks.  Can't get much better.

After I did a simple flag manicure for Memorial Day inspired by @Arlyn531, I needed to come up with something different for the 4th.  I couldn't do the same thing, but I figured if the idea became a disasticure, I would just go back and copy the Memorial Day nails and never post them or just post them as a comparison.

This thought came into my head shortly after Memorial Day.  I didn't want simple flags, or just plain red, white, and blue nails, I wanted something else.  Something festive, and something which reminded me of the 4th itself.  What better than fireworks?!

Luckily though, I do not believe that my nails turned into a disasticure....let's take a look.


Colors Used:

  • Base
    • Sinful Colors - Midnight Blue
    • Sinful Colors - Snow Me White
  • Fireworks 
    • Sinful Colors - Snow Me White
    • Sinful Colors - Sugar, Sugar
    • Sally Hansen - Celeb City
  • Flag
    • Sinful Colors - Sugar, Sugar
    • Sinful Colors - Midnight Blue
    • Sinful Colors - Snow Me White
  • Top Coat
    • Out the Door

This was actually a simple manicure, which pleasantly surprised me. For the flag, I stripped on the red lines, then with a tooth pick outlined a blue area and filled it in. With my dotting tool, I dotted on some white dots to represent the stars.

The fireworks were completely done with a striper brush which I dipped in each individual polish. I first swiped some white polish in a waterfall looking way as an outline. Once that was dried, I striped on some red polish in the same way. To make them shimmery like a firework, I added some Celeb City - my go to silver polish. I have a lil complaint about the fireworks. I believe I dragged the striper too far down, making the lines too thick. I wanted them to be more pointed at the ends, which I was able to accomplish with the red, and definitely the silver. The white lines I think are what bugged me the most. If the silver wasn't on there, I would not have been happy with them at all!

I'm going to try fireworks again, most likely for New Years, so stay tuned for that. I'll probably practice them a lot beforehand as well. They're kinda fun! Maybe a blac....no I'm not going to spill my idea now....you will all just have to wait...

I hope you all have a blessed, safe, and Happy 4th of July!!!!

Disasticures

Disasticures - Another Rant Post

9:16:00 PM

No nails tonight, just yet again, another lovely rant post.  This one isn't a rant post regarding water marbling, or some other technique, but instead of just polishing all together.  Now do not get me wrong, I love painting my nails, I love blogging about them, and I will not be giving it up in the near future.  Sometimes though, I do hate it and literally want to scream.

We've all been there - we've had disasticures.  You know, a manicure that turns into a disaster.  Thank you Nicole from Polish Me Please for this awesome term.  I have to say, this happens to me more times than  not.  I've sat and I've pondered the many reasons why, and I finally believe I have figured it all out.
 
There are so many reasons why a perfectly good manicure becomes a disasticure and through this post I shall rant about each and every thing.

The Base

The base is the pivotal part of any manicure.  Up until I started blogging, I never used base coat, and oh my goodness, what a difference base coat does make.  Colors seem to pop more, polish applies more evenly, less staining, and less damage to my actual nail.  I've never had a problem applying a clear base coat, it's when you add the color, the disasticure begins to strike.

Let's take a look at the base for my fourth of July Nails and watch me rip them apart.


I'm not a fan of white nails, but I'm planning on putting a flag there so I had to.  The blue is one of my favorites - Sinful Colors Midnight Blue.  It's a gorgeous dark navy with that beautiful shimmer.  The issue, the polish is goopy, the formula just blows.  I'm not sure if it's my bottle, or if it's all of them but it applies super thick.  This is two coats, which okay I got full coverage and you can't tell it was a pain in the butt.  I can't wrap the tips to save my life, so notice the wearing already on some of the nails.  On top of that, I stained my cuticles, and it's impossible to remove.  This polish stains like no other.

I also some how manage to miss parts on the nail.  I'm not sure how I do so, but notice on the white nail the random open spot?!  As I'm looking at the picture, I see I sort of missed a part on my pinkie finger too.  Stupid thing.  If I were to fix it or apply another coat, then it will be too thick all together, and would just be easier to start over.

The Art

Oh lord the art....this can be a disaster in itself.  I see ideas on pinterest, youtube, or come up with something in my head which looks completely awesome.  I get super psyched, paint on my base coat, then start dotting, tooth picking, whatever, and bam...disaster.  The thought then instantly enters my head as "how the hell does this person do it so well and I fail??? That picture looks so easy!!!!"  When disaster strikes, I take crappy webcam photos and start sending them around asking people what they think.  Despite the fact some say it's good, if it's not good in my own mind, it comes off and I refuse to share it with the rest of the world.  Below is a Valentines Day manicure which never saw the light of day.


This was a design I saw on CutePolish.  It was super cute on her, and she made it seem super easy.  It wasn't horrible, but let me rip it apart. My heart on my pinkie finger is a blob, the red bled into the white lines, and you can barely see the pink nail underneath.  And of course the middle finger is like swiped stupidly compared to the others.  If I ever attempt this manicure again, I'm doing the white lines on the bottom and making sure my tape is set down evenly on each nail.

The Top Coat 

If you're like me and you do nail art, you know that top coat can totally mess up your nail art even if you do not mean it to.  You sit and wait and wait until it is totally dry, but it never is.  Some polish will smear, typically the black.  It's my biggest pet peeve when that happens, and well there isn't much you can do about it but start over.  And let's face it, once you add a top coat who wants to start over.  Usually I just suck it up and deal. 

Here are the Fishy Nails I did for a guest post over at Polish Pixelle.  Now let me state that I did not think that this whole manicure was a disasticure.  I freaking LOVED my fishies.  These two nails though were disastrous all thanks to the top coat.


Notice how the little guys eyes are smeared down.  Now okay, I'm sure no one noticed this standing 3 feet away complimenting them, but I noticed it and it made me think those were disaster nails.

Photography

The wrong photo can destroy a perfect manicure.  If you do not believe me, just go back to the beginnings of my blog.  Blurry pictures will ruin anything.  I was the master of that, but I believe I have come a long way with photographing them :)

Final Thoughts

Disasticures will happen.  They are unavoidable.  I believe it's mostly due to OCD that I can take a perfectly good manicure and rip it to shreds.  I've never though looked at another girls blog and went "Wow that's awful."  Instead, I've learned from so many of you bloggers out there!  I try to frame my hands in similar ways, look at lighting in pictures, read their ways that they apply polishes, etc.  I want to learn, I want to become a better nail blogger and nail painter.  I want to reduce the amount of disasticures.  Will it happen, maybe not, but hell I'm going to try.

The biggest way I believe you can avoid a disasticure, is confidence.  Have confidence in your skills, don't think others will believe it's crap.  Easier said than done, but hell I'm sure going to try.


Have you had a disasticure?? How do you avoid them???