FingerPaints

Rose Manicure With FingerPaints Violaceous Vase

9:00:00 AM


Good morning polished world!  How are you all today?  I'm quite exhausted this week and am really looking forward to Saturday.  Nothing is better than sleeping in until noon!  Especially when it's 5 degrees out like it has been.  Although, today I think we're getting ice rain because it's a whole 25 degrees out.

Today I am sharing with you a rose manicure that's actually quite Springy.  Earlier this month, I received the new FingerPaints colors, and one of them was screaming to be paired with a pastel purple.  This polish being Violaceous Vase!  It is a must have polish, especially if you are a fan of purple like I am!

Let's take a look!


Colors Used:
  • Sinful Colors - Mad About Hue
  • FingerPaints - Violaceous Vase
  • OPI - This Crown Needs a Gown
  • Roses
    • Funky Fingers - Queen Cupcake
    • Sally Hansen - Fuchsia Flare
    • Sinful Colors - Pistache
    • Zoya - Tilda
Love, love, love this manicure.  Violacious Vase really completed it!  I used one coat over Sinful Colors Mad About Hue on my pointer and pinkie finger.  It has a pink/blue/purple shifting shimmer with multi-sized hex glitters throughout.  The glitter payout was awesome and I did not have to dab any to fill in naked spots.  Glitter to base ratio = perfection.


It's been forever since I've created a rose manicure.  Roses look like they might be a quite difficult design to paint, but they're one of the easiest.  After a few dots and some brush strokes, you have a manicure that looks like it took hours to complete, when really it took a fraction of the time!

What do you think?  Fan of the purple manicure?  Fan of Violaceous Vase?

I was in Sally Beauty the other day checking out their new nail bar, and I saw all the new FingerPaints polishes in stock!  They weren't supposed to be released until February but it seems with the reset they appeared early!  Make sure to check them out, all the glitters are so worth it!  I have a few more to share with you!

Until next time, <3.

Orly

Twinsie Tuesday: Recreate a Manicure Seen on a Celebrity

9:00:00 AM


Good morning polished world!  How are you all today?  It is yet again another Tuesday which means it is time for Twinsie Tuesday!  This week we are re-creating manicures which we have seen on a celebrity.  I thought this would be easy, but in all honesty it was one of the most difficult manicures to come up with!

First reason this was difficult was because celebrities rarely post close up photographs of their nails!  Do you know how annoying it is to squint at celebrities nails which are positioned on their hip while they pose for a photo?  You can barely see the nails, let alone if there is any nail art.

Then I came across this Buzzfeed article with a bunch of manicures Lily Allen has had.  She is the queen of funky and crazy nails!  Sure, many of them are studded and completely impossible for me to re-create, but she does have some awesome polished manicures!  

I decided on re-creating this neon yellow manicure.  Please excuse the lobster hands.  Yellow plus pale skin in the winter = no good.


Colors Used:
  • Orly - Glowstick
  • Orly - Liquid Vinyl
I think we need to take a second and talk about how bright Orly Glowstick is!  I cheated and did a base of white, followed by two coats of Glowstick, but with four coats you can get the same result without a base of white.  I just didn't want to do 4 coats on all 10 nails.  Talk about time consuming  Anywho, it is the brightest most amazing neon polish I own!  Everyone needs to get this!


Not sure what I think of this manicure.  I only wore it for one day which is very rare for me.  I can't put my finger on why I disliked it.  My polka dots were awesome, the yellow is amazing.  I think maybe it's the chevron-ish nails.  Hmmm

What do you think?  Liking this neon yellow?

Don't forget to check out the other Twinsie's posts!


Tiffany at Polished To Precision
Savannah at Addicted to Polish
Róisín at Cuti-CLUE-les
Marisa at Polish Obsession
​Lisa at The Polish Playground
Lakeisha at Refined and Polished
Kristine at Pink and Polished Nails
Jessica at Blue Velvet Lacquer
ChiChi at I'm Just Me...ChiChi
Chelsea at Nailed Blog
Bridget at A Painted Nail
Amber at Nails Like Lace
Amanda at Fashion Footing
Amanda at Amandalandish

Until next time, <3.


FingerPaints

FingerPaints Gogh With The Flow and Color Me Abstract

9:00:00 AM


Good morning and Happy Sunday!!  How are you all today?  There is nothing really new here to report.  Eat, sleep, work, blog.  That is my life, and well honestly I wouldn't have it any other way!

Today I have a simple manicure to share with you using some new colors that FingerPaints is releasing for 2015!  FingerPaints polishes can be purchased at Sally Beauty Supply, and these new colors will be released in February!

My manicure is inspired by this lovely glittery mani by Jennie Shaw.  Let's take a look!


Colors Used:
  • FingerPaints - Gogh With The Flow
  • FingerPaints - Color Me Abstract
  • FingerPaints - Paper Mache
  • China Glaze - Make a Spectacle
I love these FingerPaints glitters so much!  Gogh With The Flow is a dark purple microglitter with slightly larger glitter flecks throughout.  It is so beyond sparkly in person.  This polish most certainly can be a one coater, but I used two for extra sparkle.  I can't wait to use this polish again!

Color Me Abstract is the magenta sister to Gogh With the Flow.  It's not as dense, but still has huge glitter payoff.  I had to use two coats to get full coverage.  What I loved about it was that it had the dark purple flecks that made it a perfect pair with Gogh With The Flow.


The white glitter flecks are actually from another new FingerPaints polish called Th-Ink Outside the Box.  It is a black and white matte glitter which I will be using very very soon!  You know how much I love black and white glitters!  Cannot wait to see how this one works!

What do you think?  Liking this manicure?

As I said, the FingerPaints polishes will be available in February at Sally Beauty Supply stores.  Who knows, they might already be appearing now that they have that new fancy Nail Bar!

Until next time, <3.

kitchen sink mani

Minty Mish Mosh Mani

9:00:00 AM


Happy Friday polished world!  How are you all today?  I'm quite fantastic!!!  Well, I did have a nail fail last night, but we shant talk about that.  Hopefully tonight I'll have time to try and re-do them because what I have on right now I am so not a fan of.  I'm sure I'll like it later on after I get over the whole nail fail situation.  Meh.

Anywho, today I am posting a manicure which was for sure not a nail fail!  I cannot begin to describe how much I loved this manicure I did a week or so ago.  I was sad when one of the flowers chipped.  I took inspiration from many other manicures I've done in the past and smashed all the ideas together in one mish mosh manicure using one of my favorite colors!

Let's take a look!


Colors Used:
  • Orly - Gumdrop
  • Orly - Liquid Vinyl
  • OPI - This Crown Needs a Gown
  • Salon Perfect - Sugar Cube
  • Sally Hansen - Strobe Flash
I love this design.  Look at that gradient with the black and white glitter!  Honestly, I could have done that on all ten of my nails.  Hmmm should have done that after my nail fail last night.  Maybe if I wrote my post sooner I would have remembered these things.  Strobe Flash is a neat glitter from Sally Hansen.  I got it last year but didn't use it because I was always going to my bottle of Hard Candy Black Tie Optional.  That polish dried up so it was time to switch over to the Sally I bought as a back up.  Now I have a FingerPaints one too, so I'm good for awhile on black and white glitters.  I'm getting off topic....anyways, Strobe Flash is nice, but it does require some placement of the glitters.  It's hard to get the bigger glitters on the brush and I think maybe it's because there is too much base.  Regardless, I love it. I had to place with the Hard Candy one too.


Orly Gumdrop is by far one of my favorite colors.  I really need to head on over to Sally Beauty and grab myself a back up bottle.  It's a perfect shade and works amazingly for gradients.  Look how awesomely it blended with the white!  Love!

What do you think?  Fan of this manicure?

I am off to enjoy my Friday!  Dress down day at work!  Woot!

Until next time, <3.

Galaxy Mani

Twinsie Tuesday: Fandom

9:00:00 AM


Happy Tuesday polished world!  How are you all today??  It's Twinsie Tuesday yet again!  This week we are pleased to be welcoming Kristine from Pink and Polished Nails into our little group!  I've been a fan of Kristine's blog for the longest time, so I am beyond excited that she's going to be posting with the Twinsie's now!

Today's Twinsie Tuesday theme is Fandom!  I think the best way to describe a fandom is a television show or a movie which as a huge fan base supporting it.  If you are a fan of that thing, then you are a member of that fandom.  Maybe?

Anywho.  I do watch a lot of shows religiously and am a fan of plenty of movies, but nothing that I really knew what to do a manicure based on.  Amanda from Fashion Footing suggested doing paper nails because of my obsession with The Office, but I didn't feel up to that.  She then suggested Captain America, but I already did a Captain themed manicure.

I was about to give up and sit this week out, but then I saw a galaxy manicure on one of my Pinterest Boards.  I'm a fan of The Big Bang Theory, and I also loved the movie Guardians of the Galaxy, so this manicure could kind of be inspired by those fandoms.

Let's take a look!


Colors Used:
  • Orly - Liquid Vinyl
  • Sinful Colors - Snow Me White
  • Sinful Colors - Sweet Nothing
  • China Glaze - That's Shore Bright
  • Color Club - Cloud 9
  • INM - Northern Lights
For this galaxy look, I was inspired by a YouTube video by ellandish.  It is a gorgeous purple and teal galaxy which is so different than any other one I have done on the blog in the past.  And luckily I owned all the polishes she used so I was able to replicate it exactly.  Okay, I did add some more holo than she had, but can you blame me?  You can never have enough sparkle when it comes to a galaxy manicure.

I didn't follow her tutorial exactly.  In hers, she sponged on white.  Once that was dry, she lightly painted on the colors where she wanted them, and then sponged the excess off.  I tried it on my thumb and it didn't work out too well for me.  So instead, I just sponged on the colors like I have in the past.


Around the edge of the galaxy, I sponged on some Cloud 9.  I learned this hack awhile ago and it really adds some dimension to the galaxy.  Then when you add the Northern Lights, it blends together so well and is a sparkle, holo explosion.

What do you think?  Liking this galaxy?  Is it a good fandom manicure for Guardians of the Galaxy or The Big Bang Theory?   I think I failed this round of TT.

Now that I think about it, I should have done a manicure inspired by Arrested Development.  I'm a true hardcore fan of that show.  Oh well!

Don't forget to check out the other Twinsie's posts!


Amanda at Amandalandish
Amanda at Fashion Footing
Amber at Nails Like Lace
Bridget at A Painted Nail
Chelsea at Nailed Blog
Marisa at Polish Obsession
Róisín at Cuti-CLUE-les
Savannah at Addicted to Polish

Until next time, <3.


Fun and Random

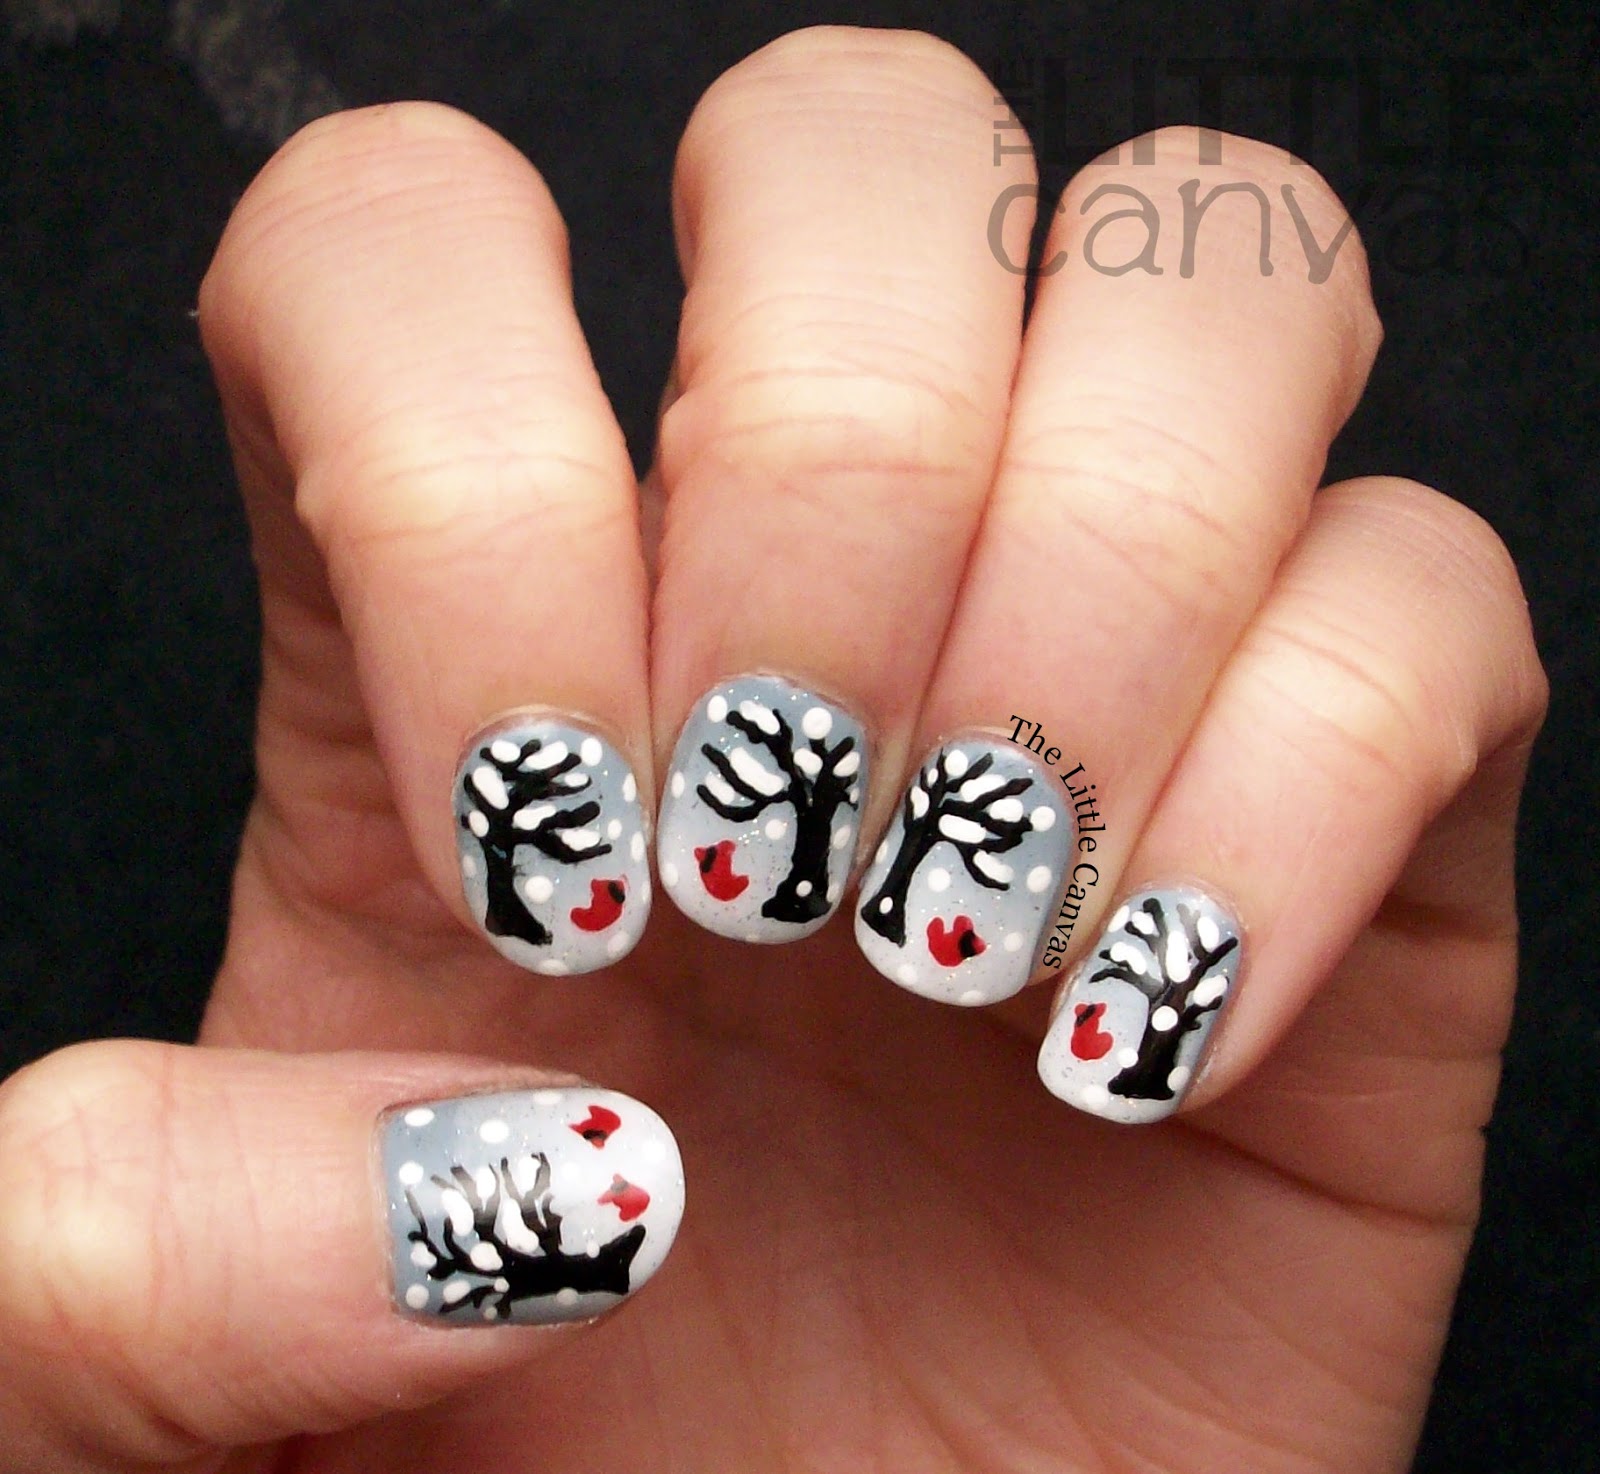
Winter Nail Art!

9:00:00 AM


Good morning polished world!  Happy Sunday!  Again, I ask of you, where did the weekend go!?  I felt like the work week dragged on, then the weekend came and now it's almost over.  It just isn't fair.  Oh well, what can you do!?

Winter is here and not going anywhere for the time being.  Our high today is in the 30s which is a lot better than the 8 degrees earlier in the week.  Sure, it's awful, but when it snows it's rather pretty, especially when it's that cold out.  The snow sticks to all the branches of the trees, and then when the sun actually does show itself, it looks like there are millions of little diamonds on the ground.  I wish that I could see that on an 80 degree day, but alas that won't ever happen.

Since it's been so cold, I decided it would be a good idea to do a little winter scene on my nails.  I did one last year that I loved so much, so I took inspiration from that.  Instead of doing the little weird cats like last year, I went with cardinals.  At work, there is a little bird feeder outside of one of the windows and the cardinals jump around it all day long.

Let's take a look!


Colors Used:
  • Orly - Boho Bonnet
  • Sinful Colors - Snow Me White
  • INM - Northern Lights
  • Acrylics
I started off with a base coat of Orly Boho Bonnet.  This is a soft grey blue shade which I think screams winter.  I then took a make up sponge and created a gradient using Boho Bonnet and Snow Me White.  This created the winter snow effect.

Last year, I didn't add a top coat of INM Northern Lights, so this year I decided to do so.  To be honest, it really didn't make much of a difference.  It did add some sparkle to the snow tips, but it wasn't anything that I thought was essential for the manicure.


With my nail art brush, I created the trees.  When the trees were dry, I used a dotting tool and added all the little snow flakes and cardinals.  Yes, the cardinals were done using a dotting tool!  I think the little guys look amazing!  They were the perfect addition to add some color to the winter scene.  Just like they do in real life!

What do you think?  Loving this look?  Fan of the cardinals?

I hope you all have a great Sunday!

Until next time, <3.

Nail Artist of the Month

January Nail Artist of the Month: Seasonails!

9:00:00 AM

Good morning everyone!  How are you all today?  Can you believe it's already January 16th?  Where did the month go!?  Usually at the beginning of each month, I introduce you all to a new nail artist with my Nail Artist of the Month feature.  Since the holidays were kind of hectic and everyone was a tad busy, I decided to delay the post until mid month.

Therefore, I am now thrilled to introduce you all to Cecilia from Seasonails!  I found her blog after seeing Adri from Morie's Nail Art share her page on Facebook.  I loved her manicures and photographs and knew right away that I needed to feature her!

I'll now hand over the blog to Cecilia!

____________________________________

First of all ‘Happy New Year!’ May 2015 grant you at least 2015 wishes! This is a great year for me and I want to share that amazing feeling with you! – what? Almost halfway through January and I already know it’s a great year? Yep! I know that because for me, this year started with wonderful opportunities and fabulous adventures!

I started my nails blog – yay! Finally! And through its many social channels and my new nails friends, Alaina reached out to me, asking me if I wanted to be her ‘Nail Artist of the Month’ for January! I was so late in responding that email because I think I read it at least 30 times – just to be sure she was talking to me and that she was actually offering me the chance to guest post on her blog! Whoaa!?! Really? Me? So yeah, it’s definitely a great year, I’m over my head with excitement!

But then… panic ensues! What was I to paint to make it notable? What?! In such fantastic company – all those talented nailistas Alaina had previously featured in her guest post category? What was I to do to make a difference? Time is ticking, I had to come up with something soon – over the weekend, the Golden Globes happened! I’m a sucker for glitz&glam, for movies and TVseries – I had to watch it and read all about it in the media! Two days and hundreds of Red Carpet pictures later, I realized what I wanted to do for The Little Canvas guest post: I would do one of the manis from the Globes Red Carpet!


Long story short: this is my version of 2015 Golden Globes Nails (as inspired by Maria Menounous)!


Starting with a natural tinted base color (after applying the base coat and allowing it to dry), I taped
the nail with French tips as to create a half-moon manicure and painted with white (OPI Alpine Snow). It took two coats to achieve an even finish and the tape should be removed before it dries completely.


To get that artsy avant-garde look as seen on Maria Menonous walking the Red Carpet at the Golden Globes we need just one little detail – the golden stripe! And because I’m really going for that hipster look, I’ll freehand the stripe with golden glitter right down the middle of my nails. (actually – I simply ran out of golden striping tape – you know, with the Holidays manis and all – but let’s pretend this ‘out of stock’ situation is the perfect opportunity to go ‘designer’ on those nails!)


Topcoat it (I’m always in a hurry, so I’m always depending on a quick dry topcoat to finish my nails) – I used OPI’s RapiDry and you’re good for the Red Carpet! Thank you Alaina for giving me this amazing opportunity to blend two of my greatest passions – fashion and nails – into a Golden Globes story.
_______________________________

How awesome are these nails?  So simple and stunning!  I really am loving this!  I rarely do half moon designs, but I must do this one!

Please make sure to follow Cecilia on her Blog, Facebook, Instagram, Twitter, and Pinterest!  You won't be sorry!  She does such amazing work!

Thank you Cecilia for such an awesome post and inspiring me!

Until next time, <3.

Fun and Random

Twinsie Tuesday: Inspired by Shoes!

9:00:00 AM


Good morning!  How are you all today??  It's Tuesday again which means it is time for another Twinsie Tuesday.  Time is just flying by again.  It's already January 13th, I swear Christmas was yesterday.

Today for Twinsie Tuesday we are sharing manicures which are inspired by our shoes!  Since it's winter time, my shoes are rather boring.  I basically go from knee high black boots, to mid calf black boots, or my fake Ugg boots which are also black!  I didn't want to just share a swatch of black polish, so I started to think about all the different shoes I own.

Then it hit me, my favorite pair of Converse!  Yes, they are also black, but they are so unique!  A few years ago for my birthday, all I wanted was a pair of polka dot Converse, and my parents found me a really awesome pair!  The eyelets are random colors which match the polka dots on the inside of the shoe.  Instead of the shoes being laced through the eyelets, the laces goes inside along the tongue so the polka dots on the inside really show.  It's hard to fully explain, but I did include a photo of them at the bottom of this post.

Enough of my babbling, let's take a look!


Colors Used:
  • Orly - Liquid Vinyl
  • Zoya - Tilda, Wendy
  • Random Acrylics
Fun right?  I followed my Converse Nail Art Tutorial to get the sneaker itself on my nail.  Instead of the normal white eyelets, I matched the pattern on my pair of Converse.  Since I couldn't get all six on one nail, I split them up between the pointer and the thumb.  For the other fingers, I tried to match the polka dot pattern on the inside of the sneakers.


Now that I see the photo below, I forgot that they had rainbow stitching on them which matches the polka dots!  It's been awhile since I've worn them since I refuse to wear them in the snow and salt.  I did once last year and my poor feet were so so cold.  Canvas shoes never mix with the snow!


Look how awesome they are.  I'm so sad they're rather beat up....I hope I can find another pair which is like them.  If not, I'll have to get the galaxy pair I saw the other day in the store.  Or just wear the cute pink laced ones which are in the photo next to them.  I may or may not have a Converse obsession.  I love them so so much.

What do you think?  Fan of the manicure?  Jealous of my sneakers?

Make sure to check out the other Twinsies!


Róisín at Cuti-CLUE-les
Savannah at Addicted to Polish
Marisa at Polish Obsession
Chelsea at Nailed Blog
Bridget at A Painted Nail
Amber at Nails Like Lace
Amanda at Fashion Footing
Amanda at Amandalandish

Until next time, <3.
Dot Mani

An Orly Hand Splatter Manicure

9:00:00 AM


Happy Sunday polished world!  How are you all today??  This weekend flew by, yet again.  There needs to be a day between Saturday and Sunday.  It would be a day where I could sleep in, have no worries, and paint my nails.  PolishDay.  Yeah, I'm going to make that a thing and forget about Mondays.

Today I'm posting a manicure I did before Christmas time, and it got lost in The Little Canvas vault.  Actually there are about 5 manicures in there that really need to be posted.  I have no idea how I gathered all these manicures!

Anywho, this design is one of my favorites!  I did it after seeing Young Wild and Polished's hand splatter tutorial!  I really liked the look so I decided to try it!  I loved the end result!

Let's take a look!


Colors Used:
  • Orly - Liquid Vinyl
  • Orly - Frolic
  • Orly - Gumdrop
  • Orly - Mirrorball
  • Orly - French Tip White
Lookie!  I used one brand for a whole manicure!  These Orly's are my favorite polishes that I own.  Liquid Vinyl is my favorite black which applies evenly in two coats.  I have tried many black polishes throughout the years, and this one has been my trusted go-to for a good portion of my blogging life.  Frolic and Gumdrop I bought at Sally's one time along with a bottle of Liquid Vinyl when they did a Buy 2 Get 1 Free deal.  I bought them knowing that one day I would use them all together for a manicure because they looked so great next to each other in the bottles!

Mirroball....need I say anything about Mirrorball?  Such a gorgeous silver linear holo polish, with holo glitter flecks!  I love my Color Club holos, but not nearly as much as this polish.  I should probably pick up a back up if I see one at Sally's this week.  I don't know why I passed up the bottle I saw a few weeks ago now that I think about it.  Dang it.....


To get the hand splatter look, I followed Nicole's tutorial.  Basically you use your dotting tool and dab paint splatters all over the nail.  I've never done an actual splatter manicure because of the mess, so this is a great alternative.  Sure, it's not the same exact look, but I kind of prefer this one anyway.

What do you think?  Liking this design?  Are you a fan of Orly?

Well, I am off to enjoy my Sunday!  I'll be back with another post on Tuesday for Twinsie Tuesday!

Until next time, <3.

Review

Glitter Nail Polish Remover Gel Review

9:00:00 AM


Good morning polished world!  How are you all today?  I'm exhausted and the weather is freezing.  I need a vacation to a warm beach!  Alas, that's not happening, so I will sit around some neon polishes and pretend that it is summer time.

Today I'm bringing you a review of a new nail polish remover!  Back in December, I was contacted by Liz from Vi-Jon asking if I was interested in reviewing a new delivery system for removing Glitter Nail Polish.  If you haven't heard of Vi-Jon, they are the largest manufacturer of Private Label Personal Care, Health, & Hygiene  and they produce over 85% of all polish removers which are sold in the US.  That's a huge amount of remover, so odds are, the remover you're using is manufactured by them!

I said yes because I was very intriqued.  If you know me, you know I hate removing glitter polish.  I avoid it at all costs because I'm not a fan of the foil method.  I want to apply a remover and get the polish off right away.


This new delivery system which Vi-Jon has created is a gel solution instead of your normal liquid.  This solution contains essential oils which will sooth the nail instead of damaging it like harsh acetone.

Bestie Twin Nails

Bestie Twin Nails with Fashion Footing! Round 8

9:00:00 AM


Good morning polished world!  How are you all today?  It's been freezing here lately!  We had wind chills that made it feel like it was -20.  Mark my words though, in the summer time, I'm going to be complaining it's too hot and wishing for colder weather.  I need to start being grateful for each season and be happy that there aren't any horrible natural disasters.

Enough babbling about the weather, we're hear to talk about nails!  Today I am posting alongside Amanda of Fashion Footing!  This is Round 8 of our Bestie Twin Nail feature!  I can't believe we have been doing this for 8 months now!  So crazy!!!  Where did the time go!?

This month we were inspired by this Burberry plaid design by NailsByDanielleT on Instagram.  A few months ago, Amanda had said she wanted to do a plaid design, then I came across Danielle's gorgeous creation and we both quickly agreed on it!  We actually selected it in the beginning of December, so I've been very antsy to finally re-create the design on my own nails!

I went out, purchased a bottle of a dark berry cream, and got to work!  Let's take a look!


Colors Used:
  • OPI - In the Cable Carpool Lane
  • OPI - My Vampire is Buff
  • Acrylic White and Black
I'm so happy I found In the Cable Carpool Lane at Sally Beauty Supply!  It was the perfect berry cream polish for this manicure!  This polish was released as part of the San Francisco Collection and now is part of the core collection.  It is a gorgeous crelly that applies evenly in two coats.  I used three coats because on my one nail I had a bald spot and it was darker than the two coated nail, so I had to make that all even out.  Anywho, it is a gorgeous polish which I'm happy I now own.


For the design, I used black and white acrylics because they dry faster than polish.  I actually used an old black striper and dipped it in the acrylic paint to get the black lines.  Always remember to save your stripers after the polishes dry up!  There is always a use for them!  I used a nail art brush to create the line with In the Cable Carpool Lane.  Kind of messy, but you can't tell from a distance.

What do you think?  Liking this design?  Fan of that gorgeous OPI berry crelly??

Make sure to check out Amanda's design!!!  She was complaining that hers looks awful, but she's such a liar.  Her manicure is AWESOME!

Until next time, <3.

Pond Manicure

Twinsie Tuesday: Pond Manicure!

9:00:00 AM


Hello everyone!  Today is Tuesday and that mean it's Twinsie Tuesday again!  Yes, that's right, we are back from our December break and ready for 2015.  Some of the ladies unfortunately are taking a little break from blogging, and will be back in the next few months.  Since a few were leaving, we decided it would be a good time to add some new members to our group!  I'm so happy that Amanda from Fashion Footing, Beckie from Polished by Beckie, and Savannah from Addictedd to Polish are now Twinsies!!!  

Today we are posting pond manicures!  This is my first time doing one and it's long overdue!  So many bloggers have created gorgeous designs using this technique and I've always wanted to re-create the look.  I purchased more jellies over the summer so I could eventually try, but I never got up the courage to  do so.

Honestly, I was thinking about skipping today's prompt because I was scared that I would have a huge disasticure, but I went for it!  I was going to follow Adventures in Acetone's tutorial for a heart pond manicure, until I was talking to Amanda and thought about doing a winter themed one!

Let's take a look!


Colors Used:
  • Sinful Colors - Bright Lucite
  • Sally Hansen - Ice Tint
  • White Acrylic
So, I kind of cheated.  I used one coat of Bright Lucite as a base so the design wasn't 100% sheer.  I'm not a huge fan of seeing my nail's smile lines through polish.  So, I started off with my base coat of Bright Lucite, then painted one snowflake on the corner's of my nails.  Then, I covered it with one coat of Ice Tint by Sally Hansen.  This is the blue sheer jelly from Sally Hansen's Palm Beach Jelly collection.

Then, when that was dry, I added some dots, followed by another coat of Ice Tint.  Then I added another snowflake, followed by another coat of the jelly.  More dots, more jelly, few more dots, then one more coat of the jelly.  I might have gone overboard, but honestly, I love how it was looking and couldn't stop!


I'm so happy I decided to do a winter design!  I love how the snowflakes looked under the different layers of jelly!  I was scared that it wasn't going to work out because of how sheer Ice Tint is, but thankfully it did!  I think it was because of that base of the cream that I put underneath!

What do you think?  Liking this pond manicure? 

I can't wait to see everyone else's pond manicure!


Amanda at Amandalandish
Amanda at Fashion Footing
Amber at Nails Like Lace
Beckie at Polished by Beckie
Bridget at A Painted Nail
Chelsea at Nailed Blog
Jessica at Blue Velvet Lacquer
Marisa at Polish Obsession
Savannah at Addicted to Polish
Róisín at Cuti-CLUE-les

Until next time, <3.