Dot Mani

The One With The Serendipity Dot Flower Manicure

9:00:00 AM


Good morning polished world!  How are you all doing on this fine Sunday?  I thought I'd fit one more post in before September is done!  I'm kind of overwhelmed again because here I am behind on posts, editing photos, and well everything.  I have to get the monthly mani favs up tomorrow or the next day.  I also need to update my Instagram, and should probably get around to updating Facebook again.  SOOOO many things to do.  Now that it's Fall though, I'm going to take some time to do it all.  Hopefully.

Also, guys....Halloween is almost here!  Some months I dedicate all of October to Halloween, but I haven't even started planning.  I blame work, I really need to not let it keep sucking up all my time.  I can't blame work entirely, I've just become super lazy in my older age.  Or maybe I've become boring.......hmmmmmm.

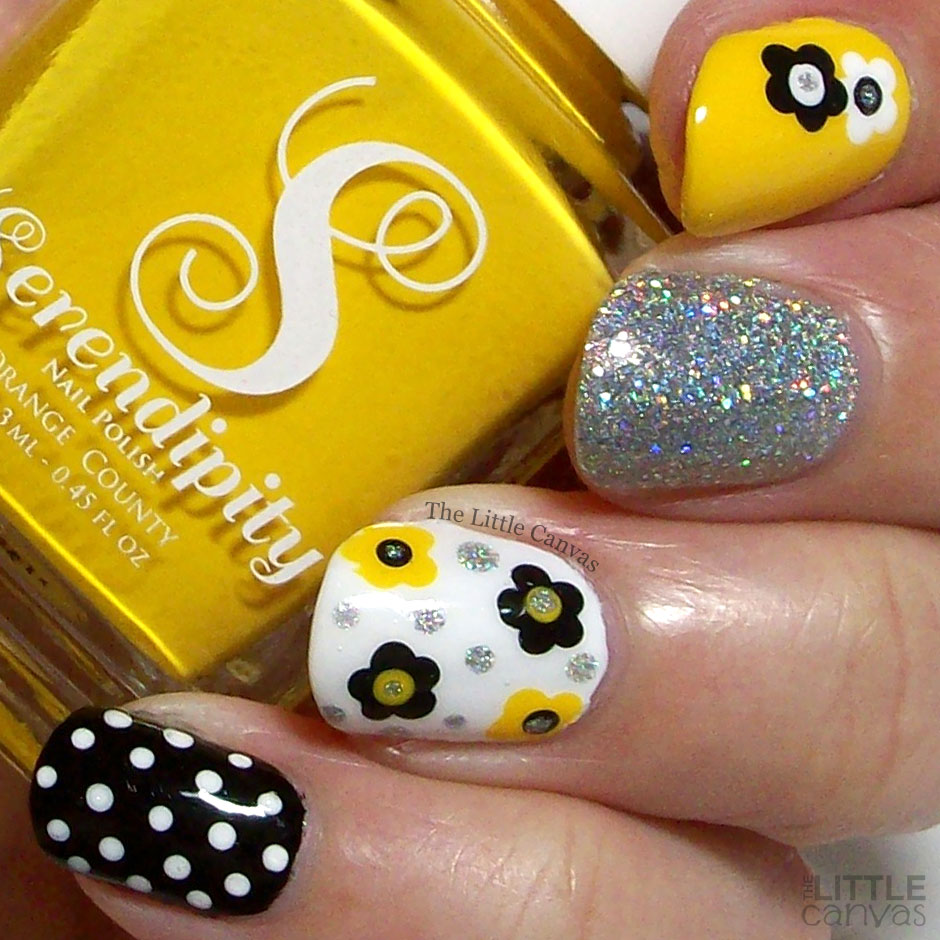
Anyways, today's manicure!  You know me and my floral manicures, and nothing is better than a simple dot flower design.  I found something similar to this on Pinterest and had to re-create it.  Have to love the yellow, black, and silver combo.  Really, this is one of my favorite dot manicures that I've done.

Let's take a look!

Colors Used:
  • Serendipity Polish - Bottomless Mimosas
  • Serendipity Polish - Building my Empire
  • Serendipity Polish - #GoalDigger
  • Serendipity Polish - Holoday Lights
Cute, isn't it??  I'm not a huge fan of yellow polishes but this one is absolutely lovely.  It's right up there with the yellow OPI I love so much.  Probably the only two yellow polishes that look good on me.  Bottomless Mimosas covers completely in two coats.  Most of my Serendipity Polish's are one coat, but it doesn't surprise me that a yellow takes two.  I find that they always need two in order to build up properly.  Who knows, maybe there's a one-coat yellow out there and I'm just missing it.


I really love the index finger.  I feel this accent nail really did tie the whole manicure together.  I debated on keeping it plain, then debated on putting black polka dots on it.  I'm so happy I went with the flowers.  It's just so dang cute.

What do you think?  Like this design?

Until next time, <3.

China Glaze

The One With the Sunflowers and Dots

9:00:00 AM


Good morning polished world!  How are you all doing on this fine Thursday?  I meant to have this post up yesterday but again, time got away from me.  I did paint my nails twice this week, which lately that's a rarity.  I actually went the whole weekend with naked nails.  I don't even know who I am anymore.  Now that it's getting cooler again and the days are shorter, I'm going to be painting more and returning back to this blog.

Today's design is a perfect Summer/Fall transition manicure!  You can never go wrong with sunflowers, especially when they're on top of a gorgeous periwinkle blue polish.  I've come to the conclusion that sunflowers are my favorite flowers.  It used to be tulips, and I'm sure in the Spring I'll say tulips are my favorite, but right now it's sunflowers.  My co-worker gave me a bouquet of them yesterday because I had a rough day and it was the sweetest thing ever.  No one ever gets me flowers. 

And in my office at work, I have a painted sunflower portrait I did at Painting With a Twist.  I look at that painting daily and still sometimes can't believe that I painted it.  Sure I can paint my nails, but I never thought I could paint that well on a canvas.  Regardless, I just love me some sunflowers.

Enough of my babbling, let's take a loo!


Colors Used:
  • China Glaze - Boho Blues
  • Acrylics
Absolutely love Boho Blues by China Glaze.  I purchased this one a few years back and I really need to see if it's part of the core collection because I need another bottle.  Two coats and full coverage.  It's just so beautiful!  I'm now imagining it with a top coat of INM Northern Lights and I'm really dying over here.


Looking back at this manicure, I'm realizing I created the look the hard way.  I should have started by painting my base, then adding white polka dots.  Instead, I started with the flowers then added the dots.  That was kind of a pain because I couldn't get the dots to fit in how I wanted with my OCD.  They look good though.

For the flowers, I again did them the hard way.  I should have drawn the outline and then colored it in like a coloring book.  Instead, I started with the semi circle, painted the petals, then outlined them.  Oh well, maybe next time I'll do it the easier way.  Watch, I do it the way I think is easier and it will end up being more difficult.

What do you think?  Like this look?  Something you'd try?

Until next time, <3.

China Glaze

The One With the Watermelon Dry Brush Manicure

9:00:00 AM


Good morning polished world!  How are you all doing today?  I am so sorry I haven't posted more this week, but honestly this week really got away from me.  Before I knew it, Friday was here, then Saturday was over, and I just don't know where the time went.  Looking back at my week though, it's so unbelievable the stuff that has occured.  Seriously thinking about selling my life rights to Lifetime for a movie.  It would be quite a movie.

Today's nail design was supposed to be posted on Friday when it was 92 degrees.  Now it's back down into the 60s where it should be for this time of year.  It is a re-creation of a dry brush watermelon manicure I did a few years ago.  I actually wore this design in August for the family picnic at work, then just never got around to posting it.  Such is life lately, right?

Let's take a look!


Colors Used:
  • China Glaze - I'll Pink to That
  • China Glaze - Lime After Lime
  • ORLY - White Tips
  • ORLY - Liquid Vinyl
Cool right?  A little abstract watermelon design.  I don't remember if I was originally inspired by someone else for this design or just came up with it on my own.  To be honest, I don't think I'm this creative....maybe I was.  I should probably scroll back through and check, but that involves effort and currently as I type this post, I'm watching blondies baking in the oven and sauce cooking on the stove.  Queen of multi-tasking at this moment.


It's a super easy design to do.  First, start off with a base of white.  When that's dried, take your green polish and dry brush 1/3 of your nail.  Then go through with a pink polish and dry brush the rest of the nail.  When that's all dried, take a black polish and dot your seeds on.  Finish with a top coat and bam, done.

What do you think?  Like these watermelons?  Something you'd do?

Until next time, <3.

Orly

The One With the Neon Yellow Pineapple Manicure

9:00:00 AM


Good morning polished world!  How are you all doing on this fine day?  Work is in full swing again, my Pinterest project is coming along.  Everything is quite productive for me.  Except for the fact that I haven't posted manicures in so long that I have this back log of summer designs to share now in the Fall.  At least it's still warm out and I'm not sharing them in the winter.  Although, does it matter?

Today's design is a re-creation of one I did a year or so ago.  You know me and my love of pineapples, so it makes sense that I have a pineapple design posted to the blog each year.  I realized during the last week of August I hadn't done my annual pineapple design yet, so I had to get going on an idea.  I started to look at new ideas on Pinterest, but shockingly enough came across my own outlined design and I decided to just do that one.  I loved it then, I knew I'd love it now.

Let's take a look!


Colors Used:
  • ORLY - Glowstick
  • ORLY - Liquid Vinyl
  • ORLY - White Tips
Oh ORLY Glowstick, how I love you.  Now, I needed to have a base coat of white underneath it to get it looking how it does.  One coat of white, two coats of Glowstick, and bright highlighter yellow is what I was left with.  On it's own, you can build Glowstick up, but it takes a good 3 to 4 coats because it's so sheer.  Plus, it doesn't look as neon on it's own.


I love how the black accents look against the yellow nails.  It's just so 90s and fun.

What do you think?  Like this look?  Ever use Glowstick?

Until next time, <3.