Christmas

Santa Claus Nail Art

11:00:00 AM

He's making a list, checking it twice, going to find out who's naught or nice....Santa Claus is coming to town!!!!  Are you all ready for the big guy to come down your chimneys?  Hopefully everyone has been good and will get lots and lots of presents :).  Christmas is now just 3 days away...can you believe it?  It feels like this month and year have just flown by!!!  These three days for me are going to be filled with cookie baking, nail painting, and just relaxing.

I can't believe I'm coming close to the end of my Christmas manicures!  Seriously, this is the second to last one before the big day!  Well, that might be a lie.  As I sit here typing this post up, I'm realizing that since my posts are at least one manicure a head of the posting, I may end up with no manicure for Christmas.  This means I might be bringing you a Christmas Eve and Christmas Day post!  For you new readers, I post to the blog every three days.  This post goes up on the 22nd (obviously), then I'd have one for the 25th, 28th, and 31st.  The manicure I'm painting for the 25th as it seems was painted on 12/19, and well lets face it, no manicure will last on me from the 19th to the 25th!  So yup, you may be in for some extra posting!!

Okay, enough of that rant, onto my nails!  What does every little child think of when they think of Christmas?  Yup, Santa Claus!  I needed to have the jolly ol' fella on my nails!  I have received so many compliments on them, and my two nephews were in love with them!  This manicure I did last year, again when I was new to blogging.  I'm going to start off by saying how much I love this years nails over last years!  I'll let you be the judge!  Please excuse my last photo with it's random colors.  It's orangier than I would have liked, but it showed the thumb art the best!
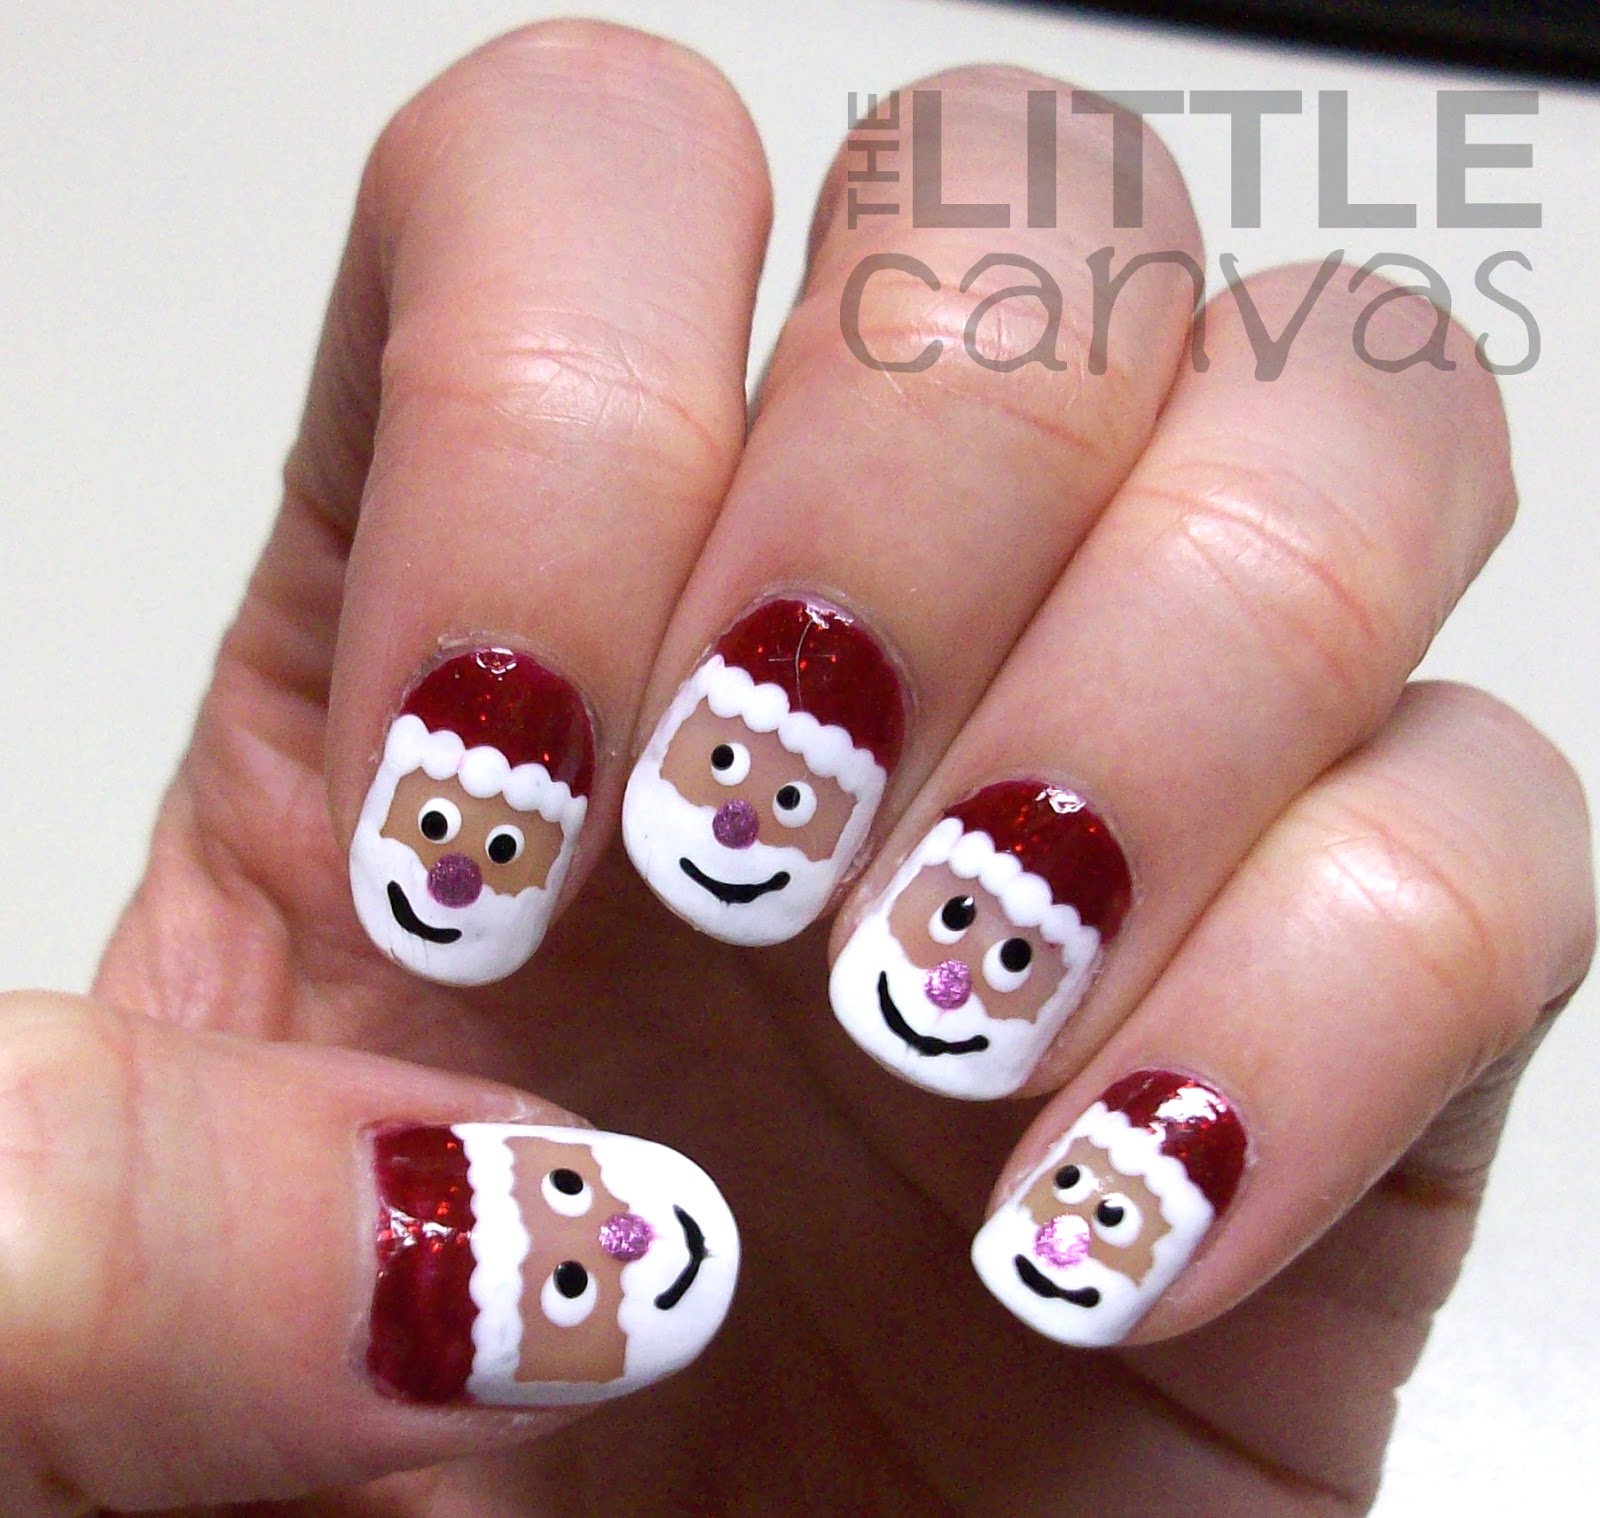


Colors Used:

  • Sally Hansen - Red Carpet
  • Sinful Colors - Black on Black and Snow Me White
  • Funky Fingers - Favorite Girl
I think out of all my Christmas manicures, this one took the least amount of time.  I started off with a base coat of NYC Matte Me Crazy Top Coat.  Some of you may or may not know, but I use this matte top coat as a base because I believe it makes my manicures live longer.  The polish also applies a lot smoother when that matte is the base!  Call me crazy, but hey it works.

When my base was dry, with a nail art brush, I took the gorgeous Red Carpet (a red almost jelly glitter polish) and drew on the hats.  I then took the white polish and painted on side burns.  I then let this dry for at least a good five minutes.  I wanted to ensure the red polish was completely dry before dotting on the fringe to Santa's hat.  Every time that I have previously put white polish over red, the red leaches into the white turning it into a nice shade of pink.  Luckily, that didn't happen this time around!!!  With my dotting tool I dotted on the hat fringe and the beard.  I then added the eyes, nose, and mouth, slapped on some Out the Door, and enjoyed my lil Santas.

This is last years attempt at Santa Clause....almost embarrassed to post them!  No clean up, short nails! ahhh.


For someone who owned NO dotting tools and NO paint brushes, this was a very good attempt.  You can see on the thumb I had some of red bleeding into the white like I mentioned earlier.  I like my eyes on this years guys also.  Since I have longer nails, I had more room to decorate, therefore, larger eyes.  Same goes for the smile.  I really think that made them!

What do you think??  Last years Santa Claus or this years?

See you all next post! <3

Christmas

Reindeer Nail Art

11:00:00 AM

Rudolph the red nosed reindeer, had a very shiny nose!!! Who doesn't love Rudolph?  It was one of my favorite movies growing up, and still is.  Last year for Christmas I purchased my nephew a light up nose Build a Bear for his gift, and well I wish I got one for myself.  Something about the movie, and Rudolph himself just screams Christmas.

What is Christmas nail art without a reindeer post?  After seeing numerous reindeer nails on Pinterest, it was my turn to have a go at them.  Of course, my first attempt turned out awful, so I found a design by Top Coat It which I copied.  So without further adieu, here comes Dasher, Dancer, Prancer, Vixen, Comet, Cupid, Donner, Blitzen, and the most famous reindeer of all.....(okay maybe it's just Rudolph).

I apologize for the messy-ish edges. The brown went into attack mode, and I hit the pointer finger with the q-tip while cleaning them and it of course took off the polish.


Colors Used:
  • Ulta - Chocolate Kiss (was going to use China Glaze Mahogany Madness but that was part of the disasticure so I opted for the darker brown)
  • Zoya - Avery
  • Sinful Colors - Snow Me White, Black on Black, and Sugar Sugar
Getting the look of these nails was very simple! I first started off with two coats of Chocolate Kiss.  This polish is such a nice brown!  It has a very nice shimmer so it doesn't look like, well, you know.  It's a perfect Fall color, so I'm happy it is part of my collection.  One thing I hate about Ulta polishes is the cap.  For those of you who haven't used any Ulta polishes, they have these circular bulky caps which are the size of the bottle.  For me, it's awkward to hold and control, therefore I flooded my cuticles and got polish all over the place.

When my base was dried, I drew on the antlers with Zoya Avery.  I decided to do the antlers first so I would have enough room for them.  I tried to do the eyes first and they ended up being too far up the nail and left no room for them.  When my antlers were painted on, I took my dotting tool and added the whites of the eyes, then the black pupils looking around in different directions.

The next step was the nose.  My original plan was to do black noses and one red nose on my ring finger for Rudolph.  Since Chocolate Kiss is such a dark brown polish, the black got lost and it didn't turn out well.  If I had a lighter brown, or stuck to my plan of using Mahogany Madness I would have been able to probably get the black noses to work.  I took my bottle of Sugar, Sugar and with my dotting tool added the noses.  I kind of wish I owned a lighter red or even a cream red because I think they would have shown up better.  Either way, they still were cute and shimmered!

Have you done any Rudolphs?  Do you think these are cute?  I'm so grateful that I found TopCoatIt's design!

Only a few more days until Christmas.  Are you all ready??  What am I going to do when I don't have Christmas nails to post anymore?! 


Christmas

Christmas Lights Manicure

11:00:00 AM

Talk about a non-disasticure manicure!  I was so nervous to do these nails the other day!  When I sat down to do them, I had a clear vision in mind as to what I wanted on my nail.  Typically when I do this though, it turns out awful and then 3 manicures later I'm left with something just as bad.  This time around though, my Christmas light manicure came out perfectly and just as I imagined.

Last year I did Christmas light nails on a baby blue metallic base with an accent nail of a Christmas Tree.  I shall include that picture at the end of this post since I did it before I started blogging.  I didn't want to do the same thing.  I wanted different.  I had seen a few white background Christmas light nails but I just wasn't feeling it.

I took to the internet and found an idea I liked.  The amazing CutePolish posted a Christmas light manicure awhile back where she painted her nails with a classic french tip and then drew on the strands of lights.  This was a decent idea...the full nail wasn't totally white but it was too bare.  I then saw her tutorial for birthday nails where she sponged on the french tip.  To me, that was perfect, it had the look of falling snow.  I didnt want the top of my nail to be bare though, so I went on the perfect glitter hunt.

I already owned China Glaze Make a Spectacle, and was debating on using that, but the glitter hexes I feel would have been too big and "swallow up" the lights.  Also, it has more of a yellow tinge to the glitter, and well you aren't supposed to play or eat the yellow snow :P.  I found a bottle of Sally Hansen Disco Ball and fell in love.  It reminded me of NYC White Lights Glitter, one of my favorite glitters that dried up to the point where not even the greatest thinner could save it.  I purchased it, and well, even though you can't really see it in the pictures, it was PERFECT for this manicure!

Enough of my babbling, picture time.


Colors Used:
  • Sinful Colors - Snow Me White
  • Sally Hansen Xtreme Wear - Disco Ball
  • Sinful Colors - Black on Black
  • Sally Hansen Xtreme Wear - Red Carpet
  • Sally Hansen Xtreme Wear - Blue Me Away!
  • Sinful Colors - HD Nails
  • Ulta - well it's yellow and I don't feel like looking it up. <- bad blogger girl.
I started off just as cutepolish always does...with a base coat to protect my natural nail.  For those of you who watch the videos, you'll understand that lol.  Then with a make up sponge, I sponged on the white polish on the tips.  I then added 2 coats of Disco Ball to the nails.  With my nail art brush, I added the light strand and the bulbs.  Top coated and done.  Easy peasy.

These are last years nails, done with all toothpicks.  The lights were smaller and my nails nubbier.  Can't believe how short my nails were!  I clearly did not know how to take photos back then either.


I also didn't own a big collection!  See how my trunk of my tree was yellow!!!  Ohhh those were the days.  I don't even think I owned a top coat yet.  How I have grown as a nail blogger/artist.  

Which do you like better....2012's version or 2011's?  Personally I like 2012!  Glitter, gradient, nail art brushes!  2011's was a great attempt though, not going to lie!

Can you predict what I'm going to paint next?  See you next post!

Christmas

Penguin and Holly Nail Art :)

11:00:00 AM

Christmas is almost here!  Have you all busted out your red and green polishes and create any cute nail art designs?  I really hope so!!!  I have seen many bloggers in my feed participating in a 12 days of Christmas Challenge, and well I have been stalking those blogs and loving all the nail art I've been seeing.

As you all know, I'm in the midst of my own Christmas nail art spree.  So far I have posted two designs for you, which I've been receiving positive feedback from.  This design I already know is loved by many of you. I posted a sneak peak of my thumb on Instagram the other night, and instantly people were liking the photo.  That sneak peek is now my Twitter avatar....a cute little penguin snowman.  

I got the idea for this manicure from a few places.  First, was Pinterst.  I had done penguins last year, but nothing like this.  They were full nail and kind of bad.  These little guys only take up half the nail and lean into the "picture" so to speak.  When I googled Christmas penguin nail art, I found a cute Santa penguins accenting holly, Christmas trees, Santa hats, and more.  I fell in love with one design, which sadly linked back to a dead page so I can't give proper credit or post it here =(.

Anywho, here are my lil guys.  Indoor photography = ugh.


And for a treat, here is a shot of both hands!


Colors Used:

  • Sally Hansen Xtreme Wear - Celeb City and Red Carpet
  • Sinful Colors - Black on Black, Snow Me White, and HD Nails
  • Zoya - Lianne
I may have to do a tutorial for these little penguins.  They were rather simple!  First, with my nail art brush, I outlined a body shape with black polish.  Once complete, I filled it in completely with the black.  When it was completely dried, I filled in the tummy with white polish.  Then, with my dotting tool I added the white circles for the eyes.  I then painted on the red hats with my nail art brushes.  I then let them sit and dry before adding any more detail since I layered on the white kind of thick.

I moved onto the holly nails.  With my dotting tool, I added the three berries.  The leaves were added with the nail art brush.  Since HD Nails by Sinful Colors is a shimmer green, the look of leaves came out almost perfectly on top of the silver polish.

Back to the penguins now.  With my dotting tool, I added the eyes, and with the brushes I added the lil guys beak and bow tie!  Then on top of the hat, I added the white detailing with my dotting tool.  Finished with some Out the Door and called it a night.

What do you think of the little guys?  Have you done penguins yet or ever?

Next nail design to show you.....Christmas lights!!!!  Well, if my photos come out well! hahahaha.