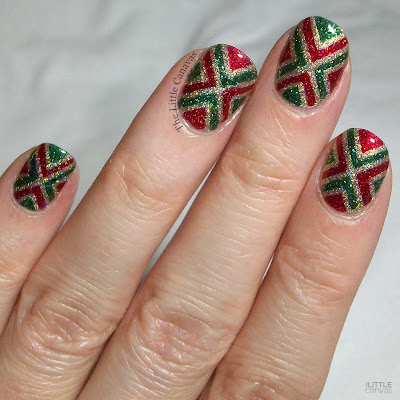
Christmas

The One With the Annual Christmas Light Manicure

9:00:00 AM

Nothing to Disclose


Good Morning, Polished World, and Merry Christmas!!!!!!  Now, I'm going to say I'm a bit disappointed in myself that I only had 4 Christmas Manicures this year.  I really wanted to create a whole lot for you all, but life really got in the way.  Let's just say I'm really tired of COVID and everything associated with it.  It just is allll consuming in my line of work and it's quite exhausting.

Despite all that exhaustion, I did find time to paint my nails one more time for Christmas.  Every year I create a Christmas Light manicure. I've been doing this since The Little Canvas was born, and I wasn't going to miss this year.  Last year I created a red and green light manicure using Christmas Cookie from ILNP as a base.  I loved it so much that I decided to re-create it this year.  Maybe next year I'll go back to the classic look over the snow.  

Until then, let's take a look!
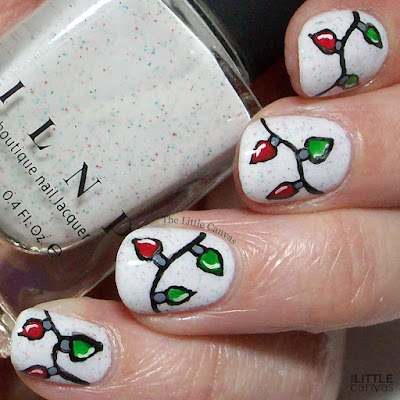

Colors Used:
  • ILNP - Christmas Cookie
  • Acrylics
Yes, I cheated and used acrylic paint for my lights, but it's so much easier, especially when you're painting your nails at 11pm and just want to go to bed.  Christmas Cookie is my all time favorite Christmas polish.  It's a sheer white polish with tiny tiny red and green flecks.  I'm not sure how ILNP did this, but it's gorgeous and I love it.  It builds perfectly in two coats for full, Christmas-y coverage.  The best part - it dries rather quickly so you're able to just start your artwork.  Or throw on a top coat and go to bed.
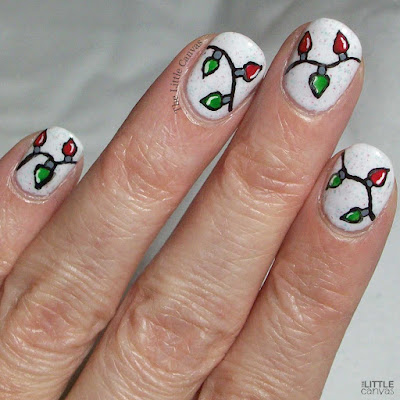

This was the first year where I was able to paint the "string" perfectly in the first try.  Probably because I didn't do any curly q's like years prior.  Despite the one imperfection on my pinkie finger on that green light, all the other lights are perfect.  I'm really happy with how this turned out.

What do you think?

I wish all my followers and readers a Very Merry Christmas!!  I'll be back with at least one New Years Eve look. Hopefully.

Until then, <3.

Christmas

The One That Looks Like Wrapping Paper

9:00:00 AM

Nothing to Disclose


Good morning, Polished World!  Less than seven days until Christmas!!!  Are you ready?  I am not!  I'm so behind this year because work is kicking my behind and taking all my time.  I had so many plans to create a bunch of Christmas manicures, but alas I've been unable to.  I'm hoping to have at least two more by Saturday.  We shall see.

Today's design is....well....amazing.  I really don't know how else to describe it.  The look took forever to complete, but in the end it was well worth it.  I wore in on my nails for much longer than I normally wear nail art, but who could blame me??  It's so cute, beyond Christmas-y, and just all around perfect.

Let's take a look!


Colors Used:
  • ILNP - Versailles
  • ILNP - Say Love
  • ILNP - Lucky One
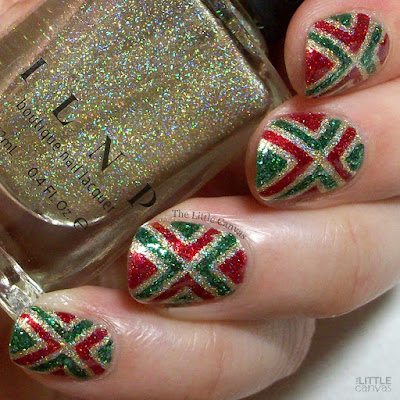
Amazing, right?!  I cannot get over how perfect this manicure is for Christmas!  At first I thought it looked like ornaments, but the more I looked at it, the more I realized that it was a dead on duplicate of wrapping paper.  All that was missing was a little bow in the middle.  The glitter, the holo, the colors, everything about it just screams Christmas.


ILNP never ceases to amaze me.  Her polishes are beyond perfect, especially when it comes to nail art.  You wouldn't think glittery holos would build so well, but they do.  To get the look I started off with two coats of Versailles, then threw on some quick dry topper.  When that was done, I started adding the 10, yes that's right, 10 pieces of nail art tape to each nail.  I then filled in the areas I wanted with Say Love and Lucky One.  Pulled off the tape, added a top coat, and admired my work.

What do you think?  Fan of the look? 

Until next time, <3.


Christmas

The One With the First Christmas-y Manicure

9:00:00 AM

Good Morning Polished World!  I am so sorry that I have been gone for so long, but work really took over my life.  As you know, I work in the healthcare industry and we just are going through a rocky patch.  I'm trying to keep my life as sane as possible by doing the things I enjoy, but that seems to be more baking than nail painting.  Doesn't help that my nails are so dry from the constant hand washing and it now being winter that I've suffered many breaks and right when my nails are long again, they snap.


Regardless of all of this, I am determined to bring you all Christmas manicures throughout the month of December.  Similarly to my promise of the Halloween Manicures in October.  I did start sooner with another Christmas design, but it was a complete failure and I'm deciding not to share them with you.  So we are jumping right to my second design of the season, a fun simple dotticure using one of my favorite reds.

Let's take a look!


Colors Used:
  • Morgan Taylor - All Tango-ed Up
  • ILNP - Christmas Cookie
  • Zoya -  Tomoko
Isn't this red Morgan Taylor polish to die for?  It is by far one of my favorite red polishes, and if you know me, I'm not a huge red fan.  This color doesn't make my nails look nubby like other reds.  It's more muted and vampy, which is why  I think I love it.  It applies perfectly in two coats, and I'm sure you're going to see it a lot more this month.


For my accent, I used ILNP Christmas Cookie, but unfortunately you can't see the gorgeous glitter in it because it's hidden under all those dots.  I think I might have to use it for a holly manicure in the next few days.  That would really make the glitters pop.  Regardless, it's a gorgeous polish which works well under those fun dots.

What do you think?  Fan of this manicure?
 
Until next time, <3!


Christmas

The One With the Santa Nail Art - Merry Christmas!

9:30:00 AM

Nothing to Disclose Press Sample Affiliate Link


Good morning Polished World, and Merry Christmas!!!!  December 25th is finally here, and I successfully brought you Christmas designs the whole month.  I'm rather proud of myself for this one.  Not going to lie, I was editing the photos for this post at 11:30pm last evening.  Santa was getting impatient with me since I wasn't sleeping and he couldn't deliver the gifts.

Santa understood though when he saw what today's post is!  I feel it's been awhile since I've done a little Santa Claus nail art, but after doing the Elf ones, I felt I had to.  Not to mention, I promised my residents at work that I would have my nails matching my Santa leggings for their "party".  I use the term party loosely since you know, social distancing and small groups.  Sigh, COVID needs to go away ASAP.  Despite the small group, they had fun, and loved my nails.

Let's take a look!


Colors Used:
  • Nine Zero Lacquer - Santa Suit
  • Nine Zero Lacquer - Cat in the Christmas Tree
  • Acrylics and such
Isn't the big guy adorable?  I literally copied the design I did a few years ago because it matched the leggings so well.  While yes these are adorable, there's something about the original ones that hold a special place in my heart and I feel they look better.  Probably because my nails were in better condition than they are now and weren't constantly breaking.  Again, I blame COVID because I'm washing my hands constantly and bathing in sanitizer.


They're still adorable though.  I'm not complaining.  As always, Nine Zero Lacquer's Santa Suit is the perfect red for Christmas.  It reminds me of Say Love by ILNP except it is a tad lighter and a little more jelly-like.  Both are gorgeous, both apply wonderfully, both have holo, and both scream Christmas.  What more can you want?!

What do you think?  Loving the Santa?

Now it's time to try to do some New Years nails.  Wish me luck!!!

Hope you all have a very Merry and Blessed Christmas! 

Until next time, <3.

Christmas

The One With the Red and Green Christmas Light Manicure

9:00:00 AM

Nothing to Disclose


Good morning Polished World!!!  Happy two days before Christmas!  Can you actually believe that Christmas is right around the corner?  I feel like December flew right on by.  I blame COVID and the fact it just turns my world upside down on a daily basis.  Despite the crazy, I'm super proud of myself for completing six Christmas designs.  Looking back at the year I've had and the hiatus' I've had to take because of my job, this is a huge accomplishment.  When I started up the blog again and my nail art, I told myself that I wasn't going to go on another break for the foreseeable future.  This has been a huge stress relief for me, and we all need that escape from the real world one way or another.

Today's I'm sharing with you my annual Christmas light manicure!  This is a design I've been doing since I started blogging years ago.  Each year I switch up the design by changing the base polish.  The most common base is typically a snowy gradient, but I really wasn't feeling that this year.  Then I remembered Christmas Cookie by ILNP.  It just begged to have some Christmas lights painted on top of it. 

Let's take a look!


Colors Used:
  • ILNP - Christmas Cookie
  • Acrylics
Super adorable, right?  I opted for the red and green lights because of the tiny red and green microglitters in this polish.  Christmas Cookie is a white jelly polish with the different color microglitters.  Two coats and I had complete coverage.  It removes off the nail just as easily as it applies.  I was worried because of the density of the glitter, but you'd have no idea that the glitter was even there.


I love, love, LOVE how the red and green lights really make those red and green glitters pop.  I wore this polish alone as a swatch a few times this season and while you could see the glitter on it's own, with the colors on top it just added a whole new dimension.

What do you think?  Fan of this manicure?

Just one more design to share with you all.  Can you guess what it is??

Until next time, <3.


Christmas

The One With the Christmas Dotticure

9:00:00 AM

Nothing to Disclose 


Good Morning Polished World!! How are you all doing today?  It's the 21st, which means Christmas is just four days away.  And I have two more manicures to share.  Well, I should have two more manicures to share.  I still need to paint my last one so maybe I'll only have one more to share.  I meant to paint last evening, but I didn't get home until late and I just did a swatch and called it a night.  Hoping tonight I can get my last design in.

Today's manicure is a simple dotticure I painted last week.  During this time of year, I fall in love with my red and green holographic polishes and I have to talk myself out of using them for every single design.  I wanted to show them off and not add too much art because I wanted the polishes themselves to shine.  So, of course a dotticure was the only solution for this.

Let's take a look!


Colors Used:

  • ILNP - Say Love
  • Zoya - Merida 
  • ORLY - White Tips
How gorgeous is Say Love by ILNP!?  This is by far my favorite red nail polish.  If you've been reading this blog a while, you know I'm not a huge fan of red polishes.  I feel like they wash me out and make my nails look super short.  I don't have that nice, long, pointed nail which reds look gorgeous on.  That was until I purchased Say Love.  This polish is everything.  Two coats of this gorgeous holographic red and my nails look amazing.  Not to mention, it's a perfect Christmas red.


The Zoya scattered holographic polishes have been a win since they were all released, and Merida is no exception.  Two coats of this dark, beautiful holographic green.  It compliments Say Love so wonderfully.  Both polishes work wonderfully for nail art.  They dotted perfectly on my index and pinkie nail.  Say Love dragged a little bit when I added my top coat, but that's because my dot wasn't completely dried when I applied it.

What do you think?  Fan of this simple Christmas design?

Until next time, <3.


Christmas

The One With Buddy the Elf Nail Art!

9:00:00 AM

Nothing to Disclose 


Good morning, Polished World!  How are you all doing on this fine Wednesday?  Can you believe we are a week away from Christmas?  Seriously where did December go?  I still have more manicures to share so I really need to get my booty moving and edit the photos.  Actually, I think I have two posts and two others planned.  It seems I'm overthinking when it comes to the time frame.  I have more than enough....maybe.

Anyways, today's manicure is going down in the history books of The Little Canvas. It is inspired by one of my favorite Christmas movies; Elf!  For years I've seen other nail artists create Buddy the Elf nail art designs, I just never had the guts to go through with it on my own.  What better year to attempt it than 2020 where I have been on a major nail art hiatus and am just trying to get back into the swing of it all.

Let's take a look!


Colors Used:
  • INM - Survival of Earth
  • China Glaze - Grinchworthy
  • OPI - Exotic Birds Do Not Tweet
  • ORLY - White Tips
Isn't.this.amazing?!  I'm so proud of this nail art, and I did it all with nail polish!!!  Do you know how long it has been since I've used only nail polish to create a design?  I'm not going to lie, I was so nervous when I started this manicure, but as soon as I grabbed my tools, it was like riding a bike.  My confidence in my art came flowing right back to me.  Sure, I'm a perfectionist and I still see things looking at the photos I would have done differently, but overall I'm so proud of myself.


INM - Survival of Earth and China Glaze - Grinchworthy are the PERFECT Elf green.  I debated on leaving my pinkie finger a swatch of the INM, but I craved that little bit of glittery bling.  I'm happy I did it because I think it rounded off the manicure quite nicely.

What do you think?  Fan of this look?  Think I need to do more crazy nail art again?

Until next time, <3.  


Christmas

The One With the Christmas Holly Manicure

9:00:00 AM

Nothing to Disclose Press Sample Affiliate Link


Good Morning, Polished World!  How are you all doing on this wonderful Sunday?  Last night I did some crazy nail art which is something I haven't done in awhile and I'm so proud of it.  I cannot wait to share it with you hopefully later this week.  It felt so good to sit down and do something a little more intricate than the normal dots or flowers.  Of course it's Christmas themed, so it fits in perfectly for the month.

Anyways, enough about that manicure, onto today's design! Not going to lie, I'm super happy with how this design turned out.  Every year I do a holly design, but this year I wanted to add a little spice to it.  In my mind, spice was adding a little glitter gradient to index and pinkie finger.  I think it worked.

Let's take a look!


Colors Used:
  • Zoya - Hunter
  • Zoya - Tomoko
  • Morgan Taylor - All Tango-ed Up
  • ORLY - White Tips
It's nice doing nail art with all nail polish and no acrylics.  I think that my holly are a tad messy, but hey give a girl a break.  I've been on a hiatus for the past year almost and now am just slowly sliding back into this.  If I were to re-create this design, I would have probably made the holly a tad larger and put it on the bottom corner of the nail.  There's always next year!


Tomoko worked wonderfully for a glitter gradient.  If you have been following me awhile, then you know how much I love my OG Zoya Pixie Dust polishes.  Tomoko is by far my all time favorite.  In all the years that I've owned them, it's never crossed my mind to utilize one of them for a glitter gradient over a cream polish.  Let me tell you, it worked WONDERFULLY!  I was super impressed.  Literally one dab on the nail with the makeup sponge and it was perfect.  The photos don't do it justice.

What do you think?  Fan of the simple Christmas design?

Cannot wait to keep sharing more Christmas manicures!! 

Until next time, <3


Christmas

The One With the Minimalist Rudolph Manicure

9:00:00 AM


Good morning, Polished World! How are you all doing today?  It's Wednesday which means....UGHHH the middle of the week.  You know, that day that feels like a Thursday but in reality you still have two more days left in the work week.  Actually, with my job, there really is no end to the work week, but whatever. I like to dream that my weekends are 100% work free.

Well, regardless of a crazy work schedule, I've still managed to start my Christmas manicures!  The trick is just getting the photos edited and up on the blog and Instagram.  So far, I have created three.  It would have been four, but I wore a swatch of Christmas Cookie by ILNP for a few days and it was too pretty to take off.

Anyways, today's manicure is a cute little simplistic Rudolph the Red Nosed Reindeer design that I found while surfing Pinterest.  I fell in love with the simplicity of it.  The original design that I found had a white three dimensional snowflake on the accent nail, but I of course opted for glitter.

Let's take a look!


Colors Used:
  • Sally Hansen - Bordeaux Glow
  • China Glaze - Big Hair and Bubbly
  • ORLY - White Tips
  • Black Acrylic 
Sally Hansen Bordeau Glow is the PERFECT Christmas red polish.  I don't know why I haven't used it until this year because I'm pretty sure I've owned this polish for awhile now.  I normally don't gravitate towards red, so when I have a few reds that I like I stick to them.  I think when I got this one, I avoided it because it looked like a frosty finish which I typically don't like.  When I found it in my drawer, I just thought it looked like the perfect Rudolph red.

After one coat of this, I fell in love.  It applied perfectly in two coats.  It had a gorgeous finish - it wasn't so much as frosted but a weird mixture of frosted and foiled....if that makes sense.  It just has such wonderful dimension and is beyond shiny.


For my little minimalist Rudolph, I took the red and made one big dot for his nose in the middle of my nail.  I then went through with a black acrylic and added the little eyes and antlers.  A coat of top coat and I really loved the look.

What do you think?  Cute Christmas design?

Until next time, <3.


Christmas

The One With the ILNP Christmas Manicure

9:00:00 AM


Good morning Polished World, and Merry Christmas!!!!  Hope you all are having a wonderful day with your loved ones!  Let us not forget all of those who are working today at hospitals, nursing homes, fire departments, and police departments!  Thank you all for your continued service to our communities.

Today's manicure was one I really was lazy about and was about two seconds from not even posting because I was just that tired from Christmas Eve to edit the photos.  The reason I forced myself to post was not only because I love the manicure, but I had to share the gorgeous ILNP Christmas polishes I bought this year.  I'm kicking myself that I didn't use them sooner.

Let's take a look!


Colors Used:
  • ILNP - Say Love
  • ILNP - Christmas Cookie
  • ILNP - Versailles 
  • ILNP - Lucky One
  • Serendipity Polish - Sunshine Rainbow
Yes, I know, I'm an idiot for covering up the beauty that is Versailles, but I wanted a little more of a glittery gem look on that nail for Christmas.  Any other time, I would have left it alone.  Two coats of that gold beauty and I had the BEST holographic gold accent.  Adding a thin coat of Sunshine Rainbow by Serendipity Polish really added a whole new dimension to the polish.  Part of me kind of wished I did an accent of Lucky One, the gorgeous green I used for the dots, but I like the gold accent.  I think it added a little something.

The main reason that I kind of kick myself that I didn't accent with Lucky One is because it probably would have blended in Christmas Cookie a tad better.  This polish though is amazing.  A white crelly with the most delicate mixture of red and green glitters.  I was so obsessed with the Say Love and Lucky One dots that I was half tempted to just do a full dotticure.  Maybe next year.


Say Love.....that gorgeous, GORGEOUS, deep red holographic polish that I have been searching years for.  This is the ABSOLUTE best Christmas red.  It reminds me of Dorothy's red ruby slippers.  It's just so flawless.  Two coats, full coverage, and just like all of Barbara's polish, the strongest holographic effect.  If the snowflake design looks familiar, it's because it is a re-creation of one of my designs from last year, just switched up all the other nails.

Looking at it again, I kind of do wish I accented with Lucky One.  Hmm.  Next year, right?

What do you think?  Loving the Versailles accent nail or do you think I should have done Lucky One?

Again, I hope you and yours have a very blessed Christmas!!

Now, onto New Years manicures.....where did my bottle of Versailles and Mega X go?

Until next time, <3.


Christmas

The One With the Annual Christmas Lights Manicure

9:00:00 AM


Good morning polished world!  How are you all doing on this last Sunday before Christmas?  I am behind in my Christmas manicures because I felt like I was coming down with a cold, so I decided to spend the last few evenings laying low and resting.  Good news is, I think I warded it off!  Still taking zinc around the clock, but I'm pretty sure if I didn't rest, I would have had a full blown cold by now.

Regardless, I probably am going to end up sick because it went from 8 degrees to a forecasted 40 degrees today.  Of course, right before Christmas, my dreams of a white Christmas are melting away.  Hopefully the temperature plummets and we get some snow before Wednesday.

Today's manicure is my annual Christmas light design.  This is one that I have done since I started this blog oh so many years ago.  I've created the design on a white base, glitter base, holographic base, and a negative space base.  My favorite though has to be the gradient with a shimmer base because it really gives that illusion of Christmas lights on top of snow.  Nothing is prettier than when the snow falls on the lights and they melt through causing a gorgeous colorful glow.

Let's take a look!


Colors Used:
  • Morgan Taylor - I'm Drawing a Blanco
  • ORLY - White Tips
  • INM - Northern Lights
  • Acrylics
Last year, I created this design on top of a negative space where I added I'm Drawing a Blanco to the gradient.  I had a love hate relationship with the negative space because I felt like where the gradient met the naked nail, it looked a tad yellow.  Therefore, this year I decided to do a sheer base of I'm Drawing a Blanco to really give a shimmery snow look before adding the stark white gradient.  Overall, I was very pleased with the outcome.


This is also the first year since I started blogging where I fit all four colors on each of the nails.  It was a bit tricky on that pinkie nail, but look at me go!

The hardest part of this design has to be painting the lines.  My OCD really got to me and I erased them a dozen times before I settled with something I like.  When the nails were lined up, the wire really looked like it flawlessly connected from nail to nail. 

What do you think?  Perfect for Christmas?

Now to paint my final Christmas design!

Until next time, <3.

Christmas

The One With the Buffalo Plaid and Holly

9:00:00 AM


Good morning polished world!  How are you all doing on this fine Sunday morning?  Yesterday it poured all day then turned to a very, heavy, wet snow.  While I hate the heavy, wet snow, I am hoping this means we are on our way to a white Christmas.  Nothing is prettier than Christmas lights underneath some white, fluffy snow.

Today's manicure is a new one for me.  Usually each Christmas I re-create past designs, but I can safely say that I have never once attempted this design.  Okay, the holly I've done, but this combination....all new.  I was scrolling through Pinterest for some inspiration and found this design and fell in love.  I then decided to start researching how to do a free hand buffalo plaid, practiced a bit, and then attempted the design.

Let's take a look!


Colors Used:
  • OPI - The Spy Who Loved Me
  • China Glaze - Big Hair and Bubbly
  • China Glaze - Merry Whatever
  • ORLY - Liquid Vinyl
Look at that buffalo plaid print!!!  All free hand using acrylics!  I am super impressed with how straight my lines are and how perfect the boxes are.  I couldn't stop staring at them!  I also had the print on my thumb, which looked even better than my ring finger.  Most certainly going to re-create this design next year.


I also have to say that my holly is probably one of the best that I've ever done as well.  Every year I do a holly design but the leaves never turn out looking right.  These were perfect.  Had nice little definition and fit along the nail bed.

What do you think?  Fan of this manicure?  Love it as much as I do?

Until next time, <3.