Dot Mani

Pink Dot-icure - Essence Ultimate Pink

9:00:00 AM

You know what holiday is right around the corner?  That's right, Valentines Day!  Also known as the holiday I absolutely hate the most.  I really think it's stupid, but we shall wait until my Valentines Day posts to see why.  This manicure I did using Essence Ultimate Pink reminded me of the holiday due to the very pink colors!  If you need a perfect pink for your holiday manicures, I suggest this.

As stated in my last post, Essence sent me a couple of polishes to review, which I have been super pleased with.  Each have surprised me and made me now want to wage a war with Ulta to ensure that they are always stocked in my store.  For those of you who have never used or seen an Essence bottle, the bottle top matches the color of the polish IDENTICALLY.  Seriously, it's amazing when you have a hefty stash of polishes.  It annoys me looking down into my drawers and seeing tons of black caps and little snippets of color.  I usually end up taking out 10 polishes before determining which one I want to use.  With these Essense polishes though, there is none of that.  All companies need to take a lesson from them.  Oh and also, their caps are awesome because they kind of snap shut.  You have to use it to know what I'm talking about, but I love it because I know that my polish is truly closed.

I'm rambling, time to take a look at the awesome pink manicure that I wish I kept on longer!  I cannot wait for my new dotting tools...you guys are going to be spammed with so many dot manicures, it will be crazy.


Colors Used:

  • Essence -Ultimate Pink
  • Funky Fingers - Queen Cupcake
  • Finger Paints - Hue Left a Message
  • Sinful Colors - Black on Black
Essence Ultimate Pink is a gorgeous pink.  I really, really, really loved it.  When it was combined with the other pinks too, it was even more jaw dropping.  I had complete coverage with two coats.  As I said in my last Essence post, I loveeee their brushes!  They aren't too thick, and aren't too thin, and literally with two swipes your whole nail is covered with polish.  It was very easy to dot with too for as fast as the polish dried.  Usually dotting with fast dry polishes is impossible because they quickly get goopy and they leave lines behind, but I had no issue with it, and I got the perfect dots!

What do you ladies think??  Love, hate?  I'm seriously falling in love with Dot-icures. 

Until next post <3

**Essence Ultimate Pink was provided by Essence for promotional purposes.  All expressed opinions are my own. Please see my disclosure page for more info**

Mosaic-ish Nail Art

9:00:00 AM

So remember a few days ago when I posted a simple manicure?  Well if you know me, then simple is a no go for a long time on my nails.  After wearing the plain colors for a day, I decided that some nail art was needed.

I sat for awhile trying to determine what I was going to do.  Since the manicure was already colorful, I wanted to use the same colors and not add more into the mix.  I think if I would have, it would have been way too confusing.  I was going to attempt polka dots, but with my one lonely dotting tool, they never look right.  Seriously cannot wait until my new dotting tools come!  

Then I thought I would attempt some form of a tape manicure, but scotch tape and my nails never works.  Even if the polish has been dry for over 24 hours, it always seems that the tape rips the polish off my nail.  Plus, I can never cut it in a straight line, or the polish bleeds under the tape....it's just a mess.  You can also imagine that I cannot wait for my new striping tape to come in the mail!  Ahhh so excited for all the manicures I will be able to do!

So, I decided to use the colors and create a mosaic on my nails!  I attempted a patchwork manicure which will never see the light of day on this blog and was kind of nervous when I started these.  I'm so happy I followed through and finished the mosaic, because this became one of my favorite manicures yet!


Colors Used:

  • Essence - Break Through
  • Sinful Colors - Frenzy, Sweet Dreams, Black on Black
So pretty, right?  They were beyond shiny and sparkly as well in person!!!  Best part, they were extremely easy!!!

First, I took my black polish and nail art brush and drew abstract black outlines on the purple nails.  Once they were dried, with my nail art brush, I filled in random areas with different colors.  I then took the black polish and re-outlined the black lines to clean up the and really make the colors look like they were placed in each area.

I think when I do these nails next time, I will use my smaller nail art brush for thinner lines and have the abstract shape areas be a tad smaller too.  This way, I can fit more color on the nail.  I think what I love about this design is I can combine so many different colors and still have a unique manicure!  Plus, since it's so simple, it takes a small amount of time and still makes people believe you spent hours on your nails.

What do you think?  Have you done a mosaic look on your nails before?  Or should we call it stained glass?

Again, I'm writing this post at 1am, so I hope it makes sense, I'll edit it probably around 5pm tomorrow when I come home and have the time too!!! hahaha  Until next post <3

Swatches

A Simple and Bright Mani - Essence Break Through

9:00:00 AM

Why hello all!  How are you this fine day?  Today I have a simple post for you, which will segue into my next post!  Originally, I was going to post these nails with the corresponding art in one post, but since I wore them with no art for a day, I thought they deserved their own post.  Plus, the colors made for a fun and cute manicure!

This is my first post using an Essence polish!  I was beyond thrilled I received these polishes from Essence since every time I have stepped foot into Ulta to purchase one of their polishes, they are ALWAYS sold out!  I've had a hell of a time dealing with the staff at my Ulta, so I never have gotten into an argument as to why they don't properly keep their Essence section stocked.  Now that I have used their polishes, I may have to start a little war.

The colors which were sent to me are such fun colors.  Purple is my favorite color, so when I saw that I received Break Through, I had to use it first.  I grabbed a purple glitter to accent, and another bottle to accent the glitter, and began painting!  Let's take a look!  The first picture makes my nails look all different lengths, but I swear they aren't.  Well, maybe the ring finger is due to a break, but meh.


Colors Used:

  • Essence - Break Through
  • Sinful Colors - Frenzy
  • Sinful Colors - Sweet Dreams
Pretty right??  Purple and blue together  in my book, are a huge win.  You have no idea how happy I am that Sinful Colors bottled a glitter with these exact colors.  Frenzy was my first glitter polish last year, and quickly became one of my most used glitter polishes.  Since I have grown a stash in the past year, it has been tucked away and not used as much as I would like.  So as you must know, I was beyond thrilled to see that it matched Break Through perfectly!!!  It also matched Sweet Dreams perfectly as well.  Sweet Dreams is one of my favorite blues from last year, but has a kind of iffy formula.

Essence Break Through is a pretty purple cream polish.  It is a tad lighter on the nail than in the pictures.  With two coats, I had full coverage, but technically could have gotten away with  one coat, which is an automatic win in my book.  The polish dried so fast as well!!!  No lie, this polish was dry in less than 2 minutes.  It reminded me of an old school 50 second Maybelline fast dry I had in high school.  I do not like using fast dry polishes usually because they start to dry mid application and I can never get them to be "smooth" on the nail.  I'm shocked by the fact this polish applied so smoothly for as fast as it dried.

The polish brush was wider than what I was used to.  I'm not a huge fan of wide brushes, but this one was a win in my book.  It was a rounded brush at the end, which fit the shape of my nail perfectly, and led to barely any cuticle flooding.  If you have trouble and are bothered by flooded cuticles, then you will love this brush!

What do you think?  Love the color combo?  Use an Essence polish?

In my next post I'll bring you some nail art I did using this base.  Kind of wish I kept the mani on longer than I did because I was so in love with it!!!  Hope you all like it when you see :)

**Essence Break Through was provided by Essence for promotional purposes.  All expressed opinions are my own. Please see my disclosure page for more info**

BigDaddyBeauty

When Nail Art Fails, Use Some Magnetic Polish!

9:00:00 AM

So it seems I've hit a manicure funk again.  Well maybe I haven't and the ideas in my head were just too big for even my skills.  I was planning on doing Spiderman nails originally for my nephews superhero birthday, but well, I'm not as awesome as the Nailasaurus.  I then was going to do some really super awesome Batman nails, but I didn't want black nails.  I found a city skyline batman nail and since I've done skylines before I knew I could do this.  I was so excited and was even going to make the sky look awesome using some magnetic polish, but after 2 nails, I was hating it.

It really wasn't that I was hating it, it just was too much work for what I was in the mood to do.  I did one nail, but did not wait for any of the layers to dry.  It looked super cool with the starburst magnetic design, the fairy dust stars and the little building.  It was my tester nail, so to say, and well, when I went to do the other nails, I was soooooo unmotivated.  Then to do a Batman logo on top of it? Nuh uh.  I was lazy, my head hurt, and I just wanted something simple and cool. 

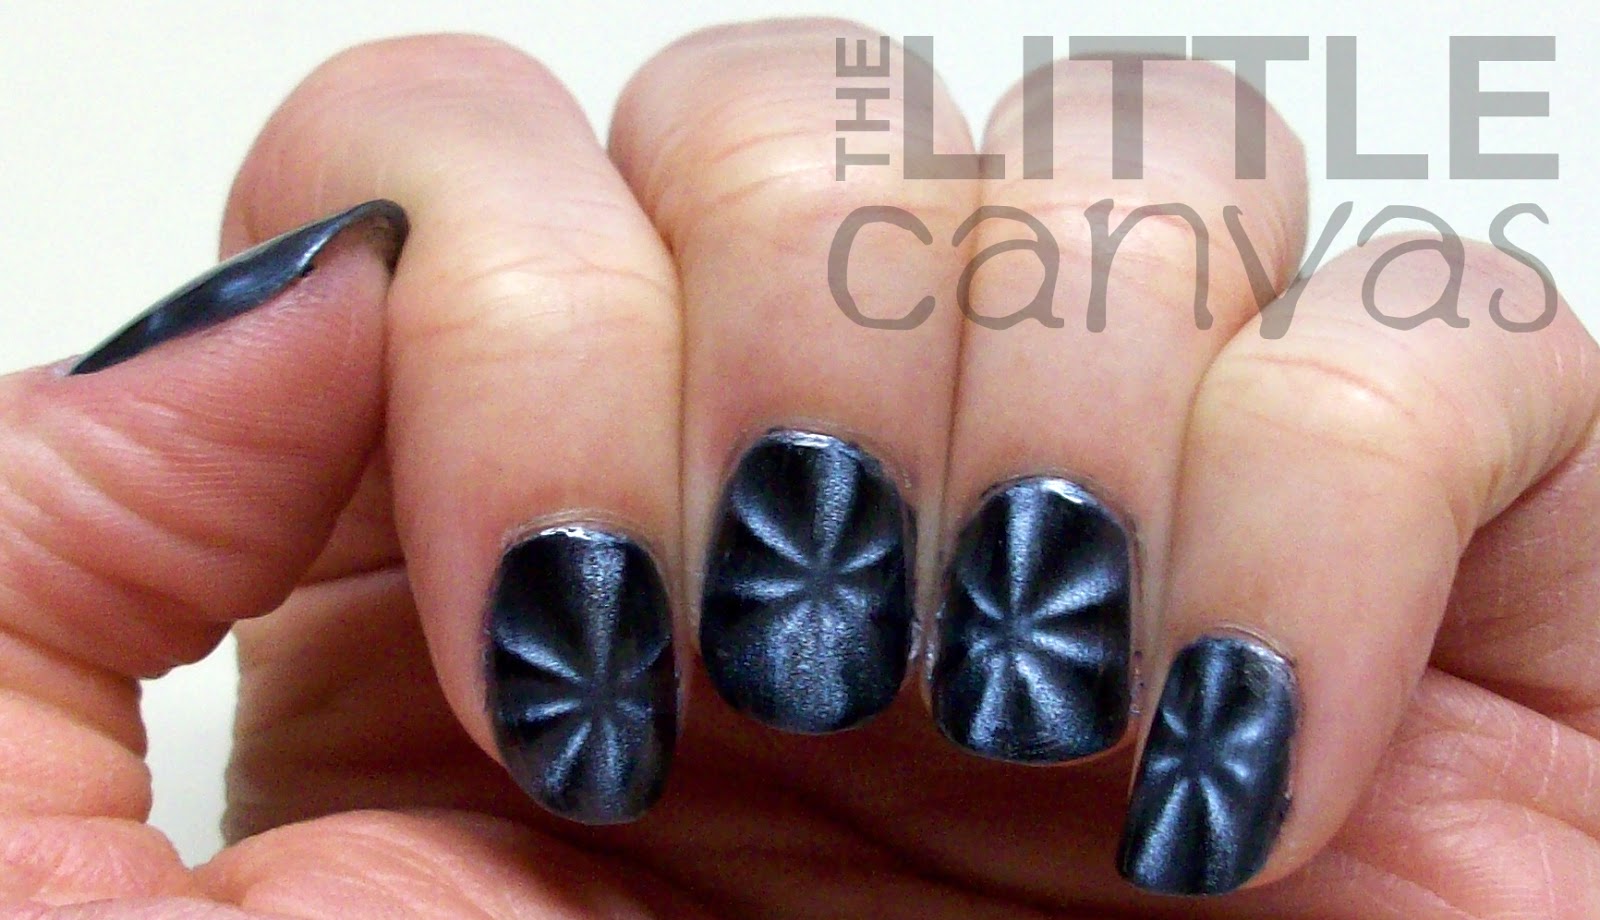
Thank goodness my base was the awesome China Glaze Magnetix Polish provided to me by Big Daddy Beauty (who is holding a sweepstakes if you haven't already seen)!  When you have a failure in the nail art department, or you are just too lazy to complete a design, magnetic polish is the way to go!  Let's take a look!


Colors Used:
  • China Glaze Magnetix - Pull Me Close
This is my first successful attempt at using a magnetic polish.  When Sinful Colors first introduced their line of magnetic polishes, I purchased one, but quickly returned it after swatching one nail.  I personally did not like the effect.  I think it was user error on my part, no matter what I did, I could not get the magnet to make the design even on each nail.  It came with this small ring with the magnet attached to it and I don't know why, but every time I held it over the nail (perfectly centered) the design came out crooked or it would partially magnetize my polish.  It was awful, and I was so upset because it was a really pretty purple color with holo glitter flecks found in a polish like Fairy Dust.

This China Glaze polish though is a hole different story.  Sure I had some user error fails on a couple of nails, but that was only because I wasn't paying close attention, put the magnet on sideways, or slipped and it hit the wet nail.  I'm miss careful as you can tell.  Unlike the Sinful Colors magnetic polish, China Glaze sells their magnets separately from the polish itself.  This really doesn't bother me because it allows you to pick which designs you want.  I believe there are 6 magentic designs total China Glaze has created with their red magnets.  The one provided to me was the starburst design, chevron, and single lines.  The other one I believe is swirls, checkerboard, and maybe straight lines (don't hold me too it though).  These designs were perfect for me and personally i like them better than the checkerboard ones I've seen floating around the blog-o-sphere.  Below is the magnet and the polish.


As you can see from this picture and my swatches, Pull Me Close is a blue/black polish.  I am a sucker for blues, so when I received this polish, I was really happy.  I was even happier when I saw how the effect showed up on the nail.  I had complete coverage of the polish in one coat, but when using a magnetic polish you want to use at least 2 coats.  If your first coat isn't thick enough and you try to use the magnet, you'll end up with some naked spots on the nail.

I loveeeed how the polish looked after the magnet was held over it.  The black came to be so apparent and really created an amazing contrasting 3-D look.  I'm looking at them now as I type this in awe.  It is so simple, and yet leaves you with nails that almost look fake.  I'm very pleased with this over the Sinful Colors magnetic polish.

What do you think?  Ever used a magnetic polish before?  Ever use a China Glaze Magnetix? 

Like what you see and can't find it in a store?  Then click here to purchase the polish from Big Daddy Beauty for $3.99.  The magnet can be found here for $3.49.  Great deal considering the retail on these polishes over at Ulta are $10.00 and then another $6 to $10 for the magnet!

Have a great day everyone!


**The China Glaze Magnetix polish was provided by BigDaddyBeauty.com for promotional purposes. All expressed opinions are my own. Please see my disclosure page for more info.**