FingerPaints

Snow Globe Nail Art

9:00:00 AM


Good morning polished world!  How are you all today?  It's funny, the day right after Christmas, winter hit my town.  That's right, cold weather, sleet, ice rain, and now today some snow!  I'm kind of bummed that this didn't happen before Christmas because I love seeing snow on the bushes with the Christmas lights.  Unfortunately I took the lights down yesterday so I won't be seeing that today when the snow hits.

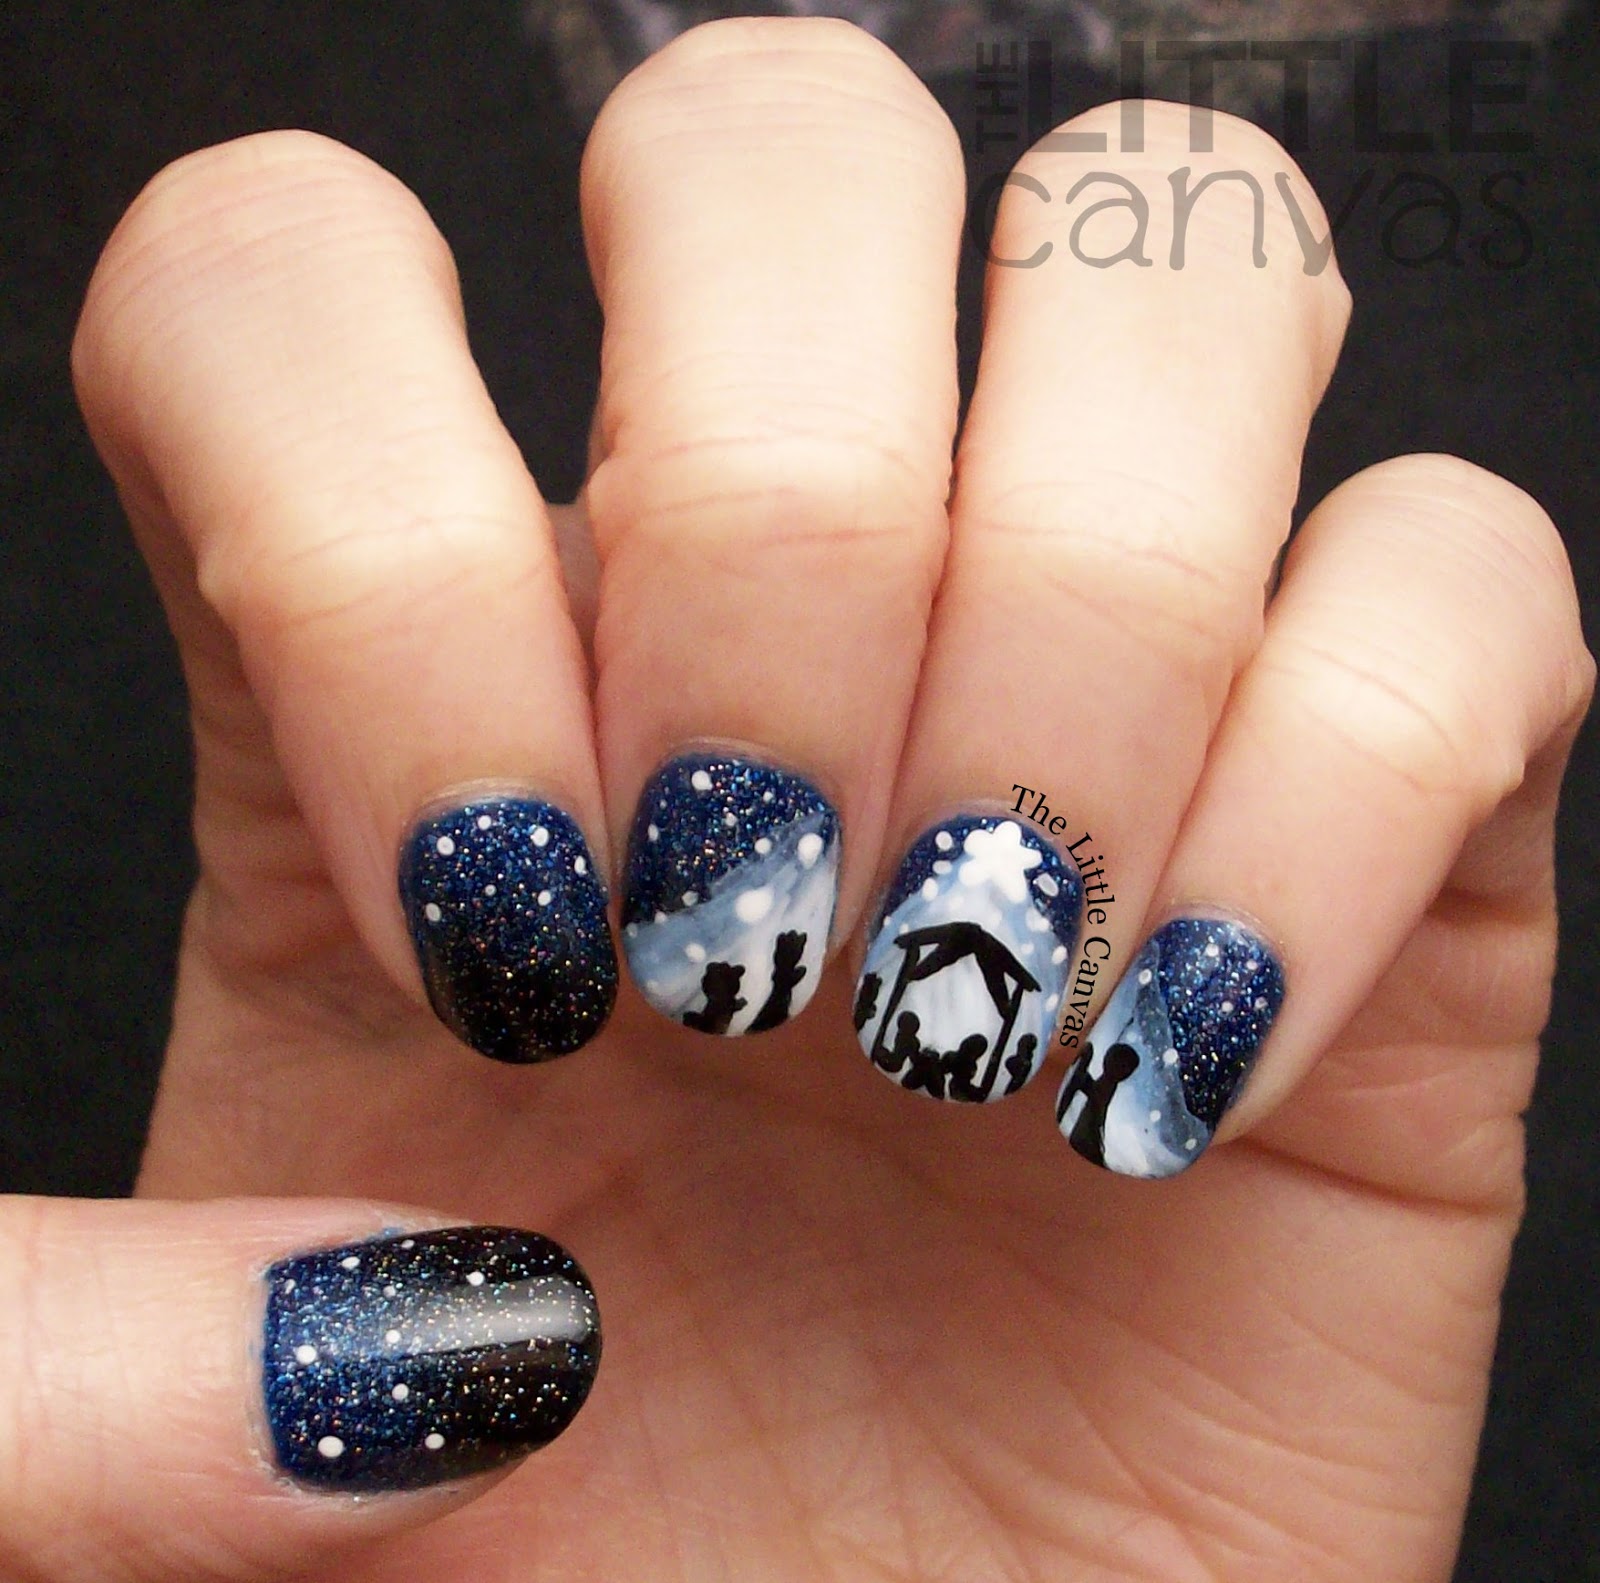
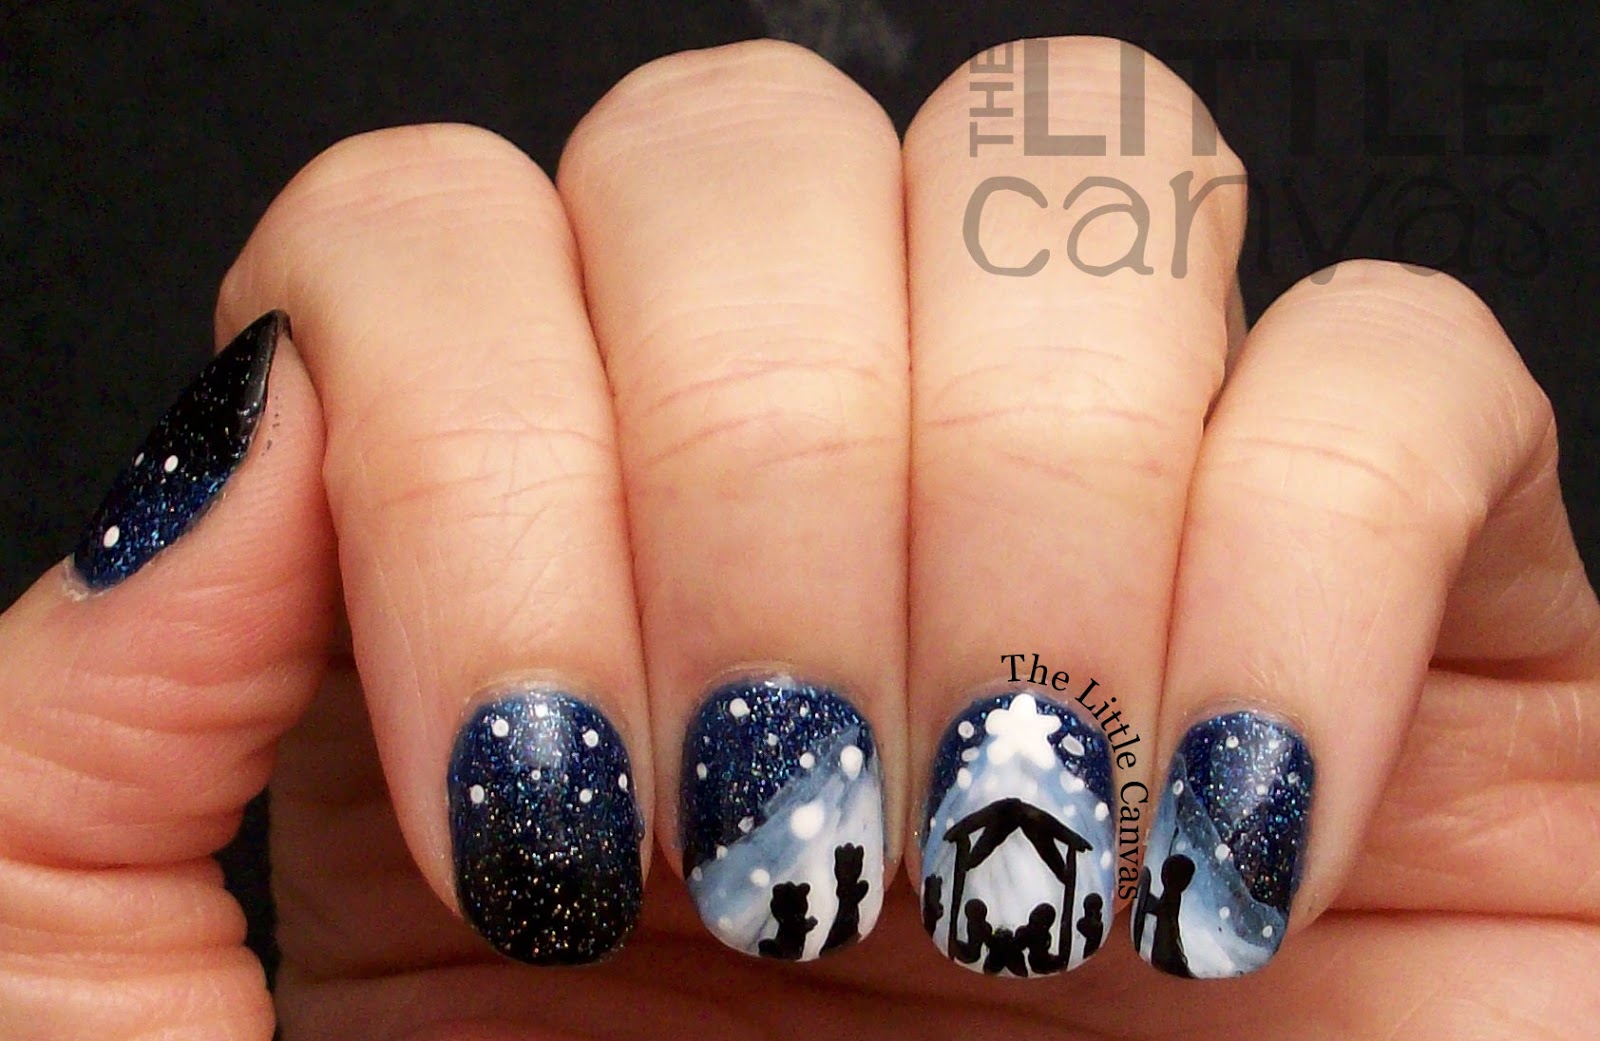
Today I am sharing with you a perfect winter manicure which is completely fitting for the weather we are supposed to get!  I created this snow globe manicure after seeing a few similar ones on Pinterest.  Most of them were Christmas themed, but I decided to take out the Christmas and make it look like what you would see in a snow globe.

Let's take a look!


Colors Used:
  • FingerPaints - Sparkle With Me
  • Zoya - Hunter
  • Orly - White Tips
  • Acrylic Paints
Doesn't this design remind you of a snow globe scene??  I started off with a plain clear base coat.  When that was dried, I added a coat of FingerPaints Sparkle With Me on my naked nail.  This matte white glitter with holo pieces is the perfect polish to resemble snow.  I debated on using dots, but I'm happy I decided to use this glitter.  One coat and I had complete coverage.  No need to place any of the hexes!

The glitter dried super fast so I was able to add the next part right away.  I went through with Orly White Tips and added an uneven french tip to my nails.  I debated on making my french tips perfect, but I decided against it since I wanted my nails to look like a snowy landscape.


I then went through with Zoya Hunter and added the trees to my nails.  For this step, I ended up using a toothpick.  I know some nail artists find it easier to use nail art brushes, but I find I have more control when using a toothpick.  While the green was drying, I created the snowman using dotting tools and toothpicks.  It was kind of a pain to get such a tiny snowman on my nails but totally worth it!  The last step was to add the white snow on the trees.

What do you think?  Something you see yourself doing??

I love how this manicure turned out.  I feel like it's been awhile since I've done "intense" nail art like this.  It took me a little longer that most manicures but it was really worth it.  I was sad when one of the nails chipped and I had to take them off.

Until next time, <3.


China Glaze

Happy New Years!

9:00:00 AM


Good morning polished world!  Can you believe it is the last day of 2015!?  Where did this year go?!  It's been loaded with some ups and downs, but through each thing there have been dozens upon dozens of blessings.  Who can be angry with that??

Today I am sharing with you a New Years manicure I did for part of an Instagram collaboration.  I really haven't done many IG collabs, so I was super thrilled when Sarah from @25_SweetPea asked if I wanted to take part!  I quickly got to work on a gold and black manicure and came up with this little mish mosh design!

Let's take a look!


Colors Used:
  • Orly - Liquid Vinyl
  • OPI - Love Angel Music Baby
  • China Glaze - Bring on the Bubbly
  • Salon Perfect - Champagne Toast
I love how this manicure turned out!  I really had no idea what I was going to do when I started, and then I just started going and it all came together!  I truly am in love with it and am going to be sad when it starts to chip!

So let's take a minute o talk about Bring on the Bubbly by China Glaze.  It is a gold multi hex glitter with these random pieces of holo glitter throughout.  There are even these large holo chunks which sparkle off the gold.  Ugh, I'm so happy I picked up a bottle of this.  I used it as a topper on all my gold nails and then for the glitter gradient.  Best decision ever.  If you can, grab a bottle of this!


Another wonky colored photo that doesn't look like the rest.  Meh whatever.  I'm too lazy to figure out why.  Maybe I should start using my real camera again instead of the iPad for the bottle shots.  Or I should just not be lazy and use my lightbox.  Maybe in 2016!

What do you think?  Fan of this New Years look?  Are your nails black and gold also??

Alright everyone, I hope you have a safe and Happy New Year!  Please be safe!!!

Until next time, <3.

Dot Mani

Floral Manicure with Sally Hansen King of Shadows

9:00:00 AM


Good morning polished world!  How are you all doing today??  It's Monday, which means it's the start to another work week!  Christmas is over too, which means it's time to return to normal manicures!  I'm kind of cheating today and sharing with you a manicure I did right after Thanksgiving because I'm honestly uninspired at the moment for anything that isn't Christmas.  Funny how that happens.  I think it's because I had so many Christmas ideas and wasn't able to complete all of them.  Who knows.

Anyways, today's manicure is a fun dot flower manicure which was inspired by Young, Wild, and Polished.  A while ago, she was doing these fun framed dot flower designs and I really liked how they looked.  I grabbed some of my Sally Hansen polishes and got to work.

Let's take a look!


Colors Used:
  • Sally Hansen - King of Shadows
  • Sally Hansen - Night Fright
  • Sally Hansen - OMGhost

King of Shadows is such a gorgeous dusty lavender polish.  It's very unique to my collection and probably not a polish I would have picked up in the stores just by looking at it.  Don't get me wrong, I love my purples, but something this muted just doesn't call out to me normally.  After applying two coats though, I was in love.  It's just gorgeous and has perfect application.


Since I was using a Sally Hansen color, I decided to find my Sally black and white polishes.  The only ones I own are the Insta-Dri from the Halloween collection in 2014.  I don't know why these polishes aren't part of the main line of Insta-Dri polishes because I really feel like they would sell.  The white you could get away with one coat.  Black needed two because it was a little streaky with the first coat.  For this manicure I used two coats of both.

What do you think?  Fan of this manicure?  Do you own King of Shadows?

Until next time, <3.

Christmas

Merry Christmas! Nativity Nail Art

9:00:00 AM


Merry Christmas polished world!!!  I hope you all are having a fabulous day so far, and have lots of fun things planned!  I really wanted to have this post up yesterday, but when I got ill last week my blog schedule got all weird.  So here I am posting my final Christmas manicure on Christmas.

This year for my final manicure, I have created a nativity scene on my nails!  I have always wanted to do this manicure since it symbolizes the real reason for the season.  If it weren't for the birth of the Savior Jesus Christ, there would be no Christmas.

Earlier in December, I saw this Silent Night inspired manicure by Rock Your Nails.  I loved her's so much that I knew immediately that this was going to be the nativity scene I was going to recreate for Christmas!

I love, love, love how it turned out!  Let's take a look!


Colors Used:
  • Zoya - Dream
  • Orly - Liquid Vinyl
  • INM - Northern Lights
  • Acrylic Paint

In Rock Your Nail's video, she used a cream blue polish and did a blue to black gradient.  I wanted my nails to look sparkly like the night sky, so I grabbed my bottles of Dream and Storm.  I started off with a base coat of Dream and then tried to do a gradient with Storm.  Unfortunately it didn't work.  I think that the black jelly of Storm didn't build up well and was just getting sucked into the make up sponge.  Who knows.  So I decided to sponge the tips with Liquid Vinyl and then add a top coat of INM Northern Lights.  It worked out perfectly and I got the same look that I was hoping to achieve using Dream and Storm.


Once INM Northern Lights was dried, I took an acrylic white and blue polish and started painting the beam of light on my nails.  In Mely's video, she said she used watered down acrylics to get her look.  I would have never thought to water down the acrylics and I don't think this design would have worked if you just used plain paint.  Watering it down blended the blue and white together, and it created the streaky light look.

After the lighting was just right, which took me quite awhile to do since my OCD had set in, I went through with the black acrylic and a toothpick to create the nativity scene.    I think this was the hardest part.  Sure the little guys are silhouettes, but if you mess up the acrylic just a little, you end up with an amorphous blob.

What do you think?  Are you a fan of this Christmas nativity manicure?  Have you tried something like it ever?

I'm super proud of these nails and beyond in love with them.  I'm so happy I stumbled across Mely's manicure so I could re-create it!

I hope that everyone has a very blessed Christmas!

See you all in a few days! Until next time, <3.