Tribal Print

Aztec Nails Inspired by One Nail to Rule Them All

9:00:00 AM

Happy Saturday polished world!  How are you all today?  I guess we're supposed to get snow, you know after it was 50 degrees yesterday.  Spring, can you please wake up?  I really would like to start wearing a Spring weight jacket again and put away my Winter coat.

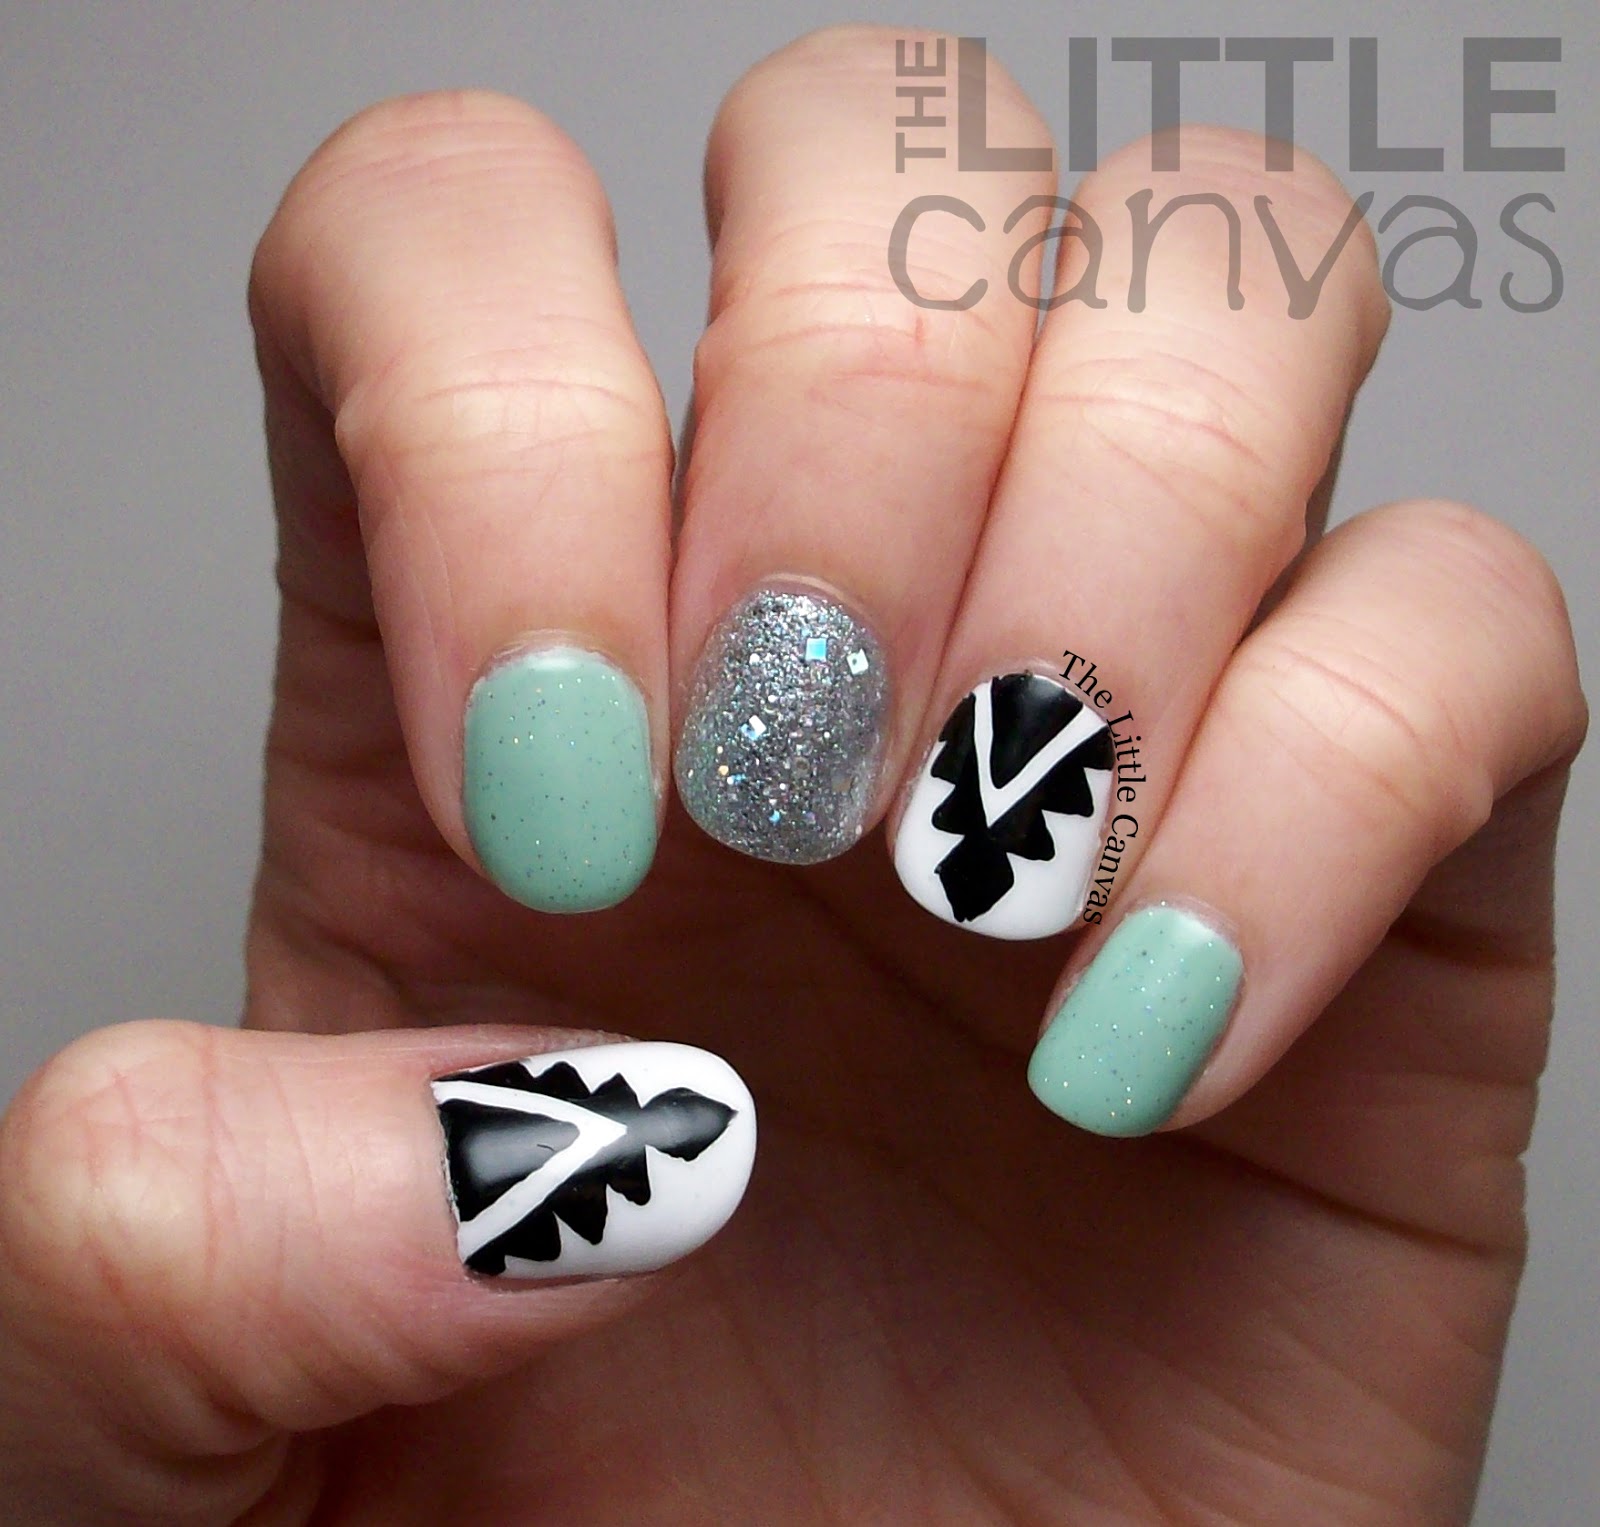
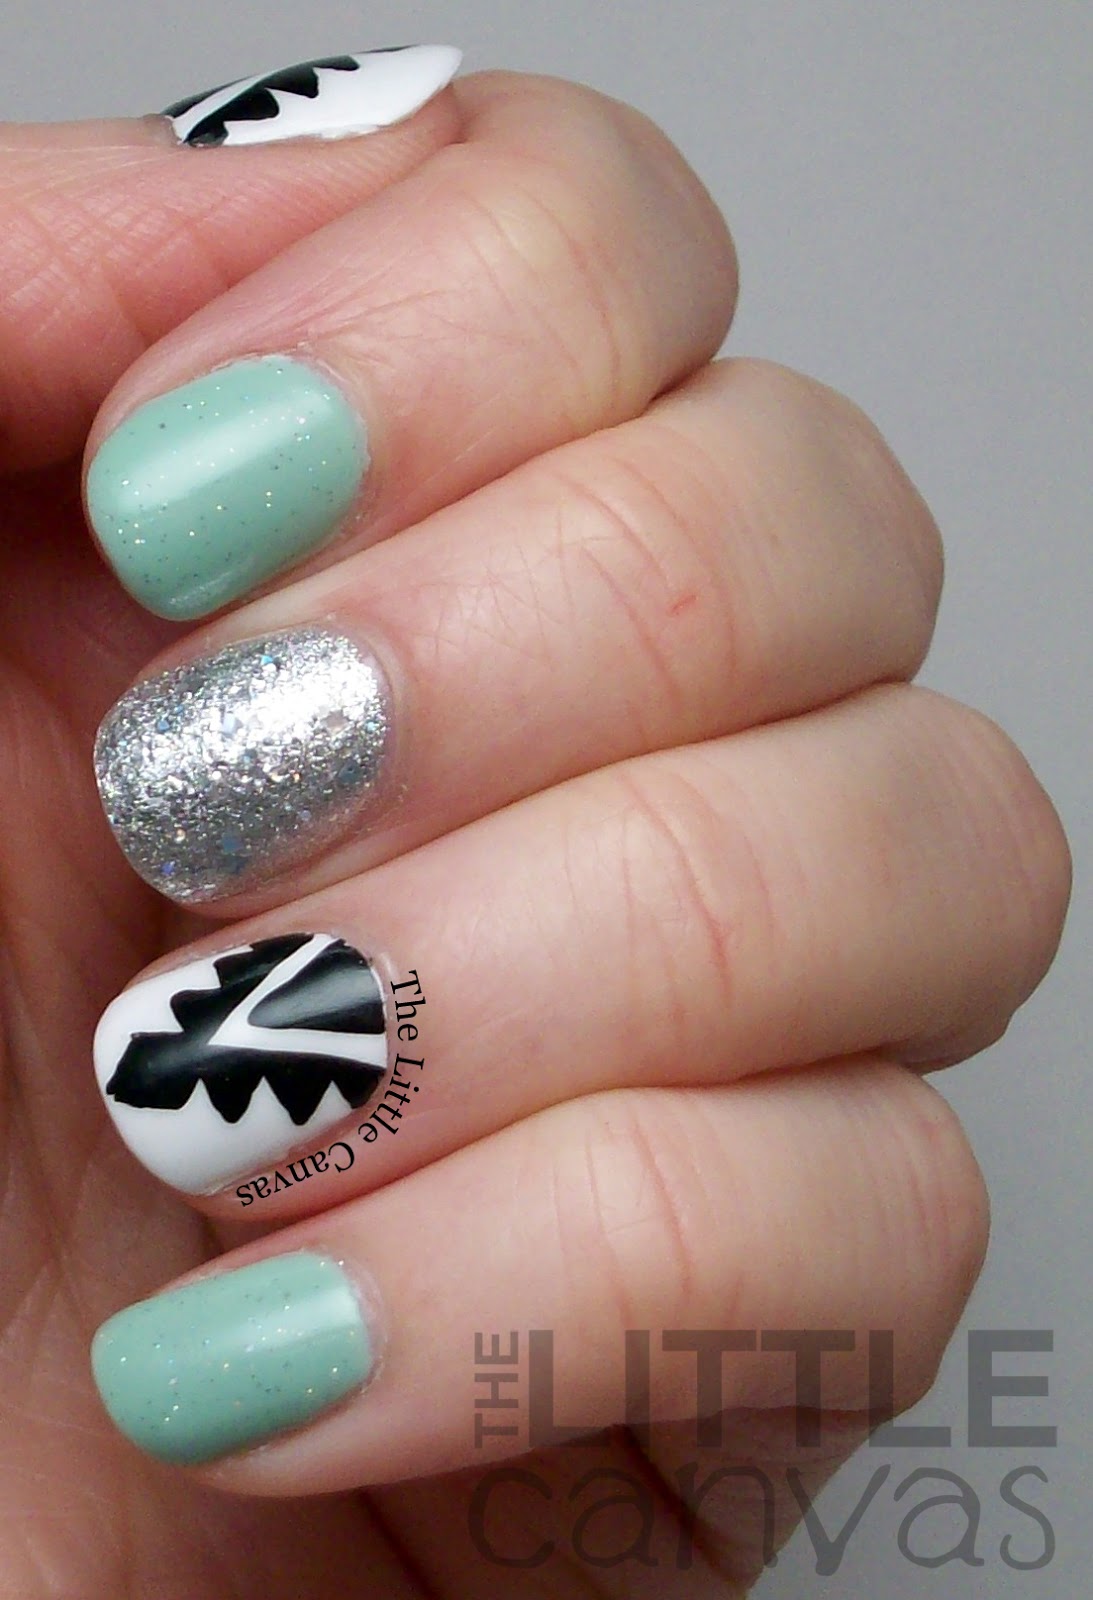
Today I'm bringing you a manicure I did a few weeks ago after seeing this glitter aztec manicure tutorial by One Nail to Rule Them All.  I fell in love with her design because it had two things I love; silver and mint.  How can you go wrong?  So, I grabbed my polishes, nail art brush, and got to work!

Let's take a look!  Pardon the photos, they look kinda cruddy.


Colors Used:
  • Orly - Jealous Much?
  • OPI - This Crown Needs a Gown
  • OPI - In True Stefani Fashion
  • Sinful Colors - Snow Me White
  • Orly - Instant Artist - Black
  • INM - Northern Lights
I really love this Orly mint polish.  It has a perfect mint shade with the perfect formula.  I'm rather impressed lately with every Orly I've purchased in the last 6 months.  I've become kind of addicted and they're slowly becoming my favorite.  If you may or may not remember, Orly Liquid Vinyl is my favorite black, and the Instant Artists are my go-to nail art polishes, so it makes sense that all other Orlys would follow.

Can we also talk about how awesome This Crown Needs A Gown looks with a top coat of In True Stefani Fashion?  The satin finish with the holo square hexes and the random smaller silver glitter pieces....it honestly was gorgeous in person.


For my design, I followed One Nail to Rule Them All's tutorial for the top half, then I kind of just did my own thing towards the bottom.  I like how they turned out!  I'm most certainly going to do more Aztec manicures in the future!

What do you think?  Fan of the manicure?

I hope you all have a great weekend!  I have lots of manicures to share with you over the next few weeks and some new tutorials!  Can't wait to show you!

Until next time, <3.

The Beauty Buffs

The Beauty Buffs - Pastels! - Pastel Tape Nail Art Tutorial

8:00:00 AM

Good Morning Polished Peeps!  I'm so excited for today's post since it is something new for The Little Canvas!

Every other Wednesday, I will be blogging along with a group of talented bloggers as part of The Beauty Buffs.  This group was created by the lovely Norelis of Fierce Make Up and Nails.  Each post will be centered around a theme that we are able to interpret however we want.  Since not all of the participants are nail bloggers, we all won't be bringing you the same thing!  Isn't that fun??  I'm so excited to see the fashion/make up posts!


Today's theme is pastels.  Spring is officially here according to the calender, but not according to my local weather.  Despite the weather outside, this is one of my favorite time of years, especially when it comes to nail polish collections.  Reason being, all the pastel pretties.  Below you can see all my pastel polishes.  It's a shock to me I don't have more since they're truly my favorite.  Especially the mints.  I believe you can never have enough mint polishes.


For today's post, I was originally going to highlight some of my favorite pastel polishes and talk about why I liked each one.  Once I took them out though, I realized how I loved all of them and couldn't pick a favorite.  I then thought about picking different combos and highlighting them, but the possibilities became endless.  All pastels look good with one another.  Pink and yellow, blue and purple, orange and mint, you can't go wrong.
  
Therefore, I decided to create a nail art tutorial for an easy and cute pastel design using a wide array of pastel colors.  Last year I did a similar manicure like the one I'm doing today's tutorial for, but instead of using pastels, I used neon polishes.  After creating this tutorial, I'm loving it so much more.  Pastels look amazing with white.

Let's take a look!   Sorry, I didn't do this on my actual nails, but I did it on the nail art wheel, so it's kind of similar...right?


Colors Used
  • Sinful Colors - Snow Me White
  • Orly - Jealous Much?
  • Sinful Colors - Bright Lucite
  • Sinful Colors - Candy Coated
  • Zoya - Dot
  • Sinful Colors - Unicorn
How To:
  1. Start off with a base coat of your favorite white polish.  I used two coats of Sinful Colors Snow Me White
  2. When your base is dry, with your pastel polishes, swipe diagonal lines across the nail.  You can use whatever color order you want, or could even have horizontal or vertical lines.  Have fun with it!  Continue down the nail with all your pastels.  Apply a fast dry top coat and let dry.
  3. Once the nail is completely dry, add pieces of tape to the middle section of each color block.  Once the tape is on how you would like, apply two thin coats of white polish.
  4. Once the white polish has been applied, quickly remove it using nail art tweezers or your own fingers.  Let the polish dry, then finish with your fast dry top coat.
My tape lines are a tad wonky, but it's kind of hard to get tape perfect on a nail art wheel.  I've done it a few times and I feel like I'm getting better, but it's still difficult.  I think this is a really cute nail art idea for Spring and even Easter.  I love how the pastels really pop underneath the white, and much prefer this over the neon design I did last year.

What do you think?  Is this a look you would try?

Don't forget to check out the other girl's posts!  I'm so excited to see them! :) 


Until next time, <3.

Dot Mani

Twinsie Tuesday - Winter to Spring Transition Polish

9:00:00 AM

Happy Twinsie Tuesday!  How are you all today?  I'm doing well!  Today for Twinsie Tuesday we are sharing our Winter to Spring transition polishes!  Where I live, Spring has yet to happen.  Yesterday it was snowing and 20 degrees, again.  It's supposed to warm up later this week, but I'm honestly holding my breath.  

I wasn't sure what color to pick. I'm typically not up on the current fashion trends or aware of what colors people wear when.  I'm the type of girl who will wear neons in the winter and dark colors in the summer.  I wear what I want, when I want.

So for today's post, I decided to go with a periwinkle blue, Sinful Colors Sail La Vie.  It is a pretty polish which reminds me of Spring, while being still kind of wintery.  Not too pastel, and not too dark.  Perfect transition right?  We will ignore the fact that it was released as part of one of their summer collections last year.

Since I'm not huge on swatching and wearing a plain manicure, I decided to do a kitchen sink manicure after seeing this design by Young, Wild, and Polished.  Let's take a look!


Colors Used:
  • Sinful Colors - Snow Me White
  • Sinful Colors - Sail La Vie
  • OPI - Kiss Me I'm Brazilian
  • Orly - Liquid Vinyl
Sail La Vie is such a gorgeous periwinkle blue with a very, very, very subtle shimmer.  To me, it leans more to a cream because it's so barely noticeable.  I used three coats for this manicure because with two I found that there were some bald spots.

When I saw the color last summer, I knew I had to have it since my collection was severely lacking a periwinkle.  I used it for a pedicure with a glitter topper and honestly it was one of my favorite pedicures of the whole season.  Paired with the OPI Kiss Me I'm Brazilian pink, and the Orly Liquid Vinyl Black, I think the whole manicure is suitable as a Winter to Spring transition.


To get the look, I used my dotting tools and striping tape.  Honestly that ring finger was a royal pain in the butt to do!  I had to work rather fast to get the colors in because if they dried too much and you pealed the tape off, some of the color started tog go with it.  I love tape manicures with multiple colors, but hate how fast you have to work.  Then when I work fast, the tape tends to fold over on one of my nails on the other hand leaving behind whatever color was on the tape.  It can be frustrating.  I even have a pair of nail art tweezers to make it easier, but the tape just gets stuck to the dumb tweezer and I still find myself using my fingers.

Despite that rant though, I still wholeheartedly love tape manicures and will continue to bring you more.  In the end, they're beautiful and fun!

What do you think?  Did I do well picking a Winter to Spring Transition color?  Can we consider periwinkle to be a transition?  Hmmm.

Don't forget to check out the other Twinsie's Winter to Spring transition manicures!


Amanda at Amandalandish
Amber at Nails Like Lace
Chelsea at Nailed Blog
Elizabeth at Did My Nails
Kelly at Tuxarina
Lakeisha at Refined and Polished
Marisa at Polish Obsession
Rachel at Top Coat It
Róisín at Cuti-CLUE-les
Stephanie at A Little Polish
Traci at DrinkCitra

Until next time, <3.

Animal Print

Simple Leopard Print

9:00:00 AM

Sorry I've been MIA the past few days here!  Life got a little hectic and I became kind of lazy and didn't want to write up posts to go with my many manicures I need to share.  So I have found a little reservoir of energy and here I am blogging!

Since I posted a leopard print earlier this week, I thought I would share another leopard print manicure and make this leopard week.  This is a manicure I came up with a while back after I saw my purple and mint sparkle polish next to each other.  It looked really pretty in person, but sadly the photographs made it darker than it was.

Let's take a look!


Colors Used:
  • Orly - Charged Up
  • Precision Lacquer - After Dinner Mints
  • Sinful Colors - Snow Me White
  • Orly - Instant Artist - Black
Simple and cute right?  I really love Orly Charged Up.  I bought it to replace a dark purple Sinful Color polish to find out that this was a whole different type of purple.  It is so rich.  It applied thin and jelly like in the first coat, but built up nicely with two more.  I could have gotten away with 2, but really wanted the purple to show through. 

I loved using After Dinner Mints as an accent.  It is such a gorgeous mint glitter.  As a lover of mint anything, I am so happy to have it as part of my collection.  For this manicure, I used three coats.  It would look amazing over the top of a mint polish.


I like the leopard print that I did using the two colors.  My original plan was to do mint dots with a purple outline, but I decided the black outline looked better.  Honestly, really happy I didn't do a purple outline now that I look at it because I think it would have looked muddled and quite nasty.  The black makes the leopard pop.

What do you think?  Love it, hate it?

Until next time, <3.

**Some of the polishes used in this post were provided for review. Please see my disclosure policy**

Animal Print

Twinsie Tuesday - Tip Nail Art

9:00:00 AM

Good morning polished world!  As I write this post, it's midnight and I'm not in the greatest of moods.  I had the cutest idea for a manicure that crashed and burned.  I spent close to an hour and a half trying to get it to work and it just was a waste.  So now I am attempting to paint at least a base coat on my nails because my nails are peeling thanks to this awful weather and they can't be naked.  Hopefully by the time this post goes live I will be well rested and not as upset over my disasticure.

I for sure am not upset over the manicure I am posting now for Twinsie Tuesday.  The prompt for today is Tip Nail Art.  I interpreted this as nail art that is only at the tip of the nail.  Originally I was going to do some sort of French Tip design with art around it, but I think my nails look weird with a French Tip because of  how short they are.  So, I kind of went crazy.

Let's take a look.


Colors Used:
  • Sinful Colors - Snow Me White
  • Sinful Colors - Mad About Hue
  • Sinful Colors - Bright Lucite
  • INM - Northern Lights
  • Orly Instant Artist Black
Kind of awesome looking right?  You can never go wrong with a gradient, glitter, or a leopard print.  I started off with a base coat of white polish, then created a gradient using Mad About Hue, a pastel purple, and Bright Lucite, a baby blue.  To even out my gradient, I used INM Northern Lights which is just amazing.  Love the little holo pieces.  Then with my nail art brush, I used my Orly Instant Artist Polish and drew on the leopard outline.  Finished with a top coat and love.


I just love this manicure.  I have not one single complaint.  It's one of the best gradient's I've done and my leopard print is looking pretty dang good.  I don't know but it's making me feel a tad better looking at it after the horrible mess up tonight. Sometimes after I mess up a manicure I feel like I should give up and that I really don't know what I'm doing, but successes such as this one bring me back to my nail art loving center.

What do you think?  Liking the look?

Make sure to check out the other twinsie's posts!


Amanda at Amandalandish
Amber at Nails Like Lace
Chelsea at Nailed Blog
Elizabeth at Did My Nails
Kelly at Tuxarina
Lakeisha at Refined and Polished
Marisa at Polish Obsession
Rachel at Top Coat It
Róisín at Cuti-CLUE-les
Stephanie at A Little Polish
Traci at DrinkCitra

Until next time, <3.

Gradient Mani

St. Patrick's Day Manicure!

9:00:00 AM

Happy Sunday Polished World!  How are you today?  Are you, or should I say, are your nails ready for St. Patrick's Day?  As you can guess, mine are!  After creating my nail art wheel, I wasn't sure that I was actually going to paint my nails for the holiday itself.  

I decided to take some inspiration from my own wheel and last year's kitchen sink St. Patrick's Day manicure and create a look.  For three of my nails, I picked 2 designs which of course were the most time consuming to create.  Even though the manicure took me close to two hours to do all 10 nails, and I finished close to midnight, I'm super happy I created the look!

Let's take a look!


Colors Used:
  • Shamrock Nail
    • Sally Hansen - Mint Sorbet
    • Zoya Josie
    • INM - Northern Lights
  • Leprechaun
    • Zoya - Chantal, Josie
    • Maybelline - Sweet Clementine
    • Orly - Instant Artist - Black and White
    • China Glaze - I'm Not Lion
  • Pot of Gold
    • Ulta - Let the Flames Begin, Sun-Sational, Blue Streak
    • Maybelline - Sweet Clementine
    • Sinful Colors - Amethyst, Snow Me White
    •  Orly - Instant Artist - Black
    • OPI - Love.Angel.Music.Baby
    • China Glaze - I'm Not Lion
    • INM - Northern Lights
Well goodness, that's a lot of polish!  I'm actually quite surprised it was that many bottles because it honestly didn't feel that way!  Majority of them are used to create the pot of gold nails.  To get that design, I started with a base coat of white polish.  Once the white was dry, I took a make up sponge and painted thin stripes of color down it starting with red and ending in purple.  I then dabbed it on the nail until the colors popped to my liking.  Since I was creating a gradient using primary colors, I didn't have to keep applying polish to the make up sponge like I have to with my neon polishes.  Probably because they're more color concentrated?  Who knows.  Anyways, I then took a quick coat of INM Northern Lights over the top and began working on my pot of gold using my Orly Instant Artist Striper.  With my large dotting tool, I created the gold pieces using Love.Angel.Music.Baby and added a little sparkle to them using I'm Not Lion.  I found that I'm Not Lions glitter and holo pieces really brought out the sparkle in the INM Northern Lights.

The leprechaun was created by starting off with a base coat of Zoya Chantal from the Natural collection.  Gorgeous skin colored nude which works perfect for little faces.  When that was dry, I used my nail art brush to create the leprechaun hat with Zoya Josie.  I then took a medium dotting tool and added the hair and beard.  The rest of the details were later added with nail art brush or dotting tools. 

Last but not least, the shamrocks were created by starting off with a base coat of Orly Mint Sorbet.  Such a pretty and bright pastel mint green polish.  I then added a quick top coat of INM Northern Lights.  Once that was dry, I created the shamrocks using a medium sized dotting tool.  I pretty much tried to line four hearts up together.


I want to pick a favorite nail, but honestly I like them all.  The leprechaun, the pot of gold, the shamrocks, just all of them are so cute.  Okay, the leprechaun probably is the cutest of all, just look at him looking at the shamrock.  Hmm, I should have had him looking at his pot of gold.  We can say he's looking at the larger amount of gold on the thumb nail!

What do you think?  Do you have a favorite nail?

If you were inspired by my nail art wheel and shared any of your designs on Instagram, please make sure to tag #tlcinspiredmani so I can see!

To everyone reading this post today, please have a SAFE St. Patrick's Day.  I know that plenty of people "party" this weekend and drink more than normal.  If you are drinking, please do so responsibly!  You are not only putting your life in danger, but others around you, which is not fair.

Until next time, <3.


Animal Mani

Owl Nail Art

9:00:00 AM

Good morning polished world!  How are you today?  I have decided to dig into The Little Canvas vault and share a manicure from last year that I'm kind of upset I never posted.  I do have more recent manicures to share, but I needed to share this oldie but goodie.  Mainly because the pictures are outside and I miss taking outdoor photos so much!  Hopefully after posting this, all the snow will melt, Spring will come, and I can throw away my lightbox.  Okay, I won't throw it away, but you know what I mean.

From the vault today, we have little owls!  I might have mentioned this in the past, but I love animal manicures.  Whenever I put a little creature on my nails, I just love them.  They're always adorable.  These owls are no exception.

Let's take a look!


Colors Used
  • Sinful Colors - Nirvana
  • OPI - My Boyfriend Scales Walls
  • Orly - Liquid Vinyl
  • Zoya - Thandie
  • Zoya - Darcy
To get the look, I started off with my nail art brush and created the swooped line for the tops of their heads.  Then with the nail polish brush, I filled in the rest of the nail.  When the little bodies were dried, I took OPI My Boyfriend Scales Walls and created the tummies.  After that I went through with my dotting tool and added all the details of the beaks, dots, and eyes.  Finished with a top coat and called it a day.

No fourth picture because this was before I started doing those little bottle shots.  I love that I started including those when I was forced to use the lightbox again.

What do you think?  Liking the little guys?  Happy I went into the TLC Vault?  Should I do a tutorial for them?

Tonight I'm planning on doing some St. Patrick's Day nail art.  I hope I can be somewhat original after doing my nail art wheel!  If you haven't seen that yet and have no idea what to wear on your nails Monday, check that post out!  If you are inspired by any of these designs and decide to recreate them, tag #tlcinspiredmani on Instagram so I can see :).  I hope this hashtag catches on!

Until next time, <3.


Roses

Retro Rose Nail Art Tutorial

9:00:00 AM

Good morning Polished World!  That's right, two days in a row I'm posting.  If you read yesterday's post (the retro rose nail art inspired by JustAGirlAndHerNails on IG), then you know I wanted to focus on the Orly Instant Artist and not how I got the look.  So as promised, here is a tutorial which shows how I got the design!

Let's take a look!  I think you're going to love my new tutorial layout!  No more PhotoShop drawings that look like eggs!


The colors used for this manicure were:

  • OPI - My Vampire is Buff
  • Ulta - Tutu Cute
  • Sinful Colors - Pistache
  • Orly Instant Artist - Jet Black
Directions:
  1. Start off with a base coat of your favorite tan/nude polish.  Once you applied as many coats as you wanted, apply a top coat.
  2. With a black polish, or the Orly Instant Artist, use a small dotting tool and create a polka dot design on your nail.  Let the dots dry!
  3. With a large dotting tool and a purple polish (or color of your choice), create the rose in a corner of your nail.  If you have short nails like I do, you can do just one rose, or if your nails are longer like this nail wheel, you can do two roses.  In my manicure, I did two roses on my thumb and one rose on all other nails.
  4. While the rose base is drying, use a nail art brush or a small dotting tool and add the leaves with a green polish.
  5. With a black polish (or the Orly Instant Artist), add the petals and details to the leaf using a nail art brush.  If using the Instant Artist, you can use the striper itself.
  6. Finish with a top coat and admire your work!
What do you think?  Is this a design you will try?  Do you like my new tutorial!?

If you re-create the look, please be sure to share with me!  I would love to see! 

I would also love to hear your feedback on my new tutorial!  I love re-creating the looks on my nail art wheel and I'm planning on doing more.  The pink nail next to this manicure will be featured soon on the blog with the tutorial as well!

If you have any designs you would like me to create a tutorial for, please let me know!

Until next time, <3.

Roses

Twinsie Tuesday - Go-To Polish (Retro Rose Nail Art)

9:00:00 AM

Sample

Good morning Polished Peeps!  How are you today?  Today it's supposed to be 40 degrees again so I can't complain.  Oh wait, I can because tomorrow it's supposed to snow.  Spring is being such a tease this year.  Oh well, could be worse.

Today is Tuesday, which means it is Twinsie Tuesday time!  This week we are sharing our Go To polish.  As a person who primarily does nail art and RARELY swatches a plain color on all 10 of her fingers, I can't say that I have a primary go to polish.  I thought about going with a go-to color that I use for a base, but that kind of gets hidden behind the art.  That's when it hit me....the art!  What is my go-to polish when it comes to adding the details to my nail art? 


 My go-to polish is my Orly Instant Artist Water Based in Jet Black.  You may think this is boring, but trust me, it's not, wait until you see the manicure and of course read about why I loooove this polish!  

Please read on!

Accent Nail

Zoya Hudson, Rebel, and Seraphina Nail Art

9:00:00 AM

Press Sample

Happy Sunday, or as I want to call it, Happy Stupid Daylight Savings Day for those who are affected by it.  Worst time of the year is when we have to Spring forward and forgo that hour of sleep.  I'm all for daylight savings in the Fall when we gain an hour, but this Spring one is awful and it takes me a bit to get used to.  A good thing about it though, is that Spring is right around the corner!  Well, hopefully.  I think we're supposed to get snow again but hopefully it will be the last time.

Even if the weather isn't saying that Spring is right around the corner, the polish companies sure are!  This is one of my favorite times of the year when it comes to polish collections.  So many pastels!  Blues, purples, mints...oh how I love it!  A week or so ago I received the Zoya Awaken collection and I literally tripped over myself to take the mani I had on off my nails and start playing with these pretty babies.

I immediately gravitated towards Hudson and Rebel, the purple and blue shimmers of the collection.  I swatched Hudson on my pointer and Rebel on my middle and decided that there needed to be some sort of accent which incorporated the two.  I grabbed my bottle of Seraphina from the Zenith collection since it had a similar shimmer finish and got to work.

Let's take a look!


Colors Used:
  • Zoya - Hudson
  • Zoya - Rebel
  • Zoya - Seraphina
  • Orly - Instant Artist - Jet Black
Before I get to how I did this manicure, or why I decided to go with a stained glass color block accent, I must talk about how GORGEOUS Hudson and Rebel are.  Hudson is a purple orchid polish with a silver metallic shimmer.  It applied like a dream and I had full coverage in two coats.  I decided to go for three coats with this manicure because I really loved the purple and wanted an extra burst of color.  Rebel is a blue sky polish with a silver metallic shimmer.  Just like Hudson, it applied like a dream and I had full coverage in two coats.  I decided to keep this one at two coats for the manicure because the color was saturated enough and I was scared if I did three that I would overpower the purple.  Since both polishes have that silver shimmer, Seraphina was an obvious choice to pair them with.  I used three coats of Seraphina because I find this one to be a tad sheer.  It's not awful with 2 coats, you most certainly could get away with it, but I think when next to bright beauties like Hudson and Rebel, it really has to pop.

The silver shimmer in both Hudson and Rebel is just gorgeous.  They're not like your typical metallic polishes and they aren't your typical shimmer polishes.  They're somewhat of a hybrid of both.  A couple people actually asked me what top coat I used to get the effect because they didn't think it was part of the actual polish.  They dried sort of like a satin polish in my opinion, they weren't overly shiny but they weren't dull.  They were just gorgeous.

Overall, the manicure is gorgeous in my opinion.  I went with the stained glass color block look because after I put some dots on top of Seraphina, I thought to myself "Goodness, these would look good as a color block."  I removed my dots, and took my Orly Instant Artist striper and added some random lines across the nail.  When the lines were dry, I used my dotting tool to add the color where I wanted it.  Then I went back through with my striper to even some lines out.  You an see where I messed up a little but oh well, from a distance you couldn't tell.  Regardless, who was looking at the accent when the other nails were so pretty!?

What do you think?  Are you a fan of the Awaken shimmers?

I cannot wait to use Dillion, the mint shimmer, from this collection.  I think all three need to be paired together for some Easter nail art!

If you would like to get your hands on any of these polishes from the Awaken collection, they are for sale on Zoya's website for $9 a bottle.  Currently, Zoya has a sale where you buy two polishes you get any green polish for free, so really now is your time to buy!  Think about it, you could get Hudson and Rebel, then Dillion would be free since it's green!  This deal ends on 3/17, you can check out the details here!

Until next time, <3.

Oh oh, If you haven't seen my St. Patrick's Day Nail Art wheel, make sure to check it out here!  And if you haven't entered my giveaway for Incoco Nail Appliques, check that out here

**Polishes used in this post were provided for PR purposes. Please see my disclosure policy**

Nail Art Wheel

St. Patrick's Day Nail Art Wheel

9:00:00 AM

Happy Friday Polished World!  How are you today?  Have you entered my Incoco Nail Polish Applique giveaway yet?  If you haven't, after you read this post, make sure to!

Since St. Patrick's Day is less than two weeks away and the blog is all decked out for the day, it is only appropriate to share my nail art wheel for the holiday!  After I created one for Valentine's Day, I had told myself I wasn't going to do a St. Patrick's Day themed one and was going to move on to planning an Easter wheel.  Well one night on Twitter, Kristin from The Manicured Monkey sent me a tweet asking if I was going to do one.  After we talked for a bit, I was inspired to create one and got to work!

Let's take a look!


I'm super proud of this wheel!  Many of the designs are my own, and I think 3 or 4 of them are inspired by other bloggers.  Two of the nails were inspired by Sarah from Chalkboard Nails.  The first of those two nails is the black one with the green clover in the middle.  It was inspired by her watercolor clover mani she did last year that was beyond amazing.  Her nails look so much better than what I did on the wheel.  The second nail inspired by Sarah is the black grunge looking one next to it.  I followed her distressed tutorial using green polishes, and well I went a little too heavy on the black.  Then to the left of that we have the leopard clover print nail which was inspired by iDreamOfLacquer, but I'll talk about that nail more in the rest of this post!

Keep reading if you want to see which are my favorites from the wheel!

Giveaway

Incoco Nail Polish Applique Giveaway!!!!

8:10:00 PM

Sponsored

Hi polished world!  How are you all today?  I'm doing fantastic!  It was sunny here today so that kind of helped my winter blues.  Seriously, is anyone else tired of this cold weather?  To all my followers in the warm states, I'm extremely jealous of you.

Well, today I have just the thing cure the winter blues!  A giveaway!  As you may remember, I recently reviewed three sets of real nail polish appliques from Incoco.  This was my first ever experience with nail polish appliques, and I was very pleased with the results!  They were easy to apply, and gave my nails a fun, unique design!  Make sure to check out each of my posts linked below the picture!

From left to right, On the EdgeBerry Swirl, and Spring Fling.

The lovely people of Incoco have offered to sponsor a giveaway here on The Little Canvas, and I couldn't be more excited!  These appliques are perfect for those who want a fun design but don't have the time to create them by hand!  The winner of the giveaway gets to PICK THEIR OWN set of appliques.  Giveaway is only open to those who live in the United States and Canada.


a Rafflecopter giveaway


PLEASE READ; TO ENTER VIA GFC CLICK HERE!! OR READ THE RED AREA ABOVE MY WIDGET!  The "join this site" button refuses to work! 

If you follow then unfollow the blog after the giveaway ends, I won't be a happy camper and I will not allow you to participate in future giveaways.  It isn't fair to those who are followers of the blog.

If you want to get your hands on a set of Incoco Appliques before the giveaway ends, then you can use the code CANVAS15 to get 15% off your order!  Make sure to check out their website to see all their awesome designs!

Good luck!!! <3

Dry Brush Mani

Twinsie Tuesday - Grunge Nails

9:00:00 AM

Hello there!  How are you today?  Have you checked out the March Nail Artist of the Month yet?  If not, please check it out below today's post!  Since it's March, I'm in the process of making my blog St. Patrick's Day themed, so I have deleted all snowflakes and gone a tad green. I'm not 100% happy where it's at right now, but it's a work in progress!  In a day or so it will be perfect!

Today is again Tuesday, which means it is time for another Twinsie Tuesday post!  Our prompt for today is grunge nails!  In January, I posted my first ever grunge look on the blog.  In this post, I followed the tutorial by the talented Sarah of Chalkboard Nails.  It's one of my favorite posts because Sarah commented on my blog and I had a minor fan girl moment.

When I saw that today's prompt was grunge, I was really excited to re-create the design again, but a tad apprehensive because I wasn't sure what colors to do!  While I was re-reading my old post and looking at my blog, my eye caught the manicure to the far left of my banner.  That mani being this bright neon gradient zebra manicure which was inspired by my fellow Twinsie, Heather of Peace, Love and Polish.  Once I saw that gradient, I knew that had to be the base for today's grunge look!

Let's take a look!


Colors Used:
  • Base
    • Sinful Colors - Snow Me White
  • Gradient
    • China Glaze - That's Shore Bright, Too Yacht to Handle, Sun Kissed, I'm With the Lifeguard, Flip Flop Fantasy
    • Orly - Oh Cabana Boy
  • Grunge Black
    • Orly - Liquid Vinyl
  • Glitter
    • INM - Northern Lights
Really awesome looking, right?!  To get the look, I started off with a base coat of white polish.  While my white polish was drying, I started taping off around my cuticle so I didn't have to deal with the nasty clean up which usually comes from applying a gradient.  I really should invest in some nail bibs.

After my nails were dry and my fingers were taped off, I started painting all six neons onto my make-up sponge kind of in a circle.  When I had enough paint on my sponge, I started dabbing onto the nail.  Since I had the white base, the neon polishes really popped.  Once I was happy with the colors, I added a quick coat of INM Northern Lights.

Then came time to "grunge" my nails up.  I grabbed my black polish and followed Sarah's tutorial.  I wiped all the black polish off the brush, then lightly swiped it over each nail.  Finished with a top coat and called it a day! 


I truly love this manicure!!  Huge thanks to Sarah for introducing me to the grunge look, and a bigger thanks to Heather for introducing me to the rainbow gradient.  If it weren't for these two lovely ladies, this manicure probably never would have been created.  Thank you both for continually inspiring me!

I cannot wait to see the other Twinsie's grunge looks!  I hope you all head on over to their blogs and take a look!


Amanda at Amandalandish
Amber at Nails Like Lace
Chelsea at Nailed Blog
Elizabeth at Did My Nails
Kelly at Tuxarina
Lakeisha at Refined and Polished
Marisa at Polish Obsession
Rachel at Top Coat It
Róisín at Cuti-CLUE-les
Stephanie at A Little Polish
Traci at DrinkCitra

Until next time, <3.

Nail Artist of the Month

March Nail Artist of the Month

9:00:00 AM

Good morning Polished Peeps!  How are you today?  Can you believe that it is already March?!  Why is 2014 flying by so fast?!  It's crazy, I swear it was just New Years Eve.  It seems like life got hectic and time flew by, and while this was happening I forgot to do Nail Artist of the Month posts.

Have no fear though, March is here and I am bringing back the Nail Artist of the Month feature!  I couldn't be more excited especially since over the past two months I have found some really talented artists that I must introduce you to!

The March Nail Artist of the Month is Sigourney, the talented author of the blog By Sig.  I discovered her amazing blog after she interacted with me on Twitter a few months ago.  As soon as I saw her site, I was hooked!  Her art, the little Vine videos that accompanied some of the posts....it was all so unique!  I knew she had to be featured!


I am pleased to introduce you all to Sigourney!

________________________________________

Hi, Little Canvas fans and followers! My name is Sigourney Nuñez and I am a former newspaper journalist turned nail art blogger. I am so thankful for the opportunity to share my work with Alaina’s friends!


Nail art grants me an access to express myself, be creative and be fashion forward. As a working professional in the communications world, I realized my inner artist lacked fulfillment. I felt truly lucky when I discovered this artistic medium over a year ago. This was the perfect solution.


As a nail art blogger, I love keeping tabs on what’s on-trend and personalize it by adding my own twist. I enjoy playing with textures, themes and glitter. Lots and lots of glitter! I  aim to create chic and wearable designs that make a bold, yet subtle statement. Here’s an example:


An easy way to make your manicure pop is to play with contrasting colors. I picked light blue and orange. To create an eye-catching design, I painted a few lines with a blue striper polish and bedazzled the entire look with rhinestones of the same color palette.


Supplies used:
-Essie Grow Stronger Base Coat
-China Glaze Re-Fresh Mint
-Marc Jacobs Snap!
-Milan Blue Print
-Big Blue Rhinestones by Nailed Kit
-Light blue and orange rhinestones from Ocean Nail Supply
-Glisten and Glow H K Girl Top Coat
-Tweezers


___________________________________

Loving this manicure! The colors really are cheering me up with this nasty weather we've been having here! I really want to bust out my rhinestones and start creating some looks! If you want to see more of Sigourney's work, I will be linking her social networks below! I truly hope that you check her out, she's such a sweetheart!

Thank you so much, Sigourney for being the March Nail Artist of the Month!

Until next time, <3.

Follow Sigourney: BlogInstagramTwitterYouTubePinterest, Vine (Sigourney Nunez)