Holiday

The Beauty Buffs: New Years!

8:00:00 AM


It's New Years Eve!  Can you already believe that the end of the year is here?!  Seriously, what happened to 2014??  I'm kind of sad to see it go because it has been a great year for me filled with many blessings.  That just means that 2015 is going to be that much better, right?? :) 

Today I'm closing out the year posting alongside the lovely ladies of The Beauty Buffs!  Our theme for today is, you guessed it, New Years!  Whenever I think of New Years colors, my mind goes to gold, silver, and black.  I grabbed some polishes and got to work with a design that I'm in love with!

Let's take a look!


Colors Used:
  • Orly - Liquid Vinyl
  • OPI - Love Angel Music Baby
  • OPI - This Crown Needs a Gown
  • OPI - In True Stefani Fashion
  • Sally Hansen - Goldi-Flecks
Let's talk about how Sally Hansen Goldi-Flecks is the most PERFECT polish for New Years Eve!  I used one coat over Orly Liquid Vinyl, and goodness, I wish I did all ten of my nails like this.  If you know me, I never, ever say that about a polish, especially a glitter.  It contains small, medium, and large gold and white flecks of polish, as well as white bar glitter.  I'm not usually a fan of bar glitter, but this is so thin that you barely notice it and it blends so well with the other pieces.  It has the perfect glitter to base ratio...it's perfect.


For my accent nail, I followed The Nail Polish Challenge's fishtail tutorial.  I have been meaning to try that look for awhile and was happy to finally get around to it.  I think it was a perfect accent nail to this manicure!  I can't wait to do that design on all ten of my nails!

What do you think?  Liking the look?  Good for New Years?

Don't forget to check out the other lovelies posts!


An InLinkz Link-up

I highly suggest heading to the store and going to grab that Sally Hansen polish.  They are on sale now at your local drug stores!

I hope everyone has a happy and SAFE New Years Eve!  Please, please, please, remember to be safe!  No drinking and driving!  You're not only putting yourself in danger, but others, so please be responsible!

See you all next year! <3

Christmas

The Beauty Buffs: Gold vs. Silver

9:00:00 AM


Good morning polished world!  How are you all today?  I'm doing alright.  I built myself a gingerbread house yesterday and it looks quite adorable.  I'll have to take a photo and share it on my Facebook and Instagram.  It's quite relaxing doing little crafts like that.

Today is Wednesday and I am back posting along with The Beauty Buffs.  This week the theme is Gold vs. Silver.  If I had to wear gold or silver the rest of my life, I would pick silver.  I have a few pieces of gold jewelry, but my silver pieces is always what I gravitate towards.  The same goes for polish.  While I have been known to use gold for accents, silver is used a lot more.

December is the perfect time to use both silver and gold, especially when it's close to Christmas.  After seeing this adorable Santa Claus manicure by the lovely Rina from Simply Rins, I decided that the little guy would look perfect surrounded by some silver nails!

Let's take a look!


Colors Used:

  • FingerPaints - Glitz and Glam
  • INM - Silver Northern Lights Christmas Edition
  • Zoya - Taylor
  • Acrylic Paints
I think this manicure looks awesome with silver!  Honestly, if I used gold nails, I don't think I would like it as much.  I used two coats of Glitz and Glam from the FingerPaints Holiday Glitz manicure kit.  Such an awesome silver polish.   It reminds me of my go to favorite OPI This Crown Needs a Gown.  It applies evenly in two coats and has such a sparkle and shine to it that the satin OPI has.

I topped it off with a coat of the new INM Northern Lights Christmas topper.  Just when I thought Northern Lights couldn't get any better, INM created a holiday edition of their gold and silver holo toppers.  These toppers include shiny red and green glitters which are beyond sparkly.  I had to dab some of the glitters on to fill in empty spaces, but overall the topper was great!


I followed Rina's tutorial to get the little guy on my nail.  Since my nails are shorter than hers, I didn't add a smile or the little pink cheeks like she had.  I still think he's adorable without it!  He looks right at home with the silver.

What do you think?  Liking this Christmas design?  Are you a fan of silver or gold?

Let's see what the Beauty Buffs have to say about gold and silver!


Until next time, <3.

Swatches

The Beauty Buffs: Holiday!

9:00:00 AM


Happy Wednesday everyone!  How are you all today?  I'm starting to get out of my nail art funk!  I may or may not have shared this on here, but I had naked nails for three days last week, and every manicure I tried turned into a disaster.  Last night I had a similar experience when creating this post, so I opted for a plain swatch as a refresher.  Plus, Amanda from Fashion Footing keeps yelling at me to do a plain manicure.  Okay, maybe it's supposed to be a plain cream manicure, but sparkle is better, am I right??

Today is Wednesday, so that means it's time to post with The Beauty Buffs!  Today we are posting all about the holidays.  Some of us are sharing fashion posts, and others are sharing manicures.  My plan for today's post was to do a winter sweater inspired manicure and share different looks that would go along with the manicure.  After that didn't work out, I became frustrated and switched up my whole idea and decided to pick out my favorite holiday looking polish and share a swatch of it!

For my manicure, I picked Zoya Tomoko.  This polish is one of the original formula Pixie Dusts.  I'm a huge fan of the original formula, and really not that big of a fan of the Magical Pixies.  They are a great concept, but a pain to remove and just too chunky for my liking.  That's another post though.  Let's take a look at this Pixie gorgeousness.


Colors Used:
  • Zoya - Tomoko
Look at Tomoko in all it's gorgeous textured beauty.  Tomoko leans between silver and gold, maybe it can be best described as a champagne color?  Is that a color you can describe things as?  Regardless, in two coats you have full coverage.  The polish dries matte with plenty of sparkle since it is textured.


This is a shot of Tomoko with a top coat.  Kind of blurry due to my camera needing to be charged.  I have found that when you add top coat, the polish still remains textured and gets ten times more sparkly!  I think that top coat makes the polish last longer as well.  Not like Pixies need any help with that.  I have found that all my original formulas stick on my nail like super glue and do not chip for at least 5 days.

I picked this polish for a Holiday post because A. it's sparkly B. the color is perfect this time of year, and C. it would be a great polish to pair with a simple nail art accent!

Last year I created this nail art wheel with many holiday designs!  Many of them would work great alongside Tomoko!


I'm really thinking Rudolph or Santa would look amazing on the ring finger!

If you have Chita or Chyna from the original Pixies, then those also would be perfect around the holiday!  I still am kicking myself that I don't have a bottle of Chyna.  I missed the clearance of it at my local beauty supply store and I haven't fully recovered.  OHHH Idea!  If you have those polishes along with Tomoko, you could put a holly on the ring finger!

What do you think?  Fan of Tomoko?  Do you prefer the original formula Pixies or new formula?  Going to try any of these Christmas designs?  Should I do a new Nail Art Wheel???

Make sure to check out the other Beauty Buffs Posts!


An InLinkz Link-up

Until next time, <3.

FingerPaints

The Beauty Buffs - Metallic - Steampunk Nail Art

8:00:00 AM


Good morning polished world!  How are you all today?  If you live in the Buffalo, NY area, I hope you are all safe and warm after that heavy lake snow.  Goodness gracious, the photos are crazy, and I'm so happy that I didn't get hit where I am!  It's crazy how early in the season it is and already places are getting slammed like that!  What can you do though!?

I also want to apologize that I didn't post alongside the Twinsies yesterday for Twinsie Tuesday.  I did next weeks prompt by accident and had no time to re-create a design for this week.  I will be back next week though for sure!

Today though I am posting with the lovelies from The Beauty Buffs.  This week we are focusing on all things metallic.  I don't have many metallic polishes because I'm not really fond of the finish on my nails.  I was planning on doing a tape design using Essie Nothing Else Metals as a base and a black top, but I loathed how it looked.  That polish was so difficult to apply so it was lumpy and uneven, and since it is a metallic polish, it is very unforgiving if you have one single thing go wrong.

So I went to the drawing board and thought of different nail art that I could do using metallic polishes!  I asked one of my friends and they suggested Steampunk!  I did a quick search online for ideas and found an awesome tutorial on YouTube by Arcadia Nail Art (my internet is not working right at the moment so I cannot link it without freezing my whole computer).

Let's take a look!


Colors Used: 
  • Zoya - Normani
  • FingerPaints - Glitz and Glam
  • OPI - Love Angel Music Baby
Awesome, right?  I started off with a base coat of Zoya - Normani.  This polish is from the first Natural collection, and it is quite amazing.  A perfect base for this type of nail art!  It applied evenly in two coats.

Using some new nail art brushes, I painted on the gears and chains using the metallic silver and gold polish.  Glitz and Glam is part of FingerPaints Holiday Glitz Manicure Kit which I will be posting a review of soon.  It is an awesome full coverage silver metallic polish which stood out perfectly on this base.

Now I do not own a bottle of silver or gold large fleck glitter, so to do the glitter placement on these nails, I dug through a bottle of Ulta Pinata Yada Yada.  I was rather dedicated to getting the most metallic look possible, and the glitter really made that more possible!


I love doing art with metallic/foil polishes on a cream base.  They really stand out and add a whole new dimension to the art!  I'm very happy that my friend suggested this design also, because it was something I never would have thought of in a million years!  I cannot tell you how much I love this design!

What do you think?  Liking the steampunk look?

Do not forget to check out the other Beauty Buffs posts!


An InLinkz Link-up

Until next time, <3.

Color Block Mani

The Beauty Buffs - Color Block

8:00:00 AM


Good morning everyone!  How are you all on this fine Wednesday.   I apologize that I was unable to post with the Twinsies yesterday for Twinsie Tuesday.  I hate when I have to miss a post, but when life gets crazy, there really aren't any other options.

I am here today though posting with The Beauty Buffs!  This week we are talking all about color blocking!  I love color block manicures!  I've tried to do them numerous times the past few months, and they were great until I went and applied my top coat.  I had a goopy bottle so it dragged the paint and ruined my crisp lines.  I never photographed them because I was just too embarrassed.  They literally came off two seconds after I completed them.

Finally after purchasing a new bottle of top coat, I was able to create an awesome color block manicure.  I'm really happy with how it turned out!  Let's take a look!


Colors Used:
  • OPI - My Boyfriend Scales Walls
  • Faby - Plastic Jewels and Neon Lights
  • Faby - Sakiko's Time
I really love the colors I used for this color block manicure.  A few weeks ago, I received some polishes from Faby.  Faby is a company out of Italy which is new to the United States.  I've used Black is Black numerous times and love it, so I was excited to start using the colored polishes they sent me!

These two did not disappoint.  Plastic Jewels and Neon Lights is such a fun, bright turquoise cream polish, and Sakiko's Time is a gorgeous purple, grey cream.  The two polishes compliment each other perfectly.  Now, you know me, my primary concern is if the polishes are good for nail art.  My verdict for these Faby's: they're awesome!!  I used my nail art brush to fill in the empty spaces for the color block.  Both were very opaque and applied evenly.  I didn't have a problem with them drying too fast, so when I pulled my tape off, I didn't have any little strings left behind! 


I really love Sakiko's Time.  It's such a unique shade of purple that my collection was really lacking.  I can't wait to use it as a base for some Winter manicures.  Can you believe I'm already talking about Winter manicures??

What do you think?  Liking this color block?  Have you ever used a Faby polish?

Don't forget to check out the other awesome posts!


An InLinkz Link-up

Until next time, <3.

Animal Print

The Beauty Buffs: Animal Print

8:00:00 AM


Good morning polished world!  Hope you all are doing well!  Fall is in full swing here.  Leaves are falling and it's getting cooler out each day.  It's also getting darker out earlier, which isn't so great.  It's also not great when it's cold, rainy, and dark out.  Regardless, it's one of my favorite times of year!

Since it is a Wednesday, I am back posting with The Beauty Buffs.  Today we are talking all about animal prints!  I decided it was appropriate to take a break from Halloween designs for this post and do an animal print manicure which is perfect for this season.

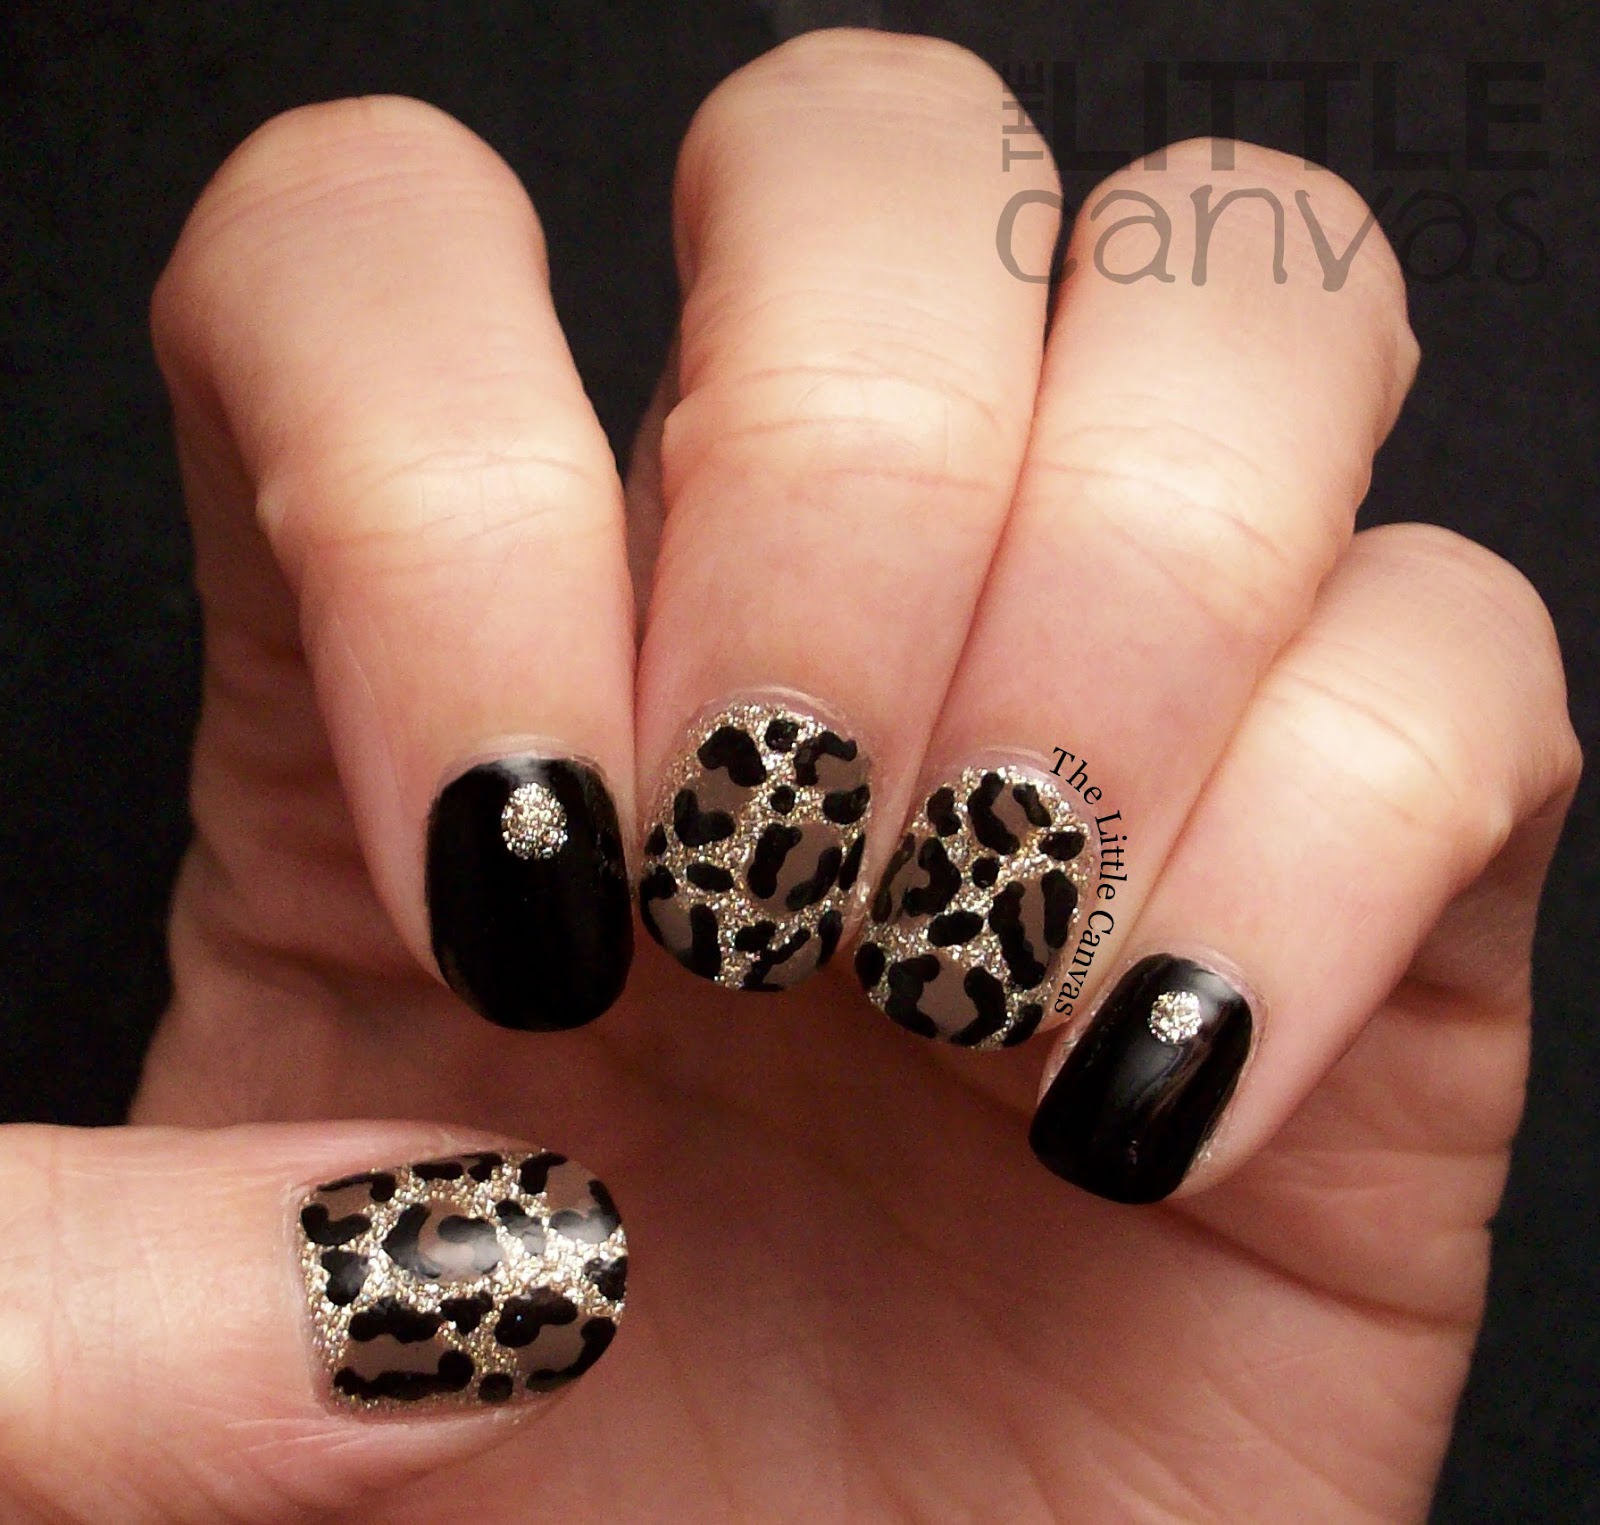
Normally, I do crazy, funky, neon animal print nails where typically a gradient is involved.  Years and years ago when I first started blogging I created a leopard print manicure using a tan base with brown spots that were outlined in black.  For today's manicure, I decided to take inspiration from that design and do a classic looking leopard print with a flash of some glitter dazzle.

Let's take a look.


Colors Used:
  • Faby - Black is Black
  • China Glaze - I'm Not Lion
  • Sinful Colors - Nirvana
New black polish alert!  I received some polishes from Faby International.  Faby is a polish company out of Italy which has 160 different colors to offer.  Each of their polishes are free of the major chemicals, which is a must have.  I was excited to try this product which is making it's way into the USA.

One of the six colors I received was black which really made my day.  I said this past weekend that I'm always on a hunt for the perfect black polish because at least 95% of my manicures have some form of black in them.  Orly Liquid Vinyl is typically my go to, but I have been known to use Sinful Colors, Sally Hansen, and Jessica black polishes.  Faby's Black is Black is certainly going to be added to that go-to list!  Perfect application in two coats and perfectly shiny.  You can see how shiny they really are in the photos above and below!  I wore this manicure for four days without a single chip...just a little tip wear, but that's to be expected.

I was shocked that my China Glaze I'm Not Lion didn't chip for four days.  If you own this polish, I'm sure you know that usually it just peels right off in a sheet.  First time EVER since I've owned it I didn't even have a teenie tiny little chip.  I was so pleased!  It was the perfect base for the leopard print too, so I was thrilled it stayed on!


 What I love about this manicure is that it is totally work appropriate!  I was able to match it with so many different outfits throughout the week!  And I felt less awkward with it on my nails versus my current hautned house manicure.  It is great because it's subtle, and yet upon closer examination you can see that there is a fun nail art design, with that little bit of glitz!

What do you think?  Liking the animal print manicure?

Make sure to check out the other Beauty Buff's posts!


Until next time, <3.

INM

The Beauty Buffs: Neutural - Fall Tribal Nail Art

8:00:00 AM


Happy Wednesday!  How are you all today?  I'm backing posting with The Beauty Buffs today!  I'm sorry that I skipped out two weeks ago, but life was a little crazy!  I'm very happy to be back though!

This week we are posting all about neutrals.  I'm not a huge fan of neutrals.  From my nails to my clothes, I'm always wearing something bright and colorful.  I need to have my teals, purples, and pinks.  So when I saw today's theme, I really wasn't sure what to do.

Luckily, the season itself inspired me.  I've always considered Fall colors to be very neutral and toned down in comparison to Spring and Summer.  For me, anything goes in Winter, so that means it's a very bright season as well.

So I started looking up different Fall designs and I found some cute tribal designs.  From there, I started to research Fall Tribal Nail Art and I stumbled upon a lovely design by Demelza's Nails.  I fell in love with it because it was a design created on a neutral base using some more toned down colors.  It was perfect for me because I could do a neutral design while adding the splash of color I needed!

Let's take a look!


Colors Used:
  • INM - Exposed
  • Zoya - Odette
  • Orly - Gumdrop
  • NYC - New York Color - Sweet Melon
  • Black Acrylic
Cute, right?  I am in love with INM Exposed.  It is a new polish from the company and it is the perfect neutral polish.  I should have taken a swatch shot of it because it really is gorgeous.  It applies perfectly in two coats.  A perfect neutral polish such as Exposed really makes me want to try more neutral designs.

The colors that went with this manicure I believe were perfect to keep the design neutral while adding a little bit of umph.  They weren't too bright and weren't too dark.  Odette by Zoya is an awesome polish.  Such a pretty dark mauve....is that what we would consider it?  That's what I would...


After I did this manicure, I really realized that neutral doesn't always have to be boring.  I think I might have to try more looks like this in the future.

What do you think?  Liking the look?  Still passable as a neutral design?

Don't forget to check out the other posts by The Beauty Buffs!


An InLinkz Link-up

Until next time, <3.

The Beauty Buffs

The Beauty Buffs: Fall Theme: Apple Nail Art

8:00:00 AM


Good morning polished world!  I'm happy to report that the headache that plagued me yesterday and caused a short Twinsie Tuesday post has gone away!  Goodness it was a killer.  Today though I feel like I'm in some zoned out state where I just want to curl up and fall asleep in a corner somewhere.  Maybe it's the crazy weather we've been having.  Hot cold, hot cold....literally the weather can't make it's mind up.

Today is Wednesday which means that it is time for another post with The Beauty Buffs.  This week we are posting all about Fall!  Fall is peaking it's head around the corner here, but since I'm still holding on to Summer, I really wasn't sure what I wanted to do.  Very few trees are changing colors, so I didn't want to d anything including foliage yet.  It was waaaaay too early for a pumpkin manicure as well.  I was feeling so uninspired that I was thinking of sitting out or posting a few ideas from Pinterest.

Then, it hit me....apples!!!!  Fall is prime apple season where I live, and at the local farmer's markets all the apples are starting to appear!  I love going apple picking each year and wandering through the orchards, then later going home and baking goodies with the fresh apples.  Nothing smells better than fresh apple baked goods.

I did a quick search for apple nail art for some ideas and found this cute manicure by fellow Twinsie, Elizabeth from Did My Nails.  I decided against doing the mini apples and just copied her accent nail!

Let's take a look!


Colors Used:
  • OPI - My Vampire is Buff
  • INM - Red Rover
  • Zoya - Louise and Tilda

 Fun, right?!  They came out cuter than I imagined!  I started off with a base coat of My Vampire is Buff.  This is my favorite nude polish that I'm glad I purchased a long time ago.  I'm also beyond thrilled that it's part of OPI's core collection at Sally Beauty Supply!  It's the perfect base for nail art!

When my base was dry, I used INM Red Rover (from the new INM polish collection) to create the apples.  I did not require any nail art brushes to do so, I just swiped the brush twice on my nail like I was doing a weird scalloped tip.  Red Rover is such a gorgeous red!  Perfect apple red, as well as had great coverage over the nude base.  I only had to paint the tip once!  I'm not a huge fan of red, but I love this and it for sure is now going to be my go to red polish!


While the red was drying, I used a dotting tool and Zoya Louise to ad the little stems.  By the time I was done doing that on all ten nails, the red was dry enough for me to add the leaves using a nail art brush and Tilda.  I then went through with white and added the "shine" mark.  Finished with some INM Out the Door and admired my cute apples!

What do you think?  Liking the design?  Think it's a good Fall manicure??

Don't forget to check out the other Beauty Buff's Fall posts!


Until next time, <3.

Dot Mani

The Beauty Buffs: Texture Inspired

8:00:00 AM


Happy Wednesday!  I'm here posting two days in a row, which means it's time for another post with The Beauty Buffs!  I cannot believe it's been two weeks already since our last postings.  I apologize to the lovely ladies in the group for not commenting on their amazing black and white posts (see the link up at the bottom!).  I loved each and every single one.  I feel awkward going back two weeks and commenting now.  Maybe I will, but still, I feel weird.  Life just got so busy!  I promise I will get better at commenting!  

Today our theme is texture inspired.  I'm a huge fan of my Zoya Pixie Dust polishes.  Personally, I love the original formula Pixie polishes.  Sure, the Magical Pixies are great, but there is just something about the sparkly fine texture of the original formula.

For today's manicure I had many different ideas running through my head.  I wasn't sure if I should do textured nail art like I did for these roses, or a cutout design like my Pixie Dust Stars, or if I should do something with tape like I did for my fun checkerboard Pixie design.  Then I thought though how awesome textured polishes look with creams, especially as an accent or framing the cream design.  

After purchasing China Glaze Capacity to See Beyond and after seeing this manicure, I decided to create what I call a framed accent manicure.  I call it that because I'm framing my nail art with plain nails, which accent the nail art quite nicely.  I tend to do this a lot with cream polishes that are topped with some Northern Lights.  Doing it with a Pixie Dust though added so much more contrast to the manicure which I fell in love with.

Enough of my babbling, I should let you look at the manicure!


Colors Used:
  • Zoya - Liberty
  • Orly - Liquid Vinyl
  • China Glaze - Capacity to See Beyond
  • Cult Cosmetics - El Porto
Isn't it gorgeous?  This has to be one of my all time favorite manicures.  As you know, I am a huge fan of blue, so this color combination was an automatic win in my book.  If I had to sit down tonight and pick my all time favorite cream polish, it would be Capacity to See Beyond.  It's the color I have searched years for and am so happy to finally own.  I need to go grab every possible bottle in existence.

Enough about the cream though, this post is all about the textures.  The original formula Pixies are great for nail art.  As you can see from my ring finger, and my thumb, I used a dotting tool and Liberty to create the flower and the dots.  I love creating dotticures using them.  If you have stayed away from purchasing polishes such as the Pixie dusts because you think that you cannot do nail art with them, click on that Pixie Dust tag at the bottom of this post.  They make nail art pop!


New photo set up.  I'm trying to hold bottles of the polishes I use instead of just my top coat.  Still trying to get a hang of it.  Cult Cosmetics bottles are rather easy due to their shape.  The China Glaze though are a whole different story.  That though is another post!

What do you think?  Loving the look?  Are you a fan of texture polishes?  Clearly due to all my rambling you can tell I am.

Make sure to check out the other Beauty Buffs posts!


Until next time, <3.

Accent Nail

The Beauty Buffs: Black and White

8:00:00 AM

Hello again!  How are you all?  Today is Wednesday and that means it is time for another post alongside with the lovely Beauty Buffs!  This is such a wonderful and fun group of ladies, and I'm very happy to be posting with them every other week!  Just as I am very happy to be posting with the amazing Twinsies every Tuesday!  I'm a lucky blogger to have gotten to know all these awesome people!

Today our theme is black and white.  I'm a fan of black and white, especially when it comes to dress clothes.  Black pants, a nice black and white blouse, or a pretty black and white dress....you can never go wrong.  Especially because 99% of my crazy manicures will go with a black and white outfit.  This logic could actually be reversed and I could wear super bright clothes alongside a black and white manicure and it would match 99% of the time as well.

For today, instead of doing a complete black and white manicure, I wanted to add a splash of color because I feel all I've been wearing clothing wise is black and white.  Actually, today I'm wearing a black and white dress, and a complete black and white manicure with it would have probably made me feel like I was matching a little too much.  Also since it's still summer, I feel like I have to wear some sort of bright color on my nails.  Let's take a look!


Colors Used:
  • Color Club - Over the Moon
  • Orly - French Tip White
  • Orly - Liquid Vinyl
My black is a little iffy looking, but overall I think it turned out well!  To get the look, I followed a tutorial by Chelsea Queen which I cannot get to at the moment because Pinterest is being dumb and won't load properly on my computer.  I'll try to link it on my Facebook page when I upload this manicure later.

Until then, I shall explain the technique.  With a nail art brush, I painted two lines down my nail, then created a chevron pattern using the white polish.  I then filled in some of the spaces with the white polish.  Then I went through and filled in the empty spaces with my black polish.  Let it dry a little, add a top coat, and call it a night!


It was actually a pain in the butt to do the design.  My lines weren't perfect and then I flooded cuticles or put the black and white in the wrong spots.  I literally think that middle finger was done 4 times.  I should have stopped around attempt number 2 but it was worth it.

I'm happy I paired it with the holo Over the Moon.  In the sun, this manicure looks really awesome, and kind of trippy due to the chevron checkerboard that is accenting it.  I'll try to get a photo today once the rain clears up and post that on my Instagram!

What do you think?  Liking the black and white look?  Liking that I added a bit of color?

Don't forget to check out the other Beauty Buffs!


Until next time, <3.

The Beauty Buffs

The Beauty Buffs: Nautical/Beachy Theme

8:00:00 AM

Happy Wednesday!  How are you all today?  I'm personally happy it's the middle of the week because that means the weekend is right around the corner!  Sleep in Saturday has become my favorite day.  So close, but yet so far.

Today I'm back posting with The Beauty Buffs!  Our theme this week is Nautical/Beach theme!  Since I just did a nautical manicure a few weeks ago for Twinsie Tuesday, I decided to embrace the beach part of our theme!  Especially after I saw this palm tree manicure by One Nail To Rule Them All.

I have done sunset palm tree manicures in the past, but never was too fond of them.  My gradients typically were weird and unevenly spaced so when I covered the tip with the black beach, the gradient itself disappeared and it looked like I had a one color base.  Not to mention, my palm trees were always sloppy and awful.

After seeing Alice's manicure and tutorial, I thought I would give it a try!  Let's take a look!


Colors Used:
  • Sinful Colors - Bright Lucite
  • Ulta - Blue Streak
  • FingerPaints - Petal Obsession
  • OPI - Hey Baby!
  • Orly Instant Artist - Jet Black
Pretty neat right?  I started off with a base coat of the lightest polishes.  For the blue nail I used two coats of Bright Lucite (which I need to get ten more bottles of) and FingerPaints Petal Obsession from the new Film Noir collection which will be hitting stores soon!  While they were drying, I put painters tape around all my nails and got my sponges ready to do a gradient.  Some people put Elmer's glue or peel off base coat around their nail before doing a gradient, and I do tape.  It is a little tedious but a lot quicker to remove than the peel off base.  Plus, I find if I don't use the tape, I get my paint all in my cuticle and then when cleaning up I ruin my actual design.

After I was all taped up and ready to gradient,I painted a line of the lighter and darker polish onto the sponge then dabbed it onto the nail.  After a few dabs, the color was just how I wanted it.  You can obtain the desired look so much faster when you use the lightest color as the base.  I recently found this out and each time I create a look using this technique, I'm mind blown that I haven't been doing it all along.


After my gradient was dried, I used my dotting tool and created the rocky shore.  With my striper I then went through and added the palm trees and all their little details.  The seagulls were added using a nail art brush because I'm not that good with a striper.  Honestly, I'm not that good with a nail art brush either because they look like messed up bats.

Before adding my OPI Matte top coat, I followed some of the lovely Beauty Buffs advice from way back when we were first starting, and that was to apply a glossy top coat on my nail first.  Last week I did another matte design that has yet to go on the blog and I forgot to do this step, and it practically ruined my art work.  The matte smeared my design something awful and I had to fix a few nails, and a few days later my nails were cracking.  With this manicure after applying the glossy then doing the matte, I had no smearing or cracking.  Instead I had a nice even matte look.

What do you think?  Liking the beachy theme?  Think I should have gone nautical?

Don't forget to check out the other lovely ladies posts!


Until next time, <3.