Glitter Gradient

The One With My Fall-ish Thanksgiving Glitter Gradient

9:00:00 AM


Good morning polished world! How are you all doing on this Wednesday before Thanksgiving?  We are in a bit of a heat wave here, but we are expecting another wind storm which is going to bring us some frigid cold temperatures for Thanksgiving.  Saying a prayer and crossing my fingers that I do not end up with some weird illness due to this weather.  I really don't want to have a sinus infection anytime soon.

Today's manicure is my Thanksgiving manicure.  Rather simple for me, but I wasn't feeling like turkey's or any other random crazy nail art that I've done in the past. I was scrolling pinterest and was coming across dozens of glitter gradients.  It's been a hot minute since I've done a glitter gradient, so I gave it another go.  Happy that I did because I'm really loving it!

Let's take a look!


Colors Used:
  • Pure Ice - Studette
  • Zoya - Louise
  • Zoya - Taylor
  • Sinful Colors - Pandora
  • Some other gold and red glitter Sinful Colors.....the label fell off
As you know from my other posts over the years, this is not a color pallette I typically would wear, so this is EXTREMELY out of my comfort zone.  Can't say that I hate it.  It's actually kind of refreshing.  I like how all these colors go with my skin tone.  Maybe they're wrong, but I didn't think so in person.


I'm rather proud of my glitter gradient.  I'm hit or miss when I attempt this, and it's safe to say this is a home run.  They always look so ugly before you put the top coat on, and I think that's why I always think I fail at doing them.  The sponge leaves rough spots because you're transferring some of the glitter base when dabbing on the glitter.  I used to take this as a failed glitter gradient and would remove it.  Luckily I learned last year when I did one that this is what was occuring.

What do you think of this manicure?  Should I attempt more glitter gradients?  Am I going to remember what a pain glitter is to remove and totally give up on the idea come Christmas time?

Speaking of Christmas....time to get started on the red and green manicures!!!  In the meantime, I hope everyone has a Happy and Blessed Thanksgiving!!

Until next time, <3.

Sinful Colors

The One With the Sinful Colors Abstract Looking Manicure

9:00:00 AM


Good morning polished world!  How are you all doing on this fine Monday?  The weather held out this weekend so the annual family picnic at work went amazingly!  I woke up Saturday around 5am and heard rain, then looked at the radar and did not see a pretty picture.  After some prayers, I drifted back to sleep until 8am, and woke up to a little drizzle, that went away after an hour or so.  Then I got to work, walked around under the tents, and it was a complete miracle.  Despite the fact it rained all night long, the ground was dry.  No mud puddles, nothing.  Everything went perfectly and everyone had fun!  I'm so happy I have a month before we have to start planning for the next big event.

Anyways, today's manicure is an abstract one I did the other night when I was completely uninspired and not in the mood to paint at all.  I feel I never use my original polishes...you know the first brand that got you into painting.  For me that was Sinful Colors.  I purchased pretty much every color when I started this blog because they were inexpensive and came in every color.  Every once and awhile I'll wander by a display and pick one or two up.  That's how this beauty became part of my collection.

Let's take a look!


Colors Used:
  • Sinful Colors - She's Gone Matte
Have I ever mentioned that this is one of my favorite shades ever created?  It's hard for me to walk by a display and not buy mints, blues, or teals.  I bought this one a while ago and I don't think I ever used it.  It had full coverage in two coats.  Now, it's supposed to be a matte polish, but it wasn't your typical matte when it dried.  Of course, I added a shiny top coat so this design doesn't show the matte at all.  Regardless, it wasn't a matte you'd expect like if you were to use a matte top coat.

What do you think?  Like this design?  Like the color?

Until next time, <3.

ILNP

The One With the Harvest Pumpkin Manicure

9:00:00 AM


Good morning polished world!!  How are you all doing today?  Are you all ready for Thanksgiving??  I cannot believe that the holiday is tomorrow.  Where did November go?  I really feel like this month flew by, probably because it's been so busy at work.  Oh well.

Today's manicure is a Fall Harvest Pumpkin design for Thanksgiving.  I was going to post it tomorrow but I figured I'd get the mani up on the blog the day before so I don't have to worry about blogging on Thanksgiving.  Not like I'll be doing much other than watching the parade and dog show.

Let's take a look at the manicure!


Colors Used:
  • ILNP - Clockwork
  • Sinful Colors - Pandora
  • OPI - My Vampire is Buff
  • OPI - Crawfishin' for a Compliment
Pandora by Sinful Colors is so so so so so gorgeous!!!  I cannot remember when I bought this polish, and honestly had no idea I owned it until I was searching for the perfect Fall color for this design.  I don't even think I had used it.  Two coats and it had full coverage of the most gorgeous terra-cotta color with a subtle shimmer.  I'm so mad I haven't used it before.

What do you think?  Fan of the cute little pumpkin manicure??

I hope everyone has a blessed Thanksgiving!!!

Until next time, <3.


Dot Mani

The One With Round 35 of Bestie Twin Nails with Fashion Footing

9:00:00 AM


Good morning polished world!!  I apologize for not posting more, but I have had quite the busy week.  I wanted to have this post up yesterday, but I went to a gala on Wednesday and never got around to editing the photos.  I really need to edit my photos ahead of time.  Maybe this weekend I can sit down and just do them.

Today is round 35, yes 35 of Bestie Twin Nails with Fashion Footing.  Amanda is taking a little break from her blog, but she is still posting on Instagram.  Then there's me, who hasn't even updated her Instagram in a week.  Where has my motivation gone?!  I"m still painting, still buying polish, but forgetting to post to social media.  Speaking of which, I really need to update the Facebook too.  Sigh, there aren't enough hours in the day!

Today, we are re-creating a splatter manicure originally done by Young Wild and Polished.

Let's take a look!


Colors Used:
  • OPI - You're Such a Budapest
  • OPI - My Boyfriend Scales Walls
  • Sinful Colors - Taupe is Dope!
  • ORLY - Liquid Vinyl
Love this manicure so much.  I never would have thought of this color combination on my own.  I really need to start looking at my Colors board on Pinterest for different color combinations.  I'm in love with the taupe nail, which is Taupe is Dope! by Sinful Colors.  I picked this up a few weeks ago and honestly didn't even pay attention to which display it came off of.  I think I also purchased a blurple color which I need to go locate.  Anyways, this taupe applies perfectly in two coats and dries very fast.  Works wonderfully for the splatter.


I wasn't sure if You're Such a Budapest was going to splatter because it's a bit sheer.  It's a light purple cream with a shimmer.  I think the shimmer is what makes it thinner than your typical cream.  Regardless, it takes three coats to get full coverage, so that's why I didn't think that the splatter would work.  Luckily it did and it's just gorgeous mixed with the taupe and black.

What do you think?  Fan of this look?  Something different!

Until next time, <3.

Dot Mani

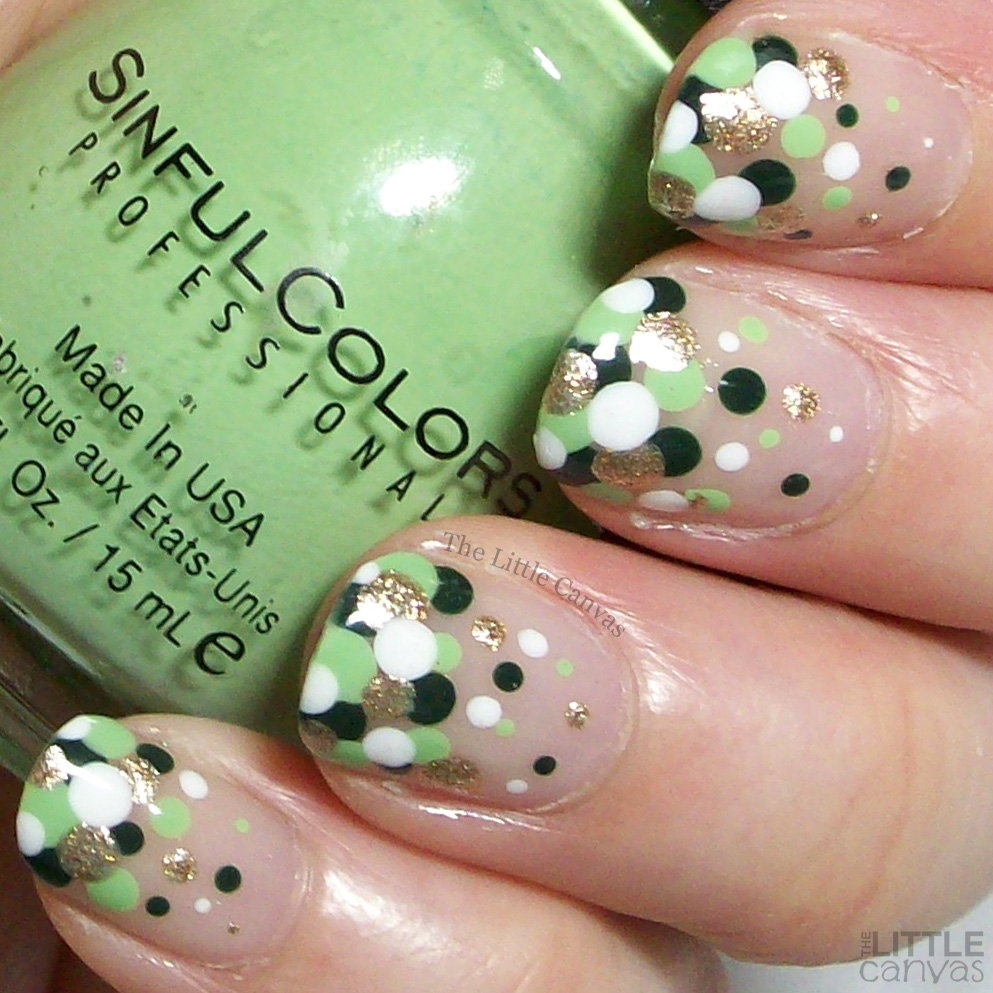
The One With the Dot Manicure for St. Patrick's Day

9:00:00 AM


Good morning polished world!  How are you all doing today?  We are smack dab in the middle of a lovely blizzard, so you know how I'm doing.  They're expecting us to have about 2 feet by the end of all this.  Oh well, we haven't had any snow this winter, and I did want one big storm before winter was over, so I guess that's what this is.

Since my power was out all last week, I wasn't able to do as many St. Patrick's Day manicures as I would have liked.  When the power did kick back on, I was kind of exhausted and just wanted to sit around and do nothing, but needed to do some sort of manicure.  Of course, I opted for something simple....dots.

Let's take a look!


Colors Used:
  • Sinful Colors - Pistache
  • INM - Emerald
  • FingerPaints - Golden Glaze
  • Sinful Colors - Snow Me White
Lovely, right?  I did a similar manicure last year for St. Patrick's Day but I didn't like the colors I used then.  They were similar, but not the same.  Sinful Colors Pistache is a gorgeous light green shade.  Stains awful, but it's beautiful.  Using it for nail art though, you don't get the stains as much as when you use it as a base.


Emerald is a gorgeous polish by the lovelies over at INM.  I love their polishes for bases and for nail art.  They are just perfect all around.  I've had this one for a few months and am kicking myself that I haven't used it sooner!

What do you think?  Like this design?

I'll have one more St. Patrick's Day manicure for you on Friday!  Then I need to start creating some Easter manicures!

Until next time, <3.

OPI

The One With the Watercolor Leaves

9:00:00 AM


Good morning polished world!  How are you all doing today?  I apologize for not having a post up yesterday.  I meant to, but didn't feel 100% and didn't want to be on the computer at all.  I literally have about 8 posts to share with you, so I'm really mad at myself that I didn't force myself to post.  I guess that means I'm going to have to spam in the next week or so.  Actually one or two posts are blank, and one is a swatch, sooooo I guess it's not too far behind.

Today I'm sharing with you a watercolor leaf design which was inspired by 25 Sweet Peas design.  I loved Sarah's manicure so much that I wanted to attempt to re-create it.  I wasn't about to try to do the design on all 10 of my nails because I didn't have much confidence that I would do Sarah's design justice.  So, I just did a few nails and accented it all with a glitter and black.

Let's take a look!


Colors Used:
  • OPI - My Boyfriend Scales Walls
  • FingerPaints - Golden Glaze
  • Sinful Colors - Pumpkin Spice
  • Serendipity Polish - Building My Empire
  • Acrylics
I think, just think, I might have figured out how Sarah got this look.  It was really an experiment figuring it all out.  I started off with a base coat of My Boyfriend Scales Walls, the perfect off white polish for a design like this.  I think if I used a bright white, the design wouldn't have shown up the same.  After my base was dried, I went through with a small paint brush and black and added the outline of the leaves.

Once my leaves were dried, I took watered down acrylic polish and filled in the leaves, and created the water colored dots.  I let them dry for about 20 seconds before I took a dry paint brush and let the water absorb into the bristles.  Alternatively, you could use a napkin or q-tip to absorb the water.  When the water leaves, you're left with the water color look.  Now, you must make sure that they are COMPLETELY dried before adding the top coat, or you will smear the colors because there is water mixed in still.  Dry time is about five minutes, so it's not a long wait.


I bought Pumpkin Spice years ago, and honestly, I don't know if I ever used it.  I think it's a dupe of the China Glaze glitter that came out for The Hunger Games years and years ago.  It's a gold and red micro-hex glitter.  My bottle settled like crazy so I really had to shake it up big time.  It didn't effect the application what-so-ever.


My new favorite black polish, Building My Empire from the Call Me Boss Lady collection.  One coat guys....one coat!  I'm so impressed with Serendipity Polish and love their collections.  I cannot wait for the winter collection, which they confirmed to me on Instagram they're working on!

What do you think of this look?  Something you would try? Ever tried the watercolor look using acrylics??

 Until next time, <3.

Bestie Twin Nails

The One With Round 27 of Bestie Twin Nails With FashionFooting

9:00:00 AM


Good morning polished world!  How are you all doing today??  It is round 27, yes 27, of Bestie Twin Nails with Fashion Footing!  Since August is the month where all the gorgeous sunflowers bloom, we decided to create a sunflower manicure.

After searching Pinterest, we came up with an idea which was inspired by a few different manicures.  To get the flowers themselves, I followed a tutorial by Sensationails4U on Instagram.

Let's take a look!


Colors Used:
  • Sinful Colors - Endless Blue
  • INM - Northern Lights
  • Acrylics
Now enter in the part where Amanda calls me a cheater for using acrylic paints.  I'm sure I could have gotten the same exact look using polishes, but it was late when I painted this design and acrylic art dries a lot faster than nail polish art.  Plus, when I do my nails, my right hand gets the same exact thing on it as the left hand pictured on the blog.  I honestly can't do what a lot of bloggers do which is just paint one hand and have their other be completely blank.  I just can't do it.  I need that matching look.  Sure it takes me longer, but then I wear the manicure for 3-4 days so in the end it's worth it.

Regardless, doing two hands with nail polish art when it's 11pm and you want to be sleeping by midnight is near to impossible.  This design, while it looks like it took forever, took me a little over an hour to do both hands.  I was in bed by 12:15am with two completely dried hands.


The gorgeous blue base is Sinful Colors Endless Blue.  Many say that it is a dupe for the original formula of Sally Hansen Pacific Blue.  I honestly should have used the OG Pacific Blue, but I forgot that Amber gifted me the polish awhile ago.  It is in my Melmer and has only been used once for a pedicure.  I need to savor it since it's my only one.

Anywho, two coats and you have full coverage of this Sinful.  I decided to add a top coat of INM Northern Lights and am so happy that I did.  The combination is drop dead gorgeous.  I've had so many compliments on the blue alone.

For the sunflowers, I started off with a brown acrylic and created the centers of the flower.  I then mixed some orange and yellow together to make a lighter orange shade.  I used that shade to add some spaced out petals.  When that was dry, I went through with acrylic and filled in the empty spaces which gave the flowers a layered look.  I took the brown and made the circle centers perfectly round again.  I then went through with a tooth pick and added the yellow dots in the center.  Top coated and called it a night

What do you think?  Like this look?  Something you think you will do??

I have to say, this is one of my favorite manicures.  I've tried sunflowers in years past but nothing ever looked this good.  

Make sure to check out Amanda's post!

Until next time, <3.

Dry Brush Mani

The One With the Roses Inspired by @rikkis_nails_

9:00:00 AM


Good morning polished world!  How are you all doing today?  It's finally Saturday!!!  This week seemed to have lasted forever.  Now it looks like I'm in for a nice, sunny weekend.  Hopefully it's relaxing!

Today I am sharing with you a re-creation of this rose manicure by @rikkis_nails_ on Instagram.  She originally created this manicure for a contest that Essie was hosting and I fell in love with it as soon as I saw it.  You know me and floral designs, I gravitate towards them.  What was unique about this one is the base.

Let's take a look!


Colors Used:
  • Orly - White Tips
  • OPI - Do You Take Lei Away?
  • Sally Harensen - Kashmir Valley
  • OPI - Hey Baby
  • Sinful Colors - Chalk It Up
  • Acrylic Black
Whew, that was a lot of colors!  Been a long time since I've done a fun manicure with a bunch of different polishes.  Do you see that awesome looking base that gives this manicure a vintage look?  I thought that it was going to be difficult to achieve the look, but it's just a simple dry brush!  That's right, put on your base of white polish, then dry brush it with your favorite nude/light brown polish!  Add a top coat and move onto the next step - adding the flowers!!


I started off with my light orange flowers.  The polish I used is Kashmir Valley from the Complete Salon Manicure Line.  This polish really is a beauty which I totally forgot I owned.  Hate when that happens.


Then I went through and added my pink flowers using OPI Hey Baby.  Running low on this one and kind of wish  I could snag a back up but I don't think that will be happening.  I probably should start finding a dupe or something.  When both my flowers were semi dry, I went through with Sinful Colors Chalk it Up and added the leaves.  Finishing touch was to add the black details using my small nail art brush.

What do you think?  Fan of this look?  Do you like that muddled, vintage, burlapish looking background??  I think it's so unique!

Until next time, <3.

Gradient Mani

The One With Round 22 of Bestie Twin Nails with Fashion Footing

9:00:00 AM


Good morning polished world!  How are you all doing today?  St. Patrick's Day is Thursday!  Are your nails all green and ready!?  You know that mine for sure are!  Especially for today's Bestie Twin Nail post with Fashion Footing!

We are getting close to the two year mark of doing this feature.  Can you believe that?  Seriously feels like just yesterday we started.  Now two years later, I've forced Amanda to do nail art and she's liking it.

Today we decided to do a green gradient with a gold dry brush over the top.  Since Amanda didn't want to do shamrocks, this was one of the most St. Patrick-y thing we could come up with.

Let's take a look!


Colors Used:
  • Sinful Colors - Chalk It Up
  • Zoya - Hunter
  • Salon Perfect - Champagne Toast
  • OPI - Love Angel Music Baby
Love how this turned out.  At first I wasn't feeling it, but after the top coat was on, I was in love.  I started off with a base coat of Sinful Colors Chalk It Up.  Such a gorgeous polish, which I used in my leopard gradient I posted a few days ago.  It dried with a semi matte finish since it is one of their demi-mattes.  Usually I find that mattes are hard to work with, but this one was easy peasy.

With a make up sponge, I added Hunter to the tips of my nails.  I wasn't sure I was going to like it at first, but it looked kind of neat.  I need to do more of the same color gradients on my nails.


Champagne Toast was a spur of the moment addition to the manicure.  I wanted the gradient to really pop and was between this and Northern Lights.  I went with the Salon Perfect because it was gold and well, St Patrick's Day is all about that pot of gold!  When that was dried, which seemed to be forever, I added a dry brush of OPI Love Angel Music Baby.  If I owned a gold flakie, I probably would have opted for that because the dry brush kind of got lost on top of the nail.

What do you think?  Something you would do for St. Patrick's Day?

Until next time, <3.

Animal Print

The One With the Pastel Leopard Gradient

9:00:00 AM


Good morning polished world and Happy Sunday!  I cannot believe the weekend is already over.  It seems like it just began.  That's always how it happens after you have a super long week....the weekend ends up being shorter than short.  Oh well!  At least I have lots of pretty new polish to play with tonight, so that's a good thing!  May or may not have finally caved and purchased the whole Neon Pastel Poptastic Polishes from Color Club.  So so excited.

Anyways, today I am sharing with you a pastel leopard gradient manicure that I did last week using some of my Sinful Colors pastel polishes.  I'm really feeling Spring so I've been slowly digging out all my pastels, and well clearly purchasing some new ones.

Let's take a look at what I came up with!


Colors Used: 
  • Sinful Colors - A-Crush
  • Sinful Colors - Chalk it Up
  • Nine Zero Lacquer - Holo all the Things
  • Black acrylic
This is kind of a gorgeous gradient.  I really wish it photographed better.  Pastels always are washed out and neons are always dull.  Photography can really be a tricky thing sometimes.  Anyways, I did a pretty blue to green gradient using A-Crush and Chalk It Up.  I kind of think that A-Crush is more of a periwinkle blue than it is a true blue.  Maybe a purple blue?  Isn't that just periwinkle?  I don't know.  I'll call it periwinkle.

I believe these polishes were part of a back to school collection Sinful came out with last year.  They are demi-matte polishes so I'm assuming that means they dry matte when you use them on their own.  Since I used them for nail art and a gradient, I really couldn't tell if they were matte or not.


For the gradient, they were super opaque.  I didn't have to dab the sponge on my nails a zillion times to get the color to transfer like I do with other pastels.  Actually, it was too dark when I first did it, so I went through with white on the make up sponge and lightened them up a bit.  I then added a top coat of Holo All the Things for a nice shimmery holo look and boy was it gorgeous.  I really wish you could see it more in the photos.  The one above you can tell there is the effect.

What do you think?  Fan of this look?  Something you've tried?  Do you own the demi mattes?

I kind of have missed Sinful Colors.  I have been eyeing their displays for some time now but none of the colors seem to be popping out to me.  I'm hoping they come out with a pastel line for Spring with some newbies.  Since you know, I need more pastels.

I need to get a start on some St. Patrick's Day Manicures!!!!  Maybe tonight!  Although that means I won't be using my pastels.....hmmmm.

Until next time, <3.

Animal Print

NailTrail Leopard

9:00:00 AM


Good morning polished world!  How are you all doing today?  I'm feeling a tad better.  Still kind of beat up from this whole stomach bug.  Luckily I have a back log of manicures to post so I don't have to worry about editing photos or doing new manicures for the time being.  Maybe I'll start that all back up later today.

So I went through my back log of manicures and picked one that was simple, easy, and something I wouldn't end up writing a whole ton about.  It is a purple and black leopard manicure with is inspired by The Nail Trail.  She has some very cute animal print nails and gradient nails.  She's just a great nail artist, I don't think I've seen a design of hers that I didn't like.

Let's take a look.


Colors Used:
  • Sinful Colors - Mad About Hue
  • Orly - Liquid Vinyl
  • Orly - French White
Overall a fun design.  I really liked the Nail Trail's better though.  I think it's because she has longer nails than I do.  Or that her art is just better.  Regardless, I did love this design.  It was fun, simple, and quick.  Can't get much better than that in a manicure!


I really love Sinful Colors Mad About Hue.  I've owned it for awhile now and used it once or twice.  Looking back on this manicure, I really think I need to re-visit some of my Sinfuls and use them more.

What do you think?  Fan of the manicure?  Something you would do?

Until next time, <3.

China Glaze

Twinsie Tuesday: Inspired by a Hobby

9:00:00 AM


Good morning polished world!  How are you all doing today?  It's Tuesday which means it is time for another Twinsie Tuesday!  Today we are sharing manicures inspired by our hobby other than nail polish.  Now it is no secret that nail polish is a huge part of my life and my main hobby, so thinking of something other than nail polish started to become quite the challenge.

Then, it hit me...crochet!  A month or so ago some of the residents at work showed me how to do a little chain when we were playing with yarn and I now am hooked.  So much so that I decided that I'm going to make myself an afghan.  If you follow me on Instagram, you have seen my little project's progress!

This weekend actually I posted that I added the green onto the purple portion of my afghan.  I'm so proud of myself that I've taught myself how to do most of this!  It's exciting.

So for today's design, I decided to do a weave design using two colors which are similar to my afghan.

Let's take a look!


Colors Used:
  • Sinful Colors - Chalk it Up
  • China Glaze - Lotus Begin
  • Orly Instant Artist - Black
Cute, right?  I started off with a base coat of white polish, and then sponged the purple and green on.  When that was dry, I used my Orly Instant Artist and drew on the painted/weave design on the top.  To me, the weave kind of looked like a braided crochet look...maybe?


I think it looks like crochet...kind of.  Make sure to head on over to my Instagram to see my little project and it's progress!  I'm sharing photos every week or so!  

What do you think?  Do you crochet?

Make sure to check out the other Twinsie's posts!


Savannah at Addicted to Polish
Róisín at Cuti-CLUE-les
Marisa at Polish Obsession
Claire at Kerruticles
Chelsea at Nailed Blog
Bridget at A Painted Nail
Amber at Nails Like Lace
Amanda at Fashion Footing
Amanda at Amandalandish

Until next time, <3.

Nail Vinyls

Twinsie Tuesday: Inspired by a Flag - Nautical

9:00:00 AM


Hey all!  How are you all doing on this fine Tuesday?  I'm am pleased to say that this Tuesday the Twinsies are back and posting!  In the month of August we took a little break to re-group and enjoy the rest of the summer.  I"m not going to lie, this post creeped up on me and I kind of wasn't ready for the break to be over.  Plus it's a super busy week at work and I most likely would have skipped today if it weren't for the group.

Regardless, I'm happy to be back.  Today we are sharing manicures inspired by flags.  Since I keep my manicures on for a few days, I didn't want to have an American flag themed manicure because I would have had to explain myself over and over again.  So I found inspiration elsewhere.  I looked up the New York State flag and in the middle of the flag there are little boats.  Which got me thinking of something nautical.  So I went searching for nautical themed flags and found dozens upon dozens of blue striped flags, ones with anchors, and ones with gold.

And I ended up with a nautical themed manicure.  Let's take a look!  I was inspired by kadnails for the look.


Colors Used:
  • Sinful Colors - Rain Storm
  • OPI - Love, Angel, Music, Baby
  • Sally Hansen - Goldi-Flecks
  • Orly - French White
New to The Little Canvas collection are Twinkled T Nail Vinyls.  I used the stripe ones for my accent nail.  I need to get used to them...that's why my lines aren't perfectly straight.  Plus my bottle of Rain Storm (love this color) was a tad thick so nothing was really going well.  Once I get used to them, I'm sure I'll be able to get straight lines and not all weird uneven looking things like I did.


Overall, I like the manicure.  It's not my favorite...honestly I think nautical nails look better on other people.  Plus my nails were rather long this weekend when I did the manicure and I feel that made them weird too.

What do you think?  Fan of the look?

Don't forget to check out the other Twinsie's posts!


Amanda at Amandalandish
Amanda at Fashion Footing
Amber at Nails Like Lace
Bridget at A Painted Nail
Chelsea at Nailed Blog
Marisa at Polish Obsession
Róisín at Cuti-CLUE-les
Savannah at Addicted to Polish

Until next time, <3.

China Glaze

Random Dot Manicure :)

9:00:00 AM


Good morning polished world!  How are you all today?  Sorry I skipped out on Twinsie Tuesday yesterday, but it's been kind of a busy week.  I'll for sure be back next week!

Today I have a manicure to share iwth you using some polishes I recently purchased at Sally Beauty Supply.  A few weeks ago, all China Glaze polishes were buy one get one free.  They just got in the Electric Nights, so of course I splurged and purchased all those.  On top of that, China Glaze re-released polishes as part of their core line, so I grabbed some long wanted colors and a few back ups of ones I thought I would never see again.  Sixteen polishes later, I was one happy girl.

Today I am sharing a manicure I did using DJ Blew My Mind from the Electric Nights collection, and The Grass is Lime Greener from last years Avant Garde collection.  The manicure was inspired by Young, Wild and Polished.  I never would have thought of this color combination if it weren't for Nicole, and I'm so happy I saw it and re-created it.  I absolutely loved how they turned out!

Let's take a look!


Colors Used:
  • Sinful Colors - Snow Me White
  • Orly - Liquid Vinyl
  • Sinful Colors - Cool Grey,
  • China Glaze - DJ Blew My Mind
  • China Glaze - The Grass is Lime Greener
  • FingerPaints - Silver Bells
DJ Blew My Mind is so much more vibrant in person.  My camera kind of dulled it out.  Regardless, it is a gorgeous neon blue cream polish which everyone should run out and go purchase.  It applied perfectly in two cats, and worked great for dots!  Same went with The Grass is Lime Greener.  I'm not sure how the application is on that green polish since I have yet to apply it as a swatch, but for art and dots, it's great!


Seriously, aren't the colors together fabulous?  The grey works so well with the silver, and then the green really just adds a different dimension in with the other colors.  I really truly loved this combo.  I think this manicure is going to force me out of my "color comfort zone" and start to try things I normally wouldn't do.

What do you think?  Fan of the design?

Until next time, <3.