Flashback Friday

Flashback Friday: All My Halloween Tutorials!!!

9:00:00 AM

Hey all!! How are you all doing today?? With Halloween being right around the corner, and my Halloween Nail Art Wheel being the most popular post on my blog, I thought it would be fitting to share all the tutorials I've created for Halloween over the years!!

To get you inspired, here's my Halloween Nail Art Wheel I created two years ago. I can't believe that it was two years ago since I did this. I could have sworn it was last year.


Head on into the post to see the tutorials!!!!

Jessica Cosmetics

Scarecrow and Scarecrow Patchwork Nail Art Tutorials!

9:00:00 AM


Good morning polished world!  How are you all doing today??  Fall is officially here!  It's perfectly chilly, the leaves are changing, and the air smells wonderful.  Ahhhh, I love this time of year.  Apples, pumpkins, boots, and scarecrows.  What else can anyone ask for??

Two days ago I shared this scarecrow manicure which I think is one of the cutest design I've ever done.  Since it's a perfect design for Fall, I thought I would create a tutorial so everyone could get the design!  It's super easy, trust me.

Let's take a look!

First we will look at how to create the scarecrow accent nail.


What You'll Need:

  • OPI - Pale to the Chief or a nude polish
  • Jessica Cosmetics - Tangled Secrets
  • Acrylic Paints
  • Dotting Tool
  • Nail Art Brush
Tutorial:
  1. Start off with a base coat of nude polish.
  2. With a light brown acrylic or polish, use a paint brush to paint the hat by the cuticle and a line close to the bottom of the nail.
  3. With a yellow and orange acrylic paint or nail polish and add the straw at the base of the hat and at bottom of the nail.
  4. Start adding the details!  Use a dotting tool to create the eyes, and a paint brush for the mouth, nose, stripe across the hat, and a patch.
  5. With a small dotting tool, add the white dots to the button eyes, and finish the patchwork on the hat.
  6. Top coat and enjoy!!

Now for the patchwork nail!


What You Need:

  • Jessica Cosmetics - Tangled Secrets
  • Acrylic Paints
  • Nail Art Brush
Tutorial:
  1. Start off with a base coat of Jessica Cosmetics Tangled Secrets
  2. With a nail art brush, an orange, yellow, and blue acrylic paint, add the colored patches.
  3. With a nail art brush, outline the patches with a black acrylic or a striper polish.
  4. Finish the patches by adding the seams.
  5. Top coat and enjoy!!
What do you think?  Like these tutorials?  Something you think you'll try???

Alright guys, I think it's time for me to start doing some Halloween nails.  You ready??

Until next time, <3.

Jessica Cosmetics

The One With the Bow Nail Art Tutorial Feat. Jessica Cosmetics

9:00:00 AM


Good morning polished world!  How are you all doing today??  I meant to have this post up yesterday, but forgot to hit the publish button so it sat as a draft.  I then meant to post it during my lunch break from my phone, but I cannot for the life of me figure out how to get blogger to work from my phone.  I'm sure there's an app for it, but I would never use it so why waste the space?

Today I'm sharing with you a tutorial for the bow manicure I shared the other day using Jessica Cosmetics The Luring Beauty from the Into the Wild collection.  I absolutely loved that manicure.  It's super simple to re-create, so I thought I would share!

Let's take a look!
What You Need:

  • White Polish
  • Jessica Cosmetics - The Luring Beauty
  • Black Acrylic or a black polish
  • Small Nail Art Brush
  • Small Dotting Tool
Tutorial:
  1. Start off with a base coat of white polish
  2. With a small paint brush and a black acrylic or nail polish, draw the outline of the bow from the edge of the nail towards the center
  3. Using the same brush and paint/polish, draw a circle in between the middle of the two edges of the bow.
  4. With a dotting tool, color in the bow.
  5. Clean up the lines, and add the details to the bow using a small nail art brush and the acrylic/polish.
  6. Add dots to the white empty space.
  7. Finish with a top coat and enjoy!
I find it easier to draw the outline of the bow, or really any intricate design for that matter, and then filling it in like a coloring book.

What do you think?  Do you think you'll try to re-create this design?  If you do, promise you'll share with me?

The Into the Wild collection is available now through Jessica Cosmetic's website!

Until next time, <3.

Dot Mani

The One With the Sunflower Nail Art Tutorial

9:00:00 AM


Hey all!!  That's right, two posts in a row!  Can you believe it??  That's because today I'm sharing with you a tutorial!  It's been a long time since I created any tutorials.  I really don't know why I stopped.  I always meant to start doing them again but never really got around to doing so.  Well last night I had some time and I wanted to paint, but didn't want to paint my nails.  So, why not doodle on the nail art wheel and create a tutorial??

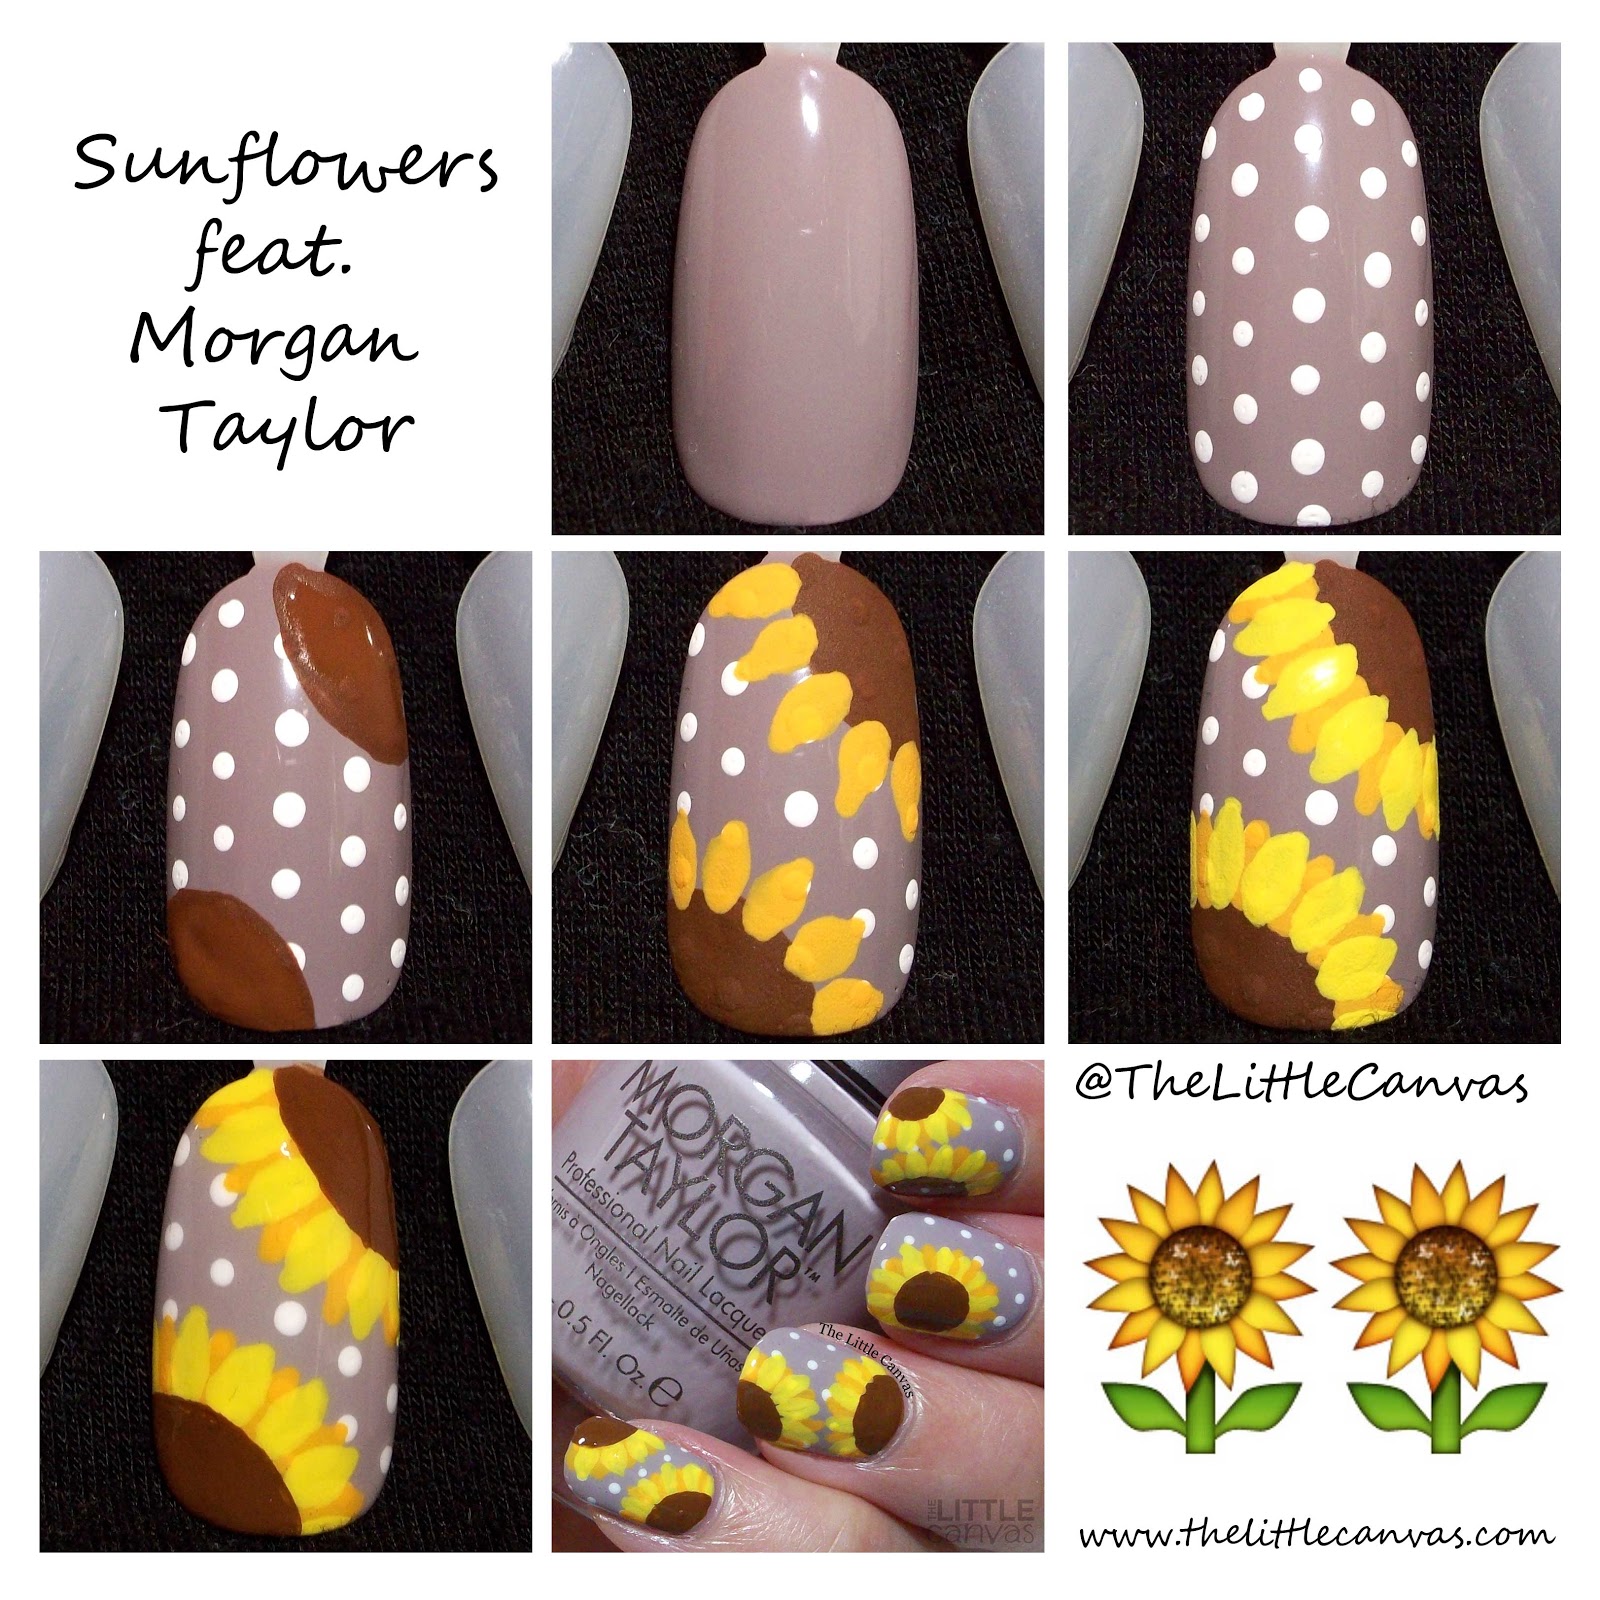
Today's tutorial is for my sunflower nails which featured Morgan Taylor Rule the Runway!  Let's take a look!

What You Need:

  • Morgan Taylor - Rule the Runway or a taupe polish
  • Acrylic Paints - white, brown, light orange, and yellow.  You can also use nail polish, I find acrylics to be easier and quicker
  • A small dotting tool
  • A small nail art brush
  • Top Coat 
Tutorial:
  1. Paint your nail with a base coat of Rule the Runway! by Morgan Taylor or a similar taupe colored polish
  2. With a small dotting tool, create a polka dot pattern on your nail using a white acrylic paint or white polish.
  3. Use a nail art brush and the brown acrylic or nail polish, create the centers of the flower wherever you want on the nail.  For this tutorial, I did one on each end.
  4. Use a small nail art brush and a light orange acrylic or nail polish and create the petals.  I do this by drawing an oval eye shape then fill in the center.  Leave space in between each petal.
  5. With the same nail art brush and a yellow acrylic or nail polish, fill in the empty spaces between the light orange petals.
  6. Clean up your brown center of the sunflower.  Using a small nail art brush, just even out the edge and cover any of the orange or yellow that overlapped the brown.
  7. Finish off with a top coat, and enjoy!
What do you think?  A tutorial you might try?  Should I start making more tutorials??

I would love to get into the world of YouTube but I don't see that happening yet.  That whole process seems very time consuming.  Filming, editing - I give you vloggers so much credit!

Let me know what else you would like to see!!

Morgan Taylor Rule the Runway is available now at LoxaBeauty.com

Until next time, <3.

Halloween

Frankenstein and His Bride - Nail Art Tutorial

9:00:00 AM

Good morning lovelies!  How are you all today?  As promised, I'm here posting the last of my Halloween Tutorials!  I've shared with you jack o'lanterns, vampires, and mummies!  Now it's time to show you how to do Frankenstein and his bride!

Let's take a look!

Frankenstein


  1. Start off with a base coat of green polish.
  2. With a nail art bush, create the hair at the cuticle.
  3. With a dotting tool, add two white eyes.
  4. With a nail art brush or striper, draw the stitches for his mouth and two eyebrows.
  5. With a small dotting tool, add the pupils!
Bride of Frankenstein!


  1. Start off with a base coat of green polish.
  2. Make a "M" shape a little more than halfway down the nail and fill in the hair with a black polish.
  3. With a dotting tool, add the whites for her eyes.
  4. Using a nail art brush or striper, create the white lightening bolt on her hair.
  5. With a dotting tool, add the pupils, and use a striper or nail art brush to draw the eyelashes.
  6. With a dotting tool, add a bow to her hair!
Don't forget to finish with a top coat!

What do you think?  Designs you may try?

As always please tag me in your recreations!  I hope your nails are all decked out for Friday!

Until next time, <3.

Halloween

Mummy Nail Art Tutorial!

9:00:00 AM

Good morning polished world!  How are you all today?!  As promised I am bringing you another Halloween tutorial before Friday!  One today, two tomorrow, and wraping it all up Friday with my last Halloween manicure!  Busy busy week for The Little Canvas!

Today's tutorial that I'm sharing with you is an adorable cute mummy design!  I loved my mummy nails from last year.  After going through my old posts before creating my nail art wheel, I knew I wanted to create a tutorial for this design.  It looks complicated, but it's really simple!

Let's take a look!


  1. Start off with a base coat of white polish.
  2. With a nail art brush and a black polish, or a black striper, create a "mask" where the eyes will be.
  3. While the "mask" is drying, take the nail art brush and black polish or black striper and draw random lines on the nail to represent the mummy's wrapping.
  4. With a small dotting tool, add white eyes on the mask.
  5. With a smaller dotting tool, add the pupils!
Make sure to top it all off with a top coat!

What do you think?  Cute simple design?  Something you think you may try?? 

As always, please tag me in any re-creations!  I love seeing them!

See you tomorrow, <3.

Halloween

Vampire Nail Art Tutorial

9:00:00 AM


Good morning polished world!  I'm going to be a busy blogger over the next few days posting my own Halloween manicures and the few tutorials I created when I did my nail art wheel!  Ever since I posted the pumpkins, I've had 4 more designs to share, and have had no clue which to share with you all first!

After one of my very amazing followers posted a re-creation of my vampire from the nail art wheel on my Facebook page, I decided it was time to share the vampire tutorial!

Let's take a look!


  1. Paint your nails with a light gray polish
  2. With a nail art brush, draw the hairline and fill in the top part of your nail with black polish.
  3. With a dotting tool, add two white eyes.
  4. With a nail art brush, draw the smile and eyebrows.  You can skip the eyebrows if you want.  I was trying to make him as scary looking as possible.
  5. With a nail art brush, draw the little teeth
  6. Using a small dotting tool, add red eyes and blood drips to the fangs.
  7. Using a small dotting tool or nail art brush, add the black pupils.  Then go through with a fine nail art brush and outline the fangs.
Don't forget your top coat!

Very straight forward, just a little tedious.  You'll see on my character nails that I tend to do the hair first.  This is because I can have a better idea as to where to place the eyes.  If the eyes are too high up, then the face can look disproportionate.  I also set up my tutorials in a way that takes drying time into consideration.  You cannot do the eyes all in one step because the red and pupils will blend into each other.  I usually will do the white and then let them dry, add the random details, then go back through and add the finishing touches.

What do you think?  Like the little vampires?  Is this a design you would try?

As always, if you re-create the design, please share it with me on my social networks!!  I cannot begin to tell you how much I love seeing your designs!

Until next time, <3.

Halloween

Jack O'Lantern Nail Art Tutorial = Times Two!

9:00:00 AM


Good morning polished world!  As promised, I created tutorials for designs that I did on my Halloween Nail Art Wheel.  While the wheel won't be up on the blog until tomorrow or Friday, yesterday I shared a cute jack o'lantern design which is one I created a tutorial for while painting the wheel! 

Since it was posted yesterday, it's only fair to share the tutorial, right?  Bonus; not only am I sharing the tutorial for yesterday's design, but for another jack o'lantern creation so you can pick which you want on your own Little Canvas'! 

Let's take a look first at the design I shared yesterday!


  1. Start off with a base coat of grey polish.  If you don't like grey, this design would look awesome on a nude base, or even a purple one!  I bet you could even do it on a naked nail also!
  2. With any orange polish, use the brush to create the pumpkin.  I did the same technique I would to get a cloud design.
  3. OPTIONAL STEP:  When the orange is dry, take a darker orange and draw lines down the pumpkin using a nail art brush.  This is optional because it will look just as cute without it!
  4. With a nail art brush and a green polish, draw a little stem.  You can also do this with a small dotting tool.
  5. With a nail art brush and black polish or acrylics, add the face.  You can do any fun or spooky face you little heart desires.
  6. With a nail art brush and the same blacks, outline the pumpkin.
Make sure to let it all dry for a few minutes and don't forget a top coat!

Now for the second tutorial!


  1. Start off with a base coat of orange polish
  2. OPTIONAL STEP: With a nail art brush and darker orange polish, draw lines down the nail.
  3. With a nail art brush and black polish or acrylics, draw a spooky or silly face!
  4. With a nail art brush or dotting tool, add green polish to the top of the nail for the stem.
Let the design dry for five minutes, then add the top coat!

Which design do you prefer!?  Do you think you will try either of these designs!?

If you re-create these designs, please share them with me on Twitter, Instagram, or Facebook!  I love seeing your re-creations!  They truly make my day!  You all are so incredibly talented!

Can't wait to share the wheel with you soon!  Until next time, <3.

Fun and Random

Converse Nail Art Take 2 + Tutorial!

9:00:00 AM

Hello polished world!  Happy Saturday!  As I write this post, I'm not a happy camper about my current manicure which is going up on the blog later this week.  If I have time this weekend I most likely will re-do it.  It got super hot here all of a sudden, and with that all the formulas on my polish I swear changed and it's frustrating me.  Maybe it's mind over matter, but I swear it's the humidity.

So, to make myself happy, I am sharing one of my all time favorite manicures that I have re-created.  This manicure being the converse nails!  I originally did converse nails when I first started blogging.  To this day, it's one of my most popular posts, and the pictures are unfortunately the most stolen.  Due to it's popularity, I really wanted to re-create the design and see how my skills have improved.  Then maybe people could start sharing a better version of the ones that are kind of a huge mess.

Earlier this year (literally I think I did these in February or March), I finally got around to doing the design.  Due to other things going on with the blog, they were put in the drafts folder and kind of forgotten about, until now!  Plus it's perfect since now that it's warmer I'm living in my Converse.

Let's take a look!


 Colors Used:
  • China Glaze - Splish Splash
  • China Glaze - That's Shore Bright
  • Orly - Oh Cabana Boy
  • China Glaze - Flip Flop Fantasy
  • China Glaze - Too Yacht To Handle
  • Orly Instant Artist - White
  • Orly Instant Artist - Black
Tutorial Time!  At the time I did this post, this was my first tutorial using the nail art wheel.   I think I've gotten a little better creating them since this! 


  1. Start off with a base coat of your favorite neon polish.  For this tutorial, I used Orly Oh Cabana Boy.  You could also use a black polish for a traditional Converse look.
  2. With a white striper, create a white line across the nail.
  3. Fill in the tip of your nail with a white polish.
  4. With a dotting tool, create six dots on the nail for the shoe's eyelets.
  5. With the white striper, create the laces.
  6. After the laces are drawn in, with a dotting tool, create the black dots in the eyelets.
  7. With a black striper, create the black U on the shoe's toe.
  8. Finish off with a top coat and enjoy!

These make me so happy.  I love my Converse and  I really wish I had a pair in all these colors.  Especially that mint on my pinkie finger.  It would make me so happy, especially since I'm mint obsessed lately.  I noticed on Converse's website that you can create your own Chuck's now and I might have to do that for my birthday.  If I do, you can bet your booty that I'll create a manicure to match them.

What do you think?  Better than the first attempt?  Will you re-create the look?

As a reminder, if you are going to share my image, please do NOT remove my cuticle watermark.  I work hard on my nails and this blog, and it is upsetting when I see my nails appearing on other people's Instagram accounts with no credit, or my favorite 'Look at my nails" caption.  Myself, along with other bloggers, put a lot of time into our sites...it truly is a labor of love.  So please, give credit where credit is due.

Until next time, <3.

Easter

Easter Bunny Nail Art Tutorial with Sally Hansen

9:00:00 AM

Press Sample
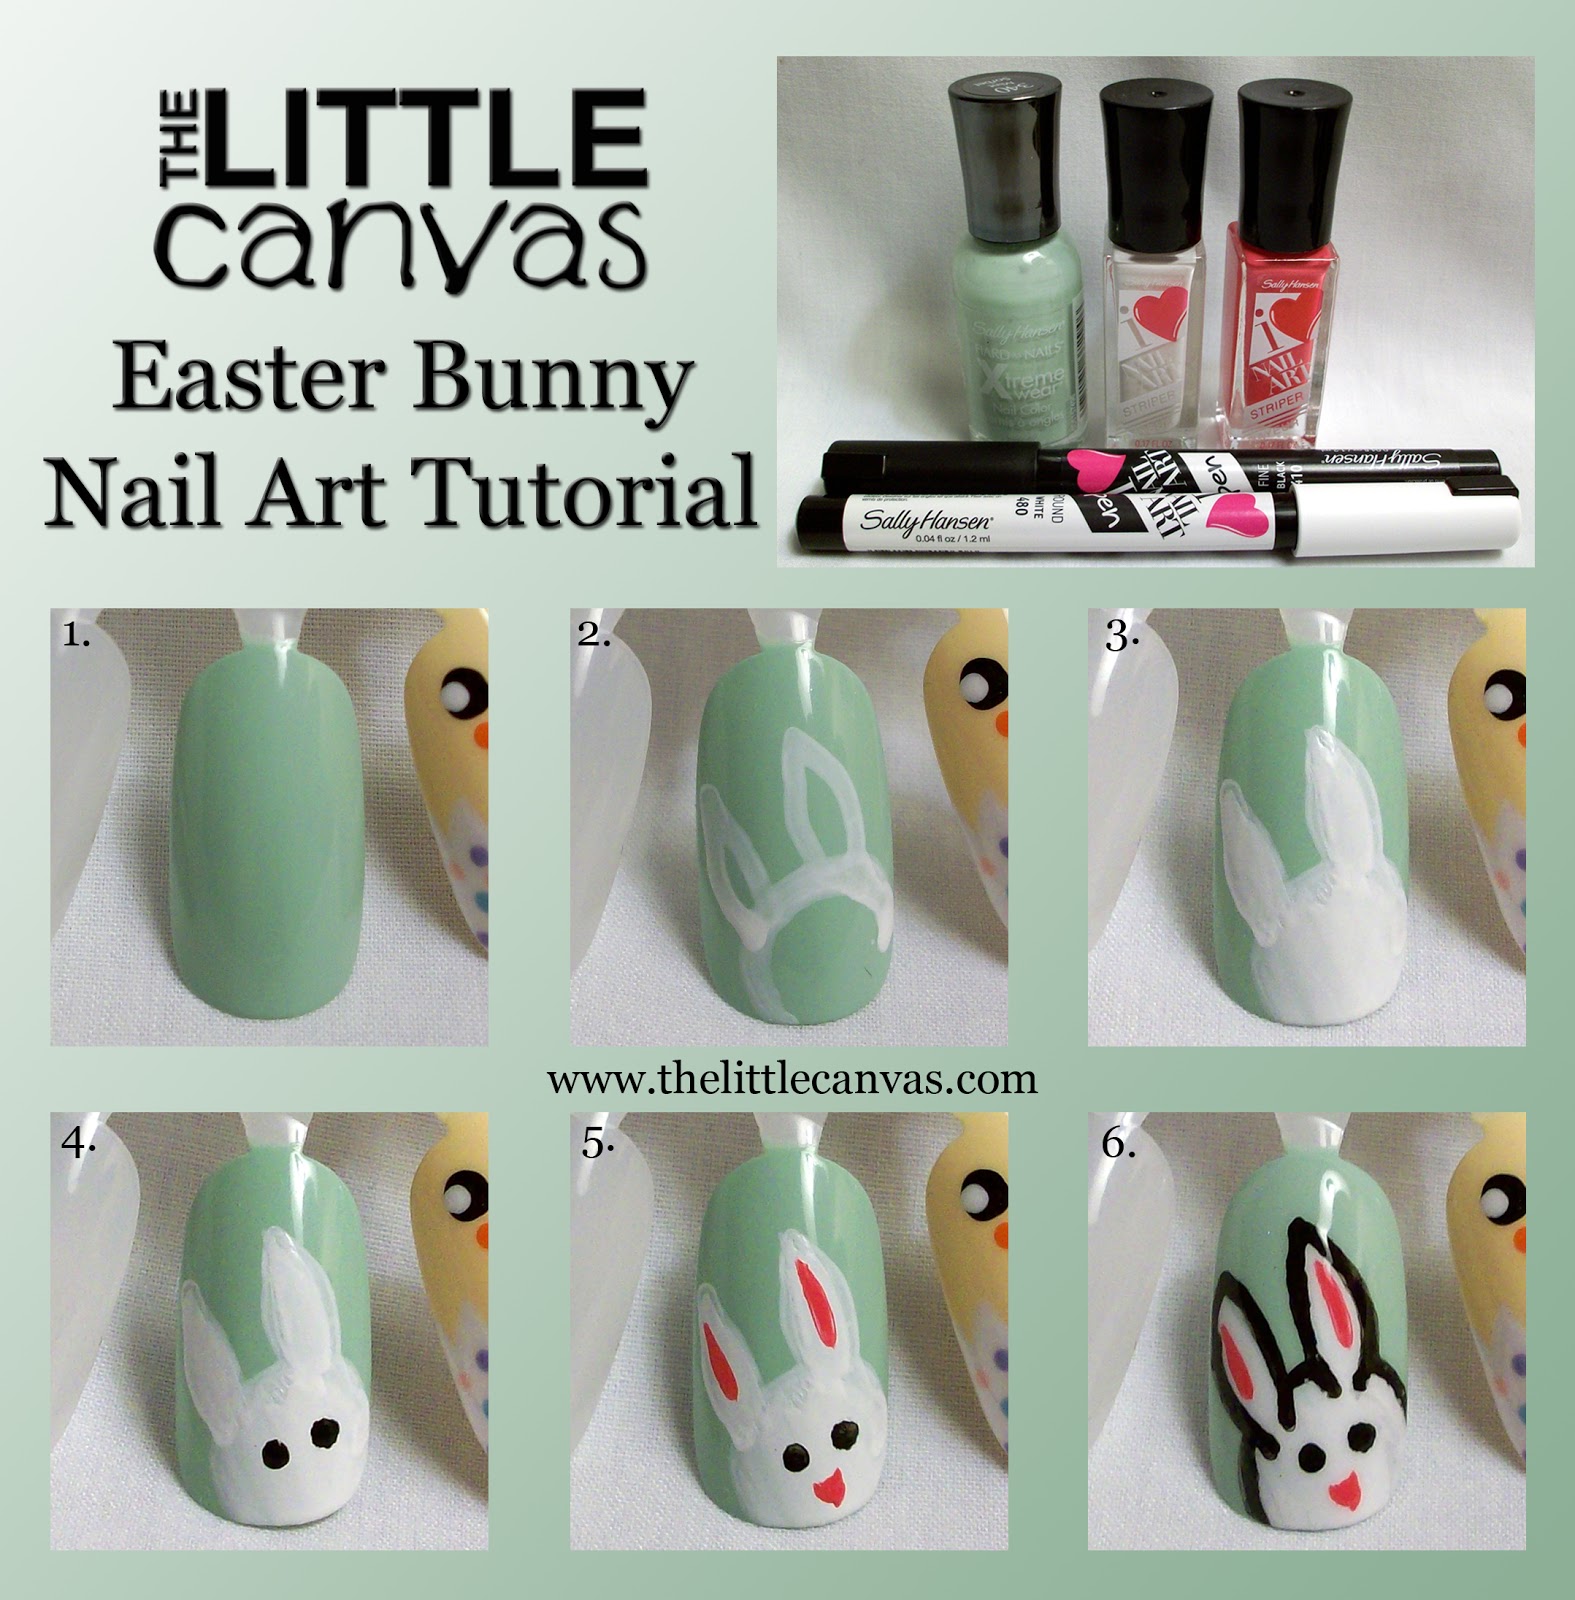
Good morning polished peeps!  Did you see yesterday's Easter Bunny nail art?  If you did read it, then you know today's post is dedicated to how you can get the look for yourself using polishes that you can purchase at your local drug store.  For my actual manicure, I used Orly Instant Artist polishes which only can be purchased on Orly's website or on Amazon.  If you want to get the look by Sunday, well it's impossible to do so with shipping times, so I decided to re-create the look using polishes you can purchase from your local drug store!

Sally Hansen recently released nail art striper polishes and nail art pens under their I <3 Nail Art line.  The amazing people at Sally Hansen sent me some of the lovely products for review which I just received on Tuesday.  Ever since I opened the box, I've been dying to use them to see how they work and get a review up on the blog.  As you know, I truly believe that there is a nail artist within each and every one of us, and products such as these which are readily available to the public at drugstores really make it easy for us to find our inner nail artist!

So, enough of my babbling, let's get to the tutorial using all Sally Hansen products!


Colors Used:
  • Sally Hansen - Mint Sorbet
  • Sally Hansen - I <3 Nail Art Pen - White
  • Sally Hansen - Striper - White
  • Sally Hansen - Striper - Hot Pink
  • Sally Hansen - I <3 Nail Art Pen - Black
Tutorial
  1. Start off with a base coat of a pastel polish.  For this post, I used Sally Hansen X-Treme Wear in Mint Sorbet.
  2. With the Sally Hansen I <3 Nail Art Pen in white, draw the outline of the Easter bunny.  I started off with the circle, then added the ears.
  3. Using the white striper, fill in the head of the bunny.
  4. With the black I <3 Nail Art pen, dot on the eyes.
  5. Using the Hot Pink striper, draw a line in the middle of the ears, then create a tiny triangle under the eyes for the nose.
  6. Outline the bunny using the black I <3 Nail Art Pen.  Add a top coat and enjoy!
Cute right?  Honestly, the lines were a lot cleaner using these products than my actual post where I used my nail art brushes and dotting tools.  I'm first going to talk about the striper polishes.  I LOVE these!  Now, these aren't like your normal everyday striper polishes.  I was expecting to open the bottle and see one of those super long awkward thin brushes that are impossible to work with.  I've started to get the hang of them, but honestly still hate those long things.  Instead, I found an awesome surprise when I opened the bottle.


The polish had a short thin brush!  See, isn't that awesome?!  When I opened the bottle, I thought to myself "If these polishes are awful to work with, I'm cleaning them and keeping all the brushes because this is awesome."  Luckily though, the white and pink that I used for this tutorial were awesomely formulated.  Even application and full coverage without having to continually apply separate coats.  From my first experience using this, I would say it's a must have.

The pens are rather neat as well!  I was expecting to see something similar to a ball point pen when I opened them, but instead the tip is a hollow white tip that fills with the polish.  The white one I have is a rounded tip, and the black is a fine tip.  As you can see from step number 2, the white is rather thin.  Both this and the black were kind of watery and not like a typical polish.  I felt that I had more control creating a straight line since I was using a pen and not a nail art brush.  Since the black was just as thin as the white, I found that I had to go over the outline for the final step a couple times times before it became dark enough.  I think if you want to outline your design, I would use the striper instead of the pen.  I liked the pen for creating outlines for the designs I fill in.  If that makes sense.

What do you think?  Like the design?  Will you recreate it?  Have you tried any of the Sally Hansen I <3 Nail Art supplies?

The X-Treme Wear polish I purchased for $2.89 at my local drug store.  The I <3 Nail Art Pens are $5.99 and the stripers are $3.99 at Walgreens.  According to Walgreens website the striper's are Buy One Get One 1/2 off.

I hope you enjoyed the tutorial! If you recreate the look, please, oh please, share it with me!  I can't wait to see.  Remember to tag those manicures with the #tlcinspiredmani tag on Instagram!

Until next time, <3.

**Sally Hansen provided the I <3 Nail Art Products.  All opinions expressed in this post are my own.  Please see my disclosure policy**

Animal Mani

Hatched Easter Chick Nail Art + Tutorial

9:00:00 AM

Press Sample
Oh hello there!  How are you all today?  I'm kind of awesome since Spring seems to FINALLY be here!  I got to drive with my window open yesterday.  Yes, you read that right, it's warm and sunny enough for me to not be in a winter coat and have the wind blowing through my hair.  I love it.

Easter is right around the corner so I figured it was about time to start bringing you some festive manicures.  As I said on my Facebook and Twitter, I decided to not do a nail art wheel, instead just a few designs on my nails with maybe a tutorial or two thrown in.

So, here I am kicking off Easter week on The Little Canvas with not only a manicure but a tutorial for how I got the look as well!  Let's take a look at my Easter Chicks!  (The pastels killed my camera...I thought only neons were supposed to do that ugh.)


Colors Used:
  • OPI - You're Such a Budapest
  • Sinful Colors - Bright Lucite
  • Zoya - Dot
  • Mary Kay - Lemon Parfait
  • Maybelline - Sweet Clementine
  • Orly - Instant Artist - White and Black
  • Sinful Colors - Snow Me White
A little different than last year's Easter Chicks, and honestly, I'm loving this look much better!  I think the little guy is so cute as an accent!  I also decided to go all pastel instead of some pastel and then a dark yellow.  I'll talk more about the polishes after I do the little tutorial!

Tutorial:

  1. Start off with a base coat of a yellow polish of your choice.  I picked the pastel Mary Kay Lemon Parfait
  2. With a white polish and a nail art brush, create the "crack" of the egg by drawing a chevron in the middle of the nail. This does not have to be perfect since a cracked egg is not perfect!
  3. Fill in the bottom half of the nail with a white polish.
  4. With an orange polish and a nail art brush, draw on the little beak.
  5. Create the eyes using a medium sized dotting tool.
  6. Decorate your egg!  I decided to do little pastel dots!  Finish off with a top coat!
If you want your shell to stand out more against the pastel white, you can outline it in black.  I like it this way and have never tried it with the black, so I can't really tell you which looks better.


As I said above, I love the little guy as an accent nail.  Isn't he so adorable?  And isn't Mary Kay Lemon Parfait the most perfect pastel yellow?  My friend is a MK consultant and asked me to review the polish since she's unsure about formulas and such and wanted to give her clients the most honest review of the product.  Plus, she knows me and knows that if I hate something, I will say it.  I'll give a more thorough review after my Easter manicures are done since I have an awesome design in mind using it, but until then, if you're looking for a perfect Easter pastel yellow, you need to grab this!  Perfect formula that had full coverage in two coats.  The polish is $9.50 and can be purchased here.

I'm also loving Zoya Dot.  Such a pretty pastel pink!  It was a little sheer with the first coat and was nervous that it was not going to build at all.  I applied the second coat and I still had some bald spots, so I went back through and did three and finally had full coverage.  It is a soft pink that I can see myself using for some floral designs.  Dot is part of the Awaken Collection and is $9.00.  It can be purchased on Zoya's website.

What do you think?  Liking the colors?  Liking the chick as the accent nail?  Something you'll try?

Remember, if you do re-create the look, please tag tlcinspiredmani on Instagram!  I would love to see!

Can't wait to share my next Easter manicure!  Until next time, <3.

**Some polishes used in this post were provided for promotional purposes.  Please see my disclosure policy**

The Beauty Buffs

The Beauty Buffs - Royal Blue (Floral Nail Art Tutorial)

8:00:00 AM

Hello polished world!  Hope you all are doing well today!  Today is my second post as a member of The Beauty Buffs!  You may remember that two weeks ago, our little group published our first posts about pastels.  If you haven't checked it out, make sure to go back and take a look! 


Today's theme is Royal Blue.  I was so excited when I first saw this because as you may or may not know, I love anything blue.  Yes, I know that I say all the time I love anything mint, but blue is really where my heart lies.  Maybe with purple as well.  Regardless, I really love that I could go into my stash and re-visit some of my favorite polishes.

I have always thought of royal blue as a rich sailor blue.  I decided to Google the color to see if I was on track, and I found that there are light and dark versions.  Truly, depending on the person, it could be different.  So I grabbed four bottles from my blue stash that were the most royal blue to me. 


The first polish I selected is OPI - OPI Eurso...Euro.  This is one of my favorite blue creams.  I used it in my manicure I posted yesterday.  To me, it's one of the darker royal blues.  The next polish I selected is Zoya Dream.  Looking at the bottle, it's a lot darker than it really is.  When it's on the nail, to me, it's a royal blue.  The holographic glitters throughout give it a new dimension which makes the polish not as dark as well.  Truly a must have polish for anyone.

If you aren't willing to spend the $9 price tag for OPI or Zoya, drug store brands have you covered as well for royal blue.  I next selected two Sinful Color polishes.  The first is Midnight Blue, a gorgeous royal blue shimmer polish.  I'm not even sure you can call it a true shimmer, but it's truly gorgeous.  This was my first blue polish when I started my little hobby.  The next bottle of Sinful Colors I selected is Endless Blue.  This polish (from what I have read) is a dupe of Essie Butler Please and Sally Hansen Pacific Blue.  When I Googled royal blue, both the Essie and Sally version popped up, so of course I grabbed this bottle.  A gorgeous two coat polish that is perfect for Summer.  Now the Essie is about $8.00 a bottle so you can't go wrong snagging this dupe or the Sally Hansen version for $1.99 or $2.99.

Since Midnight Blue is an oldie but goodie of mine, I decided to use it to create an easy and adorable nail art tutorial for today's post!


Colors Used
  • Sinful Colors - Midnight Blue
  • Orly - Instant Artist - White and Black*
  • Zoya - Darcy*
*While I used these polishes, you could just as easily use a Sinful Color Black/White/Yellow polish.  I used these ones because they were handy and my white had dried up.

Tutorial
  1. Paint your nail with a base coat (blues tend to stain) and then paint your nail with your favorite royal blue polish
  2. With a medium sized dotting tool and a white polish, create a dot flower.  Do this by starting off with one dot at the top, then two off to the side, then two closer together at the bottom.
  3. Once the white dot flower is dried, with a black striper or a nail art brush and black polish, add a little line on each of the petals .
  4. With the medium sized dotting tool or smaller, use the yellow polish to create the yellow inside of the nail.
  5. With a small dotting tool and the white polish, fill in the empty spaces with little polka dots.  Add a top coat and call it a day!
I have stepped out of my nail art zone today and decided to look for an outfit which I think that this look would look adorable with!  I started out looking at Polyvore but kind of got confused with how to actually use the site.  By next post, hopefully I'll have it down.  Anyways, since I failed at Polyvore, I was going to just share my favorite polish and the tutorial, until I logged on to Pinterest.  One of my old co-workers has been pinning royal and navy blue outfits all day long.  It's so weird how it happened!  I rarely talk to her and she has NO clue about today's post, and here I am logging in to see a full feed of just what I was looking for!

My mind was set on a white dress with some form of a blue cardigan.  This is the look that my co-worker pinned.


**no source as it led to a .jpeg link and I did a Google Image search and turned up with tumblr/pinterest links**

Now, this isn't the exact dress I was looking for, but it totally works!  When on Polyvore I was looking for blue dresses, but quickly decided against it because I feel like the blue of the nails would clash with the blue of the dress.  The white dress, with a blue cardigan and blue nails just seems so fresh and perfect to me.  


The dress I wish I could find is something Blair Waldorf-esque.  In an episode of Gossip Girl, she wore the dress above which I found to be adorable.  I imagine that dress in a sleeveless version with no tights and a blue cardigan, or keep the sleeves and have a royal blue bow and tights, and no cardigan.  Maybe my fashion sense is totally wrong, but I think it would be cute and totally compliment the nail art design!

What do you think?  Like the design?  Like the outfit selections?  Am I anywhere on base when it comes to fashion?? 

I love being a member of this group! I feel like I've come out of my comfort zone posting outfits to compliment a nail art look.  Even though the second outfit you kind of have to imagine differently than pictured, I still tried!  I hope to continue to expand my blog and maybe in other posts feature outfits that I think would be cute.

Make sure to check out the other Beauty Buffs!