Valentine's Day

The One With the Valentine's Day Manicure

9:00:00 AM

Nothing to Disclose


Good Morning Polished World!!!  How are you all doing on this wonderful Monday?  It's Valentine's Day and well, if you've been following me for awhile, you know that I'm not a fan of today.  I am a firm believer that you should show your love every single day, not just because Hallmark said to today.  Despite that, I still wear reds, pinks, and make desserts for my family and friends.

Today's design is something simple.  I've been quite busy with work lately and had some massive breaks, so this was my first design in a few weeks.  Actually, as I type this, I have just a plain swatch on my nails because this pretty design chipped and I didn't feel like painting another design for just one day.  Regardless of it's simplicity, it's still a cute design perfect for today.

Let's take a look! 


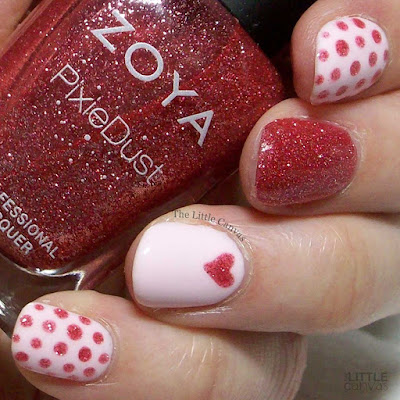
I'm going to save you from the whole Colors Used section again, because even though I painted this design two days ago, I cannot remember the light pink.  I do know that the PixieDust is Miranda!  I think.......yes, it's Miranda.  This Pixie is pinker in person than what my camera was picking up, but trust me it looked gorgeous with this baby pink.  The baby pink is a Zoya as well, but again, don't know the name.


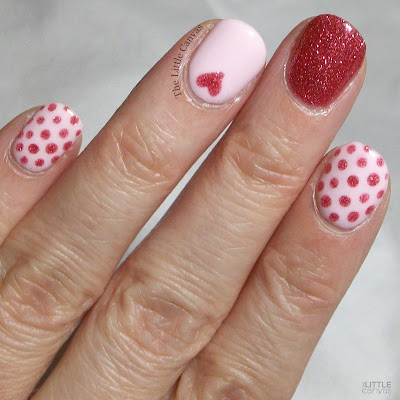
What I love about my PixieDust polishes is that they are so versatile.  You can use them for a swatch or for nail art.  They dry perfectly sparkly.  Leave it without a top coat and it's a gorgeous matte, add a shiny topper and they look like gems.

What do you think?  Fan of this Valentine's Day look?

I hope everyone has a wonderful day.  Just know, I love all you amazing followers so much! <3

Until next time, <3.


Orly

The One Where I Caved and Did a Valentine's Day Manicure

9:00:00 AM

Nothing to Disclose


Good Morning, Polished World!  And Happy Valentine's Day to all my lovely followers.  Yes, the past two posts I said I wasn't going to post today or have any themed nail art this year, but here I am.  You can thank my coworkers who peer pressured me into doing some festive nails.  I'm kind of glad I did because I really liked this design.

Earlier this week I was updating Instagram (shocking) when I stumbled across this design by Nail_Art_By_Tal.  As you know, a few posts back I shared a french tip snowflake design which I was completely in love with, so this was no shocker that I fell in love with this one as well.  I had to re-create it.  It's simple, festive, but not over the top for the day.

Let's take a look!


Colors Used:
  • ORLY - Mirrorball
  • Acrylics
ORLY Mirrorball, one of the best holographic polishes in my collection.  I have about 4 back up bottles of this beauty.  I haven't ever used it for a glitter gradient before, but now that I see how well it works, I'm going to!  I debated on using Mega X by ILNP for this manicure, but I wanted that extra glitter that Mirroball has with the little hex pieces.


When the gradient was dried,  I went through with a small dotting tool and added the hearts and the little dots.  I wanted to do the little stars that Tal had, but I never in all my years of blogging have figured out how to do those freehanded.  So, instead of the stars,  I decided to add the little line on the hearts to make them pop a little.  I love them, but think Tal did a better job.

What do you think?  Fan of the manicure?  Happy I did something for Valentine's Day?

Until next time, <3.


Dot Mani

The One With the Pink Roses for Valentine's Day

9:00:00 AM

Nothing to Disclose

Good Morning Polished World, and Happy almost Valentine's Day!!  Also, happy blog-versary to me!!  That's right, 8 years ago today, this little blog was formed.  It is beyond shocking to me that I have stuck to this blog for that long.  Sure, last year was a tad rocky, but I'm back.  Maybe not better than ever, but I'm back!  Thank you EVERYONE who has stood by me and followed me for this long.  It seriously does not feel like it was that long ago.

Today's design is a re-creation of one of my all time favorite rose designs.  I wanted to post another pink manicure before this one, but I got a lovely migraine the other night and just did not want to blog.  Anywho,  I remember years ago when I created this manicure that it took me a super long time to get everything just how I wanted it.  Now, here I am, years later, re-creating a design that took close to three hours in just under an hour and a half.  Now sure, an hour and a half seems long, but I was in the midst of playing an intense round of Candy Crush and I kind of abandoned the nails before my endless lives ran out.

Let's take a look at the manicure!


Normally this is where I tell you what colors I used, but I have absolutely zero clue.  The sticker at some point or another fell off the bottom of the bottle and I couldn't find it anywhere.  My assumption is that it fell off in the bottom of my drawer, and when I was cleaning out my drawers last, I just threw it out instead of looking to see where it belonged.  Kind of a shame because I really truly wish I knew this polish's name because it's GORGEOUS.  Two coats of this perfect, subtle, neutral pink.  Perfect base for this design.


Once my mystery pink polish was dried, I went through with a white polish and added polka dots on all my nails.  I let them dry a bit and then added the pink circles for my base of my roses.  Then with a toothpick, I paintstackingly (just kidding it went really fast) added the leaves.  Grabbed a small nail art brush, some black acrylic, and added the detail.  Slapped on some Out the Door and went to sleep.

What do you think?  Fan of this look?  Perfect for Valentine's Day without being too Valentine's-y?

Again, I want to thank you all for sticking by me for the past 8 years.  I truly cannot believe I'm still blogging after all these years and that this hobby would mean so much to me.  I love you all.

Until next time, <3.

Flowers

The One With the Rose Manicure for Valentine's Day! - and Blog-versary!

9:00:00 AM


Good morning polished world and Happy Valentine's Day!  Blah, hate this holiday, but guess what?  It's the 7th Anniversary of The Little Canvas.  Weird that it's the anniversary of my blog seeing as I hate this day so much.  I remember when I started this blog, I was homesick for a month with some ungodly illness.  Before getting sick, I was beginning to discover the world of nail polish blogs.  I so badly wanted to get my designs out there, and while lounging around the house attempting to get better, The Little Canvas was born!  Looking back at it now, while that sickness was horrible, I'm grateful it happened, because if it didn't I wouldn't have this blog, and I probably wouldn't still be painting my nails.

So while everyone is showing their love with their significant others, I'm going to show my love for all my lovely followers.  From those who have stuck from me since the very beginning, to all my new followers, I thank you all joining me on this journey!  I truly love you and couldn't imagine not having you all in my life!

I guess I should stop being so sappy and start talking about my manicure for today!  I love rose manicures, and this one is no exception.  The colors, the little roses....just everything is perfect!!

Let's take a look!


Colors Used:
  • ORLY - Mystic Maven
  • ORLY - Head in the Clouds
  • ORLY - Mirrorball
Look at this manicure!!!!!  How could you hate it?!  Mystic Maven is drop.dead.gorgeous!  Mystic Maven is a purple mauve cream from the Deep Wonder collection from Winter 2018.  I said this in my last ORLY post, but polishes like these are the reason that I still have a subscription to the ORLY Color Pass.  It's such a great deal and you get all four main ORLY collections.  Since Sally Beauty stopped carrying the Limited Edition collections, this was the way to go for me.  Especially because the Color Pass is much cheaper than what I could purchase them for in store.

Anyways, Mystic Maven covers completely in two coats.  Honestly, you could get away with one coat on this gorgeous polish.  I'm so happy to have this color in my collection.


Trying a little new background for my pose like this.  Not sure if I like it yet, but it does feature another shot of Mystic Maven, as well as the beautiful Head in the Clouds.  This polish is from the La La Land Spring Collection in 2017....another Color Pass purchase.  Two coats for that polish, but I used three because I felt like there was one patchy spot.  I think that was operator error though.

What do you think? Love this rose manicure? Love the ORLYs?

Again, I want to thank you all who have followed and supported me for the past 6 years!  You have no idea how much it means to me!  Here's to another year!

Until next time, <3.

Dot Mani

The One With the Heart Manicure

9:00:00 AM


Good morning polished world!  Welcome to yet another Monday here in 2019.  We have entered into the week of the dreaded Valentine's Day.  At least I have a super busy week so I can ignore the fact that everyone is being super extra.  I'm a firm believer we should show our love for eachother every day, and not be forced to do it one day a year.  Now we all know that Valentine's Day didn't start out as a Hallmark Holiday, society commercialized it into what it is today.

Despite my hate for the holiday, for the blog (and my resident's), I festively paint my nails.  Today's manicure is for sure out of my comfort zone because of all the pink.  So.much.pink.  I wasn't sure of it at first, but then when I finished it off with the rose gold accent.....well, you'll see.

Let's take a look!


Colors Used:
  • INM - Celine's Jelly Bean
  • ORLY - White Tips
  • ORLY - Lucid Dream
Gorgeous, right? Celine's Jelly Bean is a perfect pastel pink polish.  Two coats and full coverage.  I was scared this would be a three coater because typically light pinks like this are more sheer and crelly like, but this one isn't.  Perfect cream polish which I think I might be using again around Easter time.


I can see myself wearing more pink manicures because of this design.  Lucid Dream by ORLY is a perfect accent to balance everything off.  It is a two coat, rose gold polish from the Deep Wonder winter collection.  Polishes like this are why I continue with the ORLY Color Pass each year.


What do you think of this manicure?  Think I should do more pink manicures?

Until next time, <3.


Sally Hansen

The One With the Valentine's Day Nail Art

9:00:00 AM


Good morning polished world!  Happy Valentine's Day to you all!!  And happy six year blog-versary to me!  Maybe I'll celebrate later this month with a special post or something.  We will see.  Regardless, I'm super proud of myself for doing a few different Valentine's Day manicures despite the fact that I hate the holiday.  I'm one of those people who believe we should show how much we love each other every single day, not just one day a year because Hallmark says so.  Sure, there's more meaning behind it other than Hallmark, but we all can agree that this holiday has become so commercialized.

Wow I'm getting side tracked.  Anyways, today's manicure is one inspired by Coffee and Nail Polish.  Shannon created a cute doodle heart design last year that I wanted to do last year, but failed when I tried.  I kept looking at the manicure pinned on my Pinterest board and finally decided to give it another go.  I'm happy that I did because I'm super proud with how they turned out!

Let's take a look!


Colors Used:
  • Sally Hansen - Femme Feather
  • Sally Hansen - Let's Jam
  • Sally Hansen - Va-Va Violet
  • Sally Hansen - Flashy Fuschia
  • Black acrylic
Isn't it cute?  It took me FOREVER to do but that's because I was overly critical of myself and wanted my hearts to be perfect.  I honestly forgot that Shannon had called hers doodle hearts, and I was trying to make mine look like stamps.  When I re-read her post and saw the word doodle, I kind of threw caution to the wind and didn't aim for perfection.

The base of Femme Feather was perfect.  I've had this polish from the Xtreme Wear line for awhile now.  I think I might have used it once in the past but I honestly cannot remember.  It's a gorgeous pink nude polish which covers completely in two coats.  I was a little iffy because the first coat was so patchy, but it layered wonderfully.  Truly was the perfect base for this design.

The new formulation of the Insta- Dri polishes were amazing for nail art.  They colored in the hearts quite nicely and dried super fast so I was able to top coat quickly.  Best part, there was only one nail that had a little drag spot from the art - and that was because the dot was not dry enough.  I kind of jumped the gun with the top coat, but I wanted to go to sleep.

What do you think?  Fan of this look?

Valentine's Day done....time to start thinking about St. Patrick's Day nail art.

Until next time, <3.

Sally Hansen

The One With the Valentine's Day Tic Tac Toe

9:00:00 AM


Good morning polished world!  How are you all doing today?  The weekend is almost over and the work week is almost here.  On top of that, Valentine's Day is right around the corner.  Also, the 6th anniversary of this blog.  Kind of crazy to think that I've been blogging on The Little Canvas for six years.  That's a lot of polish and nail art!  Well I probably won't have a fancy anniversary post because I never really have done that, and if I was, I should have done it last year on the 5th anniversary.  Oh well.

Today's design is yet another Valentine's Day manicure.  Okay, maybe the last few weren't true Valentine's Day designs, but they were pink/purple and kind of subtle if you didn't want to go over the top with hearts and all that jazz.  The design I'm sharing with you today is a re-creation of a tic-tac-toe design I've done a few different times.  Same accent nail, different colors.

Let's take a look!


Colors Used:
  • ORLY - Liquid Vinyl
  • Sally Hansen - White on Time
  • Sally Hansen - Let's Jam
  • Serendipity Polish - Holoday Lights
Cute, isn't it?  I really wasn't sure if I was going to like the color combination I picked out, but I really did once it was on the nails.  Let's Jam is another polish from the re-formulated Insta-Dri line.  I'm slowly working my way through the 16 polishes I was sent for review.  This is a pretty red polish which doesn't remind me of your typical red.  Honestly, I'm not sure how to describe it, other than it worked well with my skin tone, and usually reds look weird on me.  Two coats and full coverage just like all the other Insta-Dri's I've already tried.

What do you think?  Fan of this design?  Used any of the new re-formulated Insta-Dri polishes?

Until next time, <3.


Dot Mani

The One With the Pink Dots

9:00:00 AM


Good morning polished world!  How are you all doing today?  We were supposed to get some huge snow storm but it really never amounted to anything.  It's been such an odd winter, we really have had no snow.  I know I should be happy, but I would just like a foot of the fluffy stuff at least once.

Tomorrow is Valentine's Day (blech) so I figured I should do something somewhat festive on my nails.  I couldn't think of anything super creative, so I opted for a naked nail dot manicure.  When in doubt, grab three colors and just dot them on your nails.

Let's take a look!


Colors Used:
  • FingerPaints - Paper Mache
  • Zoya - Rooney
  • Sally Hansen - Pink Cadillaquer
For someone who dislikes pink and Valentine's Day, I really did enjoy this manicure.  The naked dot manicure always is super easy, and makes it look like my nails are way longer than they really are.  To get the look, I started off with a base coat.  Currently I'm using FingerPaints base coat that you find on the shelf with their core collection.  It's a milky white base which dries clear on the nail.  When dried, I went through and started dotting.


I always tend to put the darkest color down first.  For this manicure, it was Zoya Rooney.  A gorgeous deep pink shade that sits in the back of my Melmer completely neglected.  It truly is beautiful.


After my Rooney dots were dried, I went through with Pink Cadillaquer by Sallly Hansen.  This polish is a beauty, but unfortunately I don't think I'm ever going to be able to use it again as a base color.  The brush has completely fallen apart!!  I'll have to take a picture and post it to Instagram, I can't even explain it.  It's literally destroyed.

Anyways, when the baby pink dots were on and dried, I went through and filled in the empty spaces with the white.  Slapped on a top coat and called it a day.

What do you think? Are your nails all ready for Valentine's Day?  Has anyone else's brushes in their Miracle Gel polishes completely fallen apart???

Until next time, <3.


Nail Collab

The One With the Valentine's Day Instagram Collab

9:00:00 AM


Good morning polished world!  How are you all doing today?  It's Valentine's Day so we all know how happy I am.  NOT!  Cannot wait until tomorrow where I can sit and enjoy the Grammy's and act like this day never happened!  Seriously, this is the first Sunday in forever that the Grammy's aren't on.  Did they purposely move it to the 15th because of Valentine's Day?

Today I am participating in an Instagram Valentine's Day collaboration.  I figured this would force me to actually create and post a manicure for today.  So I came up with something I really do think is extremely Valentine's Day and only lasted a full day on my nails before I took it off.

Let's take a look!


Colors Used:
  • Zoya - Rooney
  • Zoya - Livingston
  • Zoya - Tomoko

I will admit, Zoya has some perfect Valentine's Day colors with these polishes.  I have owned Rooney for awhile and I'm shocked I don't use it more.  It's such a pretty shade of pink which applies perfectly in two coats.  I might ignore it for the next month or so to forget the fact it was a good polish for today, but I will return to it.  Maybe in the summer time!

Tomoko is my all time favorite Pixie Dust polish which can be used year round.  It's such a pretty champagne gold color and it sparkles quite nicely.  Two coats plus a top coat for my manicure today.  You can leave it without a topper and it's still just as sparkly.


For my design, I used the polish brush of Rooney and created the heart on my nails.  When that was dried, I went through with Livingston and created a smaller heart.  It's pretty much the same technique  I use to do the cloud designs, which I haven't done in a long long time!

What do you think?  Fan of this look?  Something you think you might try next year?

Until next time, <3.

FingerPaints

The One With the Tic Tac Toe and FingerPaints A-Cry-Lic a Girl

9:00:00 AM


Good morning polished world!  How are you all doing today?  A few more days and I don't have to deal with any more Valentine's Day manicures!  Woot!  Seriously, today I'm planning on taking the manicure that will be up on the blog Sunday and doing something totally non-pink/red.  

So years ago when I started blogging, I did a tic-tac-toe design.  I just tried to find it to link it but I cannot.  I know I did one.  I know it's on my nail art wheel I did a few years ago for Valentine's Day.  Well anyways, regardless, I thought it was time to re-create it.

Let's take a look!


Colors Used:
  • FingerPaints - A-Cry-Lic a Girl
  • FingerPaints- Paper Mache
  • Zoya - Cosmo

Kind of cute, right?  I think it is.  The pink is a new color from FingerPaints this year.  It is a neon pink polish with a subtle shimmer to it.  I used two coats for my manicure and I think it was the perfect shade.  Not too bright, not too dull.  Now FingerPaints does have a special neon base coat with their new line of polishes this year, but I decided to not use it with this pink because I didn't want a whoa in your face bright pink for this manicure.  I'll swatch it with the white next time I wear it.  Honestly though, the pink was so opaque I'm not sure what a white undie would do for it anyways.  I guess we will see at a later date.


Paired next to Zoya Cosmo, it's quite gorgeous.  Cosmo is one of the only Ultra Pixies that I enjoy.  Probably because it's silver and it has even application.  My others don't really apply well.  I should revisit them all this year and see if they do or maybe I had one evil one and I chalked off the rest because of it.

What do you think?  Fan of the tic-tac-toe?  Liking the pink polish?

Until next time, <3.

Flowers

The One With the Romantic Mani for Twinsie Tuesday

9:00:00 AM

Nothing to Disclose 

Good morning polished world!  How are you all today?  It's Tuesday which means it is time for another Twinsie Tuesday.  Since Valentine's Day (blech) is this weekend, the theme for this week is romantic.  Honestly, not a fan of this theme since I'm not a fan of the holiday.

I could not for the life of me think of one romantic design for this prompt.  Luckily in The Little Canvas vault, I had a rose manicure I forgot to post a month or so ago!  Roses are romantic....right?

Let's take a look!


Colors Used:
  • Orly - White Tips
  • Orly - Instant Artist - Black
  • Zoya - Pinks and Greens (can't remember the exact name because I stink and forgot to write down what colors I used.  I just know they were Zoyas)
This rose manicure is inspired by this beautiful rose design by mvargas_nails on Instagram.  I fell in love with the design months ago when I saw it.  Not because it was romantic, but because it was a gorgeous floral manicure and you know me and floral!  

To get the look, I started off with a base coat of Orly White Tips.  This polish could be a one coater, but I typically use two.  When it was dry, I used my Instant Artist striper and added the black lines.  When the lines were dried, I used my dotting tool and nail art brushes and drew on the roses.


It has been the longest time since I've actually done a rose  manicure.  I don't know why I don't do them more often.  The flower itself is rather easy, but yet looks like it took forever to do.  I think I might start pinning some new ideas!

What do you think?  Does this pass as a romantic manicure?

Don't forget to check out the other Twinsie's posts!


Amanda at Amandalandish
Amanda at Fashion Footing
Amber at Nails Like Lace
Chelsea at Nailed Blog
Claire at Kerruticles
Marisa at Polish Obsession
Róisín at Cuti-CLUE-les
Savannah at Addicted to Polish

Until next time, <3.

FingerPaints

The One With ILNP Paige

9:00:00 AM


Good morning polished world!  How are you all doing today?  The worst holiday in the world is a week away, and I'm continuing to share manicures that are kind of festive for the day.  At least festive in a non-conspicuous way.  The way that when someone looks at my nails they don't automatically think Valentine's day.

A few weeks ago I went on a little shopping spree and bought myself some ILNP's.  My cart was filled mostly with blues and greens, so I decided to throw a pink in the cart to switch it up.  That pink was Paige, and boy am I happy I bought it!

Let's take a look!


Colors Used:
  • ILNP - Paige
  • OPI - This Crown Needs a Gown
  • FingerPaints - Sterling Sculpture
  • Orly - Liquid Vinyl

 Isn't Paige gorgeous!?  I believe it is part of the Ultra Holo, if not then it really should be because it really is ultra holo'ed.  This polish applied evenly in two perfect coats.  The holo effect is so strong in indoor and outdoor light.  I'm not a pink person, but this I think is one of my new favorite polishes!


This manicure is inspired by this one I found on Pinterest.  I busted out the nail art tape which I feel like I haven't used in FOREVER for the accent nails.  I feel like I finally figured out how to perfectly apply this and get the stripes to look somewhat even.  It only took about 3 years to figure that out.

I don't know how I feel about the heart.  Part of me likes the fact that I outlined it, but part of me doesn't.  It's really been a love hate relationship with that dang heart.

What do you think?  Fan of the look?  Do you think it was a good idea to outline the heart?

Until next time, <3.

FingerPaints

Valentine's Day Manicure + 3 Years of The Little Canvas! :)

9:00:00 AM


Good morning polished world!  How are you all today?  I'm fabulous because today marks the three year anniversary of The Little Canvas!  I cannot believe it's been three years since I started this blog!  Where did the time go?!  As I sit here thinking back on the years, I honestly never thought it would have lasted this long.  I started The Little Canvas on a whim, not only to share my love of nail art but with the hopes to inspire someone like so many other bloggers inspired me.

I didn't think I would get 1 follower, let alone the thousands I do have.  It's still so surreal to me.  The people I have met through something as simple as nail polish is quite amazing.  I've met some of the most awesome people, and gained friendships I truly am grateful to have!  I'm so happy to have The Little Canvas in my life!

So since Valentine's Day is tomorrow, I decided to do a combo manicure not only celebrating the holiday, but also celebrating my blog-versary!  I saw this adorable heart balloon manicure on Pinterest and thought that it would be perfect!  Balloons are festive and belong at any type of celebration!

Let's take a look at what I came up with!


Colors Used:
  • FingerPaints - You Can Crayon My Shoulder
  • Zoya - Kitridge
  • Sinful Colors - Snow Me White
  • Sinful Colors - Love Sprinkles
Want to know the most amazing thing about this manicure?  FingerPaints You Can Crayon My Shoulder!  For months and months and months, I have searched for a red textured polish.  I had my eye on Zoya Chyna but I never could find it at the store, and I skipped the Pixie Dust BOGO awhile back.  The Pixie's can be kind of expensive, and for something I rarely would use, I never could talk myself into doing it.

Well, FingerPaints released a bunch of new colors in 2015, which were sent to me to try.  I figured that this polish was going to be similar to Gogh With the Flow from looking at the bottle; a full coverage microglitter.  After one swipe on the nail, I was mistaken.  It was a beautiful gorgeous PixieDust-esque textured polish!  On my middle finger, there are three coats (I could have gotten away with two) of this gorgeous bright red textured beauty!  It dries matte but sparkles despite the finish.  I added a clear shiny top coat which kept the polish's texture, but made it beyond sparkly!  The polish worked great for nail art and I was able to freehand the heart perfectly with it!  I'm soooo happy to have this polish as part of my collection!


I bought Love Sprinkles by Sinful Colors because after seeing it had heart glitter pieces, I knew I had to have it.  I know this may come as a shock to many of my followers, but I do not own a single heart glitter.  Yes, there are dozens and dozens out there, especially from Indie makers, but I've never purchased one.  Mainly because I rarely use glitter.  So when one came along that was $1.99 and perfect for Valentine's Day, how could I say no?  The polish itself is okay.  It contains light pink and white glitters, with the hearts throughout.  The glitter itself applies evenly, but the hearts I had to kind of dig for and place on the nail.  In the end, it was worth it!

What do you think?  Fan of my Valentine's Day/Anniversary manicure?

Thank you to all of my followers, new and old, who are here supporting my little blogging adventure.  These past three years have been amazing and it's all because of you guys!  This community inspires me daily, and I do not see myself giving up this blog anytime soon!  Who knows, maybe I'll reach 5 years!  Only time will tell!  Again, thank you all! <3

Until next time, <3.

Gradient Mani

Happy Valentine's Day! Zoya Pixie Dust Heart Nail Art!

9:00:00 AM

Happy Valentine's Day, lovelies!  Will you all be mine?!  While I dislike Valentine's Day, I couldn't pass up the opportunity to festively paint my nails.  Especially because I had the most amazing idea!!!

That idea, Zoya Pixie Dust Hearts!  That's right, hearts!!  Remember my Zoya Pixie Dust Stars that I loved so much?  The manicure that still to this day is my favorite manicure?  Well at the same time that I purchased my star hole punch, I purchased a heart one.  After the star manicure was such a success, I have been wanting to recreate it with hearts for so long, but never actually did it.  Valentine's Day seemed like the perfect opportunity, so I grabbed my painters tape, hole punch, Pixie Dusts, and got to work!  

What has been created is now my second favorite manicure!  I am beyond in love with the end result.  I was a bit iffy when I was punching out the designs that it was going to work and was thinking of abandoning the idea, but I'm so happy I stuck with it!

Enough babbling, let's take a look!


Colors Used:
  • Base
    • OPI - My Boyfriend Scales Wall
  • Purple
    • Zoya - Stevie
    • Zoya - Carter
  • Pink
    • Zoya - Miranda
    • Zoya - Arabella
Ahhh I'm so happy with how they turned out!  Trust me, the look is not that hard to achieve!  I first started off with a base coat of My Boyfriend Scales Walls.  Originally, I was going to do a light pink base, but I decided to stick with the same base as the stars, mainly because I knew it worked out.  Plus, I give myself at least two hours of dry time on the base before I add the design, so I didn't want to have to start all over after waiting for so long if it looked awful.  It probably would have been just as gorgeous.

The day before I actually painted the design, I created my little templates with painters tape and my hole punch.  I cut ten pieces of tape and stuck them to a piece of parchment paper.  Then I punched at least 12 hearts into the tape (four down the center then four on each side).  I do twelve because sometimes I found myself slipping up and the hearts were too close or too far apart.  Doing 12 and only having about 9 on the nail ends up giving me a bit of wiggle room.

When my base was 100% dry, I peeled the tape off the parchment then stuck a piece on my nail.  You want to make sure your nail is completely dry because it is of the utmost importance that the tape is really secured on the nail with no open areas.  If it's not, then your design will become smeared and muddled.

I then took a make up sponge and painted my pink or purple gradient then dabbed it on the nail.  I did this twice then immediately removed the tape.  I then took a toothpick and cleaned up around my cuticle and made some of the points on the hearts a little clearer.  If your base isn't completely dry, there would be no way to clean up the actual hearts without damaging the base.  


I wanted my hearts to shine so I added some top coat, but you could go without if you want.  Trust me, these Zoya's are just as gorgeous and sparkly without a top coat.  That's what makes the Pixie Dusts so amazing.  I also stuck with the pinks and purples instead of doing the rainbow skittles like I did with the stars since it is Valentine's Day.  These are the perfect Valentine's Day Pixies!

Do you love them?  Which do you prefer, the hearts or the stars?

I hope you all have a great Valentine's Day!  Remember though, we should show our love and appreciation for those in our lives every day and not just today.  :)

Until next time, <3.

**The Zoya Pixie Dust polishes were provided by Zoya for promotional purposes.  I purchased the OPI.  Please see my disclosure policy**

Animal Mani

Twinsie Tuesday: Valentine’s Day Inspired Manicure

9:00:00 AM

Happy Twinsie Tuesday polished world!  How are you all today?  Did you enjoy my Valentine's Day nail art wheel??  If you haven't seen it yet, make sure to check it out after this post!  Today's Twinsie Tuesday post is also Valentine's Day themed since the big day is Friday.  Are you excited or are you like me who just doesn't care and think it's a stupid day?  I have to admit, that this year I'm kind of enjoying it because I'm using all my pink polishes that rarely see the light of day throughout the year.

After painting my nail art wheel, I was pretty sure that I was all out of Valentine's Day inspired manicures, so I kind of was at a loss for today's prompt.  Luckily inspiration struck after I saw my Valentine's Day bear I got with my nephews last year.  Think about it, what's the most common thing you see in stores next to the boxes of chocolates?  Those little I <3 You teddy bears!  So I grabbed my new bottle of OPI Hey Baby and started painting!

Let's take a look!


Colors Used:
  • OPI - Hey Baby
  • OPI - My Boyfriend Scales Walls
  • Orly - Liquid Vinyl
  • INM - Northern Lights
To get the teddy bear on my nail, I painted a little circle on my nail using the polish brush, then added the ears with a dotting tool.  Then with my white polish I added the nose area with it's polish brush.  Since OPI has that nice wide brush, it was perfect and required no nail art brushes.  Then with my smaller dotting tool, I made the eyes then the little black heart shaped noses.  The hearts on my other nails were done with my dotting tools as well.


Adorable right?  The teddy bears remind me of the little bears I did last year which were inspired by PolishPedia.  I'm loving this year's manicure so much more with this bright, fun pink color!  

When I purchased Hey Baby, I wasn't sure I was going to even keep it since I rarely use pink.  I'm so happy I did because it's an all around great polish.  It had great coverage with just one coat, but for this manicure I used two.  For the added umph, I put a little INM Northern Lights which added a whole new dimension to the polish.  Seriously, it was gorgeous in person.

What do you think?  Liking the pink little bears?  Anyone else loving OPI Hey Baby?

Don't forget to check out the other Twinsie's posts!


Alaina at The Little Canvas
Amanda at Amandalandish
Amber at Nails Like Lace
Chelsea at Nailed Blog
Elizabeth at Did My Nails
Kelly at Tuxarina
Lakeisha at Refined and Polished
Marisa at Polish Obsession
Rachel at Top Coat It
Róisín at Cuti-CLUE-les
Stephanie at A Little Polish
Traci at DrinkCitra

Until next time, <3.

**I purchased all polishes used in this post**

Nail Art Wheel

Valentines Day Nail Art Wheel

9:00:00 AM

Hi polished world!  How are you this fine day?  Valentines Day is right around the corner *BLECH*  I really cannot tell you how much I hate this Hallmark holiday.  We should show our love and appreciation for those close to us 24/7 and not just on this day.

Since I did my Christmas Nail Art Wheel, I have been itching to create another one.  Originally, I was not going to do one for this stupid day, but some followers asked, and well I enjoy creating on the little wheels so I thought why not?  Plus, I thought it would force me to use my pink polishes which sit in the corner of my Melmer just wishing to be used.

Pardon the broken off nail on the top.  I hated a nail I did so I just broke it off.


I kind of took inspiration from many bloggers when it came to this wheel, mainly because, as I said, I hate Valentines Day.  I really couldn't get my creative juices flowing to be 110% original due to all that bubbling hate lol.  

Let's see, the patchwork heart and conversation heart nails were inspired by Polish Art Addiction.  The heart on the bottom next to the XOXO nail was inspired by a recent tutorial by One Nail to Rule Them All, except in hers she did little flowers, I opted for dots because it was easier.  The Zoya Pixie rose was inspired by my own manicure which was inspired by @miss_prettynails on Instagram.  Last year I did the leopard print with hidden hearts and graffitti heart design on  my own nails.  And last but not least, the little cute owl was slightly inspired by Chalkboard Nails Valentines owls she did awhile ago.  She did the little guys sitting on a branch, where I just did a whole owl on the nail like I have done in the past when I did owl manicures.  The rest, well they really are mish moshes of ideas from others that you can't really trace back to an original person.  Seriously, roses...that could come from anywhere so no yelling at me.

I do have three favorites though on this wheel.  Can you guess which they are??  Head on in to the post to see!

Valentine's Day

Happy Valentines Day!!!!

9:00:00 AM

Happy Valentines Day!!! Also known as the day I hate!  I'm such a grinch, but I truly see Valentines Day only as a Hallmark holiday.  Aren't we supposed to show our love for our loved ones everyday and not just focus on it for one day?  Eh, whatever.  I had so many Valentines Day nail art ideas, but after doing two of them, I got kind of tired of them.  Actually, this nail art was done a few days ago and today I have no hearts or pink on my nails.  I'm kind of happy with this.

When I had my nails painted white with the gorgeous Sally Hansen Moonstone, I was going to draw a bunch of red and pink hearts all over them.  After doing a few hearts, I didn't like how it turned out.  The idea in my mind was great, but on the nails, not so much.  After that one disasticure, I took to my pinterest ideas board. I came across this cutepolish video that I pinned AGES ago.  Probably around the time I started this blog.  I always liked how it looked, so I thought I should try it.  

Le sigh, on my one year anniversary I couldn't even come up with an original post, oh well.  Actually,  I was going to attempt to re-do my first ever nail art which was a doily heart design, but when I was attempting it, I just wasn't happy.  So I gave up and vowed to not do any more Valentines Day manicures until next year.

Let's take a look at my copy-cat of cutepolish's design!


Colors Used:
  • Ulta - Snow White
  • Sally Hansen - Red Carpet
  • China Glaze - Hang Ten Toes
  • Sinful Colors - Black on Black
  • Sally Hansen - Disco Ball
Okay, they were rather cute.  I started off with two coats of Snow White.  When that was dried, I sponged on Hang Ten Toes and Red Carpet in random areas on the nail.  The red kind of turned out like a darker pink, but it still was cute.  To smooth out the sponging, I painted on a coat of Disco Ball, the worlds prettiest glitter.  When it was all dried, with my nail art brush I painted on the black hearts.

In the end, they kind of looked like hearts painted over some spray paint on a wall.  Almost like graffiti?  Maybe I'm the only one who sees it!!!

What do you think??  Do you love Valentines Day or hate it like me?

I'm off to celebrate the holiday by writing my thesis and having a lil party with my nephews!  Hope you all have a great day! <3