ILNP

The One With the Snowman and Snowflake Nail Art

9:00:00 AM


Good morning polished world!  How are you all doing today?  We are slowly thawing out after Winter Storm Harper dumped about 20 inches of snow on us.  Since the weekend, it's been super weird weather.  On Monday it was 1 degree outside with below freezing wind chill, then yesterday it was 47 degrees and raining.  Today though, we are back in the 20s with snow.  We are having some crazy weird weather.

Since the snow is back, that means I can continue on with snow themed manicures!  Today I am recreating my little snowmen who are looking up at the snow.  I did this one a few years ago after being inspired by Ruth from Ruth's Nail Art.  This is one of my most re-created manicures and actually was recently tagged in a few the other day.  It's a super cute design that is relatively easy but looks complicated.

Let's take a look!


Colors Used:
  • ILNP - Honor Roll
  • Acrylics
Cute, right??  Last time I did this manicure, I created it using Zoya Dream.  I was about to grab the bottle of Dream when I saw Honor Roll peeking out from the corner of my Melmer.  Two coats of this gorgeous navy blue holographic polish and you have the perfect wintery base for this design.


Once my base was dried, I went through and started painting the details with my acrylics.  To get the snowmen, you start with a white circle on the nail.  When the white is dried, I took an orange and added the nose.  The rest of the details were added last.  The part that took the most time was the snowflakes.  I actually am thrilled with the snowflake portion of this manicure. My lines were so straight and precise....for me at least.

What do you think?  Fan of this manicure?  Think they're cute little guys?

Until next time, <3.

Orly

The One With the Snowflakes and ORLY Celebrity Spotting

9:00:00 AM


Happy Sunday polished world!!  I'm sorry I have been bad at updating the blog so far this year.  I thought I had this post pre-published, but sure enough I didn't.  I swear I'm going to get back on track!

Today's manicure is a pretty snowflake manicure inspired by 25 SweetPeas!  I know you all are going to think I'm weird when I say this, but I'm sad that we haven't had a massive snowstorm yet this winter.  It's supposed to be in the 40s this week, so that means we will have rain.  Sigh, I dislike the gloomy and rain.  If it's going to be gloomy, at least give me snow so it's bright outside.

Let's take a look at the mani!


Colors Used:
  • ORLY - Celebrity Spotting
  • White Acrylic
Celebrity Spotting from the ORLY Sunset Strip collection is absolutely gorgeous.  Two coats and complete coverage of this beautiful purple polish with a subtle shimmer. Which goes on a lot more smoother now thanks to ORLY's new brush!  Remember how I said I wished they had the wider pro brush like OPI or Sally Hansen's Miracle Gel?  Well, now they do!!!  Love being able to apply a polish and not have to do a million swipes.


Once my base was dried, I took my small nail art brush and acrylic paint and got to work.  After painting three nails I was regretting my decision to do this manicure, especially since I always do the same design on both hands.  When I finished it though, I was super happy with how they turned out.

What do you think?  Missing snow in your region when usually you have it?  Have you tried ORLY's new brush?

Until next time, <3.

China Glaze

The One With the Snowflakes and Zoya Normani

9:00:00 AM


Good morning polished world!  How are you all doing today?  Tuesday is here, winter is here, and Christmas is right around the corner.  My next post I swear is going to be Christmas themed!  Until then, I'm sharing with you another snowflake manicure.

After seeing this manicure on Pinterest, I wanted to re-create it.  I loved the color combination and the little snowflake accent.  Since I don't have the vinyls that the girl used in that photo, I free-handed my snowflakes and did them a tad differently.

Let's take a look!


Colors Used:
  • Zoya - Normani
  • China Glaze - Bring on the Bubbly
  • FingerPaints - Sea Temptress
  • INM - Northern Lights
Now, I have owned FingerPaints Sea Temptress for I don't know how long.  I have purged the other three from the collection, but kept this one for some odd reason.  These polishes are oddly textured with hex glitters to create the texture.  I never knew when I would use this polish, but when I purged the others I decided to keep it thinking that someday I would find a use for it.  And today was that day.  I use done coat over a white polish and it looked like snow!  It applied evenly with a very nice pearl-y white finish.  The bumps made it look snow-like.


You can see the texture and pearl look better in this photo.  I think it was a great accent for this design.  Zoya Normani is also a great base color.  Two coats and full coverage.  Beautiful on it's own, but even more gorgeous when you add a top coat of INM Northern Lights! 

What do you think?  Fan of this design?  Something you would try??

Until next time, <3.

Bestie Twin Nails

Snowman Bestie Twin Nails with 25 Sweetpeas

9:00:00 AM


Good morning polished world!  How are you all doing today?  It's finally Saturday, but unfortunately my weekend is super busy so basically today is my only day to relax and enjoy the day.  Oh well, maybe once the holidays are over I can go back to resting more.  That reminds me, I need to start my Christmas manicures!  It's the 10th and I haven't done a single one.

Today I'm posting alongside 25 SweetPeas for a Bestie Twin Nails feature!  A few weeks ago, Sarah and I saw this adorable snowman manicure by Ruth's Nail Art and both wanted to re-create it.  Since we both wanted to, we figured why not have a Bestie Twin Nail post!


Let's take a look!!!  Hiding the photos under the cut because there's a lot of them!

Jessica Cosmetics

The One With the First Snowflake Manicure of Winter

9:00:00 AM


Good morning polished world!  How are you all doing today??  Guess what?  It snowed here!  Sure, it snowed a few weeks ago, but now it snowed on top of the Christmas lights on the bushes, so to me that's the first official snow.  Plus all the leaves are cleaned up so it's actually pretty outside.

So since it's the first official snowfall in my book, I have decided it is time to start winter/snowflake manicures.  Today's manicure is a re-creation of this manicure I did last year.  It was one of my favorites, partially due to that gorgeous blue Madam Glam polish.  This year though I decided to use some of the new OPI polishes from the Breakfast at Tiffany's collection!

Let's take a look!


Colors Used:
  • Jessica Cosmetics - Black Lustre
  • OPI - I Believe in Manicures
  • OPI - Champagne for Breakfast
Can we take a minute and talk about Champagne for Breakfast by OPI?  I bought it because I thought it was a plain silver holo microglitter.  Sure, I have dozens of those, but I have to have them all.  I am SOOOOO happy I bought this one because it is a textured polish!!!  That's right, it might as well be a OPI Liquid Sand.  If you love texture and you love holo, you need to go find this polish.  I need to find myself a back up, or three.


I Believe in Manicures is a gorgeous blue polish.  I almost didn't buy it because I have zillions of blue polishes, but this one is a different shade than others I have.  Two coats of that perfect OPI formula and I had full coverage.  Super shiny, super pretty.  I need about three back ups of this beauty as well.


Well I think my snowflake drawing technique has most certainly improved in a year.  I cannot wait to do more.  Seriously, I'm on a snowflake kick, so be expected to see at them throughout the winter season!

What do you think?  Own any of these polishes?  Is it too early for snowflake manicures??

Until next time, <3.

Theme Thursday

#ThemedThursdayJan - Snowman!

9:00:00 AM


Good morning polished world!  How are you all doing today?  It's cold, chilly, and snowy here.  Winter time!  I'm not angry about it.  I thought I would be, but it's kind of good to see the snow.  I do wish that it happened before Christmas, but whatever.  Hopefully the snow will only last a few months and not all the way into May or something weird!

Today is Thursday and I again am posting a manicure for Themed Thursday January (#ThemedThursdayJan).  This week, the prompt is snowman!  I really loved my snowman manicure I did last year so I decided to re-create it for today's prompt!  Last year this look was inspired by Simply Rins.

Let's take a look at this years re-creation!


Colors Used:
  • Zoya - Rebel
  • INM - Northern Lights
  • Acrylics
I think I did a little better this year!  Last year, I remember when I was drawing my outline of the snowman I was having a little problem with spacing.  I kept making the face too large and the hat ended up being a tiny little thing.  This year I really paid attention on trying to get the hat to be a little larger and I like the overall look a lot better!

I also changed up my snowflake nails this year as well.  Instead of doing one large flake with the dots, I did two different sized ones.  At first I thought it looked a little cramped and too busy, but once the snowman was on the nail, it all blended together.


I always forget how gorgeous Rebel is.  This polish was from the Zoya Awaken collection a few Springs ago.  There was a beautiful purple and mint with this same formula also which I need to start using more of.  While this polish did not need a sparkly top coat, I added INM Northern Lights.  It was honestly one of the best polish decisions I've ever made.

What do you think?  Fan of this look?  Think I did better this year??

Until next time, <3.

China Glaze

Snowflake Manicure with FingerPaints Be Merry & Sparkle

9:00:00 AM


Good morning polished world!  How are you all today?  It's Saturday which means it's lazy day for me!  My plan for today, maybe organize my polish, maybe crochet.  I haven't felt well the past few days so a day of rest after a crazy work week is sounding pretty nice.

Today I'm sharing with my version of this snowflake manicure by @reynasnailart on Instagram.  I saw it posted on the HBBeauty Bar page and I just had to re-create it.  Something about the blue, the silver, and the simplicity of the one nail with the snowflake.  It was all to die for.  Plus, we haven't had any snow here, so I'm hoping that if I continue to do snowflake manicures, the snow will come and I will get into the holiday spirit.

So I grabbed some polishes, and a perfect accenting glitter, and got to work!  Let's take a look!


Colors Used:
  • China Glaze - Capacity to See Beyond
  • FingerPaints - Paper Mache
  • FingerPaints - Glitz and Glam
  • FingerPaints - Be Merry & Sparkle

I'm in LOVE with FingerPaints Be Merry & Sparkle.  Like Sterling Sculpture, it is a part of the Tis the Season to Sparkle collection which is in stores now.  It applies perfectly in one coat with no need for dabbing or placing of glitters.  It's a blue, silver, and gold hex glitter in a clear base.  For this manicure, I layered it over Glitz and Glam, a silver metallic polish.  I was afraid at first that the silver glitter would get lost over the metallic base, but it ended up being just as sparkly as the other glitters.  It actually added a neat dimension to the nails.


The blue glitter I think is perfect for winter.  It is especially perfect for this manicure because of how it matches the blue polish.  I think it accented the manicure perfectly.

What do you think?  Fan of this polish?  Have you tried any of the FingerPaints glitters?

The Tis the Season to Sparkle collection is available now at Sally Beauty Supply, so head on over and pick up your bottles!  I highly recommend this glitter, and well you know my love already for Sterling Sculpture.  I swatched the last glitter of the collection on a nail wheel and I can tell you the coverage is just as amazing as these.  I just love glitters which involve no dabbing and placing...don't you?

I'm off to enjoy my Saturday!  Until next time, <3.

FingerPaints

Snowflakes with Madam Glam and FingerPaints

9:00:00 AM


Good morning polished world and Happy Monday.  Now you might be surprised to see that I'm posting on a Monday when usually I have Twinsie Tuesday on Tuesday.  Well for the month of December, the Twinsie's are taking a little break.  So that means I'll be back to posting every 2 to 3 days.

I honestly cannot believe that tomorrow is December, and we have yet to see any real accumulation of snowfall.  It was in the 60s here on Friday and the meteorologists said that it has been one of the warmest Novembers in a long time.  I never thought I would say this, but I'm kind of missing the snow.  I really love when the Christmas lights are on the bushes and they're shining through the snow.  It just makes the season feel complete.

I've been seeing some snowflake manicures appear on Instagram.  Most recently I saw this one by 25 Sweet Pea.  I loved the black snowflakes over the fun pink base.  While I didn't have that speckled polish, I do own an awesome one from Madam Glam which was PERFECT for this manicure.

Let's take a look!


Colors Used:

  • Madam Glam - BFF
  • FingerPaints- Patent Black
  • FingerPaints - Glitz and Glam
  • FingerPaints - Sterling Sculpture

Okay, so be patient with me.  Below are two bottle shot photos,  Each kind of looks a little different color wise and I think it's because of the bottle that is being held.  Which makes absolutely no sense in my mind but maybe because one bottle is silver and one is blue??  I have no idea, I need to get my OttLite out so this doesn't happen again.  I'm may have a Masters degree, but it's not in photography for sure.


First up is Madam Glam BFF.  This is such a pretty pale blue polish with multi-hexed black glitters mixed throughout.  First coat was super sheer, so I wasn't having much hope that it was going to be full coverage in two coats.  On my pinkie it was, but on my pointer it wasn't, so I went for three on each nail just to even it all out.  I love the dimensions this polish has because of the sheer base and the black glitters.  It's a jelly sandwich in a bottle.  Putting the black snowflakes over the top of it too really brought out the dimensions in my opinion.  It was gorgeous on it's own though and I almost didn't want to put the snowflakes on top.


I feel like this picture shows Madam Glam's BFF more true to color.  It's so mind boggling to me that the actual bottle shot of that polish doesn't seem true.  I mean both kind of are true because when I wasn't in my lightbox the Madam Glam did look like the photo above.  Meh whatever.

This bottle that I'm holding is one of my favorite FingerPaints glitters, Sterling Sculpture.  It was first released last year, and now it has been re-released as part of the holiday collection.  I absolutely love the multi hexed silver glitter in a clear base.  I used one coat over Glitz and Glam, a metallic silver polish.  It has such perfect distribution of glitter with just one coat and you do not need to place or dab at all.  If you're a fan of silver, this is a must have for your polish arsenal.

What do you think?  Fan of these polishes?  Do you have issues with photography like I do?

Photo issues or not, I love this manicure and I love the polishes used to create it.  It only lasted two days because I was busy at work putting Christmas decorations and lights up so I ended up breaking some nails and chipping ones that survived the breaks.  That's what happens when you're climbing a ladder, over the top of bushes, to hang icicle lights off a brick building.  I cannot wait to use BFF again, and you know for sure you're going to be seeing a lot of Sterling Sculpture here on this blog.  Especially now that I have two bottles. :)

Hopefully these nails bring some snow!

Until next time, <3.

Fun and Random

Winter Nail Art!

9:00:00 AM


Good morning polished world!  Happy Sunday!  Again, I ask of you, where did the weekend go!?  I felt like the work week dragged on, then the weekend came and now it's almost over.  It just isn't fair.  Oh well, what can you do!?

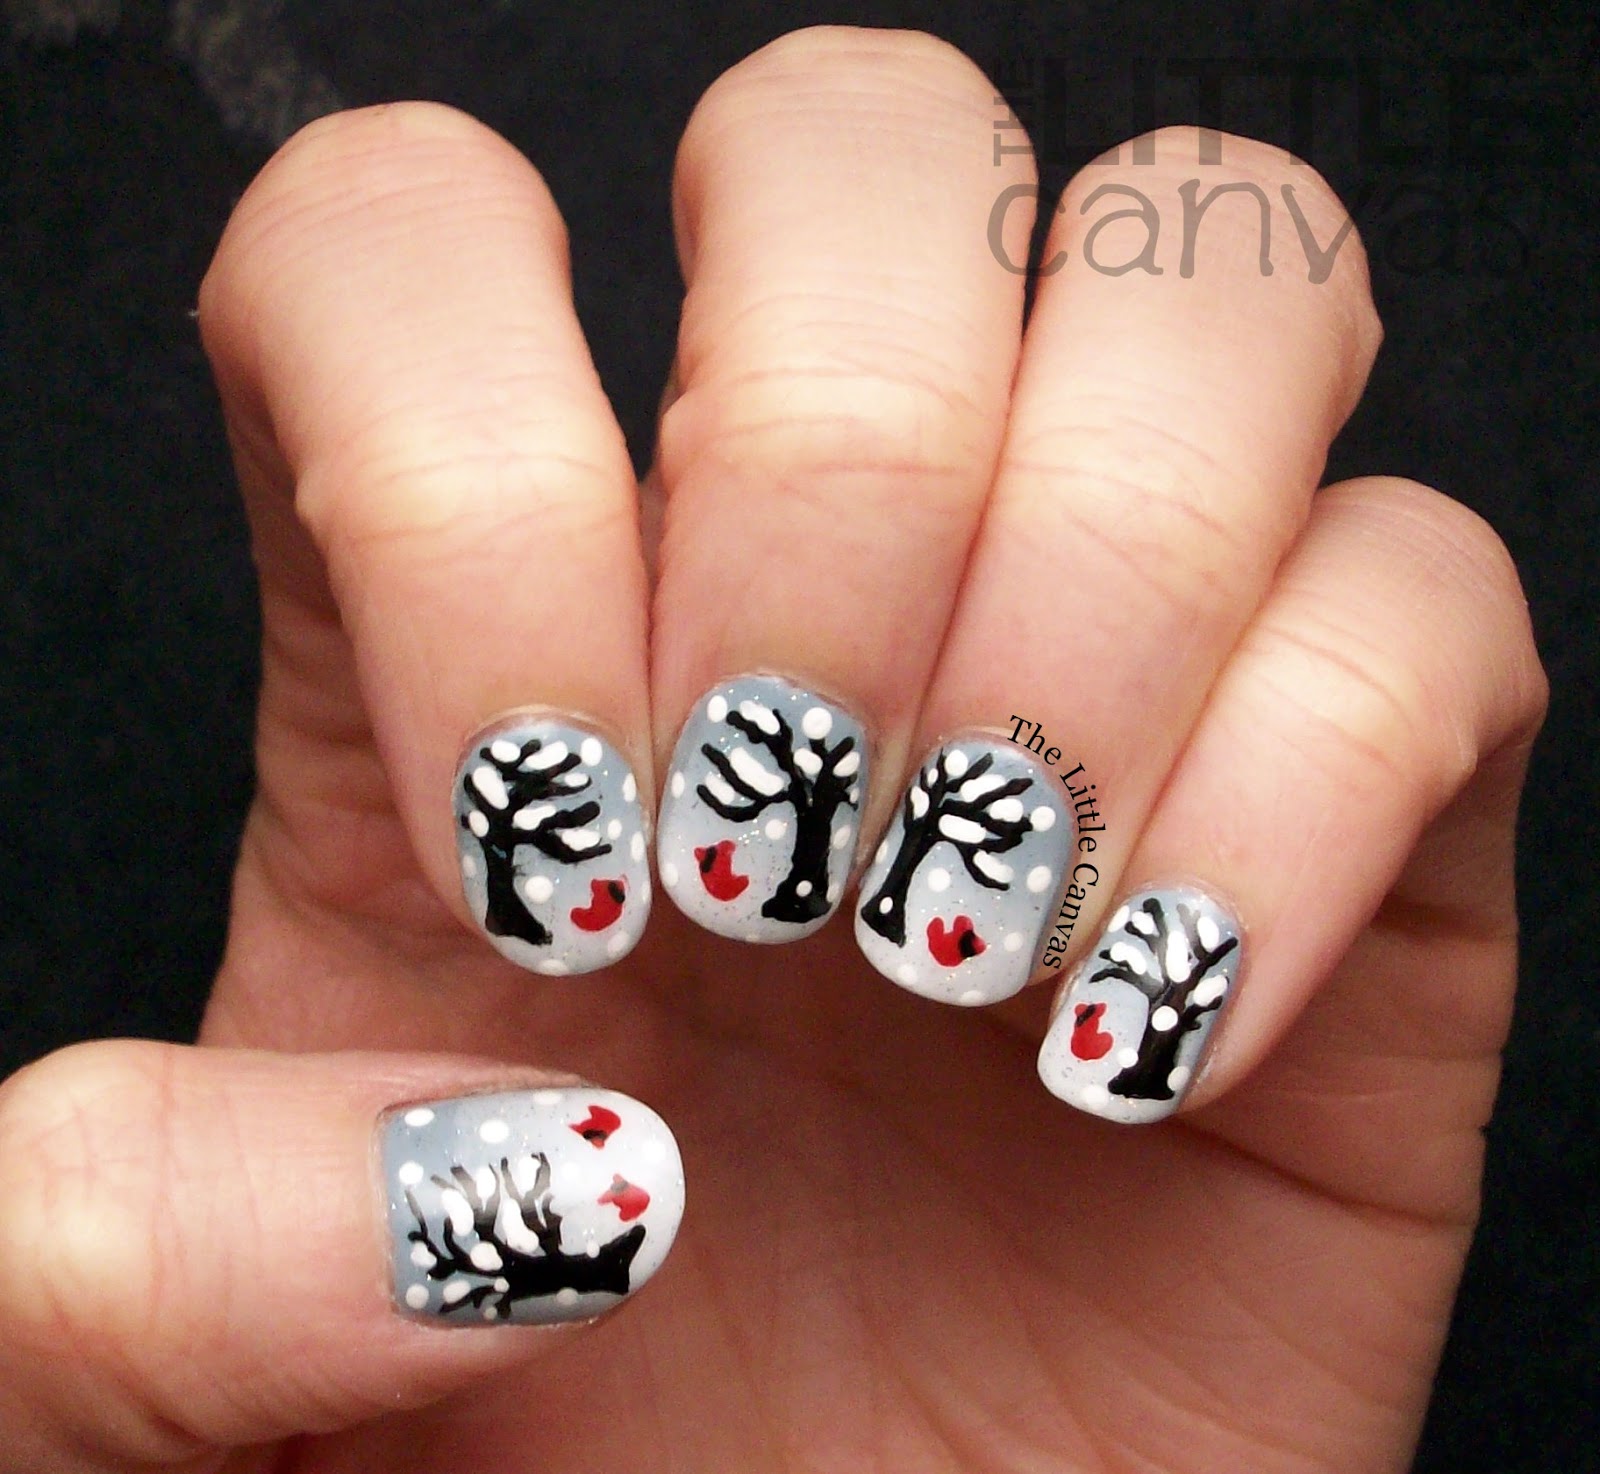
Winter is here and not going anywhere for the time being.  Our high today is in the 30s which is a lot better than the 8 degrees earlier in the week.  Sure, it's awful, but when it snows it's rather pretty, especially when it's that cold out.  The snow sticks to all the branches of the trees, and then when the sun actually does show itself, it looks like there are millions of little diamonds on the ground.  I wish that I could see that on an 80 degree day, but alas that won't ever happen.

Since it's been so cold, I decided it would be a good idea to do a little winter scene on my nails.  I did one last year that I loved so much, so I took inspiration from that.  Instead of doing the little weird cats like last year, I went with cardinals.  At work, there is a little bird feeder outside of one of the windows and the cardinals jump around it all day long.

Let's take a look!


Colors Used:
  • Orly - Boho Bonnet
  • Sinful Colors - Snow Me White
  • INM - Northern Lights
  • Acrylics
I started off with a base coat of Orly Boho Bonnet.  This is a soft grey blue shade which I think screams winter.  I then took a make up sponge and created a gradient using Boho Bonnet and Snow Me White.  This created the winter snow effect.

Last year, I didn't add a top coat of INM Northern Lights, so this year I decided to do so.  To be honest, it really didn't make much of a difference.  It did add some sparkle to the snow tips, but it wasn't anything that I thought was essential for the manicure.


With my nail art brush, I created the trees.  When the trees were dry, I used a dotting tool and added all the little snow flakes and cardinals.  Yes, the cardinals were done using a dotting tool!  I think the little guys look amazing!  They were the perfect addition to add some color to the winter scene.  Just like they do in real life!

What do you think?  Loving this look?  Fan of the cardinals?

I hope you all have a great Sunday!

Until next time, <3.

Bestie Twin Nails

Bestie Twin Nails with Fashion Footing: Round 7!

9:00:00 AM


Good morning everyone!  How are you all today?  I hope you all are having a great Sunday!  Tomorrow is Monday but we will try to forget about that for the time being.  Instead we can look at some nails!

Today I am sharing with you all Round 7 of Bestie Twin Nails with Amanda from Fashion Footing!  I'm really enjoying this monthly feature we've been doing!  Especially since Amanda has been wanting to do more intricate designs.

This month we are recreating this design by JaryNails on Instagram.  Amanda found the design early November and we decided on it.  I procrastinated on the design because I wasn't too sure about how it would look on my own nails.  I'm not the biggest fan of the manicure, but it wasn't the worst that I've ever done. 

Let's take a look!


Colors Used:
  • Gradient
    • Sinful Colors - Cool Grey
    • Pure Ice - Kiss Me Here
    • INM - Verbena
  • Silver Snow
    • Finger Paints - Glitz and Glam
The gradient is my favorite part of the manicure.  I really, really, REALLY loved the grey to purple transition.  Such a neat combination I never would have thought of if it weren't for the manicure we were recreating.

The silver wasn't cooperating with me and didn't show up how I wanted it too.  I think I needed a more opaque silver polish.  I wonder if it would have worked better with OPI This Crown Needs a Gown.  When Amanda's weren't showing up so well she added a matte top coat which made them start to pop.  


This photo you can see the snowflakes clearer.  I used a striper brush in the bottle of FingerPaints Glitz and Glam to get the silver flakes.  I've never used a striper brush in a regular polish bottle.  It was kind of difficult to do and it made me wonder if striper polishes are different formulas than regular nail painting polishes.  If that makes sense.

What do you think?  Liking this look?

Make sure to head over to Amanda's blog and check out her re-creation!

Until next time,< 3.

Fun and Random

Snowman Nails!

9:00:00 AM

Hi Polished World!!!  How are you today??  Hopefully you are all staying warm the past few days!  Seriously, where did this blizzardy weather come from?  On Tuesday morning the temperature was -4 and the windchill was -20.  I did not want to leave my house.  Today it's going to be a bit warmer, and by warmer, it's supposed to be 23 degrees.

Since it's been so cold and snowy, it was necessary to create some sort of snow scene on my nails.  Last year I did a polar bear and penguin manicure, and since I recently did a penguin manicure, I decided to do a snowman manicure!  The last time I painted a snowman on my nails was before I started blogging.  When I started the blog in February of 2012 (oh man we're close to the 2 year anniversary!), I shared the little guys!  Not too shabby for only having toothpicks to work with.  Honestly, I was beyond proud of them.

So, now that I have nail art tools, more polishes, and longer nails, it was about time I try a snowman manicure again.  Let's take a look.


Colors Used:
  • Sinful Colors - Sugar Rush
  • Precision Lacquer - Shake Your Bon Bon
  • Sinful Colors - Snow Me White
  • Orly - Liquid Vinyl
  • China Glaze - That's Shore Bright
  • Zoya - Beatrix
Cute, right?  To get the look, I started off with a base coat of Sugar Rush and added one coat of the gorgeous Shake Your Bon Bon glitter by Precision Lacquer.  When that was dried, I went through with my white polish and added un-even french tips to make it look like snow had  fallen across my nails.  On my accent nails, I did a snowman using my nail art brush.  I started first by outlining the body, adding the little head, then filling the rest in.  While the little guy was drying, I went through and added the dots for the snowflakes.  I then took my nail art brush and drew on the little hat, eyes, mouth, buttons, and scarf.


I really am happy that I decided to add the coat of glitter to the base.  I don't think I would have enjoyed the manicure as much if it didn't have that sparkle.  I got the idea after seeing my polar bear manicure last year where I put a thin coat of Orly Angel Eyes down before I drew my designs.  I was going to do Angel Eyes again, but I decided to go with the softer baby blue glitter.  Maybe I'll re-do my polar bears before winter is over just to use Angel Eyes again.

What do you think?  Like the little guys?

Hope you all have stayed warm in your neck of the woods!!!

Until next time, <3.

Winter

Let It Snow! Snowflake Manicure - Take 2

9:00:00 AM

Good morning polished world!  How are you today?  I'm happy because Christmas is over and I no longer have to do Christmas manicures.  Not like I hate them, but I do get tired of constantly using the same color scheme for so long.  Red, green, red, green....it gets boring!

Today I'm sharing a cute snowflake manicure.  I did this a little bit before Christmas because I needed a personal break from the red and green, and what better break than using Zoya Dream?  Last year, I did these snowflakes using a Sinful Color metallic polish as a base.  I'm really liking this years version better!

Let's take a look!


Colors Used:
  • Zoya - Dream
  • Orly Instant Artist - Crisp White
Don't they look so much better this year?  I really love how much neater my snowflakes are!  Last year, I used a nail art brush with a regular white polish.  This year, I decided to use one of my water based Orly Instant Artist polishes.  I'm so happy I decided to do this, because my lines were so much cleaner.  Instead of using the striper brush that comes with the bottle, I dripped some out on a plate, and used my nail art brush.  The best part about using the Instant Artist polish was that if I made any mistakes, I just had to wash it off and my base coat wasn't destroyed!


Isn't Zoya Dream gorgeous?  Literally, it's a dream.  The polish applied evenly in two coats.  As you may or may not see, it has very fine holo glitter flecks throughout it's blue jelly base.  I consider it a jelly because to me it was kind of squishy.  Dream is just so gorgeous, I'm beyond happy that I own two of her sisters Aurora and Storm.  I might need to do a manicure using all of them together.  Hmmmm.

What do you think?  Like this years or last years version better?  Are you as in love with Dream as I am?

This year I'm not going to bring you a New Years Eve manicure.  I'm rather uninspired and never satisfied with what I do for the big day, so I figured I would save myself the stress and paint my nails how I want.  Maybe next year!

Tomorrow I'm going to try to get a "Best of 2013" post up.  If not, it should be here on New Years Day!  I'm really excited to look back on the year!!!

Until next time, <3.

**Zoya Dream was provided by Zoya for Promotional Purposes.  The opinions express in this post are my own**

Animal Mani

Polar Bear and Penguin Nail Art :)

9:00:00 AM

These nails I am bringing you today may or may not be one of the cutest manicures I have ever done.  I would have never thought of this idea if it weren't for the wonderful Amanda from The Nail Polish Enthusiast!  For those of you who haven't heard of Amanda's blog, head on over and check it out!  She's the queen of rainbow glitter, and well in my opinion, all glitter.  Love her nails!

The other night when I was debating on what to do, I took to Twitter for some ideas, and Amanda came to my rescue!  I wanted to use one of my new white polishes, but really had no idea what I could do nail art wise.  Amanda suggested a snow scene with polar bears.  The idea sounded beyond adorable, so I had to try them.

After my little manicure that never came to be, I fell in love with the colors, so I decided on using Revlon Dreamer and Orly Angel Eyes as a base.  I grabbed my dotting tools and brushes, and started painting the little scene!  Let's take a look!


Colors Used:
  • Revlon - Dreamer
  • Orly - Angel Eyes 
  • Ulta - Snow White
  • Sinful Colors - Black on Black, Unicorn
  • Zoya - Lianne
I cannot begin to tell you how much I absolutely love Dreamer and Angel Eyes layered like this.  I used two coats of Dreamer followed by one coat of Angel Eyes.  To be honest, I wanted to keep my nails plain with no art because I could not stop staring at the blue sparkle and how it was jumping off the light blue base.  Gorgeous.

I pushed past the gorgeousness, and started painting on the snowy french tips.  With my nail art brush, I painted wavy, tips to represent snowy hills.  Once dried, it was time to add the details of my lil polar bear and penguin buddies.  For the polar bear, I used my dotting tool.  Using Snow White, I created a medium sized circle for the head, and a large circle for the body.  Since every polar bear I have ever seen tends to have a yellow tinge to them, I used Sinful Colors Unicorn to embellish the face and belly.  I wanted it to look like he was sitting down, so with my dotting tool, I added paw prints to make it seem like his feet were facing up towards us.  I then added the details of the mouth, eyes, ears, and nose with tooth picks and dotting tools.

For the penguin, I used my nail art brush.  I outlined his body with black polish, then filled it in using the same brush.  When that was dried, I took the same brush and created around belly.  With the dotting tool, I added two white circles for eyes, then made the pupil and such with smaller dotting tools.  For his beak and feet, I used a tooth pick.

My thumb was my absolute favorite, and I wish I was able to get a close up picture of just the thumb.  Sadly, this manicure was my first using the lightbox, so since I was getting used to it, I couldn't capture a picture of it.  As you can see from the full hand shot, you can see that the lil guys are holding "hands".  Such happy little things.  Love it.

What do you think??  

I sincerely thank Amanda for the idea!!!  Hope to brainstorm manicure ideas with her again in the near future.  

Winter

Snowflake Nail Art

9:00:00 AM

It has finally become an appropriate time to post this manicure!  I painted these in the beginning of December in hopes that we would get some snow, but alas, snow never came.  I tucked them away once I started all my Christmas nail art and planned on saving them for the day when the snow finally came.  And finalllyyy, it was this week!!  We ended up with a white Christmas which I do not think has happened in a few years.  My mind might be a little fuzzy, but I clearly remember last year having a green Christmas.

Last night we got hit with a snow storm that left us with a foot of snow!  I love it, call me weird and crazy, but it's just so pretty!  The pine trees tonight were all still covered from 24 hours earlier and it really was a winter wonderland.  If New Years Eve weren't right around the corner, I'd be grabbing my nail art brushes and re-paint this manicure just to celebrate the snow! 

Let's take a look! Guess where these pictures were taken....it may or may not have been outside of Sally Beauty during the .5 seconds of sun.


Colors Used:
  • Sinful Colors - Precious Metal
  • Sinful Colors - Snow Me White
To get these nails, I painted on 3 coats of Precious Metal, my favvvorite "metallic" polish.  It was sold as part of the Sinful Colors Metallic collection so that's why I put metallic in quotations.  To me, it is not a true metallic polish since it doesn't have that frosty, metallic look.  The glitter flecks in it give it a sort of metallic-y gleam I guess, so that's why it may have been included in this collection.  I'm a sucker for blue polishes, so I had to purchase it, and for 99 cents, how could anyone go wrong?  It's a tad sheer, but builds up nicely in three coats, and leaves you with a gorgeous dark blue, glittery, shimmery nail.

To get the snowflakes, I painted them on using one of my nail art brushes and Snow Me White.  I didn't like how the snowflakes looked on the nail with nothing in the background, so with my dotting tool, I added some white little snow-dots. 

What do you think?  Have you done snowflake nails yet?  Did you get hit by the snow storm?  Do you own Precious Metal and love it as much as I do?

It seems I have entered the nail art funk again.  I tried to do some superhero nails and had 3 disasticures, but have some really awesome magnetic nails on right now.  I'll be posting them after the New Year!  I'm hoping my funk goes bye bye and I'm able to create a pretty New Years Eve manicure!  If not, then you will be seeing a Year in Review post from me on NYE!  Until then, have a good one! <3