INM

The One With a Snowflake Manicure Before the Snowstorm

9:00:00 AM

Nothing to Disclose


Good Morning Polished World!  How are you all doing today?  I really need to work better on this whole blog and really being on top of editing, posting, and getting back into a groove.  I think when I do, my viewership and likes will go up.  I'm not going to lie though, some nights I'm just very tired and not in the mood at all.  I enjoy painting, I enjoy posting, I just need a personal assistant who will help me get from Point A to B.  Maybe one day.

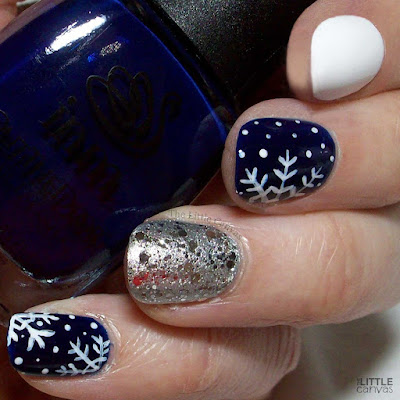
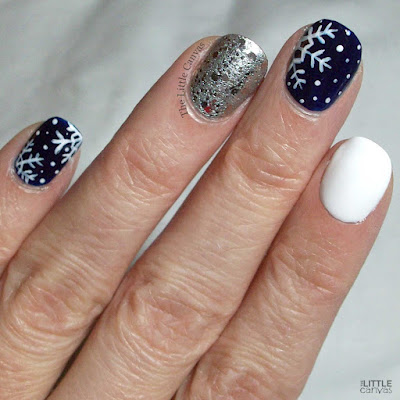
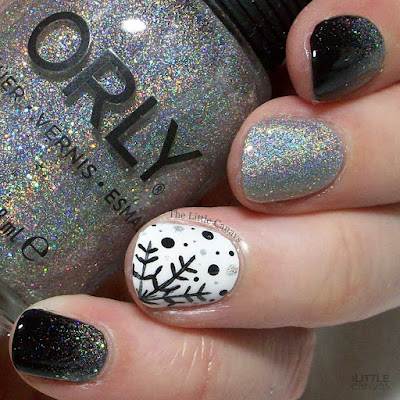
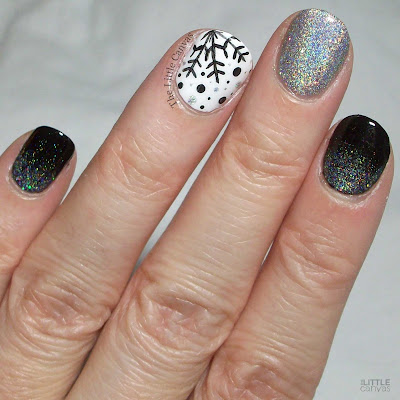
In the meantime, I'm here to post manicures which I painted in January and failed to post.  While we are headed into March, where I'm located we are headed straight into a snowstorm.  So, it's only fitting that I share another snowflake manicure.  This one is one of my favorites.  The blue, the glitter.....

Just take a look!


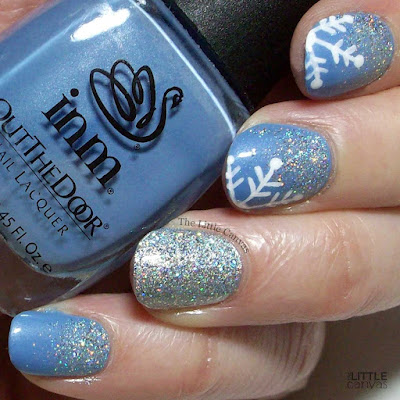
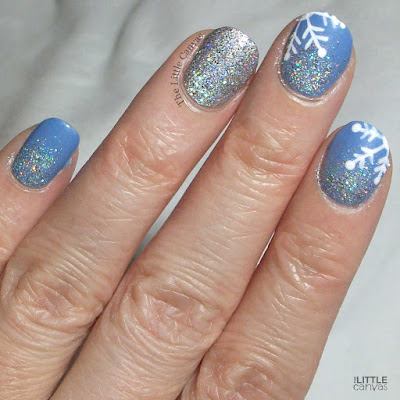
No clue what color this INM is because, again, I didn't write it down when I painted it.  Ten years blogging and you think I'd know this by now.   Maybe one day!!!!!  I do know that the pretty silver holographic glitter is ILNP Mega X.  Absolutely adore this polish and it works so well for the glitter gradients!


I just love how all of it came together.  The blue, the silver, the white snowflake popping right off the nail.  If my nails were a little longer, I would have made the snowflakes smaller and added more to the nail, but winter = broken nails left and right.

What do you think??

Until next time, <3.


INM

The One WIth Yet Another Snowflake Manicure

9:00:00 AM

Nothing to Disclose 


Good Morning, Polished World!  Welcome to a wonderful, restful Saturday morning!  I am here again with yet another snowflake manicure on this cold January morning.  I don't know about you, but we started our week off with a major snow storm, then it went into the 40s mid week, now it's -2 degrees.  The weather is so up and down, it's crazy.  I'm actually shocked that I don't have a sinus infection from it.

Regardless, the weather is perfect for snowflake designs.  Today's manicure looks pretty similar to all the others I've painted thus far.  The only difference, switched up the color scheme and painted some different looking snowflakes.  Maybe not 100% completely different from the last two, but it's somewhat different.  And that counts for something, right?

Let's take a look! 


Colors Used:
  • INM - Huckleberry Fairy
  • Finger Paints - Sterling Sculpture
  • ORLY - White Tips
Isn't it lovely?  Despite it looking very similar to every other type of snowflake I've ever painted, I just adore the color combination.  Huckleberry Fairy is the most gorgeous, deep navy blue.  Words cannot describe how perfect this polish is.  Two coats and you have the most shiny perfect coverage.  Did it stain like a b when I removed it?  Yes.  Was it worth it?  Double yes.  The staining literally came off after washing my hands a few times.  It's so pigmented that it makes sense that it would stain.


What I love about this pigmented beauty is that when you use white to create nail art, the color doesn't suck into the white.  You know how you when you use white over red and it 9 times out of 10 will turn pink?  I half expected this to turn baby blue - but here we are.  No baby blue snowflakes, just bright white pretties.

What do you think?  Fan of this look?!

Until next time, <3.

Color Club

The One With the Blue Gradient Snow Flake Mani

9:00:00 AM

Nothing to Disclose 


Happy Snowstorm Day to you all!!!  The East Coast is being hit with a lovely storm today bringing upwards of 18 inches where I live.  I'm not going to lie to all of you, but I adore the winter and the snow.  Something about it is so peaceful.  Maybe because everyone is inside and the hustle and bustle of life just slows down a bit.  And since today is a federal holiday, it will only be the "essential" workers out on the roads making it again a little quieter.  Sure, healthcare has been a nightmare lately, but I think today will be a good day.

Today's design is a spin of one I've done the last two years, except instead of using pink, I opted for a blue design.  Then while going through my drawers, I found a glitter with blue flecks for the accent nail, and it all just came together.  I was beyond upset with this design chipped off, but I enjoyed every minute of it.

Let's take a look! 


Colors Used:
  • Color Club - Factory Girl
  • Finger Paints - Be Merry and Sparkle
  • ORLY - Liquid Vinyl

I just painted these nails a week ago, and for the life of me cannot recall what the darker blue polish is that I used for the gradient.  I'm so angry at myself over this!!!  I want to say it's one of my darker Serendipity Polish throwbacks, but who even knows anymore.  I'm telling you, I am slowly but surely losing my mind.  Regardless, the blues came together to create the most perfect blue gradient which SCREAMS winter.  My love for blue deepened after I had this beauty on my nails.


Once that gradient was dry, I went to work on the snowflake.  Not my best work but not my worst either.  I love how it turned out.  Then matched with Be Merry and Sparkle, the whole thing came together beautifully.  The pictures make the glitter look more turquoise, but I swear it was more blue tinged and paired perfectly.  I think I'll have to use it again soon.

Like it or love it?  Hate it?  

Until next time, <3.


Orly

The One With the First Snowflake Manicure of the Season

9:00:00 AM

Nothing to Disclose


Good Morning, Polished World!  How are you all doing on this cold, January morning?  Yesterday it was raining and in the 40s, and now today the high is 12 degrees and we are in a winter weather advisory.  I'm not complaining, this is typical weather for this time of year, and secretly I love the winter.  Something about the cold outdoors when it's super quiet.  It's just beautiful and peaceful.  Especially when it's snowing.  Maybe I'm the only one who feels this way.

Since I love the winter and snow so much, of course I try to paint my nails with snowflakes as much as possible this time of year.  I'm onto my third snowflake manicure, just rather delayed when it comes to posting.   Today's design is a re-creation of a simple black/silver/white snowflake design I did a few years ago.   I had quite the break on my middle finger, so I had to do something that would look good on short nails, and this was it.

Let's take a look!


Colors Used:
  • ORLY - White Tips, Liquid Vinyl, Mirrorball
Mirrorball is the best holographic polish.  I think I have about 5 bottles of this beauty in my collection because I don't want to ever run out.  Gorgeous holographic with little flecks of holo silver glitter throughout - and it created the most perfect glitter gradient on my index and pinkie finger.  Don't know why I never attempted a glitter gradient with this beauty, but now that I have, be prepared to see about 50 of them.


I love my snowflake design on my ring finger.  One of my favorite snowflakes I've ever painted.   Can I tell you that I absolutely love painting snowflakes because they don't have to be perfect?  The fact that no two snowflakes are the same really helps my OCD when it comes to painting them.

What do you think?  Fan of this manicure?

Until next time, <3.

Gradient Mani

The One With the Pink Snowflake Manicure - Take Two

9:00:00 AM

Nothing to Disclose


Good morning Polished World!  How are you all doing on this fine Tuesday?  It's the dreaded Valentine's week where I am going to attempt to be festive, but will fail miserably at it.  Honestly,  I don't think I'm going to do any pink heart nails this year.  Sorry to disappoint, but I'm truly not feeling it.  If you've been reading this blog for awhile, you know that I'm not a fan of Valentine's Day, so this shouldn't come as a huge shock.  Maybe next year, or randomly in the middle of the summer when I'm feeling like doing heart nails for no reason whatsoever.

Today's design is one I created about a year ago now.  It's probably the most festive you'll get out of me for Valentine's as it has the perfect pink gradient.  And you guessed it, it's a snowflake design.  I don't remember where I got the inspiration from for this design, but it's one of my all time favorite snowflake manicures.

Let's take a look!


Colors Used:
  • Jessica Cosmetics - Mojave Desert
  • Jessica Cosmetics - Festival Fuchsia
  • Serendipity Polish - Holoday Lights
  • Sally Hansen - Blacky-O
Isn't this manicure perfect?  I kind of want to re-create it with a blue gradient.  Although I'm burning out on the whole snowflake thing, and I'm sure you all are tired of seeing them as well!  Maybe next year.  Anyways, these two pink polishes work wonderfully to create a gradient. I started off with a base coat of Mojave Desert, the most perfect baby pink polish ever.  Two coats and you have complete coverage.  When it was dried, I took a make up sponge and dabbed on the Festival Fuchsia.


When the gradient was dry, I went through and added the snowflake with acrylics.  Yes, I cheated a bit but when creating a snowflake, I'm a tad OCD and want the art to look as perfect as possible.  As you can guess, this flake took about 5 tries to get it how it is here, and I'm still finding issues with it.

What do you think? Fan of this look?

Okay, I think I'll move on from snowflakes. Maybe I'll enter a flower phase again.

Until next time, <3.


China Glaze

The One With the Gold Snowflakes

9:00:00 AM


Good morning Polished World!  How are you all doing today?  Welcome to another Saturday!  This is actually my first Saturday off in a while and I couldn't be happier.  I shouldn't say anything because I'm going to jinx it and end up at work.  At least my nails are painted, unlike that one weekend that  I was called in and went in with naked nails.  First time in about 6 years since that's happened.

Today's nail art is by far one of my favorite designs that I've ever created.  I saw a similar design on Pinterst and knew I had to re-create it.  Now, you know me, I'm not a fan of gold, but this manicure wouldn't have looked right with silver.  Plus, in the past when I've created gold and white nail art, I've always fallen in love with the look.  Something about those two shades together just works.  This manicure is no exception.

Let's take a look!


Colors Used:
  • ORLY - White Tips
  • China Glaze - Merry Whatever
  • China Glaze - Big Hair and Bubbly
  • Faby - Panic on Wall Street
Fitting that the gold base under all that glitter is Faby "Panic on Wall Street" seeing as there was literally panic on wall street this week.  But this isn't a blog about stocks, we are here about the nail art.  Let's talk about this Faby Nail Lacquer.  I received these polishes a few years ago and used them a few times.  I'm not even sure if the company is still around, but if they are you should check them out.  This gold polish is amazing.  Two coats and you have a fabulous shimmery gold base.  When it was dried, I went through and added the two China Glaze glitters to make it really pop.

The Faby polish was perfect for nail art.  I used it with a toothpick to create the snowflake on my ring finger and thumb.  Some polishes drag, get goopy, or just are not workable for nail art, but this wasn't the case.  I'm starting to picture what other gold designs I can use it for in the future.  Oooo, maybe a waterfall design like I did on the last manicure I posted.


Best part - the glitter gradient on my index and pinkie finger.  I told you I'm low key obsessed with the glitter gradient, especially since I mastered them in the past few months.  For this one, I first used Merry Whatever as it was a finer glitter, then went through with Big Hair and Bubbly to add some random larger flecks.  Both polishes sponged on perfectly.

Saddest thing about this manicure, it only lasted two days because I am at the bottom of my white polish and it's not applying right anymore.

What do you think?  Fan of this design?  Like the gold and white?

Until next time, <3.


China Glaze

The One With a Random Snowflake Manicure

9:00:00 AM

Good Morning, Polished World!  How are you all doing today? I have finally gotten around to not only painting some nail art on my nails, but editing the photos of said nails.  I cannot for the life of me figure out why my photos like two years ago were so much better than my photos now.  I'm using the same set up, same camera, same backdrop.  I think I must have messed with a camera setting....who knows.

Anyways, today's design is a low key recreation of something I saw on Pinterest.  You know me, I had to take my own spin on it.  The original design had stamped snowflakes and I hardcore fail when it comes to nail stamping.  I've tried it dozens of times but I just don't get it.  I'll stick to toothpicks and paint brushes.

Let's take a look!


Colors Used:
  • China Glaze - Boho Blues
  • ORLY - White Tips
  • ORLY - Liquid Vinyl
  • ILNP - Mega X
Isn't this a gorgeous little manicure?  I'm especially in love with my ring finger.  For years I've attempted this waterfall look.  I've tried numerous techniques and ways to do it and failed miserably time and time again.  When I saw the original post on Pinterest, I saw the waterfall design and said to myself that I'd give it a try and if it failed,  I would just paint a snowflake on the white nail to match or do a silver accent.  Then, the unexpected happened, I did it.  I mastered the waterfall accent nail.  Just like I recently mastered the glitter gradient and am now obsessed, I'm now obsessed with this.  Fair warning, you'll be seeing more of these accents in the coming year.


Seriously though, LOOK AT THAT RING FINGER.  Ahh, so proud of myself.  Then there's my middle finger with the swirled colored snowflake.  I mixed a few colored acrylics together which gave it a more tie-dyed look than just a plain blue.  Overall, I'm happy with how it turned out, but I feel it might be an odd match up with my ring finger.  Maybe?  Ehh, it does go.

What do you think?  Fan of this manicure?  Loving Boho Blues as much as I do?

Until next time, <3

Serendipity Polish

The One With the Snowflake French Tip

9:00:00 AM

Nothing to Disclose


Good morning Polished World!  How are you all doing today?  I apologize for not having more posts up last week, but I had a really bad break on my middle finger so I'm back to swatching for a bit, and work got a little hectic.  As much as I love blogging, sometimes I need to take that step back and focus on myself.  When work gets hectic, I tend to not sleep, and it just spirals from there.  So before that spiral started, I stepped back knowing I'd be back in less time than if I let that fun little spiral of exhaustion occur.

Today's design is a cute snowflake french tip design. I did this one a few years ago and really loved it.  I always wanted to recreate it but I'm not going to lie, this design is a pain in the butt to do.  I quickly remembered that as soon as I started to paint the little snowflakes.

Let's take a look!


Colors Used:
  • Serendipity Polish - Holoday Lights
  • Acrylics
Yes, I used acrylics to do the snowflakes, but they still were a pain in the butt to paint.  Maybe it was my OCD but I couldn't get the lines just right.  They were too thick, then too thin, then they didn't look like snowflakes. I literally painted the snowflakes on my ring finger about 10 times before I settled with what you see in the photos.  We always are our toughest critics, right?


Despite the difficulties and tedious process, I truly love the look.  I think HoloDay Lights is the coolest polish for a sparkly french tip.  I dabbed a bit of a plain silver on my nail first and then went over it with Holoday Lights.  I probably could have gone without the plain silver base, but I did so because i figured it would make the glitter easier to remove.  Which, in the end, I was correct.

What do you think? Like this snowflake mani?

Until next time, <3.


ILNP

The One With the Silver and Black Snowflake Nail Art

9:00:00 AM

Good morning Polished World, and welcome to January 11th!  Can you believe we are already almost halfway through this month?  This has been a crazy first two weeks of January, but hey, we all are still here and breathing so we should be grateful.  I meant to post more last week but work got kind of crazy, then I got on an editing binge, and well, one thing led to another and here we are.

Today's design is a black and silver snowflake manicure using my FAVORITE silver holographic polish, ILNP Mega X.  As I said in my last post, I'm a little bit obsessed with the glitter gradient using these ILNP holographics.   I couldn't resist when it came to this manicure, and you'll see why.

Let's take a look!


Colors Used:
  • ILNP - Mega X
  • ORLY - Liquid Vinyl
  • Acrylic White
Isn't this manicure perfect?  I was so sad when it chipped off and I had to remove it.  Mega X is just perfect. The holo accent, the perfect gradient, the bit of sparkle it added to the snowflake; all perfection!  It was very easy to manipulate over the top of the snowflake. 


One conclusion that I've drawn regarding this manicure; I need to learn how to paint different looking snowflakes.  I literally make all my snowflakes look identical each and every time I do one of these designs.  As we all know, January and February are my months of snowflake designs, so I feel I have some time to work on this.

What do you think? Like this manicure as much as I do?

Until next time, <3.

FingerPaints

The One With the First Snowflake Manicure of Winter

9:00:00 AM

Nothing to Disclose


Good Morning, Polished World!  How are you all doing today?  It's December 4th, which means we are only 21 days away from Christmas.  I need to get my butt in gear and start doing some Christmas manicures!  I have a few ideas of what I want to create or re-create, it's just getting around to doing it!  Work has been crazy this week and I wore a swatch on my nails for most of the week, so that took away some of my Christmas design time.  Might sit down this weekend and bust through a few ideas....maybe do another nail art wheel?

In the meantime, today I'm sharing with you my first snowflake manicure of the season.  You know me and my love of snowflake nails, so of course I jumped right to it even though there was no snow on the ground yet.  Sure enough, the day after I painted them, we got our first snowfall of the season.

Let's take a look!


Colors Used:
  • FingerPaints - Sterling Sculpture
  • INM - Granite
  • ORLY - White Tips
At first I wasn't sure if I was going to like this color combination, but when it was all said and done, I was obsessed.  I forgot about how perfect of a silver glitter Sterling Sculpture is.  It contains large and small flecks, which you would assume would be impossible to remove, but shockingly it isn't.  Clearly glitter removal isn't difficult due to the size of the glitter or density, but the base itself which is practically gluing it to the nail.  Anyways, it's the perfect accent for this manicure blending the white into the dark grey. 


Short little nubby nails again due to a few breaks, but what can you do.  Back to square one of growing them out.  Despite them being short, I was able to get some pretty good detail with those snowflakes.  I think I need to switch up my snowflakes a bit this year.  Go for some different patterns.  We shall see.

What do you think?  Like this look?

Until next time, <3.


Jessica Cosmetics

The One With the Pink Snowflake Manicure

9:00:00 AM


Good morning, Polished World!  How are you doing this Wednesday morning?  It's cold and snowy yet again.  Well, it was snowy yesterday morning with that horrible "heart attack" snow that is so wet and heavy that it causes heart attacks when people try to shovel it.  Of course, I went out there and shoveled it and I swear I pulled a muscle in my back.  Hey, it's my only exercise in the winter time.  Hopefully Spring is around the corner.

Since it's snowy-ish, today I'm sharing a manicure I painted before Valentine's Day and was planning on posting it before the holiday, but of course, I didn't get around to doing so.   To be honest, I thought I had edited the post, but instead I editted some other manicure which wasn't pink and had nothing to do with winter.  Not sure what I was thinking, but oh well.  At least now I can share this cute snowflake manicure with you!

Let's take a look!


Colors Used:
  • Jessica Cosmetics - Mojave Desert
  • Jessica Cosmetics - Festival Fuschia
  • Serendipity Polish - Holoday Lights
  • ORLY - Liquid Vinyl
Isn't this manicure fabulous?  It has to be one of my all time favorites.  My gradient turned out wonderfully, the snowflake is so straight and perfect, then the accented dots?  Ahhh, I just love it all!!!  Then that silver holographic nail adds a little flare and pizazz that I feel really pulled it all together!


Jessica Cosmetics Mojave Desert was the base coat for this pink ombre look.  It's a perfect light pink polish which applies evenly in two coats.  When that base dried, I took a make up brush and added some Mojave Desert and Festival Fuchsia and dabbed it on the nail.  Sometimes two color ombres can be tricky and be too dense and not have a smooth blend, but these worked wonderfully together.  After I got the color how I wanted it, I added the snowflake design and added top coat.

What do you think?  Fan of this snowflake manicure?  Love it as much as I do?

Until next time, <3.

OPI

The One With the Re-Creation of an Old Snowflake Manicure

9:00:00 AM


Good morning Polished World!  How are you all doing on this cold, January day?  I'm low key proud of myself this month for posting as much as I have been.  As you all know, last year I took a bit of a hiatus when my life got crazy.  I didn't start painting my nails again until the Fall when life slowed down.  Now I'm finding that my biggest issue with blogging is editing the photos.  I have a lot of downtime in the evenings, so I really have no idea why I don't edit photos.  I think I got so used to not blogging that the whole idea skips my mind.  That is until I realize I have 5 posts to edit and another 4 to still share.  I'm getting there, and soon I'll be blogging like I used to....hopefully.  Despite the hiatus, I'm amazed that people are still here taking a look at my nails. My views are at an all time high since returning and I never expected that.  Thank you all for sticking around!

Again, I am proud of myself that I got back into the swing of it.  Some nights I'm more inspired than others.  Last night I just did a plain swatch because the inspiration was at a zero, but since I have so many posts to share, it didn't bother me.  I took the time to edit today's post which is a re-creation of a snowflake manicure I did a few years ago.  I loved it then and I truly still love it now.

Let's take a look!


Colors Used:
  • OPI - I Believe in Manicures
  • OPI - Champagne for Breakfast
  • ORLY - Liquid Vinyl
Could have had a manicure utilizing all OPI polishes, but no, I had to grab my beloved ORLY Liquid Vinyl.  I wonder if I even have a bottle of Black Onyx by OPI.....I should research that.  I have to ask, is it an amazing black polish?  I don't know if I can be converted from ORLY's Liquid Vinyl.  I'm getting off track; can we talk about how awesome a black accent is for this snowflake manicure?  I just love the look with the stunning blue, the holographic silver, and then the black snowflakes.


What I especially love is OPI Champagne for Breakfast.  A polishe released in 2016 as part of the Breakfast at Tiffany's holiday collection (seriously this was released 3 years ago), this polish was a liquid sand holographic silver glitter.  I love the textured polishes and OPIs take on them were fabulous.  This polish is no exception.  I think OPI needs to re-release it ASAP.

What do you think?  Fan of this look?  Love the combination?  Think I should do a more formal then and now series?

Until next time, <3.

Dot Mani

The One With the Black and White Snowflake Manicure

9:00:00 AM

Nothing to Disclose

Good morning polished world!  How are you all doing on this cold, chilly Monday morning?  I can tell you that I much rather be in bed.  Sure, I'm writing this post at midnight on the 20th, but I just know that come the time this post is published, I rather be in my warm bed than in my office.  Don't get me wrong, I love my job, but my bed is quite wonderful too.

Since it's been a snowy weekend, it's time for me to start painting snowflake nails.  I think I did a snowflake manicure back around Christmas, but I feel like that was an eternity ago that I cannot remember.  My inspiration for today's design is a kind of a re-creation of a snowflake manicure I did a few years ago.  I twisted it up a bit and added a new twist and overall love the end result.

Let's take a look!


Colors Used:
  • Serendipity Polish - Holoday Lights
  • Serendipity Polish - Building My Empire
  • Serendipity Polish - #GoalDigger
Sometimes I just have to bust out my Serendipity Polish's and reminisce about how wonderful they are.  This company was one of the only that I have ever found that had one coat coverage in their creams, making Building My Empire and #GoalDigger the best black and white polishes to ever exist.  So sad that they went out of business and that more people didn't purchase their products.


You all know how I love a good silver, black, and white manicure, and this beauty is no different.  I love how it all came together to make a sleek, snowy design.  I think the dots I created on my index and pinkie finger really tied it all together.

Love the look?  Sad Serendipity Polish isn't a thing anymore?

Until next time, <3.

Christmas

The One With the ILNP Christmas Manicure

9:00:00 AM


Good morning Polished World, and Merry Christmas!!!!  Hope you all are having a wonderful day with your loved ones!  Let us not forget all of those who are working today at hospitals, nursing homes, fire departments, and police departments!  Thank you all for your continued service to our communities.

Today's manicure was one I really was lazy about and was about two seconds from not even posting because I was just that tired from Christmas Eve to edit the photos.  The reason I forced myself to post was not only because I love the manicure, but I had to share the gorgeous ILNP Christmas polishes I bought this year.  I'm kicking myself that I didn't use them sooner.

Let's take a look!


Colors Used:
  • ILNP - Say Love
  • ILNP - Christmas Cookie
  • ILNP - Versailles 
  • ILNP - Lucky One
  • Serendipity Polish - Sunshine Rainbow
Yes, I know, I'm an idiot for covering up the beauty that is Versailles, but I wanted a little more of a glittery gem look on that nail for Christmas.  Any other time, I would have left it alone.  Two coats of that gold beauty and I had the BEST holographic gold accent.  Adding a thin coat of Sunshine Rainbow by Serendipity Polish really added a whole new dimension to the polish.  Part of me kind of wished I did an accent of Lucky One, the gorgeous green I used for the dots, but I like the gold accent.  I think it added a little something.

The main reason that I kind of kick myself that I didn't accent with Lucky One is because it probably would have blended in Christmas Cookie a tad better.  This polish though is amazing.  A white crelly with the most delicate mixture of red and green glitters.  I was so obsessed with the Say Love and Lucky One dots that I was half tempted to just do a full dotticure.  Maybe next year.


Say Love.....that gorgeous, GORGEOUS, deep red holographic polish that I have been searching years for.  This is the ABSOLUTE best Christmas red.  It reminds me of Dorothy's red ruby slippers.  It's just so flawless.  Two coats, full coverage, and just like all of Barbara's polish, the strongest holographic effect.  If the snowflake design looks familiar, it's because it is a re-creation of one of my designs from last year, just switched up all the other nails.

Looking at it again, I kind of do wish I accented with Lucky One.  Hmm.  Next year, right?

What do you think?  Loving the Versailles accent nail or do you think I should have done Lucky One?

Again, I hope you and yours have a very blessed Christmas!!

Now, onto New Years manicures.....where did my bottle of Versailles and Mega X go?

Until next time, <3.


ILNP

The One With the Christmas Snowflakes Inspired by SRG.Nails

9:00:00 AM


Good morning polished world! How are you all doing on this fine Monday?  We are in a little big of a heat wave here and the snow is all melting.   Makes sense I finally paint some snowflakes on my nails and the snow melts.  I hope that it comes back for Christmas.  Nothing is better than a white Christmas.

Today's manicure is inspired by this manicure by srg.nails on Instagram.  I'm not one for red nails, but this design I couldn't get out of my head. I just had to try it.  I busted out my red polishes and started swatching to see which was the right one for the design and settled by an oldie from Morgan Taylor.  The end result, something I completely loved!!

Let's take a look!


Colors Used:
  • Morgan Taylor - All Tango'd Up
  • ILNP - Mega X
  • Acrylic
Isn't this design perfect?! I really did not want to take off this manicure, but alas, I have to keep up on the Christmas designs for the blog.  I switched up the design a little bit and put my own spin on the snowflakes. Mainly because I attempted to paint the snowflakes just like hers but couldn't get them to look right on my nails.


All Tango'd Up is a gorgeous red polish by Morgan Taylor.  This is a brand I love but severly neglect when it comes to my blog.  Sally Beauty started carrying the line, so that means I just need to splurge and start utilizing the brand more.  Paired with ILNP Mega X, this manicure truly came together perfectly.

What do you think?  Fan of this nail art?  Love the combo?

Until next time, <3.

ILNP

The One With the Snowman and Snowflake Nail Art

9:00:00 AM


Good morning polished world!  How are you all doing today?  We are slowly thawing out after Winter Storm Harper dumped about 20 inches of snow on us.  Since the weekend, it's been super weird weather.  On Monday it was 1 degree outside with below freezing wind chill, then yesterday it was 47 degrees and raining.  Today though, we are back in the 20s with snow.  We are having some crazy weird weather.

Since the snow is back, that means I can continue on with snow themed manicures!  Today I am recreating my little snowmen who are looking up at the snow.  I did this one a few years ago after being inspired by Ruth from Ruth's Nail Art.  This is one of my most re-created manicures and actually was recently tagged in a few the other day.  It's a super cute design that is relatively easy but looks complicated.

Let's take a look!


Colors Used:
  • ILNP - Honor Roll
  • Acrylics
Cute, right??  Last time I did this manicure, I created it using Zoya Dream.  I was about to grab the bottle of Dream when I saw Honor Roll peeking out from the corner of my Melmer.  Two coats of this gorgeous navy blue holographic polish and you have the perfect wintery base for this design.


Once my base was dried, I went through and started painting the details with my acrylics.  To get the snowmen, you start with a white circle on the nail.  When the white is dried, I took an orange and added the nose.  The rest of the details were added last.  The part that took the most time was the snowflakes.  I actually am thrilled with the snowflake portion of this manicure. My lines were so straight and precise....for me at least.

What do you think?  Fan of this manicure?  Think they're cute little guys?

Until next time, <3.

Color Club

The One With the Smoosh Snowflake Manicure

9:00:00 AM


Good morning polished world!!!  How are you all doing today??  It is bitterly cold here and we are preparing for Winter Storm Harper!  We are in a weird path right now where we aren't sure if we are going to get inches of snow, or feet.  You all are going to think I'm weird, but I'm low key hoping for a few feet of snow.  I love just one big snow fall and then I'm ready for Spring.  There's something about that large snowfall covering the world in sparkly white that is just so pretty.

Since we are heading into a snow storm filled weekend, of course I am sharing with you another snowflake manicure!  This for sure is one of my favorites.  I was on Instagram and saw a smoosh manicure done by NailsUponATime.  She was inspired by a tutorial by GrapeFizzNails.  Ladies and Gents, you need to go to her instagram and take a look at that tutorial!  I have been complicating the smoosh manicure!!!  Her way is so much easier and I received a perfect smoosh every.single.time.

Let's take a look!


Colors Used:
  • Color Club - Meet Me At the Rink
  • Zoya - Dream
  • INM - Northern Lightse
  • Acrylics

Obsessing over the color combination.  I searched "blue smoosh mani" on Pinterest and came across one by my friend Sarah over at 25 Sweet Peas which I had to re-create.  She used two Zoyas, whereas I don't have two Zoyas which would have worked, but I did have Dream which made life perfect.  After painting my nails with two coats of Meet Me at the Rink, I followed GrapeFizzNails tutorial using Meet Me at the Rink and Dream.


Once the nails were smooshed, I went over it with a light coat of INM Northern Lights which really made the base pop and added to the sparkle of Dream.  I then went through with acrylic and drew on the snowflakes, which took me forever.  My OCD was in overdrive with these because I wanted them to look perfect on top of this perfect, gorgeous smoosh base.

What do you think? Fan of this manicure?  Loving the smoosh?

See you soon with another snowflake manicure!!!  To all those going to be affected by Winter Storm Harper, stay safe!

Until next time, <3.

China Glaze

The One With the Glittery Tipped Snowflake Manicure

9:00:00 AM


Hey polished world and Happy Sunday to you all!  I meant to have a post up yesterday but my Friday was crazy as crazy can be.  I worked an eleven hour day, which didn't stop when I got home.  So really, you could say I worked 12 hours.  Which let's face it, no one wants to do that on a Friday.  Although, I will say I didn't mind being indoors for all those hours because it was only about 19 degrees outside on Friday.

So, remember last post how I said I'm feeling all things snowflake since it finally feels like winter?  Well, today I'm bringing you another snowflake manicure!  This one is inspired by one NailStorming did and I fell in love with.  A gorgeous silver sponged glittery tip with snowflakes drawn over the top.  While I like the manicure, I still think her's is better.

We will let you be the judge though. Let's take a look!


Colors Used:
  • INM - Northern Lights
  • OPI - This Crown Needs a Gown
  • China Glaze - Disco Ball Drop
Alright, it's kind of grown on me since I did it the other night.  I did love the gradient I did using This Crown Needs a Gown and Disco Ball Drop.  This Crown Needs a Gown is one of my all time favorite silver polishes and I really wish OPI would re-release it.  It's such a shimmery metallic silver polish that has the most gorgeous satin finish.  If anyone has any idea where I can grab more bottles, let me know!

Once I had the sponged silver on the nail, I then went through and added Disco Ball Drop.  The pictures didn't capture this gorgeous glitter, but in real life my nails are sparkling thanks to this holographic silver glitter!  I'm not going to lie, I completely forgot I owned this polish.  I'm going to have to put it on top of everything so I never forget about it again.


After the gradient was just how I liked it, I went through with acrylics and added the snowflakes.  I love the white flakes, but I feel like the blue is a little out of place.  NailStorming did pink snowflakes on hers, and I'm not a huge pink fan, so that's why I opted for blue.  Also, I felt that blue was more winter-like.  I think if I were to re-create this design, I would only do white snowflakes or an even lighter blue.

What do you think?  Should I have not gone with blue?

Until next time, you know....when I probably have another snowflake manicure to share with you. <3.


Orly

The One With the First Snowflake Manicure of the Year

9:00:00 AM


Hey everyone!!!  How are you all doing today?  It's Thursday and boy is this week dragging!!  It was about 11am yesterday and I thought that it was 5pm.  Alas, it was 11am and I had a day full still of work, meetings, and more work.  I feel life gets like that right before the weather changes, and that's exactly what it's doing here!  The other day it was in the high 40s, now it's in the 20s and we have snow. 

I'm not going to lie, we haven't had a lot of snow yet this winter season and it's been kind of sad to me.  I love at least one good snow storm.  A foot or two of white, sparkly snow covering the ground, all the branches outlined in white.....it's just so gorgeous.

The other thing I love about snow is snowflake nail art!!  I feel weird painting snowflakes on my nails when it's gloomy with no snow.  So be prepared, I have a feeling that I'm going to be doing a few snowflake designs until this accumulation melts.  Now knowing where I live and how the weather goes, that will be by the weekend.  Sigh.

Until then, let's take a look at today's snowflake design!


Colors Used:
  • ORLY - White Tips
  • ORLY - Liquid Vinyl
  • ORLY - Mirrorball
Not going to lie, I'm kind of obsessing over black, white, and holographic silver nails lately.  Right before the New Year I posted a black, white, and silver holo heart design, then I ended up painting this one right after it, and then after this one I painted yet another silver, black, and white design which is probably my favorite manicure EVER.   But, you'll have to wait to see that one.....


I really loved this manicure, especially the dots on the index and pinkie finger.  I feel that it really felt like falling snow, and it tied in the white ring finger so well.  I also loved how the silver accent was just that, a silver accent.  It wasn't at all on the other nails, but tied the manicure together so well.

What do you think?  Fan of this look?  Anyone else like the black, white, and silver nails?

Until next time, <3.

#SallySquad

The One With the Snowflakes and Candy Cane Nail Art

9:00:00 AM


Good morning polished world!!  How are you doing today?  It's Wednesday, middle of the week, so close but still so far from Christmas.  I just painted my next Christmas manicure and I'm not feeling it, but we will talk about it on that post.  I'm just annoyed by it so I had to mention it here!

Anyways, today's manicure I did like but it didn't photograph 100% how I wanted it to.  Mainly because the green was gorgeously dark that it photographed almost to be black.  It matched the candy cane dress I wore to a work Christmas event perfectly though, and the dress was a lighter green.  My camera just loves me so much sometimes.

Let's take a look!


Colors Used:
  • Sally Hansen - Jealous Boyfriend
  • Sally Hansen - Can't Beet Royalty
  • ORLY - White Tips
I cheated using an ORLY when reviewing Sally Hansen Miracle Gels, but I don't own a Miracle Gel in white!!  Does that even exist?  If it does, I need to get my hands on it!!!

Let's talk about Jealous Boyfriend by Sally Hansen.  GORGEOUS dark green polish which covered completely in two coats.  Absolutely am in love with this color and am kicking myself that it didn't photograph perfectly.  It's so brilliant and I am so happy to have this polish in my collection.

Can't Beet Royalty is a gorgeous red, and I don't say that much about red polish.  Only one coat over the tape to get the candy cane look.  As you can see, it didn't even bleed under the tape, which means it's amazingly perfect for nail art.

What do you think?  Like this look??

Wait until tomorrow when you see it with a matte top coat!!!  Yup, that's right, Sally Hansen has a Miracle Gel Matte!!!

Until next time, <3.